
Der_Hannes
-
Posts
65 -
Joined
-
Last visited
Content Type
Profiles
Forums
Articles
Gallery
Downloads
Events
Everything posted by Der_Hannes
-
Hi! that's a proper vise! Only one part is missing! there are two holes (or at least one) where the thread goes in one jaw, to hold a part that moves with the crank when the jaws open. The vise is in a very good condition, to keep it that way i would try to get the missing part (actual two parts a bowl and a fitting part of a ball)
-
At least two stools or a proper seat, a tray of beer and snuff tobaco. When you finished work at a hammer in or just with a coworker, to sit down and relax, have a chat about the project or life itself, look at the project and let the day end properly.
-
Hello! I like Stick Welding, because of the few amount it takes to get everything you need... no bottles and stuff like that. But i had a problem for a long time. I don't know why, but i couldn't get a propper chipping hammer. The store bought used to get butt/bluff very soon. So i did some chipping hammers myself. It is also an evolution of tooling. First one ( also one of my first forged piece ;) ) it works very good... just show it to the weldseam and the slag goes away by itself. second one: A bit later as the formerly weighs about a ton. Head out of high carbon steel. And the one i 'm using now. i choose a wooden handle to safe weight as i need to carry my stuff from installation to installation. i'm quite happy to get this one... working pretty well. I hope you also got some selfmade chipping hammers and might share them! Greetz, Hannes
-
Portable Blacksmithing Toolbox
Der_Hannes replied to Trilliumforge's topic in Tools, general discussion
Servus again! a while after posting my Rucksack-Toolbox i saw this Hilti Toolbox at the flea market. Made in the 50's for captive bolt-pistol. When i saw it i knew thas this is gonna be my toolbox, but i might have to change the size of my tools to fit in. But it did work. This is my daily setup. Underneath the orange cover is space for magazines or plans and sketches. Chisel and punches Safety department ( goggles, a bag, gloves, not in the picture but also a set of earplugs) Heart of my toolbox ( 1,5Kg hammer, engineers hammer, wirebrushes, cutting and grinding discs, chalk) Tongs ( all cut down to fit inside, quite short sometime but they work fine, also tong clips, rivets, claws, a adjustable Wrench in a extremely good condition by my grandfather, and a good file) these are following the toolbox, either in my rucksack or in the trunk. ( sledge 3Kgs, hammer eye chisel) and a small 1,25 kg ferriers hammer i did to test hammermaking. that's my current setup if i know i'm going to do different stuff i change the tools. Greetz, Hannes -
@VaughnT: Thanks! @arkie: Reason for my bolt choice was -> i had them on hand ;) Same for the tear sheet metal. first i thought about sink-head bolts and add small welding to lower the profile very much, or just shoot some bolts on the other side, but as they get hot and dirty i sure gonna have to remove them quite often. Gruß, Hannes
-
Servus! I want to widen a blacksmithing network in my near environment, because i like smithing in different workshops. See what's new in their workshop, chat about recent success or failure... new tools and stuff like that. So i made a friend addict which wasn't into blacksmithing. As he has not the possibility to forge at home because of having not the required tools, we met and did some basic fire tools. Yesterday we met again to built a brake disc forge so that he can start forging at home immediately. Only thing i knew before starting was, that it should be demountable because of transport and space and a brake disc was the place to put the fire in. With planning and building it took 3 hours to achieve that one ( arms and legs were rotating discs ;) ) The whole forge can be dismounted with a 17mm spanner and a hex wrench Nr. 8 i should have taken more time in searching for examples because this the first forge i was building, but i hope it will do it's job. Function to fit in a small trunk is already there. I hope the oppurtunity to test the forge will be soon! Gruß, Hannes
-
Servus! As i have the goal to achieve the goal to make a tong (one day) which is good enough to sell to get myself the award of a stylized tattoo, i trained and played around with tong for a while now. Especially when i lost my favourite spring steel tong i made a long while ago and served me well. I always loved wolf jawish tongs as they can grab stuff sideways.... but the different diameter arent kept that strong and have the oppurtunity to bounce in the jaw. First i thought about shortening one jaw to get a smaller surface on the upper part holding strong against the jaw beyond. But this would only work with a pretty small amount of stock. The tongs i have lost was a bit like Pelgroms tong but a bit shorter jaws to achieve more grabbing power. I loved them as they are so multi purposed, but couldn't handle stock sideways. So i decided to mix both up and form something like a egg-laying-wool-milk-pig. It's just a prototype out of mild steel but works pretty good so far... takes 8mm round stock to 22 mm square stock propper straight and rectangular. The next set will have the rectangular gap a bit more centered and the bow will also end round about in the middle. The evacuation of the rectangular gaps are volitional to grab the different stock sizes. the upper jaw is slight aslope to get a small surface area. Maybe there are already those tongs out there, and i did all the thinking for nothing, but it was fun anyway. and i finaly did my first set of flat jaw tongs also: Greetz, Hannes
-
Hi oldanvilyoungsmith! Your vise came out very well. I wouldn't suggest to paint it at all. Now it has got a very nice surface and overall look. Just add a Layer of Owatrol oil which works very good or maybe linseed oil for sealing. Greetz, Hannes
-
Show me your anvil stands
Der_Hannes replied to pkrankow's topic in Stands for Anvils, Swage Blocks, etc
I have built that one some time ago, as my older wooden stand was used to make sheet metal bending work and has no real straight surface. That stand is for my 71,5 Kg Söding und Halbach Anvil. Plate is 2cm thick (and stiffed by 60x15mm flat bar) and legs are T 80x60x8 mm. That is my first metal stand and i never forged on one before ( that was one of the reasons why i didn't just take another wooden stand) i have also got a 6mm Polyurethan sheet as layer between anvil and stand. the holes and some threads are there to put some tools in and adjust them as i need them... i tried to keep it as modular as possible. Pictures are from my balcony and today it will be brought to my base smithy... jepp i'm very excited! ;) -
Portable Blacksmithing Toolbox
Der_Hannes replied to Trilliumforge's topic in Tools, general discussion
Frosty: a bit Off- Topic but.... As i was at the barber shop (for a propper 50's Haircut) and the hairdresser girl asked me if i wanted some cockgrease in my hair i almost soiled myself laughing. i really like the wordplay. It is not a real translation because it is already english doesn't mean anything in german. As i store most of my smaller tools in tin boxes and i needed new pomade i got two tins. Plus: leftover pomade prevent bolts from rusting! It's pretty expensive in germany because of shipping and taxes. It might be cheaper, ordering from their shop: Greetz, Hannes -
Portable Blacksmithing Toolbox
Der_Hannes replied to Trilliumforge's topic in Tools, general discussion
Hi Sean! Great you opened this thread. I've got almost the same problem. 4 Coalforges to run with alot of room in between. You have got a very fine list of items. I try to keep it as simple and lightweight as possible. This my setup so far: Toolbox is a German mountain Infantry Rucksack. It's pretty tough and takes what comes around. In the backcase is a newspaper to start fire and prevent tools to ruin my back. Hammers: 1Kg Hammer, 0,5 Kg Engineerhammer, 1,5Kg smithing hammer made by "Krenzer Werkzeugfabrik" Left glove, a box of splints, bolts and wedges. Pelgrom style tongs, hatchet, a Zip-Loc with fire setting. and some other tools, like hotcut and chisels Soon there will be more tools. Especially one Brazeal styled hardy hot cut and a hammer eye punch... when my skills are so far. And my carrying system will be changed to a selfmade box with tong as handle. Greetz, Hannes -
Frosty the Lucky: Thanks for the kind words. I guess i have to start getting children to pass my hatchet Mike: Thanks. Material was square 50x20x80 mm -> 2x0,8 2x3,15 " ianinsa: Thanks!
-
Servus! Some time ago i went to a masterschool comrade as he asked me if would like to help him forging some hatchets for a hunting show. It was a great Deal for me as i learned alot. All blacksmithing i did so far was learned by reading or watching videos and it was a big difference to be taught how to do it right. We did 6 hatchets that day. At every step i helped with the first 5 ones and the sixth was my own. Hatchets are complete C 60 so no cutting steel inlet is necessary. Because of the tough material you can use the back as a hammer too, without getting mushroom soon or destroying the eye. Hardening was great to see, how exact he was able to set the heating colours on the blade. I'm still in love with this small hatchet as it takes what comes along. It is pretty handy and fits in nearly all types of backpacks. My anvil stump was full of metall splinters, nails and round material, but the hatchet did a great job in getting a new form to the stump without resharpening. Even my fiskars X 7 had soon to be resharped and i needed to grind the notches away. Greetz, Hannes
-
Okay, i hope this will work.... The two missing pictures. In a real good condition, even the spring works.
-
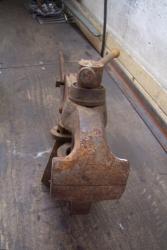
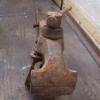
Servus again! It has been a while... As i have got to learn for my Masterdegree tests, i was looking for real important things on the internet which couldn't wait till i finished learning ;) So i found this little Baby: 6,3" (160mm) Jaw width. 57 Kg for 30 Euros :D odd... i can't upload the other two pictures.... Error 403 !? Called the owner and as he told me the width i already sat in my car. I asked him for further tools and he told me he has got a car jack for a unimog with 5tons capability. He wanted 20 Euros so i am now a proud owner of a powerfull bridging tool. I also got a new Vise which i can't identify: It ' s almost the same as a Matador vise but it's got some differences. It is no low quality stuff like those wannabe hardware store vises but i can't find the manufacuterer. Even the older Peddinghaus / Matador/ Garant vises are quite similiar, but always have a detail which won't fit. Jaw width 4,5" -> 115 mm and weighs around 10 Kgs. Greetz, Hannes
-
"Splatter/Splash" effect on finished product?
Der_Hannes replied to Grymm's topic in Problem Solving
I used thinned glue, put a brush in and threw the glue in Knife's direction. This will perform the splatter effect. Then you have to let it dry and put the Blade in " chemical black finishing" ( i don't know the english word... the stuff like Gunblue) It worked well for me... i used it on my modified opinel knife ( not the one i'm eating with... pretty toxic ) Mustard should work to. -
Hi! When i saw the first picture in this topic, http://www.iforgeiron.com/topic/32500-show-me-your-portable-demo-vise-stand/ i wanted to built one myself. I didn't want the chain, it seems to unstable to me. I prefere a fix system with three legs. With three legs i also decided to use a round pipe as center post. Planing phase was pretty short. - Should have handles - Foot plate for making it more stable - foldable - as light as possible The stand will be fitting for my small 3" Leg Vise. The vise itself is in my parents house so i just built the carrying system. My first vise stands were a bit to low so i added a extension for the leg and made the center post a bit longer. First planing stage with just tack welded parts Some time playing around the parts fitted and i did the missing ones. I wanted to add some tools to my carrier plate and because i'm working alot with 120° parts i added some circles and the angles. Three M10 threads will help me add some additives. It took me 5 hours with basic planning to get to this point. and folded down I guess it may take a while to get to the leg vise and finish the project and start a new one ( maybe a foldable small forge... so i can put all my smithing stuff in my fiesta's trunk ;) ) Greetz, Hannes
-
Hi ndnchf! Thank you very much for sharing those pictures! I have got the same problem and still having some vises laying around without stands. Do you have any further pictures or detail shots of the blacksmith's vise? I hope the Blacksmith from Civil War reeneactment will show up.
-
Hi Klammer! Congrats to your Vise! Shape looks good and spring seems to work! I can't help you identifying the vise, but for Oil or grease it also depends on the vise location. Most of my restored vises get an overall coat of ballistol oil and the ones used indoors a mix of ballistol and "elf graisse multi". It works fine and doesn't tend to much to collect dirt. For very rusted and scar covered vises and the ones that will stay outdoors, i use a grease for military helicopters with molybdenum and graphit... some kind of molycote. It fills the gaps very well and work a long time before you have to renew the coat. I put it on every moving part and it also has a quite good durability in rainy areas.
-
Awesome! Thank you very much for sharing! That´s one big hammerhead. Nice shape and it came out perfect after polishing. In Germany the square headed sledge hammers are most common and i was searching a long while for a round shaped one. Now i guess i have to try one myself ;) How was the Heat treating? Rotating hammerhead or did you harden one side and then the other?
-
Wow that´s a great idea! Thanks for sharing. time to collect spare iron sheets.
-
I did my first spring replacement long time before knowing this forum or other vises. First spring was made of a 4mm spring wire. i bent both ends to 90° . Then i put one half in a vise and bent the spring to about 30° . Now it should look like a V with bent ends. The i opened the jaws and put the spring in place ( V upside down) . the bent ends keeps position and the v Part is strong enough to keep the jaws seperated. It works 3 years for me now. Maybe not the prettiest option but takes almost no place and is easy to do. It also doesn´t reqire a mounting plate which holds the spring. The part is in the right upper corner. Greetz, Hannes
-
Hi Johndeere, Here are two topics which solve all your Vise problems: ( At least they solved mine ) http://www.iforgeiron.com/topic/28479-how-i-forged-a-new-spring-for-my-leg-vise/ http://www.iforgeiron.com/topic/16880-question-on-repairing-the-screwbox-on-a-post-vise/?&hl=%20thread%20%20screwbox There is also a thread where a new mount was made. I can't find it right now, but i would suggest looking for this thread. the new mount will help to hold the spring in place. Screw and box are looking good, nice vise! Any Stamps or marks on it? Dimension of jaws? Greetz, Hannes
-
Servus again! This is another vise i repaired for the smithy i work for. I also took some time to built the visestand. It's the prototype of the one i will built for my own smithy. Plate is a 500x500x20mm Steelplate which has enough weight to handle it stable. Vise is 120mm/ 4,7" . Pretty good condition, i only had to reforge the spring and clean screw and screwbox. And good news: I just won an auction for another Leg Vise and can get it tomorrow. Greetz, Hannes
-
Hi again! Yesterday i was lucky to get some time for smithing. I took a wirebrush and removed alot of dirt and paint to get a nice shot of the anvils' manufacture. Interessting: Facts i was told weren't right. It's a "Söding und Halbach" Anvil, built 1925 and weights just 71,5 KG instead of 78KG Stamp in the middle says " Vergiss mein nicht" ("Forget-me-not" ) with the flower itself. But still a great one and i enjoy smithing with it alot!