Keith Rider
Members
-
Joined
-
Last visited
Everything posted by Keith Rider
-
Do an advanced search on Ebay for completed listings only. That way you can see a record of actual sale prices, not just asking prices.
-
I noticed a little oil weaping out of a crack when I tempered it, so I had to do some more grinding and welding. After heat treating a second time I used Jeff's method of floor annealing upside down, aligned with magnetic north. Shoot, Jeff, was it supposed to be magnetic north or true north? I need that good mojo.
-
njfarmer -- It is never too late to learn; school me! This is not on a standard 3pt hitch, though. It is a sub-zero size hitch made by sears for garden tractors. It really only has two adjustments; there is a turnbuckle on the left lift arm so that you can level the plow left/right and the top link length can be changed to level the plow fore/aft. I did set the point down a little for some suction, maybe a little too much, about 1/4". We have red clay here, not Garden State sand, but my garden soil is dark and light from all the compost that the chickens worked in for me over the course of five years. They can work 6" of chopped leaves into 2" of nice soil in about 6 months. I only need the plow to turn under sod and weeds otherwise I would just use a cultivator. Dave -- I've never tried hardfacing. The catalog descriptions of the rod make it sound difficult. Thanks for the compliments on my welding. Truth be told, I'm a poor welder but a patient grinder. :)
-
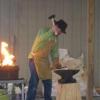
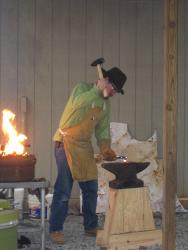
The pieces that I added to the moldboard are along the top edge and the right side. The bottom-landside corner of the moldboard is on the right in the picture. It wasn't modified because it still needs to mate with the top of the share. The new point is on the share in the foreground. You can't tell that it is new in the picture because there is an even shine on everything, but it is about 1" longer and is sharp. The landside is fine other than some rust. It is at least four times thicker than the other parts. I'd expect it to outlast several points.
-
I'm working on repairing a worn out garden plow and need some help. This is a small garden plow from Sears. It was pretty badly worn then it was in a structure fire, so it was in bad shape. It also only cut a 7" wide furrow and I need a 9" furrow to fit the right rear tire on my tractor. I took a bunch of measurements of the share and did my best to sketch out what it looked like when it was new. What you see in the picture is my best effort to put on a new point shaped like the original and I also added an extra bit at the heel to widen the furrow. Both pieces were forged from a piece of Jeep leaf-spring from the junkyard. The share started out very hard - a file could scratch it but you couldn't really remove much metal. I annealed the whole thing and welded on the repairs with 6010 and 6013 rod. (I read all of the online books about old school plow repair and forge welding on new points, but that is way above my skill level.) The welds must be good because they stood up to some post-weld forging that would have strained them a lot. Since the original share was hard, I annealed again then hardened at a red heat in oil. The old books cover case hardening shares, but there is nothing about tempering. This thing is now glass-hard and I think that it needs tempering. At what temperature should I temper this thing? I forgot to mention that I will be doing the tempering in an electric pottery kiln with good temperature control and an accurate thermocouple. My plan is to put the share in cold then ramp up slowly to about 550F, hold for an hour, then let it cool for a few more hours. The temperature and time are what I need your help with. This plow is going to be used in fairly mellow soil without big rocks. Light duty for a real plow. I don't want to risk having the share too brittle and breaking off the point, though. The thing leaning up against the beam in the picture is the partially rebuilt moldboard. It needs to be a bit taller and wider, so I forged mild steel bar to match the curves and welded them on. It still needs trimming and some finish work. The moldboard was every bit as hard as the share, but I don't have any way to reharden it, so it will just have to stay soft.
-
Some things that I made with my first coal forge. The hot cut and fuller have 1 1/8" shanks - sort of an oddball size apparently. Lucky for me the piece of axle that I had dressed down to just a bit over size when I squared it up. I don't have the arm that it would take to draw out stock that big. The plain tongs started out as 3/4" round; I drew out the reins by hand. I should have practiced that first; it is easy to spend twice the energy and work half as fast just by using the wrong technique. Now I know. The big goosenecks are from 1"x1/2" stock with 1/2" round handles welded on. I wanted to do a forge weld, but I just don't have the time to invest on practice. For this set I just upset the 1/2" stock a bit, squared it up, made a short taper, then torch welded it. After building up the weld a little over size I heated it up in the forge and dressed it down
-
The blade taper is important for a single iron held in place with a wooden wedge. The tapered blade will hold without slipping even when the wedge is gently tapped in. If you use a constant thickness blade the wedge will need to be knocked in hard and then you can't adjust the blade position left and right as easily. Lots of old wooden planes have cracked sides from someone knocking the wedge in tight then whacking the side of the blade hard to adjust it. If it was me I would make the blade first and then make the wooden wedge to match the blade. That way you can concentrate on making nice smooth surfaces and don't have to worry about getting a particular angle for the taper. Shaving down the wedge to make a perfect fit is easy compared to fooling with calipers on a red hot piece of steel. The blade width just needs to be narrow enough to clear the sides of the plane with some clearance for adjustment. The most efficent way to get the width right is probably cutting a tapered blank so that you can draw it out width-wise and end up with a roughly constant width blade. Grinding or filing could be optional if the forge work was neat enough.
-
The welding video makes is look so easy. I swear I have done that a hundred times -- no luck. One of the comments suggested that his methods were not the best way to learn to weld. The poster seemed to suggest that the no-flux, sparking-heat welding was somehow inferior. What is wrong with it? That is a totally honest question.
-
My wife got me an O/A kit for Xmas one year. I had so much fun fooling around with it that I decided to take on a big project and built a garden tractor from junk car parts. The whole thing is done with the torch -- you should have seen the look I got at the welding shop when I told him I wanted to buy 3/16" filler rod to torch weld 3/8" angle iron. He ended up selling me the box of rod at scrap prices because it had been in the inventory for so long. I even cut down the rear axle from a pickup and narrowed it to 48" which pushed my O/A skills to their limit. My school bought a nice Miller MIG -- almost no learning curve for that. Just turn it on and paint metal where you want it. Last year I got my first stick welder, a 200A inverter that draws 40A/220V. Stick is harder for me than O/A if the material is thin. A 200A stick welder is so handy, though. I can make strong, functional stuff with it, but the welds are often ugly. Someday I will sign up for a community college class and figure out how to do higher quality work. I feel like I could learn a lot faster now that I have the basics down.
-
I can't stand the idea of remaining ignorant of something like arc welding for the purpose of maintaining the purity of my craft. I want to be able to do it all with a reasonable level of skill. My personal goal is to master the widest possible range of skills. The list of things I want to do is always getting wider, never narrower. Narrowness is to be avoided at all costs.
-
Well done. I like the short handles. Most come with a long handle that is mostly in the way. Are you going to make a shaving horse? In German I think it is called a "dummkopf" bench. It is amazing how fast and accurate you can be with a drawknife and shaving horse.
- 11 replies
-
- draw knife
- blade
- tool
- carpenter
-
Tagged with:
-
Won't the wedge-shape shank let it wobble in the hole? Is it possible to wedge it into the hole so hard that it gets stuck or strains the anvil? Sometimes I see pictures of anvils that have the heel broken off right at the hardie hole. I wonder if it is from the wedging action of a tapered shank. I just made a cut off hardie and a bottom fuller and assumed that they needed to have parallel sided shanks with a collar to rest on the anvil face. Upsetting a substantial collar was very hard for me - the tapered style would be easier. My hole is 1 1/8", so I started with 1 1/4" round stock, squared it up for the shank, and dressed it down for slip fit. I stuck it in the hole and whaled away with an 8 lb sledge to upset it. At first the edges of the hole curled off shavings from the sides of the shank, but after a little while the top part diameter widened out to make a little shoulder. I couldn't get it very big, though. At a certain point I ran out of steam and gave up. It works fine, but I envisioned something with a distinct collar like the one you made. You made a nice looking tool, but I prefer the curved edge. With the curved edge your hammer face can come down little bit tilted and it still won't hit the cutting edge. Seems like the straight edge would be a lot less forgiving.
-
Be sure to do a good job with the house wrap and weather stripping. Here in VA we have the same heat and humidity as the Panhandle, but it just lasts for one month rather than three. My first shop was all mold, mildew, termites, and vermin -- the cracks let everything in. The new shop is comfortable enough to live in year-round with the same AC gear. The only difference is better sealing.
-
I got a couple of welds to stick yesterday, but couldn't get past the tack weld stage. Frustrating because I assumed that I was home free once everthing was tacked. Some of my proto-welds were pretty strong, but they all came apart after enough beating. The weld surfaces were a smooth, uniform gray color with little round shiny spots where the tack welds were holding. My best luck was with pieces that I heated up while I was rubbing them together. When they got sticky I reached into the fire and squeezed them together with tongs to get the tack weld. Two welding heats later the welds looked good from the outside, but failed the cold bend test. Same results with some rebar that I tried. The only difference is that rebar leaves a distinctive mark when you fumble the tongs and drop a piece then try to pick it up barehanded.
-
Nickel plate and zinc plate are easy to tell apart. Zinc comes right off in an acid bath and makes a white oxide when it is heated in air. Nickel is acid resistant and makes a green oxide. These used to be old ring-stands from a chemistry lab, which is why they nickel plated them. The acid vapor would take the galvinizing right off but it takes about 20 years to go through the nickel. This stock was nickel plated about 40 years ago and used in a lab with very bad ventilation and worse humiditiy control, so there isn't very much nickel left. I've gotten some good tips here so I'll give it another try this weekend.
-
evfreek -- I have an O/A torch and a stick welder and can make welds with either one that will not peel apart. I wouldn't be happy with a weld that could be pryed apart at the seam because I know I can do better than that. If it needed to look forge-welded and I needed it done today I'd do it with the O/A then heat it up in the forge and dress the weld to match the rest of the piece. I'll try the coat hanger stickyness test tomorrow. Give us some details of your observations for comparison.
-
Butter melting in the sun . . . I definitely need to have the shades on next time.
-
I tried a couple of welds recently and failed; perhaps you all can help. My objective was to fold over the end of a 1/2" diameter round bar (mild steel) and weld it to itself. I assumed that two round sections would come together in the middle first and that would allow the slag to squeeze out the sides so that it wouldn't get trapped. Would it be better to square it up first so that the surfaces that are coming together are almost flat? Maybe that has nothing to do with the failure so I'll give you the details and you can tell me where to go next. The stock was once nickel plated, but almost all the plating is gone and replaced with light rust. I heated it gently until the nickel oxidized to green nickel(II) oxide, brushed off the oxide, then reheated to orange to bend. During the bending there was clearly a continuous layer of scale flaking off, so I don't think that any of the nickel still remained on the surface to mess things up. I bent the last 3" of the bar around and brushed off the scale just before I closed it up and brought the two parts together. Then I spooned on some borax at a dull red heat until the whole joint was coated. Back into the fire . . . this might be where things went wrong. My forge is plenty deep enough to do a deep fire. I've been using about 4" of coke under the work and 2" of coke above -- if I needed to I could get almost 8" of fire under the work, but that would be a coal gobbling monster. Do I need to get every scrap of green coal out of the forge? When I rake fuel on top of the work I try to sort out the green stuff, but there is certainly a little under-coked stuff that gets mixed in. I figure the fuel on top of the work is "down wind" of the steel and isn't as likely to contaminate the weld. When I pulled out my work it was to bright to see clearly. (I don't mean the sunlight was too bright, the forge is in the shade.) There were sparks shooting out from the time I pulled it out of the fire until I set it down on the anvil. The first three or four licks with the hammer sent liquid slag spraying out like I expected. Does that sound too hot? Next time I'm going to use tinted glasses so that I can get a good look at the surface to see if it is melting. Have you ever rubbed two pieces together while they are in the fire? Should you be able to feel when they start to stick when you hit the welding temperature? Seems like it might be an instructive experiment. I can probably get some pictures of the failed welds this weekend. They looked pretty good -- I dressed the doubled part to a square cross-section with a small visible seam. Cold-bending undid the weld entirely, though. Once the first bit of the seam opened up I was able to drive it down on the corner of the anvil and the whole seam opened up. It didn't weld any part of the seam really; the inside was rough gray scale. Thanks for reading all this and trying to help
-
The ID is about 16" - it holds about 40 lbs of coal. I also build a 20"x14" table on the side so I do have a place to put some hot coke if I need to. The table is angle iron with a sheet metal bottom. The angle on the sides of the table is pointing up so that it makes a lip on the edge of the table to contain the coal or coke. The pieces on the table are the leftover andiron bits after I cut out the middle section to make the tuyere. The air inlet and ash dump are made from 3" stainless steel DWV pipe from a chemistry lab. It was supposed to be acid resistant, but it only works if you install it right. The contractor installed it with some low spots that collected waste and allowed the acid to eat through. The holes were small pinholes, so I brazed them up. The box with the knob on it is a router speed controller connected to a shop vac. The medium to medium-low range is about right. On full blast the thing looks like a volcano on the Discovery Channel. Project number one is a set of tongs. Before spring I need to figure out a way to repoint a plow. In between who knows what I'll do. Right now I'm just enjoying the sight of man's strongest materials bending to my will.
-
I ended up doing the notch with a power hacksaw and a grinder with a cutoff wheel. You only need to cut part way through on the bottom of the notch so that the cast iron will break off in a straight line. No problem. I ended up notching down to 5 1/2" above the tuyere - when I post the pictures you'll see why. There is a thick ring on the outside of the brake drum that I wanted to leave intact. The tuyere is a 9"x3" piece of a cast iron fireplace andiron. Given the dimesions you can imagine the size of the fire - huge. The only problem I had during the test run yesterday (other than a too big fire) was the massive clinker that formed way down under all that fire. I had to break down the whole mess to get it out. If I use 1/16" steel sheet to block off the ends of the tuyere and make a smaller fire is the clinker going to stick to it and make it impossible to get out? I was heating up 10 to 12" of 3/4" round on each heat, which is more than I can draw out before it cools off, so I want to shrink the fire down to only heat 6" at a time.
-
Sure wish I read Frosty's post 24 hours ago. I just packed the bottom of my forge with clay/sand that was far too wet. Good thing the raw materials are cheap.
-
I think it would be simpler to make it so that the first bucket pumps air into the second bucket and the static water pressure pushes the air out of the second bucket into the forge. The action would be similar to an old-fashioned bellows, but the water pressure would take the role of the bricks that usually ride on top of the bellows. Still super-simple. The only drawback would be the size and weight of two big drums of water. In lots of applications that wouldn't be a problem, though.
-
-
I've never heard of it before, but it sounds simple enough. Probably use a big drum full of water with an open top; a smaller bucket goes in the water up side down. The smaller bucket will need two openings in it, one inlet and one outlet. The inlet port would just have a flap valve on it for one way air flow into the bucket. The outlet port needs a one way valve and a hose attachment. The smaller bucket will need to be attached to a lever arm so that you can pump it up and down. The air will be pushed out of the hose on the down stroke and sucked in the inlet on the up stroke. Send us a picture if you make one.
-
I'm working on my second forge, but it will be my first good setup. I need some advise on how deep I should make it. I read one article that said 7" from the workpiece to the tuyere with 2" of coal on top of the workpiece. Others on this board have said 4" between the work and tuyere. My forge is from a 10" deep drum, so I mounted the tuyere 2 1/2" from the bottom and will cut a pair of notches in the top to bring the work down a bit. The area around the air pipe is covered over with some heavy sheet metal so that I can pack clay all around and make the bottom slope down to the tuyere. How deep should I cut the notches? I'm considering cutting them down about 3" and welding ears on them so that they can be slipped temporarily back into place. Details - the drum is ~80 lbs, supported on a three leg stand made of angle iron and pipe, air pipe is 3" stainless steel, air source is a shop vac with a router speed controller.