
MLMartin
-
Posts
1,120 -
Joined
-
Last visited
Content Type
Profiles
Forums
Articles
Gallery
Downloads
Events
Everything posted by MLMartin
-
re temper the leg??? the whole vice except the end of the jaws are wrought iron, wrought iron does not have enough carbon to really hold any type of temper. the jaws do have bits of tool steel welded into them and they are tempered, but the rest of the vice is not. i did not heat up the jaws any so the temper should be fine on them. we just let the leg cool nateral, no need for any tempering
-
500 lb. Bradley
MLMartin replied to Dillon Sculpture's topic in Power Hammers, Treadle Hammers, Olivers
Im glad to see ya have your hammer running, I hope i can come by and see it some time over the holidays when im home! Mackenzie and after that we need to ride the bikes back up to the Mts -
never herd of this brand, maker. how about posting a link to them if ya have one
-
looks like a sawyers anvil to me, but a recently made one, yes youll see many of the older ones that well taller with much more mass, this is because they were used to not only tune the saw blades, but to forge them as well, so you needed lots of mass for forging. recent sawyers anvils are normally only used to tune or straighten saw blades, no forging because the saw is already cut out of thin sheet metal. so no need for all that mass, just a nice big flat and hard surface but this is just my guess as i can not check how hard the thing is or look at it up close to see the sines of use
-
Roman scorpion sale (not sure where to put this)
MLMartin replied to antigoth24's topic in Blacksmithing, General Discussion
with the sad lack of common seance out there theses days i would be vary scared to sell anything thing that shoots. have no idea about price, but i hope you have some type of insurance and will be selling it as a "non functional historic replica" it dose look really cool though, i hope to see pictures when your done! just make sure your not responsible after it leaves your hands -
converting a post drill
MLMartin replied to Tom Lumpkins's topic in Drills, Post drills, Mag drills, etc
what i have done thats super simple on chucks for old drill presses is just get a new chuck thats femail threaded, put a grade 8 bolt in it, cut the head off then just "chuck" the new chuck in the old chuck, the old chuck was simpy a half inch hole with a set screw, so this was pretty easy, i did grind a little receving notch in the bolt for the set screw of the bolt -
im thrilled to here he will be back up and running in less than a year! wouldent be the same here without him
-
More Pictures
-
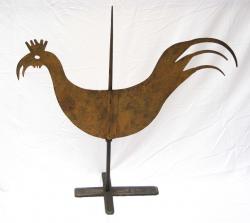
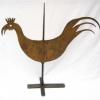
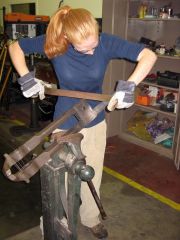
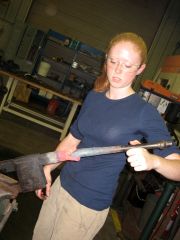
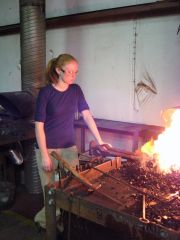
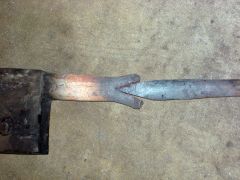
Last night my Friend & I spend some time repairing a vice I picket up for her over the summer, unlike so many ive seen before where the leg has been cut off with oxy act torch this one actuality looks like it broke at a old forge weld. I had already forged a new leg out of some Wrought Iron under a power hammer just to save time. so we started with a vice with about 6in of leg reaming and a new leg. First we split about 1 3/4in of the old leg then forged a chisel point on the new leg. Then we aligned them together in the fire and took the first welding heat right in the forge. ( sorry no pictures of the welding, there was only two of us, so we both had out hands full ) This was done by me bracing the vice in the forge while she held on to the new leg & hammered it into the slit of the old leg, after the first few blows with a hand hammer she used a light sledge, the vice body & me acted like the anvil for the weld to work against. After we had it stuck I removed the vice from the fire & we worked the forge weld down over the anvil, I worked the vice and swung a hand hammer while she swung a sledge. after working it down we forged it in top and bottom dies to help round the leg. lastly a quick hot filing to clean up. When we finished I gave the vice to her, its her first!
-
-
-
-
-

-
-
-
Looking for appreticeship...
MLMartin replied to chelseahix22's topic in Blacksmithing, General Discussion
Hello, its not an apprenticeship but it is a great opportunity if your serious about smithing. Look at the school The American College of The Building Arts I presently attend this school and think it is a great way to build up my smithing skills anyone interested please feel free to message me and ask me any questions The American College of the Building Arts -
well it dident acutely follow me home, its found my home all on its own!!! my new FREE welding helmet from Miller won the thing from Built It Didn't Buy It contest, for all of yall that get the miller power click news letter i was the entry of the stainless steel fish scalier. hope yall voted for me so i can win the grand prize of the new welder! the helmet was just for me coming in the top 5
-

-
i bet that vice is made that way, ive seen a hand full of them come from over seas like that. seems to be a somewhat common thing lately
-
the line in the middle does not look like a weld to me, from the pictures i would surly say its cast iron, i do see the line from the top "plate" whether it is acutely a steel plate or just a clever line from casting i cant tell. with a simple spark test you'll know if its a steel face or not.
-
i use them often when striking, but when working a piece alone i have never used one.
-
just use any part of it you can, definitely don't scrap it or anything, if you never find anything good for it at least you will have a vary heave door stop. so just do anything you can, or set it in the corner of the shop, your libel to need it for something completely random in a year or so and will be happy its "just out back" pretty ruff but i have seen a few anvils that were worse, still has some of the hardy and a horn, one fellow offered to sell me one that was hornless and healess and only had 1/4 the face. hahaha i had to decline. but for free ill take most any anvil. maybe one day you and some friends will toss it into the forge and re weld a new face and some cunks to the back at least it was free
-
i would not go with sand if you can, i think the best would be casting lead into the thing, lots heaver and it will not settle at the bottom like sand will
-
why dont you post a picture of your anvil and cut. many people get worried about smooth flat faces and horns and go through alot of trouble to "fix" them but normally only end up damaging the anvil instead. a few little cuts from a stray chisel with not likely show in your work. grinding or welding on the anvil is probably a really bad idea