

caotropheus
-
Posts
381 -
Joined
-
Last visited
Content Type
Profiles
Forums
Articles
Gallery
Downloads
Events
Everything posted by caotropheus
-
Peter. I only forged 6 pieces of cutlery and I am still complaining about the same issues you wrote on this post. I agree with you, it is difficult at the beginning but on my last knife, the work started getting easier and within 2.5 hours of forge work I had a piece of 5160 brand new leaf spring transformed into a KSO (knife shape object) ready for annealing and start filing and polishing. My first knife took 3 days to forge out of flat stock and I managed to crack it, so...Just do not give up and keep forging. Out of the 6 knives I made, the first I cracked the blade while forging, the fourth cracked at the ricasso while testing it and the fifth I burned it in the forge because I started doing other stuff and forgot the blower on with the knife inside the charcoals. The most important is that I am satisfied learning with my mistakes. Nice piece of cutlery you've got over there
-
 Gentleman, I dropped the idea, thank you very much for your replies.
 -
Gentleman Yesterday I was at leafspring paradise! How much paradise? a lot of it! Leafspring of all sizes, shapes and ages, even long bits of brand new never used leafspring for scrap! Even straight in shape leafsprings I could find, not even arched! The most interesting is that the guy sells his scrap cheap! How cheap? For 100 kg of it about 5 to 10 USD! Since I live in Israel and since a good quality anvil is very expensive, something like 15 USD a kg for a used one, and since I could not find yet tines from a fork lift for a reasonable price, I thought on making an anvil from leafspring. The guy has in his scrap pile 30 mm thick leafspring, about 120 mm wide and as long as I wish up until 1 metre. I thought about making an anvil out of the big gauge leafsprings by welding them together. The idea is to insert some square stock between each leafspring to allow me to make full depth welding. I can even make a vertical anvil up until the floor with a set of round and a square horns in a "T" like shape. What do you guys think about the idea, how realistic is it and what are your suggestions for type of electrodes, heat treatment, this sort of stuff? Thanks for your help.
-
Bubba, I would like to answer you, but as I described before, it is just a bit of steel I found buried in the soil! Since I am in the first steps of my smith hobby, it was a very nice exercise.
-
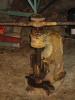
Greetings This is my first cleaver. It was build out of a piece of broken plough disk I dig out of the soil. Sure it was buried in the soil for several years as you can see by the corrosion pitting on the blade. This was my most simple smith job: cut to shape the cleaver out of the original stock; flatten the steel; correct a bit of the existing bevel in the forge; anneal; drill the holes for the rivets and for storage; harden; temper; polish; fix the handle; voilà! The annealing process took almost two days. First kept the cleaver inside wood stove red hot for several hours, while we were heating the house and then took almost one day to cool down buried inside the stove ashes. I hardened and tempered the cleaver as an axe. Hardened the all blade, including handle in oil and then tempered it in the kitchen oven for 1.5 hours at 200ºC. The handle wood is olive. Cuts like a dream, now I just need one of these to thoroughly test my new blade!
-
Laoich And where are the pictures of the "rusted" vice?
-
Totally agree with you boys, count on me as well Stan, hang on in there, shortly you will be out, better then new...
-
Better yet, use his tongs to put his fingers dancing again on the keyboard. Hope Stan can read already our posts. Stan, so much trouble these last days, hope doctors made you at least 20 years younger... ;)
-
Thank you very much for your replies. About the fuel depth, this was the first fire I lit for the picture. The pile of fuel I use is higher and always generously covers the piece I am heating. The forge works really well and the rod shown is a piece of round stock 12 mm, was red cherry in about half a minute. Now I am building small "gates" to close unused gaps I left in the frame surrounding the table top. The table top is 70 cm long x 50 cm wide
-
Who are the people that do this to anvils
caotropheus replied to leighwill's topic in Anvils, Swage Blocks, and Mandrels
I couldn't have said it better. Hope shoes are not welded on the top! -
Stan, wish you a fast recover and I hope that within a couple of days you will be able to type some words here in IFI, and of course, in the chat ;)
-
Build out of scrap material I had laying around, just bought the brake rotor at the scrap yard ($2) and the 4mm mild steel plate for the table. The ruler is 40 cm long and sorry for the lousy welding. By the way, this was the "light sabre" I used to cut the metal...
-
DanBrassaw Just like you I intend to build a leg vice. I was fortunate enough to be offered 1.5 meters of round steel 50 mm in diameter (used as a shaft for a massive water pump) and get an acme threaded rod I extracted from a 6 inch valve http://img189.images.../img1017pq.jpg/ The static leg will be around 87 cm tall and the moving leg will be made with the remaining material. I also intend to set the pivot as low as possible. Among other ideas, I want to fabricate a movable setting for the screw so I can slide it up and down the static leg, according to the job I intend to do. The lower pivot will have several settings, depending on how big a piece and want to work. The jaws will be assembled on pivots so will adjust to the shape of your work. These are the main guide lines, but I have no idea yet on how to assemble the lower pivot or the screw, we shall see.

-
I agree with sothshoresmith that this press most probably was used in some sort of mechanical job and not blacksmithing. This press reminds me a riveting tool for chains, like this, http://www.oregonchain.eu/en/products/catalogue.html?L=0&L=0&id=189&id_news=38&L=0&idmenu=3 or a jewellery/clock press or something like that. The fact that you cannot use this press for blacksmithing does not mean that you cannot use it in other useful jobs. In my case I would adopt it to rivet chainsaw chains.
-
Greetings I am on my first steps in blacksmithing and for some time I am searching around for a reasonable priced anvil. Well I found one! A bench anvil (I think) 15 kg for about $95. Too expensive? Don't think so. Prices here in Israel for used anvils start at $17/kg and up. The hardy hole is 15 mm x 15 mm, or, in imperial sizes 9/16 of an inch and as you can see by the pictures it is not aligned with the face plate. It has a striking resemblance with this anvil. The rulers are 40 cm and 15 cm. There are some inscriptions not so clear that I hope will help on the identification of the anvil. Something like "GHN RQOKG" or some other possible reading "SCHN PRQOKG". As I said the inscription is a bit blur and most probably I made some mistakes while reading, even using a 8 x pocket magnifier. There are also two numbers that I could identify "86", few cm below the letters. The anvil is steel and not cast iron, to test it I hit it with an hammer and it rings like a bell! cheers
-
Surprise! My anvil weight increased
caotropheus replied to wassomeoneelse's topic in Anvils, Swage Blocks, and Mandrels
Bryan Sorry for asking, but did it occur to you weighting the anvil on a real scale? -
Thanks everyone for your answers. Here it is a full picture of the "beast". Weights are about 7 to 8 kg, screw around 5 cm, total height 64 cm, working height 12 cm, frame height 50 cm, weight distance 72 cm, total weight 100 kg. After cleaning some gunk, it appears that there is a collar on the top of the ram that attaches to the screw. I will try to open it and remove any objects from within the ram. I intend to paint it after some cleaning, one colour static parts, some other colour moving parts. This is the paint I elected. Cheers
-
Greetings. I know, this topic is worthless without a picture, so, here it goes: I bought this flypress in the scrap yard. It cost me about 100 USD and I was not able to reduce the price. The guy was a tough negotiator! It weighs 100 kg and according to references that I saw in the website www.flypress.com for screw diameter, working height, and weights, it might be #2. I disassemble it completely to clean, and I intend to remove rust and repaint. The problem is that I looked inside the ram and I cannot understand how to remove it from the screw. Probably a die broke inside, probably someone played with a pipe and smashed it inside the ram, I do not know. Please guys, help me on this issue. I will try to remove what seems like a thin wall smashed pipe inside the ram by drilling it. Cheers
-
Another point is that there are several types of steel for harder or softer chainsaw chains. Probably an acid treatment of the blade may result in a sort of damascus steel pattern, depending on the chains used, but that, is something we'll have to check, right?
-
Nice forge. What sort of air blower are you using?
-
Mat, The authors of the previous replies know much more about metal work than I do. I do not have much more to add. I am also on the process to building my anvil and what I've learned so far is first of all to bring the material to a professional welder or bring the welder to make you the work; use only type, quality and size suiting electrodes and welding machines; bevel all those joints; make sure all the faces have a perfect contact not to make a hollow anvil; warm up the material previously to weld; tack all the pieces together first; make the deep wide welding at small lengths at the time and jump around the anvil every time you start a new welding; if you weld on one side of the anvil, the following weld should be on the opposite side; Let your piece and your welds cool down slowly to make them resistant to shock; if needed harden the top of the anvil later; last and probably most important, get a couple of beers so you and the welder can enjoy while your new anvil cools down. :D
-
Expert help on anvil purchase
caotropheus replied to caotropheus's topic in TPAAAT - Applied Anvil Acquisition Technique
Thanks guys, your advice was helpful to teach my eyes to distinguish ASO from a real Anvil. -
Greetings everyone This anvil looks Chinese ASO 75 kg low quality built and cheap, really cheap at about 190 USD http://www.lkltd.co.il/web/8888/nsf/ProLookup.taf?_function=details&_ID=140271&PF=&did=3508&G=&lang=HE&SM=&_UserReference=3F152E8257B53A2A4A38891D Please experts, I know an internet photo is not enough to make an objective review but even though I'd like to read your opinions. Thanks
-
That is a possibility. Other possibility is to weld those thin legs with TIG equipment. I've seen a guy once TIG welding tiny diameter pipes into some component of a vacuum machine, and people I guarantee you this fellow was not welding, he was making poetry !...
-
Nice bugs! And I know what I'm saying because I'm an entomologist by profession How did you attached legs and antennae to the main body of the sculpture? Silver soldering?

