
Stormcrow
-
Posts
1,095 -
Joined
-
Last visited
Content Type
Profiles
Forums
Articles
Gallery
Downloads
Events
Everything posted by Stormcrow
-
That is just too cool! I had wondered about doing something like that on a big copper basin I made for a baptismal font a while back, but I would have had to hire it out. I did it by sinking and raising with wooden hammers and forms. Sometime down the road I might play around with this.
-

Willow leaf and quasi-mandau bush swords
Stormcrow replied to Stormcrow's topic in Axes, Hatchets, Hawks, Choppers, etc
Nah, these are headed to Hong Kong: http://www.123mdw.com/shougongdaojiang/Ken_Onion/ Not sure why the URL says Ken Onion. It should be James Helm. :? -
The latest pair of big blades. Usual details, leaf spring, triple hardened in veggie oil, triple tempered, integral socket handles, hemp cord wrap with cotton cork Turk's head knots, shellac to seal the wraps. Shaving sharp.
-
Something a bit elegant - integral handle hunting sword
Stormcrow replied to Stormcrow's topic in Swordsmithing
Paul, I kind of had to laugh a while back when I was showing students in my simple knifemaking class how I wrap handles. Several of them whipped out their wunderphones and filmed me tying the Turk's head knots in order to play it back for themselves as they attempted it. It's a bit silly, but I think good application of technology. :) -
Bush sword traded for a bullwhip
Stormcrow replied to Stormcrow's topic in Axes, Hatchets, Hawks, Choppers, etc
Here's what the new owner had to say after playing with the bush sword over the weekend. Check out the awesome sheath he knocked together for it! "Last month, Stormcrow on the Hoods Woods forum, made one of his Bush Swords to trade for one of my paracord bullwhips. James Helm of HelmForge I received the Bush Sword Friday after work. Upon opening the box, I knew that what I held in my hands was something I was going to be using for a long time. To describe it to someone who has never held it, I would say it is somewhere between a short machete and a large chopping knife. It has the light weight of the machete, but the strength of the chopper. I know both the machete and the large knife chop stuff, but there is quite a difference between a machete and a Becker BK9. This Bush Sword would fit the place in between the two. This thing came shaving sharp. I actually nicked my finger through the cloth I was cleaning it with after use. I was too excited to get out the measuring tape to get dimensions. I will post those tomorrow for those interested. One thing I noticed was, like me, it came to this world naked. Being a hobby-leathercrafter, I had to clothe this big fella. I used 10 oz veg tan leather, added some D-rings, and made a srap to wear either belt or baldric style. Now for some testing review. My dad recently began removing a fencerow filled with 40 years of trees and brambles. He had a large pile of both green and well-seasoned trees. The first thing I did was find a branch about 5 inches in diameter. I am not sure of the species. I hacked through this in just a couple of minutes. Each hit dug deep. I noticed a mostly dry, thumb-sized stick was in the way, so I let the Bush Sword eat. I slashed at it at a severe angle and severed it with one swipe. Next, I found some really dry pine, and made a fuzz stick. With the Bush Sword being a light as it is, it offers many holding options. I used every part of the blade to make the fuzz stick, just to see what options I had. Overall, I am really impressed with this primal little giant. Tony" -
That looked like the "plate" was about the thickness of a Coke can. Like Dr. Hrisoulas said, showmanship. The MAD Dwarf workshop used to have a Youtube video (I just looked for it, looks like they took it down for some reason) that among other things had them whacking into some I believe 18 gauge steel. Whatever thickness, they said it was what is typically used for modern armor makers. So, not to knock the samurai or his sword, but it's not out of the realm of what a properly made blade should be able to do.
-
Another bush sword trade
Stormcrow replied to Stormcrow's topic in Axes, Hatchets, Hawks, Choppers, etc
Thanks, guys! Mark - He took more pics than what I have up so far(got my axes as well), and he's going to shoot some pics of me forging tomorrow per the request of a customer. We never really discussed how much photography the bush sword covered, but I figure I've gotten a decent bargain so far. Teenylittlemetalguy - For whatever other faults I may have, I think I have a good eye for the flow of lines. Thank you! -
While I have done all right getting the general idea of my blades across with my photos, I'm certainly no photographer. I will put together a relatively decent composition, but my camera will not really capture all that is going on. Well, I traded a bush sword for some photography. These are all pieces that have been up before, but they are looking much...better now. This is what I traded: And this is what I got: More forthcoming. :)
-
Something a bit elegant - integral handle hunting sword
Stormcrow replied to Stormcrow's topic in Swordsmithing
Knots and braiding aren't in my skillset. I keep it very simple. I do like to use Turk's head knots at the end of the wrap, though. Tai Goo sent em a link to this animation, and it's how I learned to do 'em: http://www.ropeworks.biz/archive/Aturkhed.html And how to do a Chinese sword wrap: http://forum.sword-buyers-guide.com/viewtopic.php?f=35&t=128 -
I've recently had a couple of people asking about a longer socket handle to be able to get a two-handed grip on it. Not trying to dissuade anyone from a longer grip, but I just wanted to demonstrate that by making use of the generous choil I like to put on 'em, one can get a pretty solid hand-and-a-half grip on all of the bush swords I've made recently. Even with gorilla paws like mine. From the shortest... ...to the longest. See? These are intended for one-handed wielding, but they are capable of two-handed chopping if need be. I wouldn't use this kind of a grip to stab, though. Thanks! :)
-
snapped a blade in half
Stormcrow replied to castlegardener's topic in Heat Treating Knives, Blades etc
A trick I was told recently, that I have made good use of since learning, is to lay an old file along the warp, then C-clamp the blade to the file, pulling the warp out. Then cycle it through your tempering cycle again. If it didn't take it all the way out the first time, put a couple of spacers between the file and the blade, like pennies or washers, and cycle it through again. And yes, you do have a small amount of time after you quench to straighten warps before the steel fully sets up. Try using a magnet to check for critical temperature. You might be surprised at how cool the blade will harden satisfactorily. -
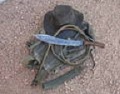
A member of the Hoodlums forum posted a picture of a bullwhip that he had braided for himself. I immediately asked if he would consider trading one for a bush sword. He was equally happy to do so as I was to get one of his whips. I forged out the blade from leaf spring, spread the handle preform to get ready to roll it, then set it aside for a couple of days. I ended up using the preform to demonstrate socket-rolling for the June meeting for the Balcones Forge blacksmith group that I hosted in my shop, which was the reason I had saved it in the first place. The demonstration went well, and I rolled a rather nice socket. Here's what the bush sword looked like after forging and clean-up grinding on the profile. Then I had a series of unexpected delays hit me. The Hoodlum worked at his whip diligently and got it sent to me in the latter part of June. Turns out it is only the second one he has made. The core is 14AWG electrical cord, with the outer layers two-tone paracord. This thing cracks like a pistol going off if you know what you're doing with it, and raises a nice welt if you don't. Unfortunately I fall into the latter category, but I'm getting a little better at it. Finally, I caught up with other stuff and got the bush sword finished. False edge, filed bevel, multiple quenches in veggie oil and multiple tempering cycles, hemp cord handle wrap with cotton cord double Turk's head knots sealed in amber shellac, sharpened until it shaves hair and slices through the tiny whippy branches smaller around than a toothpick. And finally, a full set of gear for the eccetric archaeologist gentleman adventurer or cattleman on walkabout. The bush sword is packed up and ready to go out in the morning mail.
-
I like that a heck of a lot better than most of the one-piece axes I see. Good work!
-
Thomas - Is that why the pics of him cutting the tube went away? Altusjg - I'm not metallurgist, but as I understand it, certain steels benefit from the multiple quench by refining their grain. Not all steels will, and some have a bad reaction to it. Chromium-bearing alloys like 5160 and O1 seem to benefit.
-
Just delivered this yesterday. The customer's request was: "Maybe something 12" long or so, forge finish and mean looking." Here's what I came up with: The blade is right at 12", and it is appropriately mean-looking. Forged leaf spring, multiple quenches in veggie oil, multiple tempering cycles, integral socket handle, hemp cord wrap, cotton cord double Turk's head knots at either end, sealed in black shellac. He just couldn't wait to get it home and try it out on the feral bushes in his back yard. He had to whack at a cardboard tube. This is a light, fast blade, as he commented. I like leaving a customer with a grin on their face as they heft their new blade. :)
-
The only thing I take exception to is that ugly skate lace pattern. Make it a decent black ito or even some paracord, and it'd look so much better. You executed it very well. Even got that fancy tip thing down. Good job!
-
Here's the sheath that Luke Swenson made for it. Gorgeous work on his part, as is typical. With the customer's permission, I am quoting his comments to me about the knife: "I was absolutely stunned when Luke finally let me have the knife at Ron's house. He tried to get me to beg for it, but I didn't mention the knife until he said he had better let me see it. He also told me that if I wanted a knife with a full sized handle that he could make one. He made a very nice sheath and steel pouch for it also. It is a beautiful package. I love the knife and showed it to everyone who would stand still at EOTW. You have certainly outdone my expectations. One day a storm rolled in with rain and lightening and I noticed a hole in the debris hut I was staying in at EOTW. Out came the knife and I cut some hay and patched the roof. Also I was prep cook for Dave Dennis and did a lot of slicing and dicing. It functioned exceptionally." That's exactly what one likes to hear from a customer! Thanks, Dave, and enjoy! P.S. - The "full sized handle" crack from Luke is because the handle of the original is very short, only 4" long, and I made this one 4 3/4", still shorter than I typically do, but in pretty close proportion to the original.
-
This was a major reason I decided to go with a scratch-built hammer rather than an antique commercial one. Everything is either off the shelf or can be fabricated fairly easily. I'm far away from my typical "cousin and/or brother power" support network, so I needed to be able to fix and alter on my own. On the other hand, since it was built from available junk by people who had never built a power hammer before, there was a definite period of changing things out and tweaking/repairing to get it where it needed to be. On the other other hand, my welding has greatly improved since I got the hammer as a direct result. (The hammer was built by my cousin for me; he's a much better welder than I am.)
-
Came across this randomly on Youtube: I thought it was kind of neat how he was set up to wet forge on his little power hammer. :)
-
Power hammer technique
Stormcrow replied to pike3e's topic in Power Hammers, Treadle Hammers, Olivers
One system of modular tooling for flat dies that I know of and am just making use of is to have a couple of holes that are drilled all the way through the dies. You build the tooling as a cap that fits over the die, and a pair of bolts or pins hold the tooling in place. Here's a rather clever usage of such tooling: So once you have the time invested in the initial setup, building different cap tooling should be fairly easy. Making a slightly round die like a hand hammer face is one of the ones I'd like to eventually make, in large part from watching Murray Carter's little hammer. Now, as has been pointed out, this is a light hammer hitting very quickly, and I reckon the rubber springs transfer less force than steel ones would. If you try to use the same on a large hammer without a lot of control, you'll likely screw up your piece. If you have good control or can dial back the hammer some way, it should be fine. Very rapid light hits is the key to efficiently using this kind of setup, I'd say. -
Never used a Clay Spencer hammer, but I have used a 50 lb Little Giant and I have a 100 lb Appalachian "Rusty" style guided helve hammer with a tire clutch. The Little Giant hits faster, but I get better control with the Rusty. You've seen the axes I make with mine; I'd vote for the tire hammer. :)
-
Blades for The End of the World
Stormcrow replied to Stormcrow's topic in Axes, Hatchets, Hawks, Choppers, etc
350 degrees Fahrenheit, if I remember right. They were done a good while back, I just finally got an edge on them to send out. Shave hair off your arm now. :) -
Thanks, guys! Ward - Yep: ripping. Adds to its combat options. Really quite unpleasant.
-
This ax was commissioned after the customer saw the one I had made for myself. I'd say it rides the border of being a tomahawk, which is appropriate. 4140, vinegar etch, hickory handle. The satisfied customer. Hamming it up for the camera.
-
This one is on its way to the customer. Its overall length is about 17.5", with a cutting edge just under 3" wide, and the inner curve of the beard sharpened. Head forged from 1" square 4140, etched in vinegar after heat treatment to darken it, handle is hickory.