
Stormcrow
-
Posts
1,095 -
Joined
-
Last visited
Content Type
Profiles
Forums
Articles
Gallery
Downloads
Events
Everything posted by Stormcrow
-
This large copper basin I'm working on for a baptismal font is my second attempt at it. Details are in the description.
-
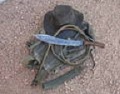
Haven't gotten to play with this any yet (been working on paying gigs), but here are pictures of what I had before: First, the punch itself. Please ignore the bad welding. The bit is H13, and it was ground to a fairly sharp angle. You can see how badly it deformed. I didn't take a measurement, but it's long enough to make a small camp ax eye. The steel being punched: 1" square mild steel. See how much it squished down? The hole once it was finally punched. Pretty ragged. I punched back and forth, pushing the biscuit around without it coming loose until I finally took a pointed bar and pryed it out. And finally, the biscuit I finally removed. So, in retrospect, having a sharp edge on the punch wasn't too bright. If anything, it should have been cold chisel-ish. I'll let y'all know the results of further experimentation.
-

Real peice of Folk art
Stormcrow replied to EWCTool's topic in Power Hammers, Treadle Hammers, Olivers
This is pretty scary to look at at first glance. Looking at it again, it's actually got some pretty darn good design and use of available material. I've seen more inefficient and impractical out on the Interwebz. The lack of adjustability, the 70 year old rubber springs, and the connector arms moving rapidly at face level are all concerning, of course. I do find it quite interesting that the tire clutch on a hammer has been around that long. That's pretty nifty. -
Bigfootnampa - I had tried this before and had some issue with squishing it out of shape. Of course, this was more a lack of control of the press on my part and not necessarily the technique. Maybe some height stops would eliminate the issue... I knew it when I started, but it has certainly been driven home, the press is a very versatile machine but it is dependent upon the tooling you build for it. I need to build more tooling and get more proficient with it. Mainely,Bob - How dare you suggest that after years of picking other people's brains that I contribute to the knowledge base? Shocking, sir! Sure, sounds good to me. I think I'll start with the pointed Brazeal/Hofi style chisel. Actually, maybe my current punch with the less heated bar a la Grant's suggestion, followed by the current punch with the faster cylinder. Have patience and I'll see what I can do.
-
Combining several ideas from this forum and from over at the NWBA forum, I think this is going to be my next attempt: 1. Use the quicker cylinder. 2. Use a somewhat thicker and more tapered punch. 3. Use a bottom jig with bars that will keep the sideways spread limited. 4. Use either a pointed tip on the chisel (like seen in this thread numerous times: ) OR a pre-rounded point. Umm, I think that was all. I may not do all of those at the same time on the next try, but they are certainly all things I intend to try. I have some scrap 4140 that I'll probably use and save my H13 until I have this thing sorted out.
-
Thanks, guys. Keep up the advice on this. By the way, I forgot to mention that the latest eye punch I've tried can be seen starting at about 3:09 on the forging press details video: Judson - Thanks for that shot. Is there any way you could get a shot of it looking down the channel? NeatGuy - I already have a faster cylinder on the left hand work station of the press, which according to the David Hyde article should be powerful enough to do the trick. No need for an accumulator. Grant - Narrow in which dimension? Are you saying that, for instance, if I was doing an ax blade that needs a long eye, I should use a narrow punch and overlap the punching? I'll try it at a cooler heat and see what transpires. Other than that, I've essentially done what you've said. I'll try to get pictures of the result of what I've done today.
-
My press is intended for all kinds of forging, but the primary job I wanted it built for was to punch eyes in hand tool heads like hammers and axes. I've been working with it a while and just do not have it where it will do quite what I need it to. My problem is that whenever I go to punch a hole, I end up squishing the thickness of the metal down. It doesn't seem to matter whether the tool is blunt on the end or sharp. If I make it too sharp, it deforms quickly, even if made from H13. After reading the David Hyde article Grant kindly supplied, I have two theories on solving this: 1.) Use the smaller, quicker cylinder on the press and work it a little at a time from each side. 2.) Make a setup that lets me punch from both sides simultaneously, as seen here: I'd like to be doing this on a low-level production basis and it's been eluding me so far. I can do the rest of the tool-shaping just fine, but eyes are giving me trouble. What do y'all think?
-
Thanks, Grant, that's a good article. The swiveling stripper plate is a good idea. My big problem, though, is the metal is squishing down too much when I try to punch. Not trying to thread hijack, but do you think perhaps I need to try it on my small, quick cylinder and work it a little at a time? Or set up to punch from both sides simultaneously?
-
I'm having issues with getting my press to punch eyes they way I need them to be, and the problem is not power! I'd be very interested to see pictures of your eye-punching setup, even the torn-up one and certainly the next go at it.
-
I've had this a little over half a year and am still building basic tooling to take full advantage of it. What it's done so far has been quite helpful in my work. Details are in the video, but I'll try to answer any questions as best I can. 3 Station Hydraulic Forging Press