
Stormcrow
-
Posts
1,095 -
Joined
-
Last visited
Content Type
Profiles
Forums
Articles
Gallery
Downloads
Events
Everything posted by Stormcrow
-

MOM! Grant's cheating again!
Stormcrow replied to Nakedanvil - Grant Sarver's topic in Tools, general discussion
Hey Grant, mind sharing what that eye punching setup was? Maybe it'll work on a smaller chunk of steel. I'm about to be building some eye-punching stuff for my press and think I know what to do, but it's always good to pick the brains of smart folks with experience. -
Power Hammer in Treadle Hammer Mode
Stormcrow replied to KjZitur's topic in Power Hammers, Treadle Hammers, Olivers
I really like your hammer, both the control and the way your have your air cylinder positioned. At some point down the road, I may build something along these lines or see about converting Gunnhilda, my Appalachian "Rusty" hammer, to air with a setup like this. How soon are you aiming at having plans ready to sell? You've piqued my interest. -
Here's a little bit of hacking on hackberry bushes with the bush sword: http://www.youtube.com/watch?v=cUPGjsBYEuQ
-
Thomas - It would have been cool to do the Filipinno blade for The Book of Eli. HWoolridge - I actually tried. Couldn't get it to straighten out. :(
-
The bush sword's owner came by the shop this past weekend and picked up his bush sword. This was the longest Kydex sheath I have made so far! The happy new owner with his blade: This is the third blade of mine he has gotten. The first, a custom bushcraft knife: He also picked up this little sharp-nosed mouse:
-
I've been busy lately but haven't put up many pics of what I've been doing. I feel like I'm falling behind! This was one I made a while back. It's what I term a "scavenger blade", a stock removal blade that is made from a plow disk from my family's farm. The blade was cut from the disk, flattened out, the profile cleaned up, and then it was normalized multiple times to make sure it didn't try to return to its previous curved cross section. Then the bevels were ground in and it was heat treated. The blade is 8" long and the overall length is 13 1/8", with a spine thickness of approximately 1/8". The handle has full-length leather slabs underneath a hemp cord wrap and a triple strand Turk's head knot in black cotton, all sealed with amber shellac. I think of this as a "bush tanto", though a couple of people have commented that they think it would make a good barbecue slicer. The texture on the blade comes from rust pitting on the plow disk from years of sitting under live oak leaves. I tried to figure out how to get a stock removal wakizashi out of a plow disk but wasn't able to. :D
-
The katana made me drool, and now this tanto does too!
-
Don Nguyen's WIP (large photo heavy)
Stormcrow replied to Don Nguyen's topic in Finish and Polish for Knives
Looks like you're doing really well so far! Remember: You can screw it up beyond saving at any point in the process. But if you know what you're doing, you can save a lot. :D -
The advantages of a "Rusty"-style guided helve hammer are: 1. Simplicity 2. Cost 3. Good adjustability for a mechanical hammer 4. Put a tire clutch on it and you have good control (mine has better control than the 50 lb. Little Giant I have run, though it hits slower) 5. Easy to scale between a 25 lb and 100 lb ram depending on the springs you choose to use The disadvantages are: 1. Large foot print 2. Like most mechanical hammers, single hits are going to be a bit difficult, though a tire clutch with some sort of brake mechanism would probably help in that regard 3. ? Anyone else have disadvantages? I'm kind of tired and can't think of more, though I'm sure they exist. Given the choice with budget not being overly tight, I'd vote air hammer, but there are a lot of advantages to a "Rusty" guided helvem when homebrewing a hammer.
-
I didn't have a khopesh in mind when I began this, but that's the closest existant pattern to what I ended up with. I like the timeless quality of this one; I could equally see it being weilded by Gilgamesh to hew down the cedars or in the hands of one of the "chig" aliens in Space: Above and Beyond. Forged spring steel, integral socket handle, triple hardened in veggie oil, triple tempered. The back edge of the clip is fully sharpened. Handle wrapped in hmep with cottorn double Turk's head knots all sealed in black shellac. Blade is 12", overall length is 18 1/2".
-
Bigfootnampa - Sam Bowie? Didn't he play for the Lakers? You mean Jim Bowie, right? As for him, there is so much legend and misinformation that there is no way of knowing for sure even what style of knife he used. Many different blade styles get called "Bowie". You may have a good point about the use of a fully sharpened clip being used to fight. I got to hold a replica of the infamous Musso Bowie that had been made by the president of the American Bladesmith Society. This is a brass-backed design, and the way it was described to me being used (presenting the spine to the oponent, blocking their blade on the spine, then tipping the point forward to cut them with the sharpened clip) actually seemed to make a lot of sense when holding the blade. Before that it had always seemed like a bit of a goofy design to me. None of these Bowies in this thread have a fully sharpened clip, just false edges. MacBruce - That was a carefully chosen background for that shot. Thomas - We had a blast, all right!
-
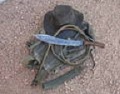
I got a text message on Friday from someone saying that he knew the son of my shop's landlord, that he was interested in blacksmithing, and could he come by. I told him I was a bit busy but that he could. What I didn't realize until he got to the shop was that he was a 16 year veteran of the Marines (out now) named Max who was on a road trip that had lasted a month so far and taken him from Los Angeles to Portland, across to Tennessee, and was in San Antonio only briefly on his return trip to L.A. He had met the landlord's son at a party in L.A. I dropped what I was doing and we forged out a small knife blade. Max was really taken with my primal/tactical Bowie "Thunderdome", as well as a Ridiculously Large Bowie that I had forged out a day or two earlier, so I agreed that we could forge one out the next day, Saturday. On Saturday, I cut out a couple of pieces of F-250 coil spring, and we got busy. Using my hydraulic forging press to straighten the spring and Gunnhilda, my power hammer, to do the heavy forging, we forged out a couple of large Bowies, one for him and one for me to demonstrate the process. After taking a break in the evening to eat some pizza and carve some pumpkins with my girlfriend and one of her friends, we got down to the stock removal. We finished that up, hardened three times in veggie oil, then started the blades on their first tempering cycle before calling it a night around midnight. The next morning we started the second tempering cycle, had a leisurely breakfast of coffee, pork chop, and huevos rancheros at a cafe around the corner, started the third and final tempering cycle, and took a quick trip to see a couple of the Spanish missions San Antonio is famous for. My girlfriend met us back at the shop, where I snapped some pictures of Max and his knife, then shut down the shop to spend the rest of the day with my girlfriend while Max headed out of town. Before he left, Max gave me and my girlfriend, a nursing student, the medical kit he had carried as a combat medic in Afghanistan. We were both greatly touched by this generous gesture. Here's Max enjoying a cigar and his new Bowie that he made in Texas: Here's what the Bowie looked like. We turned a missed hammer stroke into a notch for his thumb, and he was very pleased with the result. We established the secondary bevel on my belt grinder before he left, and he will clean off the baked-on oil, wrap the handle, and sharpen it back in L.A. This thing is a working knife, and balanced a bit ahead of the blade/tang transition. It'll chop, but it'll fight well too. Max knows how to handle a blade, and I'd hate to be on the other end in a fight. I didn't get to measure the blade before he left, but it was approximately as long as the one I made to demonstrate, which is 12" overall with a 7" blade. Before he left, Max wrote a check for the Ridiculously Large Bowie. I'll finish it up and mail it his way. It's forged from 1/4" thick 1084 bar 1 1/2" wide, and ended up 14 1/4" overall with a blade 8 1/2" long by 2 1/4" wide. The demonstration Bowie, by way of comparison, has a blade 1 3/4" wide. I was very glad to meet Max, and he is welcome back at my shop any time he's in San Antonio again! P.S. - I was going to wrap the handle of the Ridiculously Large Bowie in neon orange paracord and name it "Subtlety", but Max said he had seen enough paracord for a while and ordered up hemp with amber shellac instead. :D
-
Thomas - This is the design the customer wanted. The tasks he described were more camp chores, but he calls it a skinner. Bilip - Blade steel isn't particularly expensive, but there are plenty of scrap sources for steel that is good to learn on how to make and heat treat knives. Your plow points have a good chance, but test 'em first.
-
Test out your steel, bilip. Heat a piece past non-magnetic and quench it in oil (I like canola oil), then see if a file bites into it or skates across it. If it hardened, it should be usable. If the file bites in, try the process again with water instead of oil. If it still doesn't harden, don't use that steel for a blade.
-
How Do I go about making an axe
Stormcrow replied to lakeside forge's topic in Axes, Hatchets, Hawks, Choppers, etc
Get down the technique of making eyes first. Read up on what Brian Brazeal has to say and show on the subject here on Iforgeiron. Attend one of his workshops if possible. Punching the eye is probably going to be the most challenging part. When forging out the blade, though, take great care to kep the eye parallel to the ground so that the cutting edge stays in line with the eye. -
I posted this Bowie a little while back: It is forged from an F-250 coil spring, and is a bit more massive than I typically make my knives. 6" blade, triple veggie oil quench, triple temper cycles, hemp cord wrap, cotton cord Turk's heads, amber shellac. It helped put the phrase "primal/tactical" in my head, the fruits of which shall be forthcoming at some point in the near future. A customer bought the Bowie and took my recommendation of having Noah Legel of Wasteland Leatherwork in Phoenix, Arizona make the sheath for it. I think Noah knocked it out of the park. We call our collaborative efforts "The Wasteland Crow Project" as a combination of our names we use on forums, Stormcrow and Wastelander. In addition to the beautiful leather, Noah's better camera and photography skills helped capture the Bowie better than I could. The customer was pleased with both the knife and the sheath.
-
Ronph - Nope, I'm a full-time blacksmith who focuses on hand tools. All of these axes are sold now, and I plan on getting another batch of 'em made as soon as I get some other work taken care of. Steve - Thank you!
-
This one was commissioned by a fellow who goes bow hunting in Colorado. He tells me that it seems every deer or elk that he shoots ends up in the thickest patch of brush they can find. He needed a relatively short, capable blade to aid in extracting them from the tangle, split some firewood, and possibly quarter out a game carcass. He liked what he saw in the Youtube video I shot of this blade: Taking that as a general starting point, I decided on a blade between 13 and 14 inches in length, with a slight drop for chopping power while still being able to handle the whippy, thorny vines and branches. This is what I forged out: I checked with him to make sure that he like what he saw, and to see whether he wnted me to take a bit of the drop out or round the top of the clip rather than have it angular. He approved, so today I finished cleaning up the profile, filing the bevels and false edge, and am in the process of heat treating it. Ready to heat treat after grinding, filing, tweaking, and filing some more: After triple quenching in veggie oil: It's currently in its second tempering cycle out of three. The steel is 5160. I've seen pictures of historical hunting swords built along these lines, though with longer blades. It always seemed to me that it would be easier to dispatch game with a stab than chopping, which is what this design seems aimed at. It occurred to me while I was working on that that perhaps those types of hunting swords were designed for the same purposes as this, namely extracting game from tangled branches and brush, as well as camp chores and quartering the carcass. Anyone know for sure about this?
-
Still needs sharpening, but at least the wrap is done and sealed. Better pics taken outdoors once the edge is sharp.
-
I have commented that the one major disadvantage to a power hammer is that you cannot angle it like you can a hand hammer. This takes out a mighty much lot of that disadvantage. Thank you, sir!
-
Bush sword traded for a bullwhip
Stormcrow replied to Stormcrow's topic in Axes, Hatchets, Hawks, Choppers, etc
Tony has been giving his bush sword (and his arm) a workout! "While out scouting for deer sign, I found the cottonwood that had been blown over the trail earlier this year. It was still alive since the leaves are green and the roots are half in the pond. The way it was laying was the roots are at the pond 20 feet from the trail. The trail is about 10 feet wide with a bank that goes down 10 feet to a small creek. the other bank is a good 30 feet away where the top of the tree is. So, the tree was about 60+ feet. I thought I would give Stormcrow's BushSword and my arm a good workout. I'll let the pics do the talking. Here it is just after beginning. I did a few chops before thinking about snapping pics. After 5 minutes: After 20 minutes and a small break it started popping and creaking like it was going to give way: After the 20 minutes and 5 more chops it snapped. I then worked at it for 10 more minutes to get it all the way down. Overall, the BushSword performed better than I expected at chopping through a large tree. I did not measure the trunk, but it is the biggest I've chopped through with a machete. Being cottonwood, and green, helped a bunch, but it was no small task for a big bladed knife. I thought that the wrapped handle would tear up my hand, but it did not. The edge held up really well. I ran it across my sharpening steel a few licks and it was as good as new. Well Done, Stormcrow, for a magnificent blade! Tony " I'm quite thrilled to see my work tackle such a big task and pull it off so well. That's what I make 'em for, to be good brush tools. I've never tried to take on a tree this big with my blades before. Cottonwood is soft, but that is still a lot of chopping! -
Quenching 4140 dies
Stormcrow replied to Javan C.R. Dempsey's topic in Heat Treating, general discussion
My quench was 5 gallons of commercial quench oil and it did ok. More volume would have made me breathe easier, though, so if you have a large enough container, I'd up the amount. The oil got plenty hot and bubbled. More oil will cool it better. -
Quenching 4140 dies
Stormcrow replied to Javan C.R. Dempsey's topic in Heat Treating, general discussion
I have hardened dies for Gunnhilda from 3" square 4140 5" long in five gallons of the slow quench oil from Grainger. They hardened up just fine. Just put the die in the oil and leave it for a good while before you pull it out. You don't want to cool 4140 too quickly. I had some 2" x 3" 4140 that I made combination dies out of. I quenched in oil, left them for a few minutes, pulled out, and cooled one the rest of the way in water. It ended up cracking in the heat treatment. Expensive mistake! -
This one is being made for a very patient member of another forum in trade for a Hay Budden anvil. The blade is approximately 16 inches long, with a false edge, integral guard, and double choils/finger notches. They would be great for choking up for carfully knocking small limbs off of a pole to smooth it up or other similar tasks. Triple hardened in veggie oil, multiple temper cycles. I'm working out a small warp right now. Long blades tend to warp during heat treatment, and the closer you forge to final shape, the more important it is to get it straight without grinding. I'm using a trick that is fairly new to me, flexing the blade a bit past straight with a C-clamp, a flat piece of steel, and a couple of washers for spacers, then give it another tempering cycle. It works well, but sometimes has to be done more than once. Hopefully when I check on it in the morning, it'll be where it needs to be and I can proceed to wrapping and sealing the handle. Got other bush swords in the works as well. :D
-
Thanks, guys! BlissStreet - I have drawn inspiration from so many knife makers down through the years, it is nice to inspire others as well. MacBruce - No, it is wrapped dry and then shellacked. I'm essentially making a composite material in place. Phil - I focus on the flow of lines on my blades and don't get too concerned about the embellishment. That's where my eye is drawn, and I pass over a lot of knives simply because their flow of lines are bad or boring. The contrast of the smooth flow of the lines and the rough forge finish/rust pitting texture is pleasing to me. I like to see the work of Man and the work of God in harmony. Jaques - I don't see no ugliness here. Whatchoo talkin' 'bout? See my comment to Phil. There's a Japanese philosophy on aesthetics called "wabi sabi". As I understand it's meaning, I think it could at least partially apply to the aesthetics I like to use in my knives.