
Stormcrow
-
Posts
1,095 -
Joined
-
Last visited
Content Type
Profiles
Forums
Articles
Gallery
Downloads
Events
Everything posted by Stormcrow
-
Could I get a moderator to delete this, please?
-
Thanks, guys! Mark - I speak from experience: never, even jokingly, comment that you'll never have to get your significant other flowers again since you got her the non-wilting ones. Don - Fortunately I had one already done and about four more that were done except for adding leaves. I used the petal blanks from Pieh Tool Co., as this saves a heck of a lot of time cutting them out of the sheet metal by hand. I only had ten petal blank kits, though, so I had to cut two more out with tin snips. It still took some doing to get them all finished on time, even with the petal blank kits and almost half of them mostly complete before hand. He picked them up at 6:30 in the evening on Valentine's Day.
-
This was a commission that fell in my lap right at the last minute, Saturday afternoon prior to Valentine's Day on Monday. A man who was touring the Hausmann Millworks where my shop is located saw some of my steel roses and ordered a dozen of them, to be finished on Valentine's Day. It took about all I could do and a bit of help from a friend, but I managed to get them completed on time. Altogether the bouquet weighs around twelve pounds. The customer reported that his wife loved them. I didn't have time to take any pictures before they left my shop, so he kindly took these pictures of them in his home for me.
-
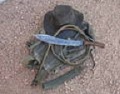
This short machete/large camp knife got called into service before it had gotten to see a whet rock. I think it did really well. I had a Cold Steel Latin machete and a Norlund Hudson Bay pattern ax (that's a good ax!) that could use its edge touched up and the handle better fit. My machete did better than either and consequently, I used it almost exclusively. Now for a scabbard and sharpening! More footage after that.
-
Thanks, Thomas! To quote Monty Python, "I'm gettin' better!" Not fancy, but nice is what I aim at. Well-executed, functional, simplistic beauty. Had a fellow recently compare my style with the Japanese concept of wabi-sabi, and as I understand the idea it seems to be a pretty good fit. I've come to understand that my sense of aesthetic enjoys the blending of the works of man and the works of God. My blades' flow of lines with the texture of the scale. Rat rods with the evidence of time worked with instead of hidden. Architecture that compliments and contrasts in a good way with nature. Not that I don't enjoy other styles, but for myself that is what draws my attention best. The consensus over several forums seems to be the bricks don't work at all, the rock makes a more interesting background, but it's easier to see on the cactus. I'll keep playing around; a darker or much lighter rock might help.
-
Tiapan - Not all steels benefit from multiple quench cycles, but some do. 5160 and O1 are supposed to, which makes me wonder if its the chromium content that does it.
-
This is a little blade I banged out as a demonstration peice for a buddy of mine. I'd show him the steps on my knife, then he'd follow with his. I then used it to demonstrate filing and heat treatment for a student. I decided it would make a good entry for a Knife in the Hat exchange on the Hoodlums forum, so I threw my name in the hat. The steel is differentially heat treated 5160 triple hardened in veggie oil. The handle is hemp cord for the main wrap, cotton cord for the Turk's head knot, and amber shellac to seal it. It's shaving sharp and ready to ship. I took pics of it in a local park (second oldest public park in the U.S.) and tried three different backgrounds. Which makes for the best photo?
-

Who are these people Painting anvils????
Stormcrow replied to a topic in Anvils, Swage Blocks, and Mandrels
They do make paint stripping wheels that fit on an angle grinder or chuck up in a drill. I use them sometimes to remove scale but leave the forge finish. They can leave a bit of scratching if you let them sit in one spot for too long, but not bad. Should be able to find them at Wal*Mart, Home Despot, or similar. -
Knife grinder Luke Swenson offered to take any knives I might have ready out to Winter Count primitive skills gathering in Arizona when he went. This is what I got ready to send with him. The small knives (except for the top one, which is an old commissioned piece whose customer disappeared) are all forged from brand new 5160 drop from a spring shop (actually sold as 5160 alloy, not just guessing that it might be). They're differentially heat treated, triple hardened in veggie oil, and their handles are wrapped with shellac-sealed hemp with cotton Turk's head knots. The big knives are forged from salvaged pickup and heavy truck spring, differentially heat treated, triple quenched in veggie oil. They all have integral socket handles, but the Walkabout Bowie has hemp and cotton while the other two are straight cotton. Shellac seals it all in. Luke sent me a message this morning saying that one of the little guys had already sold. Woohoo! Thanks, Luke!
-
Something a bit elegant - integral handle hunting sword
Stormcrow replied to Stormcrow's topic in Swordsmithing
Just a quick-and-dirty update. The sword isn't quite finished (needs sharpened and a few more layers of shellac on the handle), but it's on display at the On and Off Fredericksburg Road art show here in San Antonio. Cotton cord wrap and Turk's head knots, pecan wood plug at the end of the socket handle, red ink on the main wrap, black shellac on the Turk's heads and the pecan, then clear shellac over all the handle. Its stand is the left-over piece of Texas ebony from the Walkabout Bowie. -
Quenching in oil and cooling in wood ash have the completely opposite effects. Oil quenching hardens the steel, and cooling in wood ash anneals the steel, softening it about as much as it can be. Not to harp on it, but learn basic heat treatment with smaller blades, then tackle the swords. Otherwise you're looking at an awful lot of work to screw up or end up with something that is unusable. I'll assume you already know the shaping aspects, but if you are that far off on the heat treatment aspect, it makes me wonder if you have the shaping aspect down either. We're seriously not trying to be discouraging, but walk, then run, then join Cirque du Soleil. :)
-
Something a bit elegant - integral handle hunting sword
Stormcrow replied to Stormcrow's topic in Swordsmithing
I have never had a blade forged from spring try to change shape because it its previous life. In fact, I don't have too many warp in the quench and when it does happen, it is attributable to other issues. The vast majority of the blades I've forged have been from salvaged automobile springs, too. -
Sounds like you're looking for a commercial quench oil, but a thought to the folks who are poorboy-ing it. I personally use veggie oil for much of my work. It may need changed out after a time, but it is cheap and readily available at any grocery store. It also doesn't have the heavy metals and/or carcinogens of used motor oil or tranny fluid, and smells more like cooking instead of burning old motor oil. That being said, I went with the quench oil from McMaster Carr for some batches of tool heads.
-
Thanks, Pete! On some steels (such as 5160), it lets the crystals make the changes they need to more thoroughly. I keep heat treatment simple, and I don't remember which changes exactly are going on, but talking with another knifemaker about our two different methods of heat treatment after he came over to my shop and we forged out a blade and heat treated using my method, he does essentially the same thing with a soak time in his heat treatment furnace. Not all alloys benefit from the multiple heat treatments.
-
Thanks, guys! I'm pretty proud of it.
-
I just handed this over to the customer. He and I both are very pleased with this knife. It's impossible to get the full impact without holding it in your hand, but everyone who has held it has immediately gotten a big ol' grin on their face. This thing feels great. The point of balance is about where the cutting edge starts ahead of the choil, and it really begs to chop. The drop in the handle, elongated sine wave curve to the whole design, and distal tapers (thickest point is right above the chopping sweet spot) adds to that as well. At the same time the large belly and aggressive point combined with the half guard makes for something that would stab viciously as well. In addition to general outdoors use, this would be a great hog killing knife for those people who hunt feral hogs with a pack of dogs and a knife. It'd open a wide wound channel and go deep. The blade is about 9" long, forged from the same leaf spring as the pecan-handled knives I made for my old friend, bevel filed by hand, differentially hardened three times in vegetable oil, and tempered. You can see the quench line, though I rocked the blade up and down in the oil to give a springy middle section, tough point, and hard cutting edge, so the differential nature of the hardening continues below the visible quench line. It's sharpened shaving sharp, as usual. The half guard is forged from a piece of railroad spike, forge finished on the front. The handle is made from Texas ebony, a very hard, dense wood that is kind of halfway between mesquite and desert ironwood. It had a gorgeous figure that darkened quickly, so it is not longer nearly as visible as it had been. This was the first handle I had ever pinned. It was some stainless steel welding filler rod. Came out nice. This is what the rest of the chunk of wood looked like. The outside was rotted away, but the heartwood was still solid, though worm eaten and cracked in some places. Thankfully, I found enough good heartwood to make the handle. This thing sits very comfortably in the hand in variety of grips. Normal general cutting grip: Extended reach and increased drop for chopping: Choked up on the choil for finer work: And the raised spine/clip even facilitates holding it by the blade for fine manipulation of the tip or mincing with the belly: And the happy customer, a student of mine. He also bought a mandrel to aid in cleaning up socket handles. That's it in his left hand. Sorry if I'm gushing a bit, but this knife just begs to be used when you hold it. This is actually the second knife with this blade pattern that I've made; the first one has a socket handle and has not yet been sharpened. This is not the last knife in this design that I'll be making. I term it a Walkabout Bowie as it is a knife I would want with me when taking a walkabout.
-
Heat treating short sword.
Stormcrow replied to will52100's topic in Heat Treating Knives, Blades etc
I'd guess that you're going to end up getting the blade too hot if you try to draw temper in the gas forge. I'd recommend tempering tongs. I have better footage of the process, but this is all I have up on Youtube so far: They're just a pair of tongs with 1" square bar welded to the jaws. These act like heat reservoirs. You get them glowing a good orange, then clamp the spine of the blade you want to temper. Hold the tongs in place and watch the colors run. As the straw works its way closer to the edge, move down to the next section. Keep an eye on the area you just left, and if the colors continue to creep too far, cool that part of the edge down with a soaking wet rag. Keep going until you've covered the whole blade, re-heating the tongs as needed. The pictures in the video are a bit deceptive; it really needs to be pretty hot to efficiently transfer the heat into the blade. I'd recommend on a big 5160 blade that you draw the spine to a blue and the edge to a straw (getting it a bit brown or purple is ok, but don't go past that). I'd also draw the tip of the blade to a purple or blue. The tip is a weak point and can snap off kind of easily if it's stressed while left as hard as the rest of the edge. I've heard some folks talk about tempering by eye using a torch or tongs going too fast and leaving the core of the blade hard while the outer part has changed color, making it a lot more brittle and prone to breakage. I have to say that I haven't had any problems with this method. I think I'm going slowly enough that the heat is soaking the whole way. However, just to make sure, I have added a cycle in my kiln after differentially tempering with the tongs to make sure that it has soaked enough. -
Something a bit elegant - integral handle hunting sword
Stormcrow replied to Stormcrow's topic in Swordsmithing
New progress: After taking the blades out of the vinegar, washing them off, and cleaning them up with a power wire brush: Working on filing the edge. I had a fair amount of steel to take off since I was concentrating hard on getting a specific profile, so I didn't forge it down as clsoe to an edge as I like to. I'm using some spring clamps simply becuase they are quicker to change position with than a C-clamp. The C-clamp would have held tighter, but with three of 'em, the spring clamps held it fine. Filing away. A clsoeup look of what the file marks and forge finish look like. My camera is limited, but hopefully this gives an idea. It's going to be a heck of a chopper. That's an oak pallet, and the blade doesn't have a sharp edge yet. I also whacked it into an MDF west Texas tree stump anvl stump that is starting to come apart, and it sank in deep without much effort. After grinding and filing in the false edge on the clip, smoothing out a bump on the spine, and tweaking the knuckle guard to give more clearance in case it should turn in your hand. I need to knock off a few sharp corners around the handle and make sure everything is smoothed up as it needs to be, but it is essentially ready for heat treatment at this point. I'm going to get the other two bush swords ready and then heat treat them at one go. -
Something a bit elegant - integral handle hunting sword
Stormcrow replied to Stormcrow's topic in Swordsmithing
In amongst working on other stuff, I threw together an acid vat to dispose of my foes.... no wait, it is an acid vat, but it's 9% vinegar and it's for eating scale off of long blades so I can file the edges. This should have the hunting sword ready to file by tomorrow (whether or not I'm able to begin filing is an entirely different matter). The vat is just a shallow tray made from left-over 3/4"-ish plywood that I clamped together and lined with a cut open trash bag. The second blade in the vat is a wakizashi-ish bush sword with a blade around 14" long and a handle around 7" long. It and this other one that has a wakizashi-ish blade but a curved socket handle that gives it a bit more of a Middle Eastern feel were actually hammered out before the hunting sword. -
Something a bit elegant - integral handle hunting sword
Stormcrow replied to Stormcrow's topic in Swordsmithing
Tim - Might as well try it out of some leaf spring. Very cheap, and when you're finished you can actually heat treat it and have a very good blade if you do it right. That's the material this is made from. Phil - Thanks! Thomas - I've seen a couple of different designs that are called hunting swords, the slim one you mention, and a more falchion-ish blade along these lines. I don't have a set of scales to weigh it, but it's a bit heavy, although not bad. The stock removal to get it to a cutting edge will lighten it up some, even if it will be left forge finished. This will have a plug in the end of the handle. I like making socket handles as a lightweight, strong, nifty-looking construction, but I have yet to make one that was intended to pull double duty as a pole arm. -
stealing others ideas
Stormcrow replied to Dave Martin's topic in Power Hammers, Treadle Hammers, Olivers
Seems to me that if you're going to go to the trouble of putting an air cylinder in the linkage, you might as well get rid of the tire clutch and just use the cylinder to run the hammer. It'd give you better control overall. Maybe a variation of the New Kinyon style in another thread? Unless I'm misunderstanding what you're going for. -
I haven't posted any new work in a while. I've been pretty busy, but it's mostly been work around the shop getting my new power hammer optimized and such. I still have some more of that kind of work to do, but I'm finally getting to put the hammer to good use. I forged this out today. It's an idea I've had for a while. I've seen blades with integral socket handles and I've seen blades with integral knuckle guards. I've never seen the two together. It took some amount of technical skill to make them. Still have some cleanup work to do, particularly where the knuckle guard meets the blade, but I believe I am finished with the forging aspect. This will be forge finished, but elegant. It's what a gentleman adventurer would be carrying as he traverses the nuclear-blasted wastelands. The blade is around 20 inches long.
-
I'm curious what he's making. I thought at first a trowel, but now I don't know.
-
Newbie hammer question...
Stormcrow replied to Xsable's topic in Power Hammers, Treadle Hammers, Olivers
Durability is a smaller factor than wear and tear on your body. A fiberglass or steel hammer transmits more shock into your hand and arm than a wooden hammer will. This means more damage to you. My parents got me a hammer with a fiberglass handle for my birthday back when I was in high school. I forged with it once. Within thirty minutes, my elbow was sore. I never forged with it again. Sounds to me like you are buying a hammer from one of the big box home improvement stores that have largely replaced actual hardware stores. (I'm a grumpy old man of 28. ) They don't typically carry replacement wooden handles any more as they expect you to buy a whole new hammer if your handle ever breaks. Metal suppliers, welding suppliers, and actual old hardware atores will be your best bet in a brick-and-portar store. May be able to buy one off the Interwebz as well. I know Link is one brand of replacement handle if you want to search online for one. The big box stores will not sell a hammer that doesn't need a fair amount of dressing before it can be used for forging. They typically have a very large bevel on the face, with a sharp corner. That translates into marks all over your steel that you're forging. In my preference, a forging hammer face should be one smoothly, slightly arced dome from one side of the face to the other. Other folks' opinion will vary. If you have any decent flea markets in your area (the kind with a lot of rusty metal and not just wholesalers of cheap junk from Communist China) you will have a better chance of finding a worthwhile forging hammer for cheap. May need to replace the handle, but such flea markets often also have someone selling factory second wooden handles. -
Thanks, guys! Bigfootnampa - I made the suggestion to him, but he liked the ends like they were. Some others I've made had flared ends. These should be stable if nothing bumps them.