
Stormcrow
-
Posts
1,095 -
Joined
-
Last visited
Content Type
Profiles
Forums
Articles
Gallery
Downloads
Events
Everything posted by Stormcrow
-

Garden hoe I made for myself
Stormcrow replied to Stormcrow's topic in Axes, Hatchets, Hawks, Choppers, etc
Thanks, guys! Bigfootnampa - Got any pictures of it up? Steve - I'm thinking about when I have a table at a crafts show having a display of tools: half of them made by me, and the other half being what you find in Home Despot these days. Let people hold them and use them some, and let them tell the difference for themselves. -
I currently live in an apartment not far from my shop. I don't have a garden, but there is a bit of a yard, and it grows a lot of grassburrs. If you aren't familiar with these, count yourself lucky. They are resilient plants and their seeds are little spheres covered with spikes that have microscopic barbs. These can easily drive deeply enough into unsuspecting flesh to draw blood and hurt like the devil to pull back out. The seeds grow in clusters, and when dry will scatter at the slightest disturbance, spreading themselves and attaching to anything mobile so they may come to soil further afield. These end up in my carpet, where they are suddenly encountered with my bare feet. So I need to hoe the plants in my apartment's yard before they can produce seeds. I didn't have a hoe. The ones available for sale at Home Despot and similar stores are heavy, ugly, with blades at the wrong angle, likely as not made in Communist China, and generally unsatisfactory. Good thing I have a power hammer. This is what I forged out last week. It is forged from a single piece of scrap leaf spring that I had in my shop. I hardened and temepred it, and managed to find a handle to put it on (it was actually more difficult to find the handle than to make the head because stores expect you to buy a new tool rather than replace a handle, a sure sign of our degenerating civilization ). It is held on by friction at the moment, but will be receiving a screw to help hold it on if it becomes loose. It's lightweight, is at the correct angle for use, and is much more interesting and beautiful than what I could have found in a store. It's almost sculptural in form. And most importantly, it works well.
-
Nice! I'd like to see a close up shot of how you are holding the dies on.
-
Integral socket handle machete
Stormcrow replied to Stormcrow's topic in Axes, Hatchets, Hawks, Choppers, etc
It's already gone, so I can't measure it for you. I'd sayit averages a bit over 1/8" thick at the spine, though there are multiple distal tapers going on. It's heavier than a commercial machete of the same size would be, but it'll outperform it chopping while still slashing nicely. This slashed through tiny whippy branches about the size of a thick needle - cut, not ripped through them. -
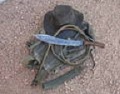
This one is ready to be picked up by the customer. He's clearing a section of his property, which is heavily covered in cedar and briars. This will be seeing action in that regard. The blade is around 16" long, with an unsharpened false edge. The steel is brand new 5160, multiple hardened in veggie oil prior to multiple tempering cycles. Handle is wrapped in hemp cord with cotton cord double Turk's head knots at the ends, all sealed with black shellac. Since briars were a major reason for the commission of the machete, the design is pointed more toward slashing than the short, recurved machete with a scabbard I posted recently. It'll still chop like an ax, don't get me wrong! A look at the socket prior to being wrapped: It's built for a righty, with the seam toward the fingers. A closer look at the end of the socket which is rolled over: I always enjoy making a good using tool. There are subtleties in physics and biomechanics that have to accounted for that cannot be understood fully unless you use tools yourself. And using a good tool like that is an especial pleasure as well. They just kind of sing to you is the best way I know to put it.
-
Something a bit elegant - integral handle hunting sword
Stormcrow replied to Stormcrow's topic in Swordsmithing
Finally finished this up. Added more red ink to the handle, gave it more layers of clear shellac, and put something of an edge on it. Not as sharp as I typically do; unlike most of my other work, this is more of an art piece, and I'd rather not have accidental cuts happen while it's on display. A closeup showing that the handle is indeed an integral socket: And showing the full length of the handle. That's a plug of pecan wood on the end, sealled with black shellac. I think I'll give it to my brother in appreciation for his help through the years. -
Custom machete with wooden scabbard
Stormcrow replied to Stormcrow's topic in Axes, Hatchets, Hawks, Choppers, etc
Thanks, guys! It has made it to its new onwer, who seems happy so far. Too rainy where he's at to go out and really try it yet, though. ;) -
Custom machete with wooden scabbard
Stormcrow posted a topic in Axes, Hatchets, Hawks, Choppers, etc
I haven't posted any new work for a while. Been busy during that time, though. Some of what I've been working on will be posted later. This short custom machete is ready to ship to its owner now. It has a 13.5" blade forged from leaf spring and was hardened multiple times in veggie oil prior to multiple tempering cycles. It has an integral socket handle wrapped in hemp cord, with a cotton cord double Turk's head knot at the front, all sealed with amber shellac. Here it is prior to heat treamtnet: It ended up with a bit more recurve. I tested it out on some dead hackberry, which is never easy to cut, prior to sharpening. Here's the video of that: Then I built a scabbard for it out of padouk wood. The scabbard is ambidextrous and has multiple holes for a variety of carrying and accessory mounting options. The overall package is light, and the blade is very lively in the hand, although as you can see it will easily tackle big chores. And now that it's actually sharp, let's see what it will do: -
Punching Hammer Eyes on the Hydraulic Press
Stormcrow replied to gearhartironwerks's topic in Presses
I really wish I could have seen all this two years ago... This was the major thing I wanted my press to be able to do, and through ignorance have caused myself to go about it somewhat roundabout. I can punch holes now, but need to ge tthe toolings all set up to do it efficiently! My little tidbit of contribution: on my press that my cousin built, it is rigged for both hand and foot operation using a single control per cylinder, with a foot pedal and hand lever linked together with angle iron. Step down with the toe or pull down on the lever and the ram goes down. Step down with the heel or pull up on the lever and the ram goes up. Never have to take your foot off the pedal if you're using it that way, and allows you to easily use hand tools under the press (careful! Lots of power.) The more of this kind of data you put up, the happier you will make a lot of people. -
Homemade dies
Stormcrow replied to Countryboy39067's topic in Power Hammers, Treadle Hammers, Olivers
I just welded and let it cool at its own pace. I'm suspicious of the rail itself, though; in grinding on it I saw a whole lot of odd lines all through the steel, looked like cold shuts. I'll replace it with better dies when I'm able and take a lot more care about pre-and-post heating, and will actually heat treat them afterwards. -
Homemade dies
Stormcrow replied to Countryboy39067's topic in Power Hammers, Treadle Hammers, Olivers
Y'all be careful using homemade dies. This happened recently to my bottom combination die made out of a railroad track: I was running short on time and needed the dies. I had just enough of the same size railroad track to build a replacement, so I did so. I will be checking them both for any cracks before using them each time, and will see about making a whole new set of combo dies when I'm able. No point in risking my health over steel that has cracked. -
first socket slick
Stormcrow replied to cracker72's topic in Spears, Arrows, Pole arms, Mace/hammer etc.
Looks good! I had a student get cracks in a socket handle because he persisted in working it too cold with the fuller end of a cross pein while spreading prior to rolling in spite of my warnings. I'd get busy with another student, look up, and he'd be hitting it cold and thin. Sure enough, rolled the socket and found some cracks. You said it was likely scale, I know, but this is one way that you can get cracks when making a socket. -
Biggest hammer I've seen was last week. Brian Brazeal had it with him. I believe he said it weighed 30 lbs. That's my little six pound hammer to the left by way of comparison. And yes, they did actually swing it...to drive an anvil stand with the anvil on it into the ground to level it.
-
Due to some rather unfortunate injuries to one of the students in the Toolmaking Class portion of Balcones Forge's Bluebonnet Workshop, a slot opened up for me to take the class. I jumped on it. I was really wanting to get some instruction on making eyes. Sure, I had seen what Brian Brazeal has said on the subject here on the forum, but there is only so much that reading can tell you. Sure enough, we spent time making eyes. Among other tools, I ended up helping to make four eyes, and due to Brian's instruction, they came out great. Here's what I ended up with. The big one is about a 3lb. rounding hamemr still needing ground and heat treated; it got a bit burned on the last heat. Dang coal forges! The other is a tool blank, to be forged out into whatever is needed. I had met most of the other students before. I'd never met this one before, but he seemed familiar. I think I've seen him on T.V. building motorcycles or something. And, most importantly, I was able to apply the knowledge gained in the class when away from the class. Here's the best hole I've ever punched on my own: It was punched using my homebrewed power hammer and hyrdraulic forging press. I didn't get in any hurry and didn't yet have the nifty tongs that make handling this kind of work so easy that we used in class. I'd say it was probably between four and six heats to do the hole. With some practice and the tongs, I'm betting I can get it down to one. It hasn't been drifted, just punched. Thanks to Brian, Lyle, Balcones Forge, and everyone involved in the class. I achieved what I set out to with y'all's help.
-
Wasn't he the kid doctor who wore sneakers? Cool dies!
-
Homemade dies
Stormcrow replied to Countryboy39067's topic in Power Hammers, Treadle Hammers, Olivers
Interesting, MacBruce. I may adapt that adjust-o-die setup to my hydraulic press tooling. It could really kill a couple of birds with a singular projectile. -
Homemade dies
Stormcrow replied to Countryboy39067's topic in Power Hammers, Treadle Hammers, Olivers
Looks like a good setup. I particularly like the auxiliary tool holders on either side. Got any pictures of them in use? -
Homemade dies
Stormcrow replied to Countryboy39067's topic in Power Hammers, Treadle Hammers, Olivers
The link is higher up the page. The big thing that turned me off of bolt-on dies was simply lack of precision on my part. Getting eight holes per die to line up easily and quickly just wasn't happenning. I got one set of dies made that would bolt on, then tried to make a pattern so I could make more. The pattern matched the holes in the base plate of the die, but didn't match the holes drilled and tapped in the anvil. I realized that I was looking at a lot of effort and frustration down the road, so it would make sense to use my very limited precision and machining experience to build a die-holding system that would let me hold the dies in place without having to be precise each time with hole drilling. In short, I was working around my idiosyncrasies. As a side effect, my die-holding setup is a quick-change operation. I undo one nut per die, swing the arm open, slip the die out (sometimes needs a bit of persuasion), clean the scale out if it's the bottom die, slip in the next die, close the arm, and tighten back down. It doesn't allow for offsetting the dies like you can with a dovetail setup (neither do bolt-on dies), but that can be overcome somewhat with purpose-built offset dies or handheld tooling. -
Homemade dies
Stormcrow replied to Countryboy39067's topic in Power Hammers, Treadle Hammers, Olivers
Country boy- I haven't directly done anything with it yet, but my plans are: a butcher for isolating steel, fullers, cut-off dies, flatters, and so forth. Macbruce - My baseplates warp some when welding, but I straighten them a bit with the press and then grind them to fit. With my die-holding setup, it just makes for a tight hold. When I was using bolt-on dies (briefly), I saw that it would contribute to making it difficult to get the bolt holes lined up correctly whenever I made a die. Part of the impetus for going with my setup. -
Homemade dies
Stormcrow replied to Countryboy39067's topic in Power Hammers, Treadle Hammers, Olivers
Here are the track dies. Please disregard the hideous welds. I am slowly getting better at it. First off is a set made from a piece of rail that had been used as a field drag. In other words, after plowing the field, this was dragged behind the tractor to break up any clods and smooth out the dirt. This wore a nice progressive arc to the cap. This was the first pair of dies I made, before switching to the current die-holding setup. The remnant of the original baseplate is still there. I ground one end at an angle. I've used these dies for a number of different things, including roughing out blades. They can do a surprising amount of work on forging a knife, though there may be other shapes better suited. The other two sets are made from a different piece of track. The first is simply a pair of narrow flat dies. And the final set is a pair of combination dies. They are all a bit soft, but have stood up to hammering fairly well so far, and the main material for them was already owned and therefore cost no money in itself. They've let me do a lot of work so far and have a lot more work still in them. If they start to deform too much, I may see about heat treating them, but for now I run them as-welded. -
Homemade dies
Stormcrow replied to Countryboy39067's topic in Power Hammers, Treadle Hammers, Olivers
I've built three sets of dies from railroad track using a similar method, but my die-holding setup is different from anyone else's that I've seen, so before describing the dies, here's the system: That said, I cut the track lengthwise down the web, one inch below the cap. Then I fill beneath the cap with 1" square bar. I tack it together, then tack to my baseplate, which is already drilled for plug welding. I weld everything securely, filling in the gap between the rail's cap and the 1" square. So far, seems to work well. I have a set of flat dies, a set of combination dies, and a set of off-center fullering dies. I'll try to snap pictures in the next little bit. -
Power hammer tooling and texture samples
Stormcrow replied to Stormcrow's topic in Power Hammers, Treadle Hammers, Olivers
Thanks, John! Power hammer tooling interests me. At the three shops I worked at prior to getting my own shop space, I only used the power hammers to taper, generally to make scrolls or pickets. I saw some of the tooling used for other operations being used, but never got to use it myself. Tooling under a hammer surely does expand what you are capable of doing, and I really like to see what others have done. That's one reason I went with the die-holding setup I did: it's a lot easier to fabricate a number of dies with base plates than dove tails, especially when you have no machinist training. I can make dies out of scrap. Commercial dies start at $400 a pair and go up, from what I've seen. By the way, the tool-holding setup on the pending main flat dies I mentioned is the same seen on Sweet Pea in your video: Is there a term for that system? And when are you going to make more videos so I can pick your brain? :) -
I made some texturing tools for my home-brewed hammer this week, and used them to help provide some samples to an architect for a potential upcoming job. The first tool was made from a dome-headed bolt used to hold sections of railroad track together. I found it mostly buried in the dirt near the tracks that run by my shop, heavily corroded and pitted by rust. I cut the head off, welded it to the end of a length of thin mild steel strap, bent the strap to make a spring, and had my tool: It fits into the auxilliary tool holder on my hammer's quick-change die holder. The bottom die is just a scrap piece of 1" plate, which rests even with the top of my die holder. I need to make an actual completely flat bottom, but mostly just to make it fit in the holder better since this scrap is a bit smaller than the holder. Works really well for using tools, upsetting, etc. Then I used the tool to make another tool. I took a couple of scrap pieces of 1"x3" mild steel bar, welded on rebar handles, got them hot, and passed them under the bolt head tool, and now had the texture transferred to the flat bar. After rounding the edges off, I welded these two onto a piece of wide, thin strap, bent it into a U, welded on a shank to fit the auxilliary tool holder, and had a spring texturing swage. When I have my main flat dies completed, which have tool-holding holes drilled in them (don't know if there is a name for that system of holding tooling on), I'll cut them off of the spring and turn them into die-cap tools. As is, it does a very nice job on 1" round. I love this texture! I also used the bolt head tool to texture some 1/4" plate before cutting out topographic shapes and plug welding them together. The plate began to cup upwards under the hammer, so I flattened it back out with my press after texturing. I see the bolt already starting to flatten out some, so I think my next step will be to use it to make a die out of some truck axle that I can harden and use to make new texturing dies as needed. The samples as delivered to the architect yesterday: All of the samples not made on the new texture dies were made using my combination dies torched out of a section of railroad track. The octagonal one reminds me of rock formations like Devil's Tower and the Giant's Causeway, so I didn't try to make the faces all even, just smooth. The look for the ironwork is supposed to be raw and primal anyway. The two with the "Dark Tower of Barad-dur" textures are only slightly different from each other. They were the ones the architect liked best. Today I forged out a quick sample of half a door pull from 1 5/8" round. The amount of offset, the shape of the flattened portion, and the exact texture aren't necessarily what the final would look like, but they give an idea of what can be done. Most of the forging was done on my hammer, and the rest with the press. Having a power hammer is sure a game changer! Even if it looks a bit rough.
-
Scrap Yard Won't Sell Scrap Metal!!!!
Stormcrow replied to CurlyGeorge's topic in Blacksmithing, General Discussion
I make a trip every couple of weeks to the south side of San Antonio to refill my propane tanks at Bell Hydrogas and peruse Ashley Salvage for useful metal. Got most of the steel to make my power hammer there. You can wander where you like, just don't be stupid about the equipment. -
I've made three different sets of hammer dies so far for my Appalachian-style guided helve hammer. These have so far all been made from pieces of railroad track and have done pretty decently since being put into service. I'm making a set of main flat dies for the hammer now. In addition to being used by themselves to forge with, they'll also serve as tooling platforms (more information when completed and I have pictures). These dies are made from 3" square 4140 5" long. For quick reference, my die-holding system is here: So I have these flat dies welded to their base plates, pre-and-post heating to make sure everything is as it should be. I need to do a little grinding and then I'll be ready to heat treat. My question is this: After hardening the dies, I'm not sure how far back to temper them. My hammer hits pretty hard (88 lb ram driven by a 3 hp motor), so I don't want to see high-speed shrapnel come off of these. I also don't want to have these expensive (for me) and time-consuming dies pick up dings and dents too easily. So I'm not sure whether it would be better to draw them back to blue (560-600 degree range) or purple (520-550 degree range). This is a hammer that so far has proven to be as hard-working as a manufactured mechanical hammer, and the dies need to be tempered accordingly. It's not a hobbyist hammer, just a home-brewed workhorse.