

Glenn
-
Posts
17,325 -
Joined
-
Last visited
Content Type
Profiles
Forums
Articles
Gallery
Downloads
Events
Posts posted by Glenn
-
-
You folks in pecan country ever use the shells for forging fuel?
-
Do not overcomplicate simple. It is just a box to hold dirt. It is a hole in the ground raised to a convenient working height.
Ash is a good insulator, and cheap.
-
Only 50 days until Christmas 2021.
-
-
Look into the Pennsylvania Artist Blacksmiths Assoc. PABA, and Pittsburgh Area Artist-Blacksmiths Association PAABA. A few hours at one of their meetings is well worth the trip.
Click on the read this first tab at the top of the forum page.
The more you read and research your area of interest, the less mistakes you will make and the less expensive things become. To get started you only need a 2# hammer, something to hit on, (improvised anvil), and something to get the metal hot so it moved easier. Search the site for JABOD, just a box of dirt. Build one for little or no cost in a couple of hours.
Welcome to the forum.
-
-
Weld a piece of bar stock diagonally to the bottom of the hardie plate. It will fit into the hardie hole and will not turn.
-
He, family, and friends are on the list.
-
A quick google image search for "Parker 974 vise and Parker 974 1/2 vise" lead to a bunch of images. Another search for "difference between a Parker 974 vise and a Parker 974 1/2 vise" and a search for "Parker vises 974" had some rabbit holes to follow. There were several hits on vise restoration.
-
Photos of your vise go a long way in getting the proper information back to you.
-
Drainage pipes are suggested, even with gravel as fill.
Besides how long is the lumber going to last in wet conditions?
-
As Iron Dragon said, use the anvil for a year (2000 hours) before you do anything.
If you are new at the craft and blacksmithing, you MUST consider the source and reason for the advice you receive. A farrier, bladesmith, general blacksmith, and an architectural blacksmith all have different ways to use their anvils. All can give good advice for their way of blacksmithing that may not fit well for the others.
A year (2000 hours) of working on YOUR anvil and you should have figured out what YOU need.
-
You must be a member to access the OWWM site.
-
2 hours ago, Jarntagforge said:
Please don't comment on this thread anymore.
If comments bother you, use the sites ignore feature and you will not see post from the members you choose to ignore.
Or do not choose to open the tread to see if there were any additional posts.
-
You may want to put drains below the crushed stone to remove any water that may accumulate. Do not forget that it can drain both ways, out and in. Be sure the outlet of the drain is well below the level of the crushed stone.
Now would be the time to add a conduit for any future utilities. Only cost would be the conduit itself at this point.
You may wish to put a goesinta in place now for use later. They come in handy for many things.
-
While at a demo a fellow took a couple of photos and you can clearly see that my fingernails are touching the top of my ear at the beginning of the down and power stroke. With full shoulder, arm, and wrist movement, the metal did move. When less power was needed, the hammer was not raised as much.
Need more power, use a heavier hammer. Move from 2 pound to 3 pound to 4 pound or heavier. As long as your comfortable with the hammer weight and the blows are accurate, you can move metal.
Jymm Hoffman makes a long handled hammer that has two hand hold positions. Choke up for detailed or fine hammering, or slide your hand back to the end of the handle for more power.
There is no one perfect hammer. The hammer you have now can do more things than you have learned how to do.
-
We also need to factor into the conversation the power of the hammer stroke, whether full power and heavy hitting, or just a little power for fine work.
The technique changes with the amount of power you apply.
-
Put your hammer on top of the anvil face. Grip the hammer handle with your thumb on top of the hammer handle, and push the hammer head down against the anvil. You should be able to feel the stress transferred to the thumb, wrist, arm, and shoulder.
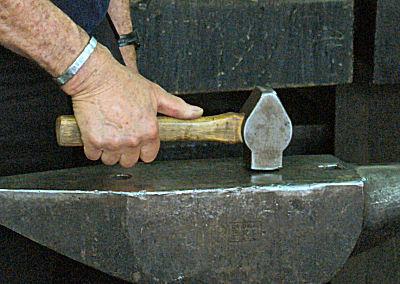
Now grip the hammer handle with your thumb wrapped around the hammer handle, like you were holding a tennis racket. Push the hammer head down against the anvil. Your wrist will bend. There is little stress transferred to the wrist, arm, and shoulder.
Alternating thumb positions, repeat the grips and pushing the hammer head down hard against the anvil several hundred times.
Hofi has a different hand grip on the hammer. Notice the thumb not wrapped around the hammer handle, but beside the hammer handle.
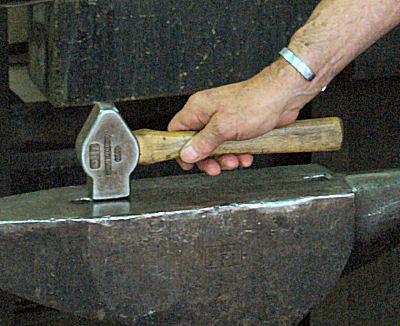
Grip the hammer handle as shown, between the thumb and fingers. Push the hammer head down against the anvil. The hammer will rotate between the thumb and fingers. There is little stress transferred to the wrist, arm, and shoulder. This technique takes some getting used to but is well worth the time invested.
-
Gandalfgreen, Rojo Pedro If you have trouble drawing out the nail shaft, then practice drawing out. You do not need a 4-5 inch shaft for every nail, as 1-2 inches work for practice and where short nails are needed.
The nail head should be about 1-1/2 times the diameter of the parent stock. Place it in the header and give it a heavy, well centered whack. Well centered takes some aim and some practice. A second well centered whack may be needed to reduce the thickness or better center the hail head. Hit with the hammer head tilted a bit, hit the nail head from 4 different directions, North, South, East, and West, resulting in 5 flat surfaces and a decorative nail head.
-
Then cut and install bricks to create a wall in your forge.
-
Are you going to rigidize the wool plug or just let the loose fibers get blown about with the air? A quick fix can have lasting health problems.
-
Sarah, family, and friends are on the list.
-
A commercially made forge is built to the specifications of those selling the forge.
Different forges are made to different jobs. Do you know which type forge is best for your type work?
Built correctly depends on who you ask and what they think correctly is for the type work they do.
-
Pneumatic power vs mechanical power vs screw press power do similar things, just in a different way. Choose the one that works for your project. Look at a punch press to get an idea of how production work is done.
The hole produced is a product of the punch used.
German Church Window Anvil
in Anvils, Swage Blocks, and Mandrels
Posted
TechnicusJoe: Excellent videos with great information as to construction and function. Thank You.