

Glenn
-
Posts
17,325 -
Joined
-
Last visited
Content Type
Profiles
Forums
Articles
Gallery
Downloads
Events
Posts posted by Glenn
-
-
When I said come-along, do not get locked into the actual come-along style device. A boat winch works well. Avoid a block and tackle, or rope hoist, as there is no way to securely stop, or disable, the device. Then there is always the possibility of someone coming along and pulling the loose end of the knot, or rope, and turning everything into a free fall situation.
Low and slow are the words to remember whenever you are lifting anything. A heavy object with one inch clearance is much easier to control, and less tippy, than the same object with lots of air underneath. If that object wants to fall, or tip, get out of the way. It is easier to hoist it back up without it being on top of you, your leg, foot, etc.
Be sure that the dog and cat are outside of the building and locked in a crate. Animals have a habit of thinking they are inspectors, or helping, when they walk around or under the load.
-
Two goesintas, one at the top of the leg, and one at the bottom of the leg should stabilize the crane.
An inverted U, using opposite legs to form a diagonal bridge across the stand. That would most likely be the strongest and most stable lifting design.
-
Safety should ALWAYS be first. Working tired is just NOT safe. Too many things you do not recognize as dangerous.
Working for an education or information is an investment. You can collect all manner of ideas from each craft that can then be applied to whatever you are doing. Combine several ideas and solve problems as they arise.
Pinch points are always available. The object is to recognize them, reduce then, and or stay away from them.
Make a couple of goesinta and weld them to one leg of the stand. Fabricate a 7 shaped crane hoist to fit vertically into the goesintas. Use a come-along to raise, flip, and lower the swage block into place. Just be sure the weight of the swage block, when raised, does not want to cause the stand to tip over. The come-a-long does not have to be between the top of the 7 and the swage block. It can be located on the leg of the 7 and use a couple of pulleys to direct the lift to the swage block. Just be certain that everything is secure during the lift, the flip, and lowering the block into place. A piece of pipe or heavy rod can be used as a lever to encourage things to move while you keep your hands away from any pinch points. Keep your hands out of harms way. If the block does not slip easily into place, a lever can provide a bit of encouragement while keeping YOU and your hands at a safe distance.
Once the block is flipped, remove the crane so you have a clear path to work on the swage block.
-
Clinker is the stuff in the fuel that does not burn, dirt, debris, etc. They may have scooped up the bottom of the pile and dirt when they loaded the coke.
Coke likes a gentle air. Fuel does not make the fire hot, air makes the fire hot. The metal goes in 1/2 to 2/3 of the way up the fireball. You may want a deeper fire.
One fuel does not behave like any other fuel so you need to learn to use the fuel at hand. One batch of fuel does not behave like the next batch some times. It is a learning process.
-
When considering a wood stove, ask the sales person to unplug the stove while there is fire in it. They choke up.
One popular stove uses the stove fan to cool the same fan from the heat of the stove. No power and the stove overheats and burns out the very expensive to replace fan. You are left with a overheating stove in your home.
Only thing left to do is to shut off the air to the fire, if whoever is home recognizes the danger, and knows how to shut off the air.
-
They look like what is called briquettes here. The additives in briquettes are mainly used to hold the materials together in order to achieve clean little blocks that are often roundish-squarish in shape which makes them easier to stack. Although briquettes burn longer, they do not burn as hot as lump charcoal.
I would suggest that you sift or sort them apart and learn to use each by itself.
-
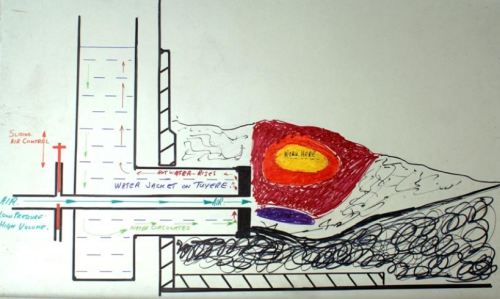
You may want to look at the image of a side blast forge again. The fire is above the height of the end of the air pipe, and the ash, slag, etc collects below the end of the air pipe. You are trying to limit the size of the fire by placing walls at the end of the air pipe, AND limiting the size of the fire with the away wall. The fire will naturally be in front of the air pipe on its long axis. With no away wall, the fire and fireball will be self limiting by the fuel and the air blast used anyway. Try putting the away wall so that you can get a tennis ball or larger fireball between the two walls.
Changing your forge design may take a little playing the design, but that is part of understanding how the forge and fire works. Easiest way to start is to remove the away wall, add more fuel, and then look at how the fire wants to work. Once you get things working, you can add a stock rest so the stock naturally locates horizontally and 1/2 to 2/3 of the way up the fireball.
-
Look at the hot spot and then adjust the forge to move the hot spot to where you want it. Keep an amount of fuel over the top of the hot spot so it replenished the burned fuel as you forge.
-
Fuel does not make the fire hot, air makes the fire hot. Use only as much gentle air as you need to get the heat you want from the fuel.
Start by raising the air pipe up, say an inch at a time. Add more fuel to insulate and keep the heat down into the fire. Insert your metal horizontally and 90 degrees to the air pipe. Adjust as needed. The fire may only allow a short section of the stock to get hot, so slide the stock in and out (through) the fire to get a longer heat. You can only work 4-6 inches of hot metal at a time, so multiple heats may be required.
Learning how to use YOUR forge takes practice and making ONE adjustment at a time until you get things to work the way you would like. Patience and one adjustment at a time is the key.
-
A quick search of local gas prices show a $0.05 cents per gallon difference in this area. For 20 gallons that is a $1.00 difference. Makes you wonder if chasing down that bargain is worth the dollar after you factor in time, wear and tear on the car, mileage, and exposure to traffic and traffic hazards.
-
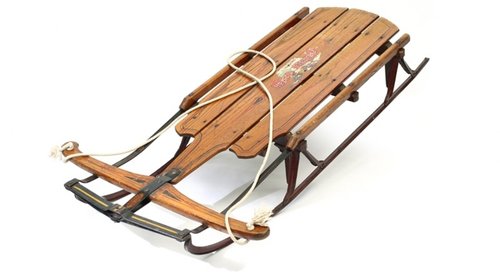
Stearing mechanism of the Flexible Flyer
-
When you get down to fine measurements, 1/32 of an inch is about 32 thousandths of an inch. Actually 0.03125 but close enough when your using a 2 pound hammer to forge with.
-
A blacksmiths can make all swords of things.
-
How much twisting square bar will shorten it would depend on the size of the square bar and the amount and type of twisting you are applying to the bar.
A coil formed by winding wire around a uniform tube to form a helix would certainly be different from say a pineapple twist or a just a plain twist.
-
Two pieces of heavy angle iron welded together make a square tube.
-
If your welding put the animals outside away from the bright light and arc reflections.
-
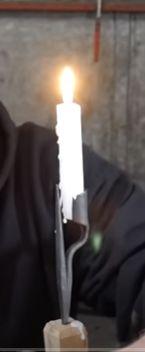
Moss shows the candle holder in use. The top spike would seem to be a support for the candle and to keep it upright.
-
6 hours ago, jlpservicesinc said:
Candles in the old days were expensive so sure they were used frugally.
Then why was a drip pan not used to catch the wax so it could be reused?
-
The style I recall was with the spike to be driven in horizontally and the candle turned 90 degrees. Another style was like a hairpin where the spike was driven in horizontally and the candle pinched and held in place.
-
JHCC You may want to try to remove that ring from your finger, just to be sure that you can.
Das, You plan on adding a tea candle to the heart on the left?
-
Annealing
Annealing is very similar to tempering. The metal is heated and held at a temperature for a period of time and then allowed to cool very slowly. The temperature allows the carbon in the steel to form carbides and then allows the carbides to grow larger. By allowing the carbides to grow large, the steel becomes softer. A full anneal involves heating the steel until it is fully austenitic. As we learned in the discussion about phase diagrams, this temperature will be determined by the carbon content. However, if the carbon content of the steel is not known, heating to a bright red heat will have to do. Holding is difficult to do in a coal forge but any time spent at high heat will achieve more than just heating and slow cooling. By slow cooling, we mean cooling in ashes or vermiculite for 12-24 hours. This gives more time for the carbides to grow and results in a softer steel.
Sub-critical annealing, or heating to a lower temperature, will soften steel but not as much as a full anneal. Sub-critical annealing involves heating to a dull red and slow cooling. This may be sufficient for low carbon steels.
Normalizing
Normalizing is also similar to annealing. It requires the steel to be fully austenitic and this means heating to an orange to yellow heat, depending on the carbon content. Cooling is done in still air rather than slow cooling in ashes or vermiculite. Normalized steel will be harder than annealed steel. Some steels should not be normalized, such as the air-hardening grades of tool steel. They will get almost as hard from normalizing as they would if you intended to fully harden them.
Tempering
In many old books on blacksmithing, the word "tempering" actually referred to the hardening process. "Drawing" was the reheating of the piece to achieve the final hardness. Today, the process of heating and quenching is called "hardening" and the reheating afterwards is "Tempering".
The alloy content of the steel affects how quickly the carbon can form these carbides. Molybdenum is a very potent alloy used to create a deep hardening steel and it slows down the movement of the carbon during tempering. This has the effect of maintaining high hardness at high heat. That is why hot work die steels like H12 or H13 have a lot of molybdenum in them. Molybdenum is also used in high speed steels (the "M" series) so that they do not become soft when they heat up due to friction.
The surface of the steel will change colors during tempering if you remove the scale and brighten the surface before tempering. The color indicates the temperature of the steel, NOT the hardness. For this method to be effective, you must have some idea of the alloy content of the steel so you can choose an appropriate temperature for tempering.
A simple way to determine the appropriate temperature (and color) is to harden a sample piece of the steel you are working on, preferably something about 6" long. After hardening the entire piece, grind the scale off, sand the surface smooth, and heat it from one end only. Stop when the opposite end is just a light straw. Quench immediately to preserve the colors. Take a file and strike a line through each color. When you hit steel that is harder than the file, it will leave no mark. This will give you an idea what color is appropriate for the steel. This assumes that you are trying to achieve a high degree of hardness. Tempering to lower hardnesses will improve toughness.
Tempering of tools usually involves heating to the range of 400-600F. This can actually be done in your kitchen oven with a high degree of accuracy and success. Get the oven up to temperature before you put the steel in it and allow at least one hour per inch of thickness for a holding time. Minimum tempering time should be one half hour regardless of thickness. Double and triple tempering often improves hardness and toughness but every time you temper, you should increase the temperature by about 25-50 degrees.
-
Nothing is as permanent as a temporary fix. Thomas Powers
-
Anvil height, how can you tell if it is the right height
The above will show you if you are hitting the metal flat with the hammer face. From there measure the anvil face to your hand so you can have a quick reference later.
-
Many times we hear different recommendations for anvils based on anvil weight. So let us break that down into increments and discuss what an anvil weight can and can not do.
75-100 pounds
100-150 pounds
150-200 pounds
200-250 pounds
300 pounds
400 pounds
over 400 pounds
What are your thoughts ?
How do you store your metal ?
in Blacksmithing, General Discussion
Posted
How do you store your metal stock? Racks (vertical or horizontal), laying down, standing, hung from the rafters, A frame racks, etc ? Photos help and we will not judge.
We use multiples of 20 feet, that is to say two 10 foot sections, four 5s, five 4s, six 3s, 2s, etc. Each length standing up in its own 5 gallon bucket. That way we can pull the length we need without having to make the long pieces shorter when you already have a short piece.