January 28, 20242 yr Evening all, I've almost got my green sand casting set-up back and running, because my wife has been after me to show her casting. Thought I'd try to do the Gingery lathe, and if that works well, go through his series: the lathe, the shaping machine, etc. For those not knowledgeable (although I expect most of you are), Gingery starts with the idea of making a simple charcoal foundry, then pouring the pieces of a metal lathe, and using the partially finished lathe to turn the parts as you go. I've got a couple of small flasks made, and today I did the moulding table as well as mixing the green sand. It's not as fine a grade of sand as I would like (commercial medium grade), so I expect more scraping and finish work. Part of living on a bloody island, getting materials of any kind can be a pain. Otherwise, it's more or less out of the book: 100 lbs of sand, 11 lbs of bentonite, 1.66 lbs of flour, and a little more water than I would have liked - took three quarts. I'm not touching it until I see how it looks after it goes through the riddle tomorrow and dries out a little if it needs it; I'm not fond of steam in my mold. It shouldn't need more bentonite either, but it sure feels like it does, possibly because of the greater porosity of the larger sand. I'll know better tomorrow when the clay has had a chance to absorb the water more evenly. The big thing I'm still missing is aluminum. I've got a few lbs I can melt down, but not enough for the whole thing by far, or even much more than the bed. I may drive out to the junkyards in Sedro Wolley tomorrow and see if I can find a busted engine or transmission case, something that's only good for scrap value. They're a pain to break up but have a lot of aluminum. I know the Gingery design is imperfect and I don't mind incorporating improvements. If y'all have any suggestions, please feel free to shout or to just show your builds.
January 28, 20242 yr I've been thinking about going down the Gingery Rabbit Hole. Like you said, acquiring ENOUGH aluminum is quite the challenge. Living in Kansas, I face the same challenges, but sometimes a tornado can drop aluminum in your lap. While technically illegal, I found a couple of these: ...on uncles farm. Gonna use one for the ways and the other one for part of the miler or shaper (undecided now). The nice thing? -Don't have to make/worry about "the hardest part to cast" and no need to make a one off flask Also lucky enough to find 1/2" thick structural angle scrap I plan to use as the foundation of the carriage (i.e.- the saddle) assembly. Oh, one other thing, instead of hand scraping, I plan to use a grinding wheel on my dad's radial arm saw. Even though you already mixed up your sand, I saw a youtube guy using this stuff from the Home Depot (Unimim 75 lb. Ind5020 Silica Sand-Fine) with 30W motor oil as a poor man's Petrobond. Another guy said Middle Eastern casters use molasses water and fine sand, which we also know can be baked and used for "cores" Thought I'd throw that out there as you could use either as "facing sand" Good Luck!
January 28, 20242 yr Author Fishplates? They're not generally illegal to own, although the acquisition might be. You can talk to road crews sometimes and they pop up in various places, including uncle's farms. As a former conductor, I strongly encourage everyone to stay off the rails; it's not the eight bucks in stolen scrap metal that offends so much as nearly killing people one in every two or three trips. I've got high enough blood pressure. Molasses water does make for a nice core and smells kind of good cooking. I'm going to give the medium sand a whirl; if I'm not happy with the surfaces, all I've lost is 10 bucks worth of sand or so. If worst comes to worst, there's a foundry in Port Townsend and I might go begging for some of their used sand. You wouldn't think, living on an island, that fine silica sand wouldn't be hard to come by, but none of the six brands of local hardware stores in 45 miles of driving carry it anymore, including the orange one, the blue one, and the one from the playing cards, and I will never make the mistake of sifting my own sand from scratch again *shudder*. I may have to hit up a few masonry or pottery stores closer to Seattle the next time I go to drill. That's what I finally had to do for the bentonite. A few of the pet stores have the fine sand, but at about two dollars a pound.
January 28, 20242 yr Nobody: You might want to sieve for finer sand and you need to let it temper (allow the moisture content to equalize through out the sand box) for several days at least. The feel will change as it tempers. The traditional test is to squeeze a handful hard and examine the results. If it leaves your hand wet or streaks it, it is too wet, add more dry mix a LITTLE at a time! If it crumbles it is too dry add a LITTLE water with a watering can to distribute it over the sand as much as possible. Mix thoroughly and let it temper for a couple few days. Retest. Keep notes on how much water or dry mix you added to make it right. It WILL dry out over time and use. A sealed box is the best but covered is necessary. You can leave it open to dry it of course. About your flask. How are you going to lay the Drag flat on the table to mold the first half? The alignment pins should only be on the Cope with the receivers on the Drag. Or and my favorite is to have receiver holes in the table so you can lay the Cope on the table or pattern and it can't shift as you ram it up. I've never seen a flask where the alignment system is proud of both Cope and Drag. Of course you could make a table with receivers for both, maybe at 90*. Have you made your tamper? You have to ram up between the pattern and flask. What are you using for release? Frosty The Lucky.
January 28, 20242 yr It was a fun series of books and what got me into casting. I skipped ahead and made the shaper, only, but read them all. It will be interesting to watch your progress. If you plan on sharing it all here, that is. Sorry, I no pictures or I would post them.
January 28, 20242 yr Author Frosty - honestly hadn't thought it through fully. Two solutions - either lower the alignment cleats on the drag (the ones on the cope still extend far enough) or use a moulding board the same size as the flask. If it's rammed with the moulding board on top of sand in the moulding table it shouldn't matter if the cleats go a little deeper than the board, but I'll probably just move the cleats a little. After all, I imagine I'll want to just use the table sometimes rather than have a board for each flask. I was letting it temper for at least a day before use, and more if it needed it, as I have not enjoyed steam explosions enough in the past to do it again...accidentally. Right now, water is 6 lbs out of 118, say about five percent, which is more than I like but not out of the question since both the clay and sand were sealed and pretty dry. Squeeze test it felt damp, but not too wet, and broke okay-ish, but I wanna see how it does when the moisture has had more time to even out. It was a little sticker than I like last night. As a cover, I had a piece of plywood almost large enough, and tarped the rest; gonna cut a piece of plywood to size later. Tamper for now is an old hammer handle, although I'll probably sand the end down into more of a wedge shape to fit the corners better. For parting powder, I was planning on something sophisticated, like diatomaceous earth in a sock dusting bag since I have a bunch of it already. If I decide I don't like the mild risk of silicosis, I may try chalk dust or give charcoal dust a whirl - I've been swimming in fines I started busting it up for the forge. I'm not sure that charcoal would work, but they use coal dust and graphite, and they're both similar-ish forms of carbon. Also need to get a larger mesh for a riddle; not counting window screen the only meshes I had at the house were box wire fencing, which is a tad wide and steel 1/8" mesh because I use it for the bees. It works, but it makes for godawful slow riddling.
January 29, 20242 yr 3 hours ago, Nobody Special said: ...need to get a larger mesh for a riddle; not counting window screen the only meshes I had at the house were box wire fencing, which is a tad wide and steel 1/8" mesh because I use it for the bees. It works, but it makes for godawful slow riddling. Guess I need to check my OCD at the (barn) door! I suggested that Granusil/30W motor oil as the po'boy alternative to Petrobond, personally, I've been sifting dried up creek-bed sand through an "extra fine double mesh" restaurant strainer and then through a dollar store grease splatter guard. I only do 'bout 2#'s at a time while having a beer/shot/smoke in the barn though (cold winter nights this year). Thankfully I'm finished grinding up the bentonite (kitty litter)! Unfortunately, (frustration) time and five bucks is just too much cheaper than shipping/gas (3 hour round trip in a hungry V8) for 7-10 pounds of bentonite.
January 29, 20242 yr Of course you haven't thought it through and wont for a while, right now you're in the concept stage. You're beyond wild ideas but still brainstorming. Check your sand's temper in 3-4 wide locations, one dead center, one bottom corner and one top far corner. Differences in moisture content will show better. With only 115 lbs. of sand you can use a mixing tarp instead of a shovel and hoe. It's a lot more thorough too. The only problem with that small a sand box is how fast the moisture content will change. Unless you're flasks are really small you'll need a lot more than a hammer handle. This is where yard / garage / etc. sale baseball bats comes into play. I got something like 15 at a moving sale for the take all this stuff or nothing deal and when I stopped to think for a second lowered the price to $1. and I was more than happy about the $5 for half a dozen hammers of various description. Anyway, old wood ball bats make excellent mallets, twockers, feral dog discouragers, etc. and it doesn't make you one tiny bit sad to take a saw to one. Just show any interest at a ball bat at a yard, garage, etc. sale and they'll give it to you. NOBODY wants to buy old scuffed up bats. I see a beautiful tamper hidden in one, don't you? Hmmmm? Diatomaceous earth or chalk, Hmmm, choices choices, silicosis or asbestosis . . . Dang I just can't decide, dust mask it is. On a serious note, you aren't starting a commercial foundry are you? Graphite doesn't stick to anything and isn't expensive though I don't know what breathing any quantity would do. Black lung maybe? I don't have any thoughts about screens. If it hardens up enough to need mulling I'd rent a cement mixer and buy some mill balls to break it up for minimum sweat. Just so you know I'm dredging memories of sand casting from high school shop class more than 50 years ago so I blame my memory for any silly mistakes I make and please double check my suggestions! Frosty The Lucky.
January 29, 20242 yr Any heavy duty ruck shops nearby? A lot of Aluminum in a 22-24" semi rim Just a matter of breaking it up with sawsall or something
January 30, 20242 yr Author The flasks ain't huge, except for the one specialty flask for the lathe bed, which I haven't built yet. Going to start easy, a couple of core plates, maybe the handles described in Book 1. We usually have a puppy whacker or two laying around if it requires a bat. Wasn't gonna be casting so much I was vastly worried about the dust...yet. Graphite works just fine from what I recall but is bloody messy and hard to clean up the few times I've dealt with it. To TLBH, I was going to suggest building a small ball mil for the kitty litter, but you've already finished. They're not hard to build if it's small and meant for one or two jobs. I've done the sifting sand through a splatter cover. I'd rather drive the several hours or work some overtime so I can pay too much before I would do it again voluntarily.
January 30, 20242 yr 23 hours ago, Dogsoldat said: A lot of Aluminum in a 22-24" semi rim The center part of brake chambers are also a good source of casting aluminum, but you may have to find a way to safely deal with the 1/2" diameter spring coiled up on one end. There's not nearly as much aluminum in one of those as a rim, but it's a much more manageable size. I'll be watching this with interest. At one point I was considering this route, but recently I was able to pick up a Montgomery Wards metal lathe (which was made by Logan and is essentially their model 200) for a hundred bucks. I'm just waiting for warmer weather so I can reassemble it and assess the condition. It won't surprise me if I find the need to cast or machine some new parts for it.
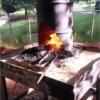
February 5, 20242 yr Author Well, got the first test casting done Thursday, following the Gingery books; he suggests casting core plates and since I haven't done casting in years, seemed like a good idea. I used a moderately thick stainless steel bowl as a crucible (I still haven't given up on pottery ones, but I've kind of gone sideways a bit). I'm a bit wary of steel crucibles, but it held up well under the heat and seems perfectly intact. Preheated it and the aluminum prior to charging and melting to make sure everything was warm and dry. Made a few mistakes but perfectly happy with it as a proof of concept (i.e. that I'm not a complete idot who's going to melt my face off). I underpoured the casting due to guessing shy and not having enough aluminum yet (this represents about half a busted pressure cooker). Usually I prefer to have too much and make ingots.The casting wasn't completely level - hence why one side filled up before the other. And I got more porosity than I would like - on the bottom though, not the top. That could be from overly wet sand, but I don't think that was the case here. I think I maybe over rammed it a touch and didn't vent well enough. I also stopped by a pottery supply in Tacoma on the way to drill this weekend and got some finer sand. Was also thinking about fluxing with crushed shell, never been entirely happy with borax for casting. Haven't decided yet whether to set the medium sand aside or to keep using it and use the finer stuff as facing sand. Probably less work to replace it all in the long run since it will save finish work. Pic 1 moulding board and patterns with parting dust. 2. Drag rammed and vented. 3. Same thing reversed. Pic 4 - the pattern removed. Could have been a bit better if I had lacquered them and had put a bit more draft onto them. Pic 5 - A cold chisel for a sprue pin. Don't judge, I couldn't find my dowels anywhere. I think my wife played with it with the pit bulls and it's now splinters. Pic 6. My furnace in action. Built it about 7 or 8 years ago and only used this one once. I honestly can't remember what happened to the original and the gas burner I had for it. Been deployed, two divorces, and slept since then. Pic 7 - My casting. Flawed but still fun. I can enjoy my aluminum I-phone and slice of bread, or I can always remelt it and go again. Oh yeah, and Frosty - I found an old book on green sand casting that discussed using the burnt sand from prior castings as a favorite for parting sand. Since it's already vitrified, it doesn't really stick to the green sand.
February 5, 20242 yr Yeah, you always want to over melt, it's better to have it and not need it than need it and not have it. Simple angle iron ingots are good for low slag al for the next melt. I don't think an al melt gets hot enough to vitrify casting sand. Maybe just use straight bentonite as a parting compound? Your sand was probably too moist, there is a LOT of area above the pattern to provide release for a reasonable amount of steam. Your sand kept steaming as it heated up. You sprued and gated in the center of two flat thin patterns and no riser? Whenever possible you want the melt to move in ONE direction, not split and have to flow in two. That invites trapped air and incomplete filling. Next time sprue centered but off one end and gate into the ends, corners suck to gate properly and clean up is more work. Then put a riser in the same general position at the far end! Keep the runners in and out deep so the flow won't cool too quickly. What you remember about the gates should be above the bottom of the pattern and are wondering how to cut runners in the cope? You can lay something on the rammed up drag half to mark the runners or some kids in class made runner patterns so all they had to do was cut gates. Sprues and risers "should" be conical but cylindrical works just fine they just require more melt and you ARE going to melt a LOT more than you think you'll need next time. Right? Steel or stainless make lousy al crucibles, molten al dissolves iron so the crucibles degrade and the al is contaminated. Inconel or Monel work nicely but there's no iron in them and boy HOWDY are they expensive! Proper ceramic crucibles aren't that expensive you just have to be really careful prepping and handling them. A good learning project is house numbers. They used to be wood but now I expect they're plastic so that's good, molding sand doesn't like sticking to plastic. Best of all they have plenty of draft, they say it keeps snow from stacking up on them but personally I think it makes it easier to get out of the molds. Look for the thick ones, 1/4" is way hard to cast compared to 1/2" or thicker. Easier pick something thick, say something like a pack of cigarettes in general dimensions. Something that flows well and is reasonably easy to pull from the sand. We had lots of such patterns in school, I made Dad an ashtray and he kept it on a shelf over his desk or computer for decades after he quit smoking. We did make aluminum frisbees but had to pack the insides so they didn't collapse when we rammed them up. Talk about a lethal toy! Casting is a ball! (Please note I did NOT say "casting is a blast") Frosty The Lucky.
February 6, 20242 yr I built a gingery lathe in high school, started the shaper, then happened upon a big commercial shaper for really cheap. I decided I needed to redo the lathe in iron, built a cupola furnace, fired it once and my parents ( and the fire marshal) shut the project down. That was more than 30 years ago so my memory is a bit iffy. I still have half the patterns ( just pulled them out last week) the big thing I recall from the lathe was what a huge pain the bed was. That takes a lot of sand, the flask is unpleasantly huge and it takes a lot of aluminum to fill. The pattern was the worst of the lot to make too. I wish I still had that one…
February 6, 20242 yr Author I think you're right about the sand steaming back on me. When I cut into it to take the gate off and to get a look at a cross-section, all the pinholes and blowouts were all at the bottom with a little bit on the sides at the outside edges. The rest was clean and solid. I did feed and gate it from the middle - wanted to follow the Gingery pics to a tee, although it's a bit lazy, and also because I haven't done any casting in years so I wanted to follow the "recipe". I did change the plates to a half inch thick rather than the 1/4" he recommends, not the least of which because I didn't want to drive 20 miles each way into town for 1/4" plywood. I think maybe he left the feed that way for simplicity, he's too smart for it not to be deliberate, but I've noticed for some of the people that tried his feed systems either ended up doing multiple castings to get a good casting or had to make considerable adjustments to the recommended feeding and gating, especially for the lathe bed. I also don't recall Gingery talking much if any about the use of risers - he certainly didn't for this casting, but he also plans for shrinkage by deliberately building molds oversize to compensate. Doing the hardest casting (the bed) first is like doing the boss battle at the beginning of the video game. I'm also sure to make errors from inexperience and not having played in years. I dunno, gonna plan it out and I've got some time while I source aluminum and turn it into clean ingots, but in the meantime I was thinking of recasting this pattern using a tapered sprue and pouring basin at one end, and an open riser at the other (and also the rest of that pressure cooker).
February 6, 20242 yr I haven't looked at a Gingery book in so long I don't remember when, before moving to Alaska I think. Your sand may have too much bentonite in it or be a bit too fine. I'd maybe move the plates a little farther apart. The problem with dropping the sprue directly onto the runners like that invites the melt to erode sand from them which ends up in the mold. I do recall we dealt with shrinkage with deep runners and over filled sprue and riser. How do you gage the sand's moisture? Do you do the squeeze test? I might have asked this already but a hard squeezed clump of sand should break cleanly without crumbling at all and NOT leave sand or moisture on your hand. Over ramming is a thing too, especially for beginners and it takes practice which I am more than 50 years out of. Frosty The Lucky.
February 7, 20242 yr Author Squeeze test is the way I go, but I'm probably not experienced enough to be certain I'm doing it right. It breaks clean, and feels damp, but doesn't leave any visible moisture. I finally got down to a junkyard and chatted with the owner for awhile, walked out with two and a half front-end drive transmissions I got off the recycle pile on the cheap. No idea the alloy, some cast aluminum alloy with Si, Mg, and a little copper. Maybe 356, maybe adamantium. Either way it breaks up lovely when struck properly. Busted up the first (smaller) half of one the fun way - with a big sledge and a three-pound ballpeen hammer on a ridiculously long handle that I got at a yard sale for two bucks with just such a purpose in mind. Got 10.5 lbs out of it and a large bearing for fun forging later. I'm sure there are more pieces in the yard near where I broke it that I'll find in the morning. So figure maybe 50 lbs of aluminum before cleanup, maybe a little more. Even if I'm off by 20 percent that should see me well through the lathe and take me into the shaper, if I get that far. I was going to build a larger flask and start casting ingots tomorrow, off a long runner like the old pig iron pours. I even thought about using an open mold. I don't care if they come out perfect, just want to get rid of the worst of the oxides and oil, gunk, and any steel I missed. If I end up with even close to 50 lbs of aluminum, and it's that's around 500 cubic inches. The bed as Gingery calls for it uses about a quart of metal, which I think is about 57 cubic inches, about 5.5 lbs. Some of the versions I've seen call for taller or thicker beds to cut twisting or chatter but I haven't decided whether to modify it yet.
February 8, 20242 yr Squeezing is the only way I've tested green sand and it's been so long I don't remember how it felt. I don't think it felt damp, cool yes but I don't really recall. Does it leave anything more than a dusting of sand on your hand? Not dust but a really thin layer like dust but moist. DANG it's been so long . . . <sigh> You might let it dry a LITTLE and try again, keep notes maybe even pics of your hands after the squeeze. A blunted splitting maul is DE-BOMB for busting up al trannies and such. Engine blocks are a whole nother story, think big saw. You should do a solvent wash before melting, there is NO telling what contaminants are in the old oil that's stuck to the casings. Burning it off won't remove metal or mineral contaminants and you're melting a lot of transaxle surface area into your castings. No? ANYTHING having to do with molten aluminum has to follow THE 3 rules. Clean, clean CLEAN! A good closed ingot mold can be welded up from shortish lengths of angle iron. Weld them flange to flange in two sets, say 4. They then get clamp plates across the outside and how you close up the bottom is up to you. I like using angle iron as the clamp plates, it lets you run long screws down to the base plate and across letting you clamp the ingot molds together and down on the base hard. I suppose you could grind a channel between them to feed any overfill to the next mold but stopping before it over flows is my preference. You can open the mold up for easy ingot removal and wire brushing when necessary. If al sticks smoke it first. Of course using angle iron laid flat makes fine ingots but the above mold reduces air contact and loss to oxidization. And one last note, there is every reason to flux the melt before pouring ingots! Frosty The Lucky.
February 9, 20242 yr Author Well, the only welder I have now is a couple of tombstone style arc welders, which presents two problems, one I haven't run 220 out to my work area yet, and two, I suck hardcore at arc welding. I can forge weld, a monkey with a five minute tutorial can mig weld (although it's like clarinet, any idiot can do it; it takes learning and practice to do it well), used to be able to a bit with the blue tip, although I did far more brazing, but arc welding is one of those things I've meant to learn and haven't got to yet. Fine state for an aspiring amateur smith, no? That's why I was going with the pigs in a sand mold, although I was debating on whether or not to do it open-faced. I love the idea of the splitting maul and can't believe I've never thought of it; I've got three of them. And now I also kinda want to try a splitting wedge...incidentally, busted the first whole transmission yesterday and got 28 lbs and change, plus a few bearings for later, ball bearings, a couple of what strongly appears to be brass pieces to melt later, and some mystery shafts. Not sure what steel they are or how forgeable - I hit the torque converter shaft early on by accident and it sheared off beautifully. Looks like I'll probably end up with around 70 lbs or a bit under.
February 9, 20242 yr Ah, so keep your eye open for one or more cast iron "corn on the cob" corn bread pan pans. Fill it and lay an old cookie sheet over it to keep air off and flux it, 20 mule team borax works okay but foams up to cover the melt and keep oxy off. Why the corn cob shape pan? The increased surface area speeds up melting in the crucible. The ingots look pretty cool stacked on a shelf too. A muffin pan is good too just NOT a coated one. Look for muffins that fits in your crucible. Read the labels on brazing, welding, etc. fluxes at the local welding supply. You want one that is anhydrous borax, a little boric acid is fine but NO IRON OXIDE. I've been using Peterson's blue for oxy propane, brazing, silver soldering and welding silicon bronze. And it REALLY works forge welding or making mokume gane. Yeah, I flux mokume billets when I was playing with it. Frosty The Lucky.
February 11, 20242 yr Author The local welding supply is, I kid you not, over 30 miles from here. Go north to Anacortes and hang a right on WA-20, you can't miss it. This is why Amazon loves my house. I had the same problem this weekend; the sequencing relay is shot on my electric furnace, so you have a choice - heat on all the time, or no heat at all, just flip the breaker to the choice you want. Drove 90 miles this morning trying to find a $20 part at any industrial supply or hvac place open on a Saturday morning, only to be reminded that I live in western Washington. Got home and ordered it online; easier then going 40 miles away to get one on Monday or 20 miles to try to talk the local repair guys into selling me one at double the price. I made another flask, Friday, and some ingot patterns before running a few castings. Getting there but still making mistakes; didn't remember to vent the first run (still came out better than I expected, considering). The last one I poured a bit cold and is rough on the bottom of the ingots with some blowholes near the gate; I think because it was cold it stopped and started in the sprue, leading to air mixing with the metal and getting trapped in the casting. Not too upset, they're only ingots, but still want to get it right before I do the bits that matter. Still not quite happy with the medium sand and since the weather's supposed to be messy tomorrow, I might go ahead and mix up a new batch with the fine sand I got at the pottery supply last time I went to drill. Every day it's nice I'm going to run one or two batches of transmission housing until I have thirty or forty pounds.
February 11, 20242 yr Okay, I had to check out a map to see where you are. Cool, I was born in Everett and have relatives scattered all over the PAC NW. Some within spitting distance on Camano Island. That I know of I don't know about the ones I don't know about. Sorry, couldn't resist. I'll PM a link to the stuff I swear by on Amazon, free delivery if you have Prime. It is Peterson's #1 Blue, fine powder flux. Frosty The Lucky.
February 15, 20242 yr Author Minor setback today. My dog ate two molding boards, a pattern, and the parting powder! Bloody pit bulls.
February 16, 20242 yr Yeah, they're always opening cupboards and drawers! Could feed them more or buy them chew toys. I don't recommend rawhide chews, pit bulls tend to just eat them and it goes right through them. An old friend used to own a white Staffordshire terrier name of Diesel. Sweetest most gentle dog ever, Jim moved to the Valley and a neighbor's rottweilers used to bully Diesel constantly. We were having coffee in the nook near the front door when they chased Diesel and cornered him in the front entry. We leapt to our feet to rescue Diesel and he discovered he could fight. About 30 seconds and two 100+ Rotties were running for home kai yiing for help. He chased them onto their front entryway and wouldn't let them leave until they laid down and submitted. And he came home. No, Diesel was till the sweetest most gentle dog a person could want and he got along great with other dogs, cats and a couple parrots. He was just never afraid of another dog again. Sorry, that was a long sidetrack but one Diesel day (birthday) a few of us chipped in and bought him a rawhide chew made from a whole cow hide. He loved it, he literally ate it in about 10 hours. His head would distort when he bit off a mouthful. Worse he left many piles of undigested chewed rawhide all over the yard. It was just awesome! A couple mold boards and pattern? He must've been really board. Maybe get him some big gnarly chew toys? Our dogs like Kongs with our without peanut butter, hard plastic dinosaur chews, etc. They always have one handy and they leave our stuff alone. Unless there was food touching it of course. If one has something they're not supposed to we tell them "leave it." and give them one of their chews or something else that is theirs. Frosty The Lucky.
Join the conversation
You can post now and register later. If you have an account, sign in now to post with your account.