Retired farmer Posted February 1, 2020 Share Posted February 1, 2020 For whatever reason I can't see either of the videos , I'm signed in . So in regards to pipe tape installed backwards . The tape has to be put onto the nipple thread so that when you screw on the next fitting, the tape is wound in the same direction as you are screwing on the next fitting . It should lay nicely as you are threading on the second fitting; if it bunches up & wants to unravel you have installed the tape with the wrong direction of wrap . Once you got it, it's like riding a bike. Quote Link to comment Share on other sites More sharing options...
frozen_coyote Posted February 1, 2020 Author Share Posted February 1, 2020 Just to be safe, I took everything apart and then re-wrapped it making sure everything was done correctly. Tested for leaks and didn't find any. I'm using a .035 mig tip and I picked up some torch tip cleaners and made sure the tips were clear of any obstruction. I put everything back together and let the forge run for a few minutes. The video below is about a minute after I turned on the gas. This isn't a permanent location (being near the bilco doors would not be a great idea) just where I was testing. You can see at the end of the video that the burner closest to the front opening is going out for a brief second or two. What could cause that? I'm also going to add a firebrick door to the front. Thanks for the continued advice as I muddle my way through this. forge running.mp4 Quote Link to comment Share on other sites More sharing options...
frozen_coyote Posted February 1, 2020 Author Share Posted February 1, 2020 I should probably add after looking at this. The flames color seems to indicate that it's very fuel rich so I'm going to have to tune the burner some more and trim more off the mig tips. Quote Link to comment Share on other sites More sharing options...
Another FrankenBurner Posted February 2, 2020 Share Posted February 2, 2020 The color of green in that video certainly says rich flames(if you see it with your eyes). Before you go cutting back the orifices, did you get the sputtering issue resolved? In all of your videos, I see a flame which tends to spin off center or topple around the perimeter of the nozzle. I have had this occur when my orifice was out of center or out of alignment and when my nozzle was out of alignment. If any of these conditions is true, it causes the air induction to drop drastically resulting in a rich flame. Do you still have the reducers as nozzles on the burners? How deep into the blanket do they penetrate? Did you just cut round holes in the blanket downstream of them? You went with two burners, are these 3/4" or 1/2" burners? Was it a breezy day when you shot the video? Even lightly. I believe that Frosty advises against having the burner air inlets in line with each other like that. You have flare fittings so you can easily rotate those burners 90° to see if it gains you anything. Quote Link to comment Share on other sites More sharing options...
frozen_coyote Posted February 2, 2020 Author Share Posted February 2, 2020 I didn't see/hear any sputtering in the back burner but the front one going out for a second there seemed to be the sputtering again. I feel like the air/wind could have been doing that? I think that might have been the reason for the front burner having that difficulty in the video. I do have the reducers on the pipe in the forge. They're in the blanket about an inch and a half. They don't actually fit in the burner ports so I have to screw them on from the inside. The only part in the forge is the reducer itself which is about an inch and a half in length. I drilled out the the holes with a hole saw. When I got through the thin metal bucket I took the 2 inch hole saw bit and just cut into the blanket with the bit by hand. The burners are both 3/4" (the inside area of the forge is around 650 cubic inches so following the 350 cubic inches per burner led me to making 2). That makes a lot of sense to turn the burners 90 degrees. I attached pictures below of the t fitting and how the mig tip sits in it (one t got minor surface rust from being outside today). I have not ground these mig tips back at all. I did have two that I cut short but I held off on using them because I didn't like the way the cut turned out (used an angle grinder and it made for sloppy cuts. I'll just grind them down on my disc sander if I need to again and clean them out with the torch tip cleaners I picked up). Quote Link to comment Share on other sites More sharing options...
Frosty Posted February 2, 2020 Share Posted February 2, 2020 Slow to join the party here. The second video of the forge shows a problem with your burner alignment in the forge, the flames are directed almost directly into the far side, this can cause excessive back pressure. I run 0.035 mig tips and never run such low psi except driving NARBS, they're a different thing all together. Trim those tips. What is with you guys and cutting disks and disk grinders? Chuck the mig tip in a drill motor and using a draw file GENTLY file the tip down WHILE it's turning. I do it in my drill press at high speed. Use the tip file from the threaded end and be gentle or you'll alter the shape and diameter of the orifice. Yes? The top two pics looking in the intake port makes it obvious the tips are way too long, take 1/8" off the one in the TOP pic. The second pic shows your mig tip is way out of line. I'll bet this is your sputterfly. Unless you bent the mig tip you'll need to redrill and tap the T. Rust! Oh MY! RUST!!! If it doesn't have some rust on it, it isn't mine. Breezes will effect T burners, another good reason to run them at higher psi. unless you get yours working at lower then you're golden. Frosty The Lucky. Quote Link to comment Share on other sites More sharing options...
frozen_coyote Posted February 4, 2020 Author Share Posted February 4, 2020 I figured out a big source of the problems I've been having. Both of the female 1/4" x 1/4" flare swivel nuts I'm using are leaking. It's happening on both burners. How did I miss this before? Short answer: because I'm an idiot. Longer answer: I wasn't testing the swivel nuts when I submerged the manifold. I had 1/4" endcaps that I put on the 1/4" flare connection before the swivel nut. I really don't have a good reason as to why I wasn't testing the swivels. Anyway, I'm new to brass fittings so I'm wondering if I'm doing something wrong with these fittings. I'm not using tape or dope as I saw that that's not needed on flare fittings. I'm also avoiding over-tightening as I've read that can cause leaks. To problem solve today I tried tightening to loose, snug, and tight and still leaks. Then I tried every combination I could between the burners to see if I could isolate some part but both swivels would just keep leaking. It's not isolated to one part of the fitting either. It leaks on both sides and in the center. I feel like I must be doing something wrong. Again, thanks for all the help and input. I would've probably blown myself up without your guidance. And Frosty, once I get the leaks resolved I'm going to trim back the mig tips and recenter the one that's off. Quote Link to comment Share on other sites More sharing options...
Frosty Posted February 5, 2020 Share Posted February 5, 2020 Uh HUH, two good reasons NOT TO use a water tank to look for leaks unless it's a tire. Soapy water in a spray bottle or slopped on everything with a brush doesn't let you forget to test something. Even a LITTLE bit of dust can score a swivel and make it leak and every time you loosen or tighten a fitting puts wear on it and again just a bit of dust and it leaks. Typically the more often you break a flare connection the sooner it WILL begin to leak, it's almost always the copper tube needs cut and re-flared but sometimes something gets the brass. Frosty The Lucky. Quote Link to comment Share on other sites More sharing options...
Another FrankenBurner Posted February 6, 2020 Share Posted February 6, 2020 I have seen several factory made flares leak. Take them apart and take a good look at the mating surfaces. Hopefully it doesn't scare you away from flare fittings though. Quarter inch copper tubing is my preferred way to plumb a forge. Quote Link to comment Share on other sites More sharing options...
frozen_coyote Posted February 6, 2020 Author Share Posted February 6, 2020 It hasn't. I picked up a flaring tool and 10' of 1/4 copper coil. Before I think of testing it again, I'm going to make a stand and mount the manifold away from the burners. I'll flare the copper and use the tubing to give it space. I'm suspect of any results I've shown thus far. Knowing I had leaks on both lines is a good wake up to getting this all put together before continuing. Once it's all mounted then I'll get back to the quality of the burners. Quote Link to comment Share on other sites More sharing options...
Irondragon Forge ClayWorks Posted February 6, 2020 Share Posted February 6, 2020 Best to make a double flare on the tubing. Quote Link to comment Share on other sites More sharing options...
frozen_coyote Posted February 11, 2020 Author Share Posted February 11, 2020 Had a chance to build the stand and mount the manifold away from the burners with copper tubing. Flaring tubing and connecting everything was a lot simpler than I thought it was going to be. Tested every connection under pressure with soapy water and 0 leaks so far. I'll have a chance to fire this up tomorrow (weather permitting) and start tuning the burners. I did grind back the mig tips about 1/8" while I was reconnecting everything. Cleaned them out with a torch tip cleaner. The stand is just 2x4s and ply. I'll keep an eye out for any burning going on and mitigate it as needed. Quote Link to comment Share on other sites More sharing options...
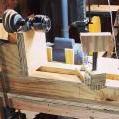
frozen_coyote Posted March 11, 2020 Author Share Posted March 11, 2020 I fell off this build for the past few weeks. I had the forge assembled and was ready for testing but the weather had other plans. The forge took a hit during a storm and I walked away for awhile. Finally got the parts back in for my new manifold and I'm putting everything back together. These few weeks were fruitful though because I decided to build a 2x72 grinder. I imagine it will not be taken well because I built it out of a sheet of plywood and an untreated 4x4. I'll put a picture below but it tracks well and now I'm back to building this forge. Quote Link to comment Share on other sites More sharing options...
ThomasPowers Posted March 11, 2020 Share Posted March 11, 2020 Well---better an untreated 4x4 than a treated one! Let us know how sturdy it is in use. My commercial 2x72 grinder has about a 1.5hp motor on it IIRC and that looks a tad light in construction for that much power. Quote Link to comment Share on other sites More sharing options...
Buzzkill Posted March 11, 2020 Share Posted March 11, 2020 The proof of the pudding is in the eating. If it works it's good. I tend to constantly dip my blades in water to cool them when grinding, and that probably wouldn't work well long term with a wooden structure, but I'd take that over a HF 1x30 or a bunch of hand filing any day. I'd guess it could handle 1.5 hp for a while anyway. Quote Link to comment Share on other sites More sharing options...
frozen_coyote Posted April 4, 2020 Author Share Posted April 4, 2020 I finally got the forge back together. I had it going for about 5 minutes when I took this video. It looks like it's burning oxygen rich but I'm pretty happy with it. I'm not sure how hot this will get. I'll have time this weekend to get some steel in it and really test it out. IMG_2027_HEVC.MOV Quote Link to comment Share on other sites More sharing options...
Recommended Posts
Join the conversation
You can post now and register later. If you have an account, sign in now to post with your account.