frozen_coyote Posted January 16, 2020 Share Posted January 16, 2020 I’ve been reading everything I can in preparation of making a small gas forge. This is completely a hobby thing so this is a bit of an experiment. I wanted to lay out what I’m planning to do and see if anyone has thoughts on what I should change if anything. The plan is to use an 8-inch diameter piece of stove pipe that is going to be 10 or 12 inches in length. 10 inches puts me at 282 cu/in or 339 cu/in at 12. I’m going to be making a ¾” Frosty T burner. I’ve read that 1 properly tuned T Burner is sufficient for sizes of 350 cu/in and below. Will the 12 inch length pose a difficult setup for one burner or is that a fine size? The build is going to be two 1-inch layers of kaowool. Put the first inch in, wet it with a spray bottle then use rigidizer. Then wrap the 2nd inch and do the same. I’m going to then put a ¼” to ½” layer of kast-o-lite in the forge (just the bottom or all the way around?). Then it’s a layer of plistix and it’s built. How does that sound? Hoping to catch any mistakes before making them. Thanks Quote Link to comment Share on other sites More sharing options...
Another FrankenBurner Posted January 16, 2020 Share Posted January 16, 2020 Big possible mistake, your sizing. Your math is right if you were planning 1 inch of blanket only for a 6 inch internal diameter(ID) forge. An 8 inch pipe, minus 4" for blanket(2" per side), minus 1" for kastolite(1/2" per side) yields an ID of 3 inches. I am guessing you subtracted the 2 inches of blanket from the 8 inch pipe for 6 inches or did you square the 3 inch diameter instead of the radius? Two inches of blanket and 1/2 inch of kastolite for the 3 inch ID would be ~71 in³ at 10 inch length or ~85 in³ at 12 inches. If you were expecting 3 inch ID, great. One 3/4" burner might be too much, maybe not. If you go to 12 inch length, your forge will be fairly small and long which may hinder the burner performance. You might think about 2 smaller burners or a shorter forge. I had a forge at 3 1/2 inches ID by 12 inches length with a 3/4" burner. It worked well. Made out of a refrigerant cylinder based on Ron Reil's website. If you were expecting a 6 inch ID, you need an 11 inch case. The larger disposable helium cylinders and 20lb propane cylinders are around 12 inches. As to the kastolite on the bottom or all the way around, that is personal preference. Just the bottom will be less mass in the forge which will heat up faster and possibly to a little higher temperatures but the walls and ceiling will be fragile to piece bumps. If you are clumsy with hot metal, armor the walls and ceiling with kastolite. It will take a little longer to come to temperature and maybe not get to as high a temperature but it beats poking into the blanket. If you are only half clumsy, the kastolite can be thinner. Experiments are great. Sounds like you do your homework, you'll have a hot forge in no time. Quote Link to comment Share on other sites More sharing options...
frozen_coyote Posted January 16, 2020 Author Share Posted January 16, 2020 1 hour ago, Another FrankenBurner said: Big possible mistake, your sizing. Your math is right if you were planning 1 inch of blanket only for a 6 inch internal diameter(ID) forge. An 8 inch pipe, minus 4" for blanket(2" per side), minus 1" for kastolite(1/2" per side) yields an ID of 3 inches. I am guessing you subtracted the 2 inches of blanket from the 8 inch pipe for 6 inches or did you square the 3 inch diameter instead of the radius? This is why I knew it would be a good idea to ask before starting the build. That was a huge oversight on my part. My brain just thought, "8 inch stove pipe minus 2 inches for the kaowool so the diameter is 6 inches making the radius 3." That would have been a really stupid mistake to make. Thank you for pointing that out. My original plan was to use an old propane tank but after doing a bunch of research I got scared off the idea. Basically everything boiled down to: take off the valve, fill it with soapy water (or nitrogen or car exhaust fumes (!?)), let it sit for some amount of time, then cut into it and you'll probably be okay. Inevitably in these discussions 2 or 3 comments would pop up saying something like, "My cousin Steve used to cut open propane tanks all the time with that soapy water method. Then one day the tank exploded anyway and that was the end of Steve." All this to say, I'll have to recalculate but I'll most likely opt for a steel (non-galvanized) 5 gallon bucket. Thanks again for pointing out that mistake and saving me a good amount of time/resources. Quote Link to comment Share on other sites More sharing options...
Buzzkill Posted January 16, 2020 Share Posted January 16, 2020 Disposable helium tanks and refrigerant tanks work pretty well and don't have the explosion risk. Quote Link to comment Share on other sites More sharing options...
ThomasPowers Posted January 16, 2020 Share Posted January 16, 2020 He tanks don't have the explosion risk with abrasive or saw cuts. All empty tanks have an explosion risk for O-A cutting. I pick up a couple of sizes of He tanks at the scrapyard to hand out to folks wanting to build a propane forge. Got them hanging from a wire up high in the shop. Quote Link to comment Share on other sites More sharing options...
Another FrankenBurner Posted January 17, 2020 Share Posted January 17, 2020 Don't feel bad, I suspect it is a common oversight on the first forge. Maybe not, maybe just me and you. I can't comment on the propane tanks as I don't use them for this. Their wall thickness is a bit heavy for me. My last forge was cased with sheet metal. I look forward to seeing your progress. Anything in particular you want to forge or more general hobby work? Quote Link to comment Share on other sites More sharing options...
Retired farmer Posted January 17, 2020 Share Posted January 17, 2020 Sounds like the colder weather has people building propane forges . I’m planning a small gas forge also . I have both 20& 30 lbs propane tanks at my disposal , the valves have been removed & tanks outside for over a yr. The 20 lbs- 452 3 in with 2” wool alround , 30 lbs - 750 3 in. . My old forge has a 3/4 Riel burner I think was the fellows name ( built 6 yrs ago) didn’t use it much , couldn’t get steel hot enough . Doing homework now know why inside wool 577 3 in , to much space & didn’t center burner well. I work on knives , hatch’s & tools mostly . Thinking the 20 lbs tank would be big enough with single burner , with extra layer of wool on 1 end & flat bottom . Not exactly sure what kalo lite is , but I do have 3000 degree refractory cement , will have to check name brand .. Any info very much appreciated . Plans are easily changed , iron not so easy. Quote Link to comment Share on other sites More sharing options...
Mikey98118 Posted January 17, 2020 Share Posted January 17, 2020 It would be even better enough with two 1/2" burners; this would allow you to do most of your work with 1/2 the fuel, by sliding in a temporary baffle wall, and running a single burner. If you had used a Riel burner with the MIG contact tip changes (that are recommended on his burner Page), that burner would have got plenty hot enough. Quote Link to comment Share on other sites More sharing options...
frozen_coyote Posted January 17, 2020 Author Share Posted January 17, 2020 17 hours ago, Another FrankenBurner said: Anything in particular you want to forge or more general hobby work? The idea of building a forge came about because I wanted to make a stock removal knife but didn't have a way to heat treat it. There's simpler ways to heat treat a knife, but I like going down these rabbit holes and building things. I came across a piece of railroad track so now I have a makeshift anvil. I already have a decent woodworking/restoration shop set up so I'm hoping to make my own handles and hinges for the cabinets and things I make out of wood. Quote Link to comment Share on other sites More sharing options...
Another FrankenBurner Posted January 17, 2020 Share Posted January 17, 2020 If you are like me, welcome to an addiction. Even seemingly too small, otherwise scrap metal is a possibility. I avoid stock removal whenever possible. Any tool you can imagine, you can make. You are limited only by your own intellect and skill. Quote Link to comment Share on other sites More sharing options...
Retired farmer Posted January 18, 2020 Share Posted January 18, 2020 There . Found my way back to thread. I think I have figured out Frosty’s ratio calculations. For 1/2” tube dia. Tube length 8x 1/2” dia.- 4” nipple . T - 3/4 x 3/4 x1/2 . Tip distance to nipple approx .25” approximately as this needs to be tuned . The mig tip thinking I will start with .020” and go up one size at a time if needed . the refractory cement I have is Vesuvius 3000 monolithic refractory . The info I have found to date , apply no thicker than 1/4” & heat to min 250 f degrees for 1/2 hr. Not sure on heated right after application or let it sit after application for x amount of hrs & then heat to 250 f degrees . Any additional info or criticisms always appreciated . I noticed other people entered their location elevation, 750’ approx. here Quote Link to comment Share on other sites More sharing options...
Another FrankenBurner Posted January 18, 2020 Share Posted January 18, 2020 If you are thinking 1/2" pipe, that is a nominal size. The actual ID is 0.622 which puts the 8x at 5 ish inches. The 1/2" Frosty T that I built did well with the 023 mig tip. Quote Link to comment Share on other sites More sharing options...
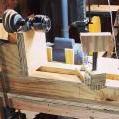
frozen_coyote Posted January 18, 2020 Author Share Posted January 18, 2020 I got the new forge shell in and have started building. This picture was me realizing that I need another running foot of kaowool. Delayed until it arrives. I'll have time to construct the burners in the meantime. Quote Link to comment Share on other sites More sharing options...
Irondragon Forge ClayWorks Posted January 18, 2020 Share Posted January 18, 2020 You want to make sure and ridgitize the Kaowool. I put a little green food coloring in the ridgizer, so I can tell about the coverage I have. Quote Link to comment Share on other sites More sharing options...
Another FrankenBurner Posted January 19, 2020 Share Posted January 19, 2020 Looks like a good start. If you are planning legs, it is easier before the blanket is rigidized in. If you can weld, you can use your burner(once it's built) to bend up some 1/4 inch round. It's minimal, cheap and it looks pretty good. If you can't weld, you can use nuts and bolts through the can to make the legs. Quote Link to comment Share on other sites More sharing options...
frozen_coyote Posted January 20, 2020 Author Share Posted January 20, 2020 While I'm waiting for the kaowool to get here, I got the fittings to make the burners. Here's two pictures of everything laid out. One thing not shown is that I'm adding another elbow with a closed nipple to the elbow in the picture to give it a 90 degree bend down from that point to the forge. I'm hoping to reduce the strain on the burner ports by doing that. If you see any issues let me know before I blow myself up. I have propane rated teflon tape (the thicker yellow stuff) to seal it. Debated going with some sort of adhesive but given that I'll have to fiddle around with the fittings I'd rather not make a permanent mistake. Quote Link to comment Share on other sites More sharing options...
Another FrankenBurner Posted January 21, 2020 Share Posted January 21, 2020 You'll be just fine. The yellow tape is good stuff. Read the roll for the instructions. I think it was two wraps(in the correct direction) while being mindful to stay off the last thread to avoid having any tape make it's way into the plumbing. You do not need to spot tight any of these fittings. If you tighten iron pipes into brass fitting too tight, you can crack the brass. Do not tape the flare fittings. You also don't need to tape the mix tube threads. If you are concerned about leaks, you can pump the system up with air and use bubbles to check for leaks. If you are wanting less strain on burners, hard mount that manifold somewhere convenient to access the valves and then run from there to the burners with a longer copper line. The only fitting you would have to replace is that short flare connection. This would require a flaring tool though. This also makes it so you don't have to mount the burners in the forge in alignment with the rigidly secured gas jets. Quote Link to comment Share on other sites More sharing options...
Retired farmer Posted January 24, 2020 Share Posted January 24, 2020 On January 17, 2020 at 2:16 AM, Mikey98118 said: It would be even better enough with two 1/2" burners; this would allow you to do most of your work with 1/2 the fuel, by sliding in a temporary baffle wall, and running a single burner. If you had used a Riel burner with the MIG contact tip changes (that are recommended on his burner Page), that burner would have got plenty hot enough. I'm getting things together , seems very slowly . Got .023 tweco tips . Can access 5/8 or 1" alumni kiln shelving . Trying to visualize the divider in the forge Mikey . I would prefer not to cut a slot in side of forge , to add or remove dividing wall . So I'm thinking the 1" kiln shelving cut to fit closely to inside dia. Of forge , so it won't fall over . But starting the forge usually gives a woof , that I'm pretty sure will either move or knock over the divider. The slot in side of forge maybe a necessity. Pipe pieces for burner ordered. Was thinking of 1/2" pipe coupler , heavy wall , and machining forge end to 12% taper with lathe. Was able to find 3/4" SS burner ends but not 1/2" on the net. SAFETY ALERT - we just got notified at work that there is a new refrigerant for mobile applications coming out . The listing is R-1234 yf . It is very flammable , don't inhale or touch it with skin . Why do they come up with deadly things people have to deal with . I see many law suits . When I pick up propane piping stuff . Going to get a gauge to put on or by regulator & see if I can tune that Reil burner . Looking at different flame videos , my flame exiting forge is yellow almost orange . Maybe can salvage this forge . Still would like a smaller one . Info & ideas always welcome. Quote Link to comment Share on other sites More sharing options...
Mikey98118 Posted January 26, 2020 Share Posted January 26, 2020 Most guys don't get that the internal movable "barrier" is not meant to completely fill up the internal space; you want some room left between it and the walls & and ceiling; a baffle wall--not a complete barrier. So, all the fitting problems only exist in our heads Quote Link to comment Share on other sites More sharing options...
Retired farmer Posted January 26, 2020 Share Posted January 26, 2020 Thanks Mikey. Picked up a gauge for propane . I will be using much less propane now , psi was 30 , turned it down to 6 . After 6 hrs still had 3/4 tank left . At 30 psi 6 hrs & tank was all but empty . $20 gauge ha. & yes Reilly's burner making white steel . Think I'll still make another propane forge . Centre & align burners better., maybe even more efficient. You got the right idea frozen coyote, ask all the questions then build. Thanks Gentlemen. Enjoy the day. Quote Link to comment Share on other sites More sharing options...
frozen_coyote Posted January 26, 2020 Author Share Posted January 26, 2020 I’m testing each burner individually before putting the whole thing together and checking for leaks with soapy water. Here’s the first burner running at around 5-7 psi IMG_1868.MP4 Quote Link to comment Share on other sites More sharing options...
Mikey98118 Posted January 28, 2020 Share Posted January 28, 2020 The video shows a weak reducing flame; it also shows the reason why. you need to cut the MIG tip back until it's end is about in the center of the pipe fitting; this is how "T" burners get tuned. Tou're doing okay so far. You just haven't gone far enough Quote Link to comment Share on other sites More sharing options...
frozen_coyote Posted January 31, 2020 Author Share Posted January 31, 2020 Thanks for the tuning advice. I cut back the tip and my flame changed pretty significantly, but I ran into a pretty big issue. I got the burners going and finished the forge. Put everything together and did a test run. When I lit the burners they had a sort of sputtering sound. You can hear it in the above video and the one I'm posting here. After about 30 seconds, my manifold burst into flames. I was at the tank so I shut it off immediately and the flames died down. Very close to needing a new pair of pants. I thought I could smell a bit of propane in the air so I figured one of my connections was leaking. Took it inside and completely submerged it underwater and then turned the pressure on and no leaks. I'm not sure what happened. The video below was at around 5 psi. Let me know if there's any info I might be leaving out that you'd need to know, and thanks for the help. IMG_1881.MOV Quote Link to comment Share on other sites More sharing options...
Mikey98118 Posted January 31, 2020 Share Posted January 31, 2020 Better, but you still have far to go. After shortening the MIG tip, did you use a set of Torch tip cleaners, to clean all burrs from the Tip orifice? What size orifice does the MIG tip have? Because the pipe reducer you are using looks out of axial alignment, you may need to use this burner without a flame retention nozzle; in that case, you will need to finish tuning the burner with it mounted in the heating equipment. How do I know this so? It looks out of alignment; this view is backed up by the flame, which is being forced out of alignment as a result. Look into each question, one at a time; you'll get there. Quote Link to comment Share on other sites More sharing options...
Another FrankenBurner Posted February 1, 2020 Share Posted February 1, 2020 Get some dish soap, mix somewhat thick with water, spread over your plumbing. This can be done while the burners are running with valves open. If you start making bubbles, you have verified a leak and located it. The second video you posted shows part of the plumbing very briefly and it looks like maybe the gas tape was put on backwards. I can't tell for sure but I figured I'd mention it so you can verify. If so, this can cause leaks. Quote Link to comment Share on other sites More sharing options...
Recommended Posts
Join the conversation
You can post now and register later. If you have an account, sign in now to post with your account.