evfreek Posted March 4, 2008 Share Posted March 4, 2008 Hi. I tried to weld a billet out of pallet strapping and old dull bandsaw blades. There were a lot of inclusions in the final billet, and I noticed that the etch did not attack the pallet strapping and the bandsaw blades all that differently. It was possible to see the layers, but the difference was not all that stark. Perhaps they were the wrong kind of bandsaw blade? They came from the scrap bin in a metal fabrication shop. They were about 1" wide, and 10 tpi. A spark test showed the teeth were a different material than the rest of the blade. The teeth sparked like a tungsten high speed steel, and the bulk of the blade as medium carbon. The blades were hard to shear. I have read that the correct nickel bearing blade material is found on sawmill wood bandsaw blades. There was one offering on Ebay of "knife bandsaw blade". It looked iffy, since the seller said that they were normally $12. Is this a reasonable price for half a dozen 10" lengths? I don't think so. Do the blades have to be above a certain width? I cannot seem to find the really wide ones (4-6"). Could these be what is required? Quote Link to comment Share on other sites More sharing options...
oakwoodforge Posted March 4, 2008 Share Posted March 4, 2008 Bi-metal Bandsaw blade is NOT what you want for billet material- What you want is the mono steel blades. It is important to remove the black coating on the pallet strapping, as well as grind off the saw blade teeth - they attract crud and can start cold-shuts. I have the best luck with billets that are uniform, clean, tight and smooth sided. Pattern welding with mystery steel can be frustrating as heck! I'm Lucky enough to have a machinist friend that brings me all of his shops broken blades. And since he works in the tool maintenance department and is responsible for ordering new blades I have the luxury of knowing for sure what they are. Jens Quote Link to comment Share on other sites More sharing options...
Rich Hale Posted March 4, 2008 Share Posted March 4, 2008 Jens is right on the spot with his thoughts. One thing to keep in mind for the future is that new steel is not that expensive when you consider how much shop time you just spent for nothing to show. Another thing is that good billet steel etches differently depending on whether it has been heat treated or not. I alway want to see if the pattern I tired to porduce is what I expected. But I have learned to wait until after heat treat and final grind to etch. And by the way that is one of the most exciting times for me. When you pull it from the etch and see the layers in their final pattern. Have fun Quote Link to comment Share on other sites More sharing options...
ThomasPowers Posted March 4, 2008 Share Posted March 4, 2008 You might tell us what you etched with so we could suggest variations that might work better. The BSB on ebay was probably for people wanting to make a knife from the blade as it is with no forging or welding---often fillet knives or pocket knife blades are made that way. You didn't mention how wide was what they were selling; 5-6" wide BSB is often sold at hammer-ins for $5-$10 a piece depending on how long they are. I have not had much problem with inclusions starting from clean strapping and BSB, heating it evenly---so the pieces don't bow allowing crud in and welding in a cave fire. If it's unknow steel I will often throw in some file steel to beef up the carbon content or do a san mai construction with a known high carbon steel for the center. Note if you are having trouble getting differentiation in the etch make sure the piece is *very* clean first and use a weaker etch. Strong etchants tend to etch everything about the same. You want it weaker so if prefferentially etches one over the other. Quote Link to comment Share on other sites More sharing options...
Chuck Richards Posted March 5, 2008 Share Posted March 5, 2008 You need to use commercial/wide BSB. They are normally at least 6 inches wide and .04 thick. The metal saw blade material as mentioned can be bimetal. Needs a much higher temp to melt. The edge metal is a cobalt base and will not weld well and also is toxic to grind. If you are using banding and wood BSB or carbon steel BSB then the two are not different enough to show much pattern. The wide blades are normally 15N20, which has 2% nickel. Quote Link to comment Share on other sites More sharing options...
evfreek Posted March 5, 2008 Author Share Posted March 5, 2008 Hi Jens, Rich, Thomas and Chuck. Thanks for all the good information. It is really helpful. These were some scrap bandsaw blades that I retrieved from a fab shop which was relocating. I was hoping to use these for hacksaw blades, but they proved to be too slow cutting. Probably need a broken or stripped blade for this, otherwise it may prove to be dull. The blade that I saw on Ebay was 1.5" wide. Not nearly up to the 6" that Thomas and Chuck mentioned. I suspect that it will be easier to just order 15N20, since that will cost less than hunting around. I would like to use up the old blades that I have, but if they are poisonous to grind, they may not be of much use. Also, the pallet strapping is only medium carbon. Definitely not 70 points according to a spark test. More like 40-50. Also, I did not clean the coating or remove the bandsaw blade teeth. I tried two etchants: 1/3 strength muriatic acid and full strength Radio Shack PCB etchant (ferric chloride). Both produced mediocre results. The acid was slower, but it seemed to give a nicer looking pattern. Unfortunately, it was uneven. In otherwords, it produced a mottled pattern on both types of steel, with the contrast of the mottling similar to that between the different steels. Perhaps I should try a diluted solution of the ferric chloride and let it sit for longer. Next hammer-in I go to, I'll search for the mono steel wide bandsaw blade. I will need to calibrate my eye for the nickel alloy sparks, since I don't know what to look for yet. I hate to waste the old metal cutting bandsaw blade that I have now, but maybe it will be good for shop knives. Thanks again. This stuff is tricky. Quote Link to comment Share on other sites More sharing options...
ThomasPowers Posted March 5, 2008 Share Posted March 5, 2008 Ferric Chloride from Radio Shack is usually used in a 1:3 to 1:4 dilution; full strength is TOO strong! Slow is good for differentiation! I prefer not using bimetallic blades and so try for wood cutting blades or single alloy metal; but I've used bimetallic blades and not had any trouble with them. I don't grind off the teeth just flip the blades so that the teeth are on opposite side with a pallet band in between. If you have not done mutch deformation and not a lot of folding a low layer count will look rather mottled as there is not much there but almost parallel layers. Cleanliness is an absolute before etching! Quote Link to comment Share on other sites More sharing options...
evfreek Posted March 5, 2008 Author Share Posted March 5, 2008 Hi Thomas. Yes, I understand the mottling effect of low layer count billets. Actually, I was going for that look. But, what I did not like was the different etch amounts within each different steel. I now realize that it was a combination of two effects. Wrong steel and too fast. The muriatic acid did a better job, as it was much slower (few hours). The ferric chloride started well, but started to lose differentiation after about 10 or 15 minutes. Next time I will dilute it more. Maybe I will try to weld up the remaining bimetal blades, but hotter, and with a more aggressive flux. Also with the pallet strapping cleaned better. Another thing I had problems with was excessive tapering of the knife point. That caused delaminations and loss of pattern. I would have been better off just grinding. Quote Link to comment Share on other sites More sharing options...
ThomasPowers Posted March 5, 2008 Share Posted March 5, 2008 You are remembering to cut off the very ends as they tend to have problems (though I'll often just throw the back end into the tang and if it shows problems I have even welded it up with an arc welder once.) You should not get delamination when forging; were you working it quite hot? Quote Link to comment Share on other sites More sharing options...
Chuck Richards Posted March 6, 2008 Share Posted March 6, 2008 EV, What width strap banding do you have? Also I grew up in the SF Bay Area. Were abouts are you? Quote Link to comment Share on other sites More sharing options...
nonjic Posted March 6, 2008 Share Posted March 6, 2008 ive had no problems with bi-metal bandsaw blades (about 1 1/4 high) and pallet strap, with either etch contrast of weldability. I use ferric chloride about 5 : 1 with water. You get a better etch if you clean all the black crud off every 15 mins or so. When the forge weld sticks properly it really should become a near homogeous piece of steel, and not delaminate. A good test of your forge welds is to take a stack of say 10 pieces and weld them so youve got a squarish billet, then reheat and forge AGAINST the welds untill you have a wide and thin billet. They should hold fine. (this is the starting point of some interesting damascus patterns). Quote Link to comment Share on other sites More sharing options...
ThomasPowers Posted March 6, 2008 Share Posted March 6, 2008 The start for my latest pattern welded pizza cutter was a 25 layer BSB&P billet folded to 400 layers and then squished lengthwise to a flat round disk; that's rough on the welds. I can't wait to see the patterns though. Quote Link to comment Share on other sites More sharing options...
Chuck Richards Posted March 7, 2008 Share Posted March 7, 2008 That lengthwise opposing squish is the start of a W pattern. Now cut it into 4 equal lengths and re-stack. Do that 3-4 times the forge out a blade. If you continue to fold it the same way it will give the W's. John is right that you should not have a problem with the bimetal blades. Cobalt will homoganize with simple steel. Be sure to use a good respirator when grinding and a dust collection system. Cobalt is a nasty material and can cause serious problems over long periods of exposure. Builds up in the system and takes years to flush out. It is ground all the time but proper precautions must be used. Quote Link to comment Share on other sites More sharing options...
evfreek Posted March 7, 2008 Author Share Posted March 7, 2008 Hi Chuck. I live in the south bay area (silicon valley). It is nice here, but a lot of people do not understand why a fellow would be interested in blacksmithing, or any other hobby for that matter. The pallet strapping I am using is about 1.25" wide. It is a little wider than the bandsaw blades. This may have been the reason for some of the delamination problems. I had the most problems where I hot cut the billet at an angle to form the tip. I then forged the curve back. There was some separation at this point, and I refluxed and rewelded. In my experience, anytime a little opening occurs, it will never close, since it is impossible for the flux to get in and dissolve out the junk. The same is true with shuts on rolled bars. As long as they do not get exposed to the atmosphere, they will reclose when the bar is rolled. Hi Thomas. I was working the billet quite hot. Not as hot as I would work mild steel, however, since I have heard of cracking problems. Perhaps it could have been a little hotter. There is enough material to try one or two more. Transverse forging did not shear the welds. It was primarily the cutting and forging back on the tip which did that. Also, I "discovered" some delaminations when I ground on it. In desperation, I used my micro-tig to close some. Small HAZ did not affect the temper, but the blotches did show (unwanted) differentiation. That ER70-S2 must have had a bit of chrome in it. :( Quote Link to comment Share on other sites More sharing options...
evfreek Posted March 7, 2008 Author Share Posted March 7, 2008 Hi John N. So, you don't have any problems with this mix; well, I shouldn't either. One difference, I am using a coal fire. Another difference, different person behind the hammer. I guess I will try it a couple more times. If it doesn't work out, I will probably give up for now. At least I put this much effort into it. We have an annual blacksmithing conference, but most people are not too interested in pattern welded knives, so not much demo or instruction there. There will be a rose workshop, which I am really looking forward to, and I think the Brazeal brothers will be there. These guys are awesome. Also, probably some traditional joinery, which is always of great interest. Quote Link to comment Share on other sites More sharing options...
brucegodlesky Posted March 7, 2008 Share Posted March 7, 2008 Get it hot, it'll weld :-) The strap I use is 1 1/4" wide. The bsb a little larger. I stack it all together, tack one side, then flip it over and grind all the edges even. Clamp, tack and away we go! Quote Link to comment Share on other sites More sharing options...
Chuck Richards Posted March 7, 2008 Share Posted March 7, 2008 EV.. Email me at chuck@woodchuckforge.com. I have an offer for you you cannot refuse.;):D Quote Link to comment Share on other sites More sharing options...
Chuck Richards Posted March 8, 2008 Share Posted March 8, 2008 EV, Since you are using a coal fire the type of flame is absolutly critical. It has to be reducing and a very clean fire (no clinckers). Also there must be a good bed of coke under the billet. The best way to forge a damascus billet is in a beehive. Mound up the coal after it is going good and allow it to burn for a bit, 5-10 minutes. Get the center coked out and then poke a hoe in the center of the mound from the side closest to you. it will be a blast furnace coming at you but the fire will be better for this type of welding. Make sure you are using a good flux, anhydrous borax is great 20mule team ok. You should not need a more aggressive flux. Make sure the billet is held together in a solid fashion, ie tack the sides so there is no warping. Then it is just a matter of getting it to welding temp. One mistake people make is they try to do too much on the first weld. Take light strikes and cover the billet quickly. Then brush reflux and back in the forge. Do this 3 times then go for it. Even if there are a couple of minor inclusions they should close up and weld as long as you are working at welding heat. Keep working at heat until you are ready to do the final finish. Welding in a coal forge is definitely harder but is absolutely doable. Made many of my first billets in coal forge. Propane is cleaner and easier but that's a different story. Good luck and drop me an email sometime. Quote Link to comment Share on other sites More sharing options...
evfreek Posted March 9, 2008 Author Share Posted March 9, 2008 Hi Chuck. Thanks for the assurance on the flux. I just use the 20 mule team out of the box and let it foam up. I make sure that there is an even sheen over the whole piece once it heats up. I also have boric acid and fluospar available. Sometimes I mix a little boric acid in, but I don't like adding fluospar. It reminds me of aluminum flux (fluoride fumes). Welding in a coal fire has always been a little tough for me, but that's the way it is set up at the historical farm for now. We also have charcoal, which I find easier, but someone gave us a couple of bags of coal, so that is what we are using now. It is good quality, and labeled "Blacksmithing Coal". It produces very few clinkers in a bottom blast forge, and usually I only have to deal with a half donut. I do use the beehive type of fire for welding, but I am still breaking myself of the bad habit of letting the fire go hollow after a while. Have to remember to push in from the sides with the shovel every now and then. Sent you an email just now from my alum account. Quote Link to comment Share on other sites More sharing options...
Chuck Richards Posted March 9, 2008 Share Posted March 9, 2008 The boric acid can cause pitting if too much is added. I tried the flourspar and your right don't breath while applying or while heating. I never had the problem of foaming with 20 mule team. if you flux at a red or red-orange heat just before it begins to form scale, it will flow like melted butter. That is what your billet needs to look like also when it is ready to weld. You probably know that anyway. Good luck Quote Link to comment Share on other sites More sharing options...
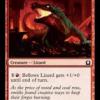
Phil Dwyer Posted March 9, 2008 Share Posted March 9, 2008 Thanks for the thread guys. I'm learning a lot. Any chance of some photos? (If you're willing to show us your flubs, that is, it might be even more illuminating.) Quote Link to comment Share on other sites More sharing options...
evfreek Posted March 9, 2008 Author Share Posted March 9, 2008 Hi Farmer Phil. Here are some "flub" photos. Around these parts, we call it "goofed up". Quote Link to comment Share on other sites More sharing options...
Chuck Richards Posted March 11, 2008 Share Posted March 11, 2008 EV. Those are cold shuts. Your fire is not hot enough when you try to weld. Soak it for a couple of minutes at heat and try not to burn it. Using known material will also help. Care package on the way. Quote Link to comment Share on other sites More sharing options...
evfreek Posted March 11, 2008 Author Share Posted March 11, 2008 Hi Chuck. Yeah, I think this is what's going on. I was taking it easy on the heat like it was suggested in Jim Hrisoulas' book, The Complete Bladesmith. But this steel was probably not as high carbon as the cable that he was discussing. The welds were made at a high orange/low yellow. Cooler than I usually use for mild steel. Also, I think that I was not hitting hard enough. I hit a light blow with a 2.5" hammer. This is about right for a mild steel weld on scarfed round stock, but may have been too light for the billet, because when I hit it harder, I heard that unmistakable "weld" sound. I have gotten away with forging tool steel at mid-yellow, but sometimes I have problems with heat checking which has to be ground off. Thomas always warns about blacksmiths working too hot when transitioning to tool steel. The book warns against going too hot with the higher carbon steel as well. But I did not get those familiar hairline cracks in this piece, so can probably afford to go hotter. Quote Link to comment Share on other sites More sharing options...
Chuck Richards Posted March 11, 2008 Share Posted March 11, 2008 I use a propane forge with a thermocouple. I can see what temps I am forging at and welding at. I use 1084/15N20 most of the time in my Damascus. If I don't have 1984 i use 1095. You should be able to weld at lower temps the higher the carbon.but there are more variables in it esp when talking coal. I normally weld around 2350F. I do go up to as high as 2450F. I can weld Iron at these temps. I have no problems with higher heats. Now if I were using O-1 or 52100 I would tone it down a bit. At least during the first few welds. But simple carbon steel can take the heat. If you are having to hit it hard to get it to take then it is not hot enough. Light taps are all it should take. THen I do 3 rounds before I really get er going. Once it is welded I can forge in any direction sides or face whatever. I am using a 100lb power hammer to draw my billet out with so if it was going to delam it would. I just finished up a W pattern billet where all the welding is done on the edges. Really have to make sure the billet is solid. I was always taught to forge at welding temps. Then only come down on the final heats. But there are as many opinions out there as there are smiths. Try to find some 1080 or 1095. I sent along some new 15n20 and some used material in 1.25 and 1.5. Your band strap will work fine for some of the used material. Just keep on trying. Quote Link to comment Share on other sites More sharing options...
Recommended Posts
Join the conversation
You can post now and register later. If you have an account, sign in now to post with your account.