October 18, 20169 yr This is my First attempt at building a burner. The very small amount I know about gas forges has been learned on this site over the past few weeks. Thank you to everyone who has contributed to the gas forges section, and a special Thanks to Frosty. I downloaded the T-Burner plans. They are well done and easy to follow. Top shelf in every way and a very cool design. I have all the parts to build the Frosty T Burner but I came to a stopping point due to thread pitch. I couldn't find a Tweco? mig tip locally. I have a drawer full of .025 and .035 Lincoln tips but they are 6mmx1. No problem you say? I went to every business in the small town I live nearest to and no one had metric taps. The T-burner build is on hold until I find a mig tip with SAE threads or a set of metric taps. Since I was already in motion and rounding up parts I was determined to produce a working burner out of parts I could find. I have to stress again, this is totally new ground for me. What I built was based on other burners I've seen online and at a friends smithy. I am not trying to improve, modify, reinvent or tweak proven designs, I just want to build a working burner. My goals for this burner were-1) don't blow myself up 2) don't burn down the shop So far so good..... I have burned a little over three thousand pounds of coke and coal per year for the past several years. That seems to be the burn rate when I'm forging full time. More specifically, that's about five hours actual burn time per day, five days a week with a coke forge. Of that five hours burn time I estimate I'm away from the fire about an hour each day doing other things, file work, grinding, drilling etc. I forge first, then grind and I usually have blades to harden. I let the coke fire burn just to keep from having to rebuild the fire after I grind. Then of course when it's time to harden blades I have a dirty fire, full of clinker and ash so it needs a little work. I'm essentially wasting an hours worth of fuel to save a few minutes re-lighting the forge.(am I the only one who does this?) So on to where I am now. I love forging with solid fuel. I don't want to get away from coal and coke but I would like to shut the coke forge down when I'm done forging for the day. What I want is a gas forge that I can flip a switch and bring a few blades up to quinch temp without relighting the big forge. I won't be welding in the propane forge but I would like to be able to forge up to 3/4" stock with it. At some point I may want to take advantage of the portability of the propane forge so I will be attempting to build something suitable for light duty forging, but the primary function will be bringing blades up to the very unscientific temp of "cherry red" Specifics about this burner, 3/4"x8" barrel, 3/4"x1 1/2" bell for the air intake. The gas jet is a 1/16" drilled hole in 1/8" pipe held into the air inlet bell with set screws. I started with a 6" barrel and it would blow itself out. I had a bag full of parts so I started experimenting with different tube lengths and flares. The 8" nipple will run with a 3/4" straight connector but it seems to like the 3/4" x 1" bell the best. The regulator is 0-30 lbs and I put a ball valve shut off close to the burner. I may never attach this burner to a forge body but I was a little bummed about not finding everything for the T-Burner build today and I wanted to play with fire soooo..... I will be building the T-Burner next week and Frosty, if you're reading this, I will follow your instructions "to the T"(pun intended) Till then, here's the Frankenburner.
October 18, 20169 yr The welding supply or a Lincoln dealer will carry taps to match their mig contact tips or guys wouldn't bother to buy their product if they had to toss the gun every time threads got buggered. I'm surprised though almost everywhere that carries tools carries metrics. If nothing else there's online. Frosty The Lucky.
October 19, 20169 yr The burner you have there will certainly heat a forge. It might not be the most efficient, but it will work. Why not try it ?
October 19, 20169 yr Author Not as surprised as I was! Lowes, Home Depot, two local hardware stores and two auto supply and No metric taps. I didn't think of a welders supply for the taps. I'm about an hour away from a Granger warehouse with a front desk sales set up so I will get the tap. I'm going there this weekend to pick up soft fire brick rated for 3000f and I'm sure I can get a metric tap set while I'm there. 5 minutes ago, Latticino said: The burner you have there will certainly heat a forge. It might not be the most efficient, but it will work. Why not try it ? Being new to this I figure doubling the size of the gas jet would be a waste of fuel. The thing I like about Frostys design is that its built around a .035 mig tip.
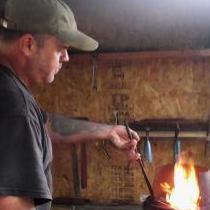
October 19, 20169 yr What's wrong with the "frankenburner"? It appears to be burning alright though there's no good way to know until you put it in a forge. Tuning a burner outside the forge is like tuning a dumptruck to run right empty. Tune the burner IN the forge where it has to perform. Frosty The Lucky.
October 19, 20169 yr If you are heating blades, you should, at the minimum look up Riel's mini-forge in the Riel Burner Pages on line. Then, go back over his burners without missing the the option for using a MIG tip. An .023 tip in a 1/2" modified Riel burner, in something like his mini-forge will heat for about sixteen hours running flat out. You can go on from there to up running time even more, providing you start with at least a decent burner design in a two-gallon size tube forge.
October 19, 20169 yr 12 hours ago, TwistedCustoms said: Being new to this I figure doubling the size of the gas jet would be a waste of fuel. The thing I like about Frostys design is that its built around a .035 mig tip. Heat is heat. As long as you can keep the flame inside the forge body till it transfers it's heat to the forge walls you won't have as big a waste of fuel as you think. Of course that isn't as easy as it sounds. With a less effective flame configuration (see Mikey's detailed posts on this) the speed of the flame front, volume of gas air mixture and actual combustion of the mix may not be optimal, so it will be hard to use that heat effectively (if you have a couple of feet of flame shooting out of your forge it is a good indication of overall system inefficiency). On the other hand, presumably you can turn down the gas pressure on your existing burner and still have it function. With a fixed orifice, inducer type burner, less gas pressure = less gas used during forging. Don't get me wrong. I think the use of a MIG tip as an orifice (or the needles Mikey is now advocating) is a brilliant option for allowing a repeatable burner build. It certainly isn't the only game in town though.
October 19, 20169 yr Author 10 hours ago, Frosty said: What's wrong with the "frankenburner"? It appears to be burning alright though there's no good way to know until you put it in a forge. Tuning a burner outside the forge is like tuning a dumptruck to run right empty. Tune the burner IN the forge where it has to perform. Frosty The Lucky. Frosty, that's the kind of advice I need. My first concern was not wanting the burner to blow itself out and continue pouring gas out, or burning back up into the tube closer to the gas supply. I don't know if I will ever be comfortable enough to turn my back on the gas flame for very long. I just don't want anything to go boom. I'm going to buy enough brick to make a few configurations of brick piles before I weld a cabinet together. This first build will be a square cornered chamber. My first plan was to make a two brick forge but I now think I may have built too much burner for that. I don't have a pressure gauge yet so I can't tell you where the pressure was in the photo. The regulator is 0-30 psi and I had it turned down as low as it would go and stay lit. I have lots to do through the weekend but next week I'll have all the supplies here to finish the build. I'll keep updating as it progresses and when I hit a wall will attempt to read before I ask for help!
October 19, 20169 yr Author 9 hours ago, Mikey98118 said: If you are heating blades, you should, at the minimum look up Riel's mini-forge in the Riel Burner Pages on line. Then, go back over his burners without missing the the option for using a MIG tip. An .023 tip in a 1/2" modified Riel burner, in something like his mini-forge will heat for about sixteen hours running flat out. You can go on from there to up running time even more, providing you start with at least a decent burner design in a two-gallon size tube forge. Thank You for the info! My next round of reading will be about burner size/output in relation to forge size. Years ago I used blunt tip dispensing needles to mix paint on the job. The ones we had were stainless with threads and screwed onto the injector bodies. Barrel sizes were in thousandths and in increments of .005 A quick search yesterday turned up plenty of blunts but with plastic slip on sleeves. I haven't searched in earnest for the screw on type but I'm sure they are out there. They look like a football pump inflator needle but with a known bore size. After sleeping on it I'm excited about how far I got yesterday and will probably end up building three different burner sizes before I settle on one for my new gas forge. 1 hour ago, Latticino said: Heat is heat. As long as you can keep the flame inside the forge body till it transfers it's heat to the forge walls you won't have as big a waste of fuel as you think. Of course that isn't as easy as it sounds. With a less effective flame configuration (see Mikey's detailed posts on this) the speed of the flame front, volume of gas air mixture and actual combustion of the mix may not be optimal, so it will be hard to use that heat effectively (if you have a couple of feet of flame shooting out of your forge it is a good indication of overall system inefficiency). On the other hand, presumably you can turn down the gas pressure on your existing burner and still have it function. With a fixed orifice, inducer type burner, less gas pressure = less gas used during forging. Don't get me wrong. I think the use of a MIG tip as an orifice (or the needles Mikey is now advocating) is a brilliant option for allowing a repeatable burner build. It certainly isn't the only game in town though. Latticino, my buiggest obstacle yesterday was woefully inadequate supply houses. I would rather buy locally when I can but for most of my projects it isn't an option. I will end up having to order a handful of things but I'm excited about moving forward and greatful for everyone's consideration. Frosty, Mikey98118, Latticino, have a great day! I'm off to play with fire :-)
October 19, 20169 yr Can't fault a guy for being cautious with burning propane. Not leaving it alone is a good policy but you can turn your back on it so long as you're not too far away to reach the shut off reasonably quickly. Propane burners are loud some very loud, it the wind isn't blowing you can hear the T on my forge from the house about 100' from the shop. Not that I recommend you take a walk outside but you'll know if the fire goes out. If you have a 1/4 turn ball valve between the regulator and burner as a shut off you can kill the gas flow in seconds max, a thrown rag will do it even. Propane burners are LOUD, their own siren and a 1/4 turn valve in the line away from the forge makes shut down almost instantaneous. I test burners in a brick pile forge and my rule of thumb is 1 well tuned 3/4" burner to 300-350 cu/in chamber volume. A linear burner like the one you show running might have a lower capacity but a brick pile is the perfect way to determine it's potential. You're doing fine, be cautious but don't go overboard. Frosty The Lucky.
October 20, 20169 yr okay, If you really want to know what simple change can soup up this burner, put a a threaded hole in the in its cross pipe. You see, the pipe is way too close to its large opening (which puts its gas hole too far from the opening of the mixing tube to be very effective). I remember suggesting that people who wanted to improve their Reil burners put their cross pipes where yours are, so that they would have enough room to place a MIG tip there, not to move a gas stream from the original hole further away from where it originally was.
October 20, 20169 yr My response is to your initial problem of burning an hours fuel to save you the hassle of relighting the fire...When I was using a coke fire I ended up just lighting it with an oxy-acetylene rosebud...not quite instant but not far off... I have only lit the fire once or twice in the last two decades though...various configurations of gas furnaces have covered all bases so far, so I am not suggesting you don't carry on with your explorations, far from it! Alan
October 20, 20169 yr Author Mikey98118, you're saying the gas jet should be further into the throat of the bell? I played with Frankenburner again today when I was done forging and it just will not stay lit without the 3/4 x1" bell on the flame end. I don't understand the science behind it yet but that bell, despite being the " wrong" flare angle is doing some good in the current configuration. I did purchase the 6mmx1 tap needed to use my Lincoln mig tips. I have Lincoln welders so I'm determined to use the tips I keep on hand. I am interested in tuning, improving and playing with this burner because its my first but come Monday I will be building the Frosty T Burner in 3/4 and 1/2 inch sizes. I'm picking up the soft fire brick tomorrow. When the two T burners are put together I'll start " tuning" and adjusting both of them trying .025 and .035 tips. I'll be trying to match one of them to a two brick forge that will fit in a surplus .50 cal amo can. I also had an idea today, maybe not original but it did come to me at the forge. I have lots of mandrils and round drifts. Couldn't I pick up a heat in a length of pipe and drive it down onto the drift forging the flare on one end then trimming the other end to length for the build? I'm sure this has been done, I probably just haven't read enough yet. 16 minutes ago, Alan Evans said: My response is to your initial problem of burning an hours fuel to save you the hassle of relighting the fire...When I was using a coke fire I ended up just lighting it with an oxy-acetylene rosebud...not quite instant but not far off... I have only lit the fire once or twice in the last two decades though...various configurations of gas furnaces have covered all bases so far, so I am not suggesting you don't carry on with your explorations, far from it! Alan I'm excited about learning about gas forges. As to lighting/re-lighting the solid fuel, I'm sure I built it up in my mind to be more of a hassle than it really is. Years ago when I brought home one fifty lb sack of coal I treated it as if it were gold. I scrounged pea size pieces out of the clinker bucket, moved heavy objects to reach behind if I dropped a small bit and it rolled under something. Once I started buying tons my attitude became "let it burn, I have plenty". I'm not sure why it started eating at me recently. Frugality must be coming on with old age. Edited October 20, 20169 yr by TwistedCustoms
October 20, 20169 yr The 1/2" burner is plenty of overkill for a 2 brick forge. I've tried driving hot pipe onto different taper mandrels with so so results but I didn't pursue it long. Frosty The Lucky.
October 21, 20169 yr Author Based on what I got out of the 3/4 Frankenburner I thought 1/2 would be plenty. I can already see where this is going. I bought an old green glass backed Fred Bear recurve when I was kid. Five years later I had built shave horses, fletching and string jigs, acquired dozens of longbows and recurves, both traditional and primitive. I tend to go all the way down the rabbit hole once I look in. I want to get the two brick up and running to serve the requirements stated in my OP but the Two brick won't be my last ;-)
October 21, 20169 yr Do build the 1/2" T burner for the forge, and carefully read through the Burners 101 thread before "tinkering" with burners anymore. We are always happy to great new people in the rabbit hole, but you need a lot of background information to be happy in here.
October 25, 20169 yr Author Update... I brought home a bag of plumbing parts to put together a few T-burners, a 4'x8' sheet of 14 gauge plate, a case of soft fire brick, a 4"x25' roll of k-wool and a 55lb bucket of something called "blue ram". The blue ram is a cast able refractory rated for 3000f. The guy at the sales office told me it dries through evaporation, no need to fire it after it sets. I'm hoping someone here has used it and can give me some pointers. It contains crystalline silica and acidic phosphate. The T-burner....I wanted to be able to move the gas jet in and out without having to take anything apart so I welded a sleeve onto the back of the T and I can move the gas assembly by loosening a couple of cap head screws. I carved out two of the brick for the small forge and started the fab work on the housing but ran out of daylight. Next update tomorrow.
October 25, 20169 yr Like your burner mod. Adjustable location for the gas orifice is a nice touch for the T burner. Wonder if using a plumber's cross fitting would allow you to keep the same kind of simple tools build while also allowing this enhancement. Not sure if they are available with reducing fittings, still the way I've needed to shroud the inlet of my 1/2" Frosty Tee I'm not completely convinced that a standard fitting won't work. The burner looks far too big for the (2) brick forge design, so I'm interested to see how it performs in such a small chamber. As regards your refractory castable, I was not able to find info on same from the MORCO site. I recommend that you follow the manufacturer's directions carefully for installation. Also that you check if it is actually a "rammable" material that needs to be installed in a plastic state by hammering it onto a solid surface. If so you may have trouble installing it into a fiber blanket shell, as you would with a true castable, and may need to use an alternate construction method (ram material into a temporary mold then remove and wrap with frax blanket). Good luck in any event. Look forward to pictures of your complete forge working.
October 25, 20169 yr Author Lattacino, no one builds with black pipe or copper in the South. It's mostly pex tubing for water and very few gas appliances because of the mild winters. Everyone I know has electric heat. As a result you're lucky to find 1/2" and 3/4" pipe fittings of any variety at the building companies. I did look for a cross fitting but no luck, hence the welded pipe and forrest of cap head screws. The refractory is on hold for now. I will get the MSDS before I pop the top on it. I've been playing with the two brick all morning. It heats up near the entrance ports but won't put any color in mild steel under the burner. Is this cold spot because of the air being drawn in(too much air not enough gas?) I'll keep tinkering and post photos tonight.
October 25, 20169 yr Based on the photo of your burner in action I would expect too much of everything. I expect you need to throttle it back a lot to slow down the flame speed at the burner outlet so the business end can heat the opposite wall. We don't talk about it a lot here, but if I recall correctly you can have burners that are too large for their combustion enclosures as well as too small. I believe a sign of this is the quantity of flame shooting out of the forge openings. I have a similar problem with a 1/2" Frosty Tee and a quickie paint can forge I cobbled together. Will have to check if I put the right size MIG tip in it and reduce same if possible.
October 25, 20169 yr I Used a 1/2 T in a 2 brick forge and needed to turn it down and also modify it. It was a good start though. I you have more bricks you should not have an issue, you can change the configuration to enlarge the chamber. So yes I second Latticino. For my entire array of mistakes and learning, please see below. I had a lot of valuable input and got a 2 brick forge to work with a 1/2 T. I was able to use said mistakes and valuable input to make a better next forge
October 25, 20169 yr Judging by the pic of it burning in the vise it's running darned rich, there is actually YELLOW flame. Coupled with the increased back pressure of firing into a forge chamber and it'll run very rich. It's cold under the burner because the unburned fuel air is keeping it cool. Tune the burner IN the forge not a vise. You aren't planning on using it as an open air torch are you? A 1/2" burner is good for around 150 cu/in. easy so it's a healthy bit of overkill for a 2 brick forge. Check with an appliance supply or repair company. You guys do have gas ranges and ovens don't you? Propane and galvy are NOT friends so propane is plumbed through black iron pipe. Frosty The Lucky.
October 27, 20169 yr Author Thank goodness for solid fuel. I hedged my bets by securing a thousand pounds of coke today. I had orders that had to go out so I didn't get to work on gas forges today. Turns out getting a burner to stay lit is just the beginning. So far I have spent double the cost of a whisper baby and have managed to bring one piece of 3/8" square mild up to forge temp after several minutes in the two brick. On the plus side I have enough materials to build several 350 cubic inch forges but I have a lot more reading to do. The Blue Ram refractory is not castable, it is in fact a ram type refractory. It's right there in the name, I just didn't know that type existed when I bought it. The guy said it was rated for 3000f so I brought it home. I pounded out a small test piece on the face of a hard fire brick to dry overnight. The company confirmed what the salesman said about it curing through evaporation. Pound it out around the walls of the vessel and let it dry. I told them what I was trying to build and they said not to worry about the k-wool. Two inches of this stuff is supposed to keep the outer shell cool to the touch. We'll see. On 10/25/2016 at 3:05 PM, MonkeyForge said: I Used a 1/2 T in a 2 brick forge and needed to turn it down and also modify it. It was a good start though. I you have more bricks you should not have an issue, you can change the configuration to enlarge the chamber. So yes I second Latticino. For my entire array of mistakes and learning, please see below. I had a lot of valuable input and got a 2 brick forge to work with a 1/2 T. I was able to use said mistakes and valuable input to make a better next forge Thanks for the input Monkey Forge. I'm going to read through your post. I'm now planning to build a larger shop forge rather than build a smaller burner for the two brick. I am finding this whole side of forging fascinating and I like a challenge. On 10/25/2016 at 5:18 PM, Frosty said: Judging by the pic of it burning in the vise it's running darned rich, there is actually YELLOW flame. Coupled with the increased back pressure of firing into a forge chamber and it'll run very rich. It's cold under the burner because the unburned fuel air is keeping it cool. Tune the burner IN the forge not a vise. You aren't planning on using it as an open air torch are you? A 1/2" burner is good for around 150 cu/in. easy so it's a healthy bit of overkill for a 2 brick forge. Check with an appliance supply or repair company. You guys do have gas ranges and ovens don't you? Propane and galvy are NOT friends so propane is plumbed through black iron pipe. Frosty The Lucky. You're right, the 1/2" is way overkill for the two brick. Rather than build smaller burners, which from what I gather may require a level of skill I don't yet posses, I'm going to build a bigger forge. Thanks for the the tip about galvi. I did use a galvi bell for the air intake on frankenburner but no galvi on the hot end. Everything I've picked up since then is either black pipe or brass. Is there any reason other than cost not to make a burner from all lead free brass. Just curious about that one.
Join the conversation
You can post now and register later. If you have an account, sign in now to post with your account.