March 8, 201610 yr Author Oh yeah I know. Many guys have given me advice in the chat room, in the forums, and pms. No doubt about it. I was just saying that some don't you can't trust like Frosty said, and I can tell which have the knowledge and I can trust. As far as that book, I have read it. It really helped me out to understand things, especially flares.
March 9, 201610 yr Author Well, I just realized I may have messed up a cut. Instead of measuring 3.5" from the bottom of the tank to mark the straight line, I measured 2.5". I literally studied the instructions like a test, and of course I have to mess up when I get to the cutting. However, I don't think it should be too big of a deal. If the bottom has 2 layers of 1" ceramic wool, then that should leave me with a half inch until I reach the lip. Then I am probobly going to put about a half inch of casting so that should bring me to the lip. Worse case scenario, I have a little bit of lining showing. Sometimes I just need to talk things out to figure out something.
March 18, 201610 yr Author Got my forge welded up today. The guy told me that the welds look pretty crappy, but they should hold up fine. They did go through the shell a bit, but I don't think that should matter. I got it done for free, so can't complain. I am going to give the guy a bottle opener once I get forging again. Now I need to trim up the overhand of the burner mount that's in the shell with a dremel. After that, I just got to line and finish the burner. The parts for my burner came in, but they forgot probobly the most important piece, the scd80 1/8" nipple. They are sending it to me though. I will post more progress once I paint the shell. That brings me to something else. How many coats of high heat do you guys find necessary for a good lasting finish? Thanks
March 21, 201610 yr Author I put a coat of high heat paint today. The forge now looks really good! I am going to put another coat on tommorow. At first I wanted a glossy finish, but this finish came out matte. I really don't mind the matte though. Thanks for any input
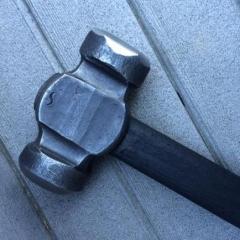
March 23, 201610 yr Author So here is a question. I know that the burner mounting tube should not extend into the shell of forge. So as you can see in this picture, my burner mount extends probobly 1" at the furthest point. Should I just leave it, or should I get rid of the over hang? I tried with my Dremel, but I was not getting anywhere. If I need to remove it, what would be my best way to do so? Thank you
March 23, 201610 yr 4 1/2" grinder with cutoff wheel and GOOD PPE if you really must remove it. With 2" thickness of insulation I wouldn't be extremely concerned, but you may lose a little heat thru the thermal bridge if you don't. Hope you are going to either cast rings for the front and rear of the forge or have some kind of door system. Those openings look huge.
March 23, 201610 yr Author Alright maybe I will try to remove it since the this part of the forge is going to be only 1 layer of 1" ceramic blanket which will then be casted over. The opening is about 5" wide. I plan on making a stand which will have slots for fire bricks to go. But the first couple forge sessions with it will have nothing since I need to rack in a few more bucks to get some angle iron.
March 25, 201610 yr Only 1" ceramic wool and that volume? Good thing you're never going to want to do any welding with it. Frosty The Lucky.
March 25, 201610 yr Author I am new to this kind of thing, so I can't tell you if you are right or wrong. I am just following my plans letter for letter the best I can. There is also .5" of kast-o-lite 3000 over it. The bottom half is probobly even more. I casted it already, so no turning back now. If this doesn't work, then I will know for my next forge. I will put up a picture a little bit later. Thanks for the advice though.
March 27, 201610 yr Author Well, here is the outcome of my forge. Something happened that I have no idea what. It all started when I put my forge in the convection oven at 500F to dry up and harden the refractory. This makes it less likely that a piece of casting will fly out of the forge on the first lighting, and it also makes it less likely to crack. It was in the oven for 40 minutes when smoke started to fill my house. I turned off the oven and opened the windows to get the smoke out. Later on I took out the forge and it was almost burnt, looked just like a cooked marshmallow. What was strange is that the kast-o-lite 3000 is supposed to withstand up to 3000F and still look like mortar. Instead of grey, my casting was yellow. I then realized that the high heat paint was flaking off too. It's not like I just painted it, it had 4 days to dry. The forge then cracked in a spot too. I thought I did everything right, mix the cast able with water until it was the constincency of cement or mortar. Here are some pictures. Any help would be greatly appreciated and hopefully allow me not to make the same mistake next forge build. Thanks
March 28, 201610 yr Header or high heat paint needs to get hot to cure and it SMOKES in the process. It says so on the DIRECTIONS. Had you used stove paint it would've been fine in the oven though 200f is it's typical cure temp and it's not as tough. Drying castable refractories is a sneak up on it process. Even if it's had a day or to to dry at ambient you start it at UNDER 212f in the oven, then bump it to 230f. before trying to CURE it. I have no idea what you did to the refractory. How many different inter-web recipes or techniques did you try at once? Do you recall how many times experienced smiths here on Iforge have said Youtube and blogs are lousy places to learn to do this stuff? Sure there are some outstancing videos and online articles on all facets of the craft but in general anyone with a video camera and a connection can be a youtube "expert." A person needs to know the craft to a point before they can tell the pearls from the road apples. In fact there's a thread that mentions a FB series of blacksmithing videos advising downright DANGEROUS practices in addition to showing how to ruin anvils and other tools. Next time you build a propane forge pick ONE set of plans and follow them. Are you sick of hearing that yet? Education is expensive and it usually takes a couple decades before we figure out the value of learning from other people's mistakes. So, how about paying it ahead some and telling us what you did to screw up that refractory liner. Frosty The Lucky.
March 28, 201610 yr I'm really sorry about that Forging Carver. Here's a little advice from what I've experienced with my recent forge build: I really would not worry about that crack in the refractory, especially if you put extra Plistix around that area. Once your forge gets up to temp, that refractory will be glowing red hot anyway, so a crack may not be such a big deal, especially if you have the layer of insulating blanket underneath yet. The crack is also not in a high heat area. I hope your forge floor is going to be flat across. Even so, that still looks like a fairly large forge. I hope you will be able to get it up to temp. I really do not know about that high temp paint flaking off. BUT, on my forge build, which I used Wayne Coe's products and plans, I just painted my forge shell with a coat of regular Rustoleum, no high heat rated stuff. That refractory is amazing stuff. So far, the only place the paint has burned off is around the door of my forge. For perhaps the first 45 minutes of running my forge, I can put my hand on the outside, so I think that regular paint will do fine. Another point about paint is did you take the previous coat of paint off? I'm sure the paint on freon tanks is not rated for high temp. Once you stuck in the oven, it probably burned off, which meant that your top coat of high temp paint had nothing to stick to, so it is now flaking off. This is what may have happened, but I don't know. Frosty, try to be nice to him. I suspect he may be a perfectionist, which isn't all bad--I am one myself, at times. But perfectionists can make life hard for themselves by worrying about getting too many things right all at one time. I know that from experience. Blessings to you, Anthony
March 28, 201610 yr Again, what Frosty said. It would have been interesting to see a before picture. Other than crack (which can be repaired with refractory mortar) and the brown color, its hard to see what is wrong. The brown color (is this what you mean by "almost burnt?) could be from the burnt paint. Lot of could bees without more info...
March 28, 201610 yr The Kast-O-Light in my forge turned a toasty brown by maybe the third time I fired up the forge.
March 28, 201610 yr Frosty, he was following my instructions to place it in the oven at 500 degrees for a couple of hours. I have always cured my forges and recommended it and have never had any problem or had any adverse comments. I suspect that Matt's paint burning off gave the discoloration.
March 28, 201610 yr Author Thanks for the help. Next forge I will remove the paint on the tank to get better luck with the high heat paint. The bottle did say that the paint will smoke non toxic fumes when heated, but who knows what else was in the smoke. So if the casting is only discoloration, is it still safe to use? At first I was thinking no, but I could be wrong. That one crack can flake off real easily. Maybe I would be better off making a new one. Thanks
March 30, 201610 yr On 3/28/2016 at 3:18 AM, WayneCoeArtistBlacksmith.c said: Frosty, he was following my instructions to place it in the oven at 500 degrees for a couple of hours. I have always cured my forges and recommended it and have never had any problem or had any adverse comments. I suspect that Matt's paint burning off gave the discoloration. I misunderstood, I thought he was talking about a failure in the liner not just a color change. Burning paint might've tinged everything in the kitchen. I'd laugh but I've done worse. I think we all probably have. Frosty The Lucky.
April 13, 201610 yr Author Well, the gas forge is finally done. It is made out of a freon bottle, and inspired by Wayne Coes plans. I plan on cutting soft fire brick to put inside the forge, and this way it will reduce some of the forge volume. The stand is made of 2" angle iron, and is tall enough to reach just below my chin when the forge is on it. Some legs are a bit crooked, the top is a bit off level, and there is a little bit of wobble. Part of that issue is that the stand is so tall, and the width of the legs narrow. I guess it's not too big of a deal. I can't wait to fire it up. Let me know what you guys think.
April 13, 201610 yr center of gravity is way too high, have you checked to see what it takes to tip over. imagine that being operated when it falls... be carefull
April 13, 201610 yr I second Steve's concern. There are a couple easy fixes to that. Probably the simplest is to fasten it securely to something like a sheet of plywood or a pallet. You could also put some outrigger supports on it or secure it to a heavy plate of steel - anything that makes it much harder to tip over in any direction. The last thing you need is to be pulling a hot piece of steel out of there and end up with it falling to the ground while in operation. I assume you also plan to block off a good portion of the front and the back to keep the heat in. I'm looking forward to seeing what you do (safely) with it.
April 14, 201610 yr I build a cradle out of angle iron then weld 3 3/4" couplings on the bottom, one on each of the front corners and one in the center of the back. They are splayed out at about 22 1/2 degrees, the front ones angled out to the front and the side at 45 degrees. The legs are 3/4" pipe screwed into the couplings and as Matt did about chin high so that I can look straight into the forge without having to squat, etc.
April 14, 201610 yr Author Thanks for input. Yeah, I got to be very careful. Where it is planted, it can be knocked over but you would really have to try. Taking a piece of steel out of the forge shouldn't knock it over, but something like falling into it or pushing it probobly will. Wobble is the main concern. I wanted to do a tripod type design like Wayne did, but I didn't have a welder and didn't find it worth it to go back to the guy again. Next forge and stand I make I will have a welder, so the design will be better. Right now my forging area is in sand, so I can plant it really well and it won't move easily. But when and if I move to somewhere on the grass, I will definetly mount a heavy plate of steel or get a pallet to it if I still have this stand. Thanks again.
April 14, 201610 yr Nice job Matt. If push comes to shove, drive two stakes into the ground and screw or wire the legs to the stakes. You really don't need to stake all 4 legs,2 should be enough. I'm spoiled because I have a bunch of concrete pins with holes in them from years of doing concrete for things like this, but any 2'-3' long, 3/4" or larger rod would work, or even those 1 1/2" x 1 1/2" oak tree stakes would work ( though they are harder to drive and pull than steel pins. As far as stiffening your stand, you'll want some sort of "brace" down near the lower end of the legs to help stabilize them to start with. Simple 2" x 1/8" flat would work. I say 2" because it's wide enough you could drill and use blots vs needing to weld. Even 1" x 1/8" would work if you had access to a welder. Thicker flat or angle iron would also work. I'd think about adding a brace maybe 12" from the bottom, and maybe one about waist level or so. The one at waist level, if made of angle iron on at least 2 sides would allow you to make a small shelf. "Outriggers" of some sort would help stabilize the whole thing. 2x4's are simple and cheap. I'd do a T shape. one across the front two legs say extending 6" to 12" past the legs on each side. This should be enough to stabilize the stand side to side, but you may need to be wider if your stand is taller than I think it is. The"vertical of the T would start behind this front 2x and attach to the legs front and back on one side and extend out the back by about the same amount the front does. This will keep it from tipping over backwards. I doubt in use you will tend to want to tip it forward. I would not extend legs to the front to prevent tipping. Instead if it does become an issue, toss a sand bag on the back leg and it will keep it from wanting to move. For a "sand bag", if you know anyone who gets bulk feed, the heavy feed bags work great for this. I prefer to use gravel vs sand for things like this as sand tends to work thru the fibers and can make a mess if you aren't careful. The reason I suggest 2x4's is A; they are dirt cheap, you can take them off a scrap pallet for free if need be, and B: you can simply drill a few holes in your angle iron legs and use drywall screws to hold the 2x's on. No welding needed.
Join the conversation
You can post now and register later. If you have an account, sign in now to post with your account.