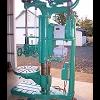
Rockcrusher Posted January 1, 2014 Share Posted January 1, 2014 I have been gathering some steel to make a post anvil for a while now and finally came up with a piece that would work for the post. It is the bit from a large hydraulic excavator. It had broken in use near the retained end so had been discarded to a scrap heap. The problem would be holding it up stable and solid. I found a casting that would work to support the bit with minor modification and a plate for the bottom. Both are made from high alloy impact resistant steel. Here is a pic of the Anvil so far.... The breaker bit is over 6" diameter weighing 244 lbs and was very difficult to cut but I was able to get partial cuts all around the base and with a little torch work it sits solidly on the lower band in the casting. Surprising to me the casting itself cut quite well with the torch so getting the bit to fit through the top was fairly easy, The bottom of the bit modified to rest on the band in the lower casting. The only thing left to do was to weld the casting to a 1" plate for a base that was also a difficult alloy. I used a couple of different rods. First pass was Dynamang, a rod that works well on manganese steels, and second pass was with some Utectic rod I had left over from a project. Here is a pic of the weld area. I will probably pour the casting full of crusher backing securing the bit to the casting but for now it is just sitting and is still very solid...I may leave it as is. Total weight is right at 390 lbs. Rebound is very good and it has a nice ring. The top is set at the same height as my West anvil about 33". The top of the new post anvil has the wear of beating on rocks all it's life and is fairly rounded but I don't plan to change it. Just need to use it a little and see how useful it is. Ed. Quote Link to comment Share on other sites More sharing options...
VaughnT Posted January 1, 2014 Share Posted January 1, 2014 That is fantastic! I've always wanted to build a post anvil out of one of those bits, but they are so hard to come by around here. I wouldn't change a thing about your design. It looks great and I don't doubt that it will certainly function perfectly. Quote Link to comment Share on other sites More sharing options...
Geoff Keyes Posted January 1, 2014 Share Posted January 1, 2014 I would not fill the holder with anything. I heard a story about a big hammer with a separate anvil. The operator had to keep adjusting the spacing of the dies, until he ran out of adjustment. Then he realized that the anvil jumped in use and sand and scale worked it's way under the anvil, lifting it up. In the end he had to pull the anvil and scoop out all of the stuff and reset the anvil. They poured lead around the anvil to seal out the debris. I use wooden wedges to hold my post anvil in the holder, I've never sealed the space around it, because I've had the thought that I was going to pull the anvil and re-face it. Geoff Quote Link to comment Share on other sites More sharing options...
781 Posted January 1, 2014 Share Posted January 1, 2014 What do you use the rounded end of the anvil for. Have seen flat square posts knife makers used not never round tops. Quote Link to comment Share on other sites More sharing options...
Rockcrusher Posted January 2, 2014 Author Share Posted January 2, 2014 For now I will leave it as is, normal hammer blows do not rattle the post around as it is a very good fit. I am toying with the idea that if I finish squaring off the bottom end I could pull the post and reverse it having one rounded end and one squared. It is not a lot of work to make that possible but end changes wouldn't be super easy just because of the weight of the post so I would need to roll a hoist over for the lift. A rounded end certainly has many uses, try knocking dents out of old headlight housings, cream cans, or your hard hat with a flat surface. Lots of times reaching to the bottom of deeply drawn objects where a radius on the end could be quite useful. Of course a flat surface on the end could be quite useful as well but I do have a perfectly good anvil right there for most flat work. Still planning to live with it a while and see how useful it is. I mainly made it to play with the idea of a free standing post. Ed. Quote Link to comment Share on other sites More sharing options...
caotropheus Posted January 2, 2014 Share Posted January 2, 2014 Rockcrusher Nice setup you have over there. I like the stand you built for it. I wish I could get something similar. What is the chisel diameter and how bad is the ring of your current setup? I am also improvising an anvil from an hydraulic breaker chisel like this one. Same story, got the chisel broken from the scrap, bottom piece 120 kg, butt piece (upper piece, secured inside the breaker) 50 kg. Chisel diameter 144 mm and it rings like a bell when hammered. I took the "bottom piece", 77 cm long and cut a flat face with a chop saw. Very hard steel, took about 10 hours to cut. Not to destroy the chop saw, cut the chisel for 10 to 20 seconds, let the saw cool down for a couple of minutes. The steel was never too hot to the touch, I could always handle the steel with my bare hands. Now, I am improvising a stand to hold the chisel upright and I am improvising a horn to attach to the stand. Quote Link to comment Share on other sites More sharing options...
ianinsa Posted January 2, 2014 Share Posted January 2, 2014 That's very nice, I recon you'll use it rarely but when you do you'll love it. There has certainly been times when I wished I had one like that. Reminds me a bit of those bollards in Amsterdam :D Quote Link to comment Share on other sites More sharing options...
Rockcrusher Posted January 2, 2014 Author Share Posted January 2, 2014 Caotropheus, the bit I used is 6-3/16" or about 158 mm in diameter. It weighed 244 # or about 111 kg. It does have a clear ring probably about the same as an unsecured cast anvil. It is tough steel to cut with a chop saw mainly because of the large diameter and amount of abrasive wheel that ends up in contact as the cut progressed. I was wishing for more hp on the chop saw. The first 1/2" or so of the cut went pretty easy so I just kept rolling the bit until I had all the relief I needed all around to sit it on the lip in the support casting. I worked on the cut end about an hour or so with my chop saw tripping the breaker a few times. It actually cut pretty good with the torch when I plunged into the chop saw cut but that was only a 1/2" of bit I pierced. (you can see what I mean in one of the pictures.) Amsterdam bollards? Thanks Ianinsa, that's a new term to me but will give me new google fodder. edit- (Oh...dock post for tying up ships) I suppose it does resemble those. Ed. Quote Link to comment Share on other sites More sharing options...
Anachronist58 Posted January 6, 2014 Share Posted January 6, 2014 Rockcrusher - Excellent execution. Art Gallery Quality Appearance - Oh what the Heck - I am filled with Envy! Robert Taylor Quote Link to comment Share on other sites More sharing options...
ianinsa Posted January 6, 2014 Share Posted January 6, 2014 I think they are called Amsterdammerkie or something like that. Ian Quote Link to comment Share on other sites More sharing options...
marcusb Posted January 7, 2014 Share Posted January 7, 2014 What size is that WEST? Shes a beaut! Quote Link to comment Share on other sites More sharing options...
Rockcrusher Posted January 8, 2014 Author Share Posted January 8, 2014 My West anvil is right at 400#. It is really just my assumption that it's a West....who else was putting a W on the side of cast anvils. I know Postman shows a few different types of markings on West anvils in AIA and this isn't an exact match to any of those but he also says he never found a mid size West even though he suspects they were produced. The profile looks right to me also. I was told by the previous owner that this one came from the shipyards in Portland. Here is a pic of it as found showing the only marking on it. (Pic links back to the PB album) Ed. Quote Link to comment Share on other sites More sharing options...
marcusb Posted January 8, 2014 Share Posted January 8, 2014 Sure looks like one. Sounds like they are about as tough as they come for anvils. I sure hope to stumble onto one myself someday. Thanks for the pic! Quote Link to comment Share on other sites More sharing options...
Recommended Posts
Join the conversation
You can post now and register later. If you have an account, sign in now to post with your account.