
Rockcrusher
-
Posts
35 -
Joined
-
Last visited
Content Type
Profiles
Forums
Articles
Gallery
Downloads
Events
Everything posted by Rockcrusher
-
Camelback drill press
Rockcrusher replied to reitenger's topic in Drills, Post drills, Mag drills, etc
Opps, double post. -
Camelback drill press
Rockcrusher replied to reitenger's topic in Drills, Post drills, Mag drills, etc
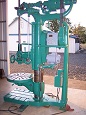
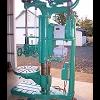
Mechanics machine company made upright drills under that name from the late 1800's through about 1912 when they sold the drill line to Rockford Machine Tool. Thie C/L drill Is probably around 24" and has a two speed head shaft with planetary gears in the uper cone pulley for additional speeds. Also power feed which is quite useful. I have a 32" Mechanics drill which stands over 9' tall with the spindle shaft extending a couple of feet above that. I'm a fan of camelbacks in general and they can be really usefull for boring the really big holes. Here is a scan of their brochure cover and a pic of my MMC drill. Ed. -
There are some really cool vises in that line up. I would be interested in better pics of that early fisher if you get a chance NJ Anvilman. I have never seen one like it. I also liked the one in the last pic, the "giraffe neck vise". Ed.
-
John the picture probably makes it look bigger than it is. It's 12-1/2" square x 3-1/2" thick. Weight is #110. No identifying marks found and I looked it over pretty good. Ed.
-
Here's one I picked up from an elderly uncle the other day. He called me because he wanted to give me an old Buffalo forge he had got from his father in law when he passed away. It had been in his car port for years. I never turn down a tool lead. The forge was better than I expected but to get it out there was quite a pile of other things to move first including this swage block. He wanted it gone as well and offered to give it to me but I gave him a couple hundred for the pair, all I had on me, and stuck around and fixed his air compressor too. Not many holes in the center of this one but good size and weight. This is a pic "as found". I still need to build a stand for it. I have a couple of home made ones too which work great but this is the first "real one" I've had. Ed;
-
My West anvil is right at 400#. It is really just my assumption that it's a West....who else was putting a W on the side of cast anvils. I know Postman shows a few different types of markings on West anvils in AIA and this isn't an exact match to any of those but he also says he never found a mid size West even though he suspects they were produced. The profile looks right to me also. I was told by the previous owner that this one came from the shipyards in Portland. Here is a pic of it as found showing the only marking on it. (Pic links back to the PB album) Ed.
-
Caotropheus, the bit I used is 6-3/16" or about 158 mm in diameter. It weighed 244 # or about 111 kg. It does have a clear ring probably about the same as an unsecured cast anvil. It is tough steel to cut with a chop saw mainly because of the large diameter and amount of abrasive wheel that ends up in contact as the cut progressed. I was wishing for more hp on the chop saw. The first 1/2" or so of the cut went pretty easy so I just kept rolling the bit until I had all the relief I needed all around to sit it on the lip in the support casting. I worked on the cut end about an hour or so with my chop saw tripping the breaker a few times. It actually cut pretty good with the torch when I plunged into the chop saw cut but that was only a 1/2" of bit I pierced. (you can see what I mean in one of the pictures.) Amsterdam bollards? Thanks Ianinsa, that's a new term to me but will give me new google fodder. edit- (Oh...dock post for tying up ships) I suppose it does resemble those. Ed.
-
For now I will leave it as is, normal hammer blows do not rattle the post around as it is a very good fit. I am toying with the idea that if I finish squaring off the bottom end I could pull the post and reverse it having one rounded end and one squared. It is not a lot of work to make that possible but end changes wouldn't be super easy just because of the weight of the post so I would need to roll a hoist over for the lift. A rounded end certainly has many uses, try knocking dents out of old headlight housings, cream cans, or your hard hat with a flat surface. Lots of times reaching to the bottom of deeply drawn objects where a radius on the end could be quite useful. Of course a flat surface on the end could be quite useful as well but I do have a perfectly good anvil right there for most flat work. Still planning to live with it a while and see how useful it is. I mainly made it to play with the idea of a free standing post. Ed.
-
I have been gathering some steel to make a post anvil for a while now and finally came up with a piece that would work for the post. It is the bit from a large hydraulic excavator. It had broken in use near the retained end so had been discarded to a scrap heap. The problem would be holding it up stable and solid. I found a casting that would work to support the bit with minor modification and a plate for the bottom. Both are made from high alloy impact resistant steel. Here is a pic of the Anvil so far.... The breaker bit is over 6" diameter weighing 244 lbs and was very difficult to cut but I was able to get partial cuts all around the base and with a little torch work it sits solidly on the lower band in the casting. Surprising to me the casting itself cut quite well with the torch so getting the bit to fit through the top was fairly easy, The bottom of the bit modified to rest on the band in the lower casting. The only thing left to do was to weld the casting to a 1" plate for a base that was also a difficult alloy. I used a couple of different rods. First pass was Dynamang, a rod that works well on manganese steels, and second pass was with some Utectic rod I had left over from a project. Here is a pic of the weld area. I will probably pour the casting full of crusher backing securing the bit to the casting but for now it is just sitting and is still very solid...I may leave it as is. Total weight is right at 390 lbs. Rebound is very good and it has a nice ring. The top is set at the same height as my West anvil about 33". The top of the new post anvil has the wear of beating on rocks all it's life and is fairly rounded but I don't plan to change it. Just need to use it a little and see how useful it is. Ed.
-
They are neat little vises....not all that rare though. I have one with a swivel base. I think I gave about $15 at an antique shop so $3 sounds like a bargain. I've seen a few that were broken where the square bar mounts to the movable jaw from over tightening. Mines doing light duty on a reloading bench. Ed.
-
Soderfor FORGED steel anvil or not?
Rockcrusher replied to a topic in Anvils, Swage Blocks, and Mandrels
I suppose my anvil could be cast. I suppose all Soderfors could be cast. I've read that Soderfors may have been in business since 1200 AD. If true that is about 800 years of processing iron and steel. Surely this company practiced a high level of integrity and customer service to have this type of longevity. The main problem I have accepting the "Soderfors cast all anvils" premise is apparently the only documents I've seen containing information on the Soderfors manufacturing methods employed in the early 1900's or before so far are a few advertisements. Either we accept that the information in these advertisements is accurate or we must conclude that their was a deliberate effort by Soderfors management to deceive potential customers. Seems a bit unethical doesn't it. I guess I hope that evidence will somehow emerge to restore widespread faith in Soderfors credibility. Not trying to be argumentative at all...just stimulate further discussion. Ed. -
Soderfor FORGED steel anvil or not?
Rockcrusher replied to a topic in Anvils, Swage Blocks, and Mandrels
Nice anvil Black Frog. You sure have a lot of information stamped in that one and a rivetted tag to boot. Interesting texture in that first pic, it looks like a chisel makers anvil until you see the stampings are on top of all those straight line marks. The only information to be found anywhere on my Soderfors are in the picture above. Good info about the Dannemora mine too. I had not heard that before. Ed. -
Peter Wright Farriers anvil
Rockcrusher replied to Nicemibs's topic in Anvils, Swage Blocks, and Mandrels
I'm a little late to this party but the topic fits...Peter Wright definitely made a farriers anvil with the extreme features you might expect to see in this pattern. Swelled horn with clip at a raised angle, the thin graceful tail with double pritchel holes, and a narrow waist. Very similar to some of Hay Buddens farrier pattern anvils. I've had this Peter Wright for a couple of years now and I haven't seen another quite like it....yet. Ed. -
Soderfor FORGED steel anvil or not?
Rockcrusher replied to a topic in Anvils, Swage Blocks, and Mandrels
Black frog, does this 510# anvil show casting lines or have raised insignia? Do the handling holes show signs of use? I suppose even a cast anvil could have handling holes pushed in and be beat on once removed from the mold to mask the flash line...but there is probably only one reason to do so. Could it be that Soderfors was making a forgery of a forged anvil? I kind of doubt that, so for now I'm sticking with the theory that they produced both cast and forged anvils over the years. Now where did I leave that darned time machine, wouldn't it be nice to go back about 120 years or so and check out the Soderfors factory works. :) Ed. -
Actually no. That was about as solid as I could mount it. In my day job at the quarry there is no such thing as anything being over built. :) What is interesting and not totally expected is that I get pretty good rebound off the top of this vise now. Not as good as an anvil but still about 50% to 60%. Very good for forging on or heavy bending. I used cone liner backing to set the foot in the casting and the wall thickness on the mounting pipe is about 5/8". This vise will not move.
-
Here is a pretty good way to get an exceptionally solid mount if you have a good floor to mount to. It is a chunk of 1-1/2" plate which has been recessed to perfectly fit the vise body. the face of the plate was drilled and tapped so a front strap can secure the vise to the plate. A heavy wall pipe was used to join the top plate to a lower 1" plate which also holds an old casting that fit the post base very well. A special epoxy was used to give 100% support to the foot. This is an 8" vise and the top of the jaws are set about the height of my anvil which I find a very useful. I do have another 6" post vise nearby that is about 8" higher. I know it looks like the leg was cut off but I'm fairly sure it came this way as the stump doesn't look cut. Any way here are a couple of pics. Ed.
-
Soderfor FORGED steel anvil or not?
Rockcrusher replied to a topic in Anvils, Swage Blocks, and Mandrels
I would agree with Thomas because it seems that getting enough metal movement to significantly refine grain structure would require a drop shaped differently enough from the dies it was forced to flow to fill them. That would be the easy part. Getting it to flow and fill perfectly without flashing between the dies leaving the parting line would be masterful. If your not getting flow and simply compressing the casting to refine grain size is it worth the effort? I know...more questions than answers. Ed. -
Soderfor FORGED steel anvil or not?
Rockcrusher replied to a topic in Anvils, Swage Blocks, and Mandrels
I'm not really sure just how old it is but possibly before the paragon line? All markings are stamped including the Soderfors shield with crown. Ed. -
Soderfor FORGED steel anvil or not?
Rockcrusher replied to a topic in Anvils, Swage Blocks, and Mandrels
I'm a little surprised at the apparent lack of strong feelings on this topic one way or the other. I am pretty sure that Soderfors was forging at least some of their anvils in the traditional manner. It seems equally likely that some were outright cast. As far as taking a fresh casting and forging it in closed dies, well, from the evidence available I believe that likely was a manufacturing method Soderfors used as well. Soderfors made anvils for many years, during the evolution of metalurgy, so a certain level of experimentation would be expected. No doubt as Anvil makers around the world were discovering there were many suitable processes for producing quality anvils. Being priced competitively while maintaining quality would have been the challenge. They certainly had one advantage in that Swedish steel by all accounts was as good as there was. I would like to think that someday we will have more of the answers....possibly some of them coming from discussions like this one. Ed. -
Soderfor FORGED steel anvil or not?
Rockcrusher replied to a topic in Anvils, Swage Blocks, and Mandrels
I have only owned one Soderfors anvil and it does not have a parting line at all and I don't believe it was ground off. I have a big West anvil also and it is obviously cast. Soderfors advertising claimed they were forging anvils for many years and I believe they did. Here is a picture of the back of my anvil...a 506# Soderfors that I would say shows signs of being forged. Ed. -
Anvil restoration- 15CrMn FAIL =/
Rockcrusher replied to Pulsepushthepopulace's topic in Anvils, Swage Blocks, and Mandrels
If you have access to an old rod fridge you should be on the look out for any of the following rods, all of which have similar characteristics and should work well on an anvil face. Some of these are still readily available or can be further cross referenced depending on your local dealer. I recently priced MG 710 at around $23/lb...about as good as it gets. Ed. MG 710 Eutectic N6SH UTP AH-2 Chronatron 346 Certanium 215 Nassau Midas H12 X-ergon 710 Stoody 1105 -
That is a really nice anvil. I also really liked this link you included in the for sale section. http://www.ernst-refflinghaus.de/pageID_4751474.html A very interesting write up of the forging process that produced this type of anvil. Ed.
-
Welding a cast steel anvil
Rockcrusher replied to CleetisMorgan's topic in Anvils, Swage Blocks, and Mandrels
I thought the OP had a few torch nicks to repair...not a major buildup of a large section of the face. That's why I recommended he try one nick first. It has been my experience small welds on minor defects seem to absorb and alloy with the parent metal and a hard peen kind of forges it in place secured by original metal. I would certainly not expect to cover large sections of the face with only 7018....and never have screwed up a job so bad I couldn't fix it. -
Welding a cast steel anvil
Rockcrusher replied to CleetisMorgan's topic in Anvils, Swage Blocks, and Mandrels
If you are a good welder you could clean out one cut very well and using a dc welder lay a beautiful bead of 7018 in it. Peen it a bit and lay another bead on top of the first weld until you are just proud of the surface. Then grind it carefully to just flush. Hold your hand on the surface. It should be no more than warm and cool very quickly because the anvil is such a large heat sink. Try that one repair out and see how it reacts. Cast steel welds very well with 7018 when the temp is correct and will take on the same color as the cast steel. If you are satisfied the repair is sound you have a method that will work. Try bouncing a steel ball on both virgin face and the repair, see what happens. I have used this method for minor dings and torch cuts quite successfully on solid cast steel anvils. Certain high strength tool steel rods work quite well also but the color will be different. Of course there are other methods that will work quite well also.... Ed. -
Big Swedish Anvil ID
Rockcrusher replied to Rockcrusher's topic in Anvils, Swage Blocks, and Mandrels
Just one more thing to add. I found a pic of this neat old tin sign....so that's what the shield with a crown is suppose to look like. Ed.