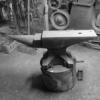
stuarthesmith Posted August 9, 2012 Share Posted August 9, 2012 I got a call from my auctioneer friend, telling me he has another anvil for me. I bought this last night. It is an extremely clean, 150 beauty, which looks to be a Trenton. I have never owned a Trenton before, but at first I thought it was a Hay Budden. What convinced me that this is a Trenton is the narrow face, the flattened feet, and the football-shaped hollow underneath the anvil. It rings like a bell, and has very sharp edges, with zero signs of abuse. The serial number is present, but I was too tired and lazy to read it, but the first alpha-numeric in the serial number appears to be a "w". I generally buy anvils to sell them to newbies, but this one I am KEEPING. Oh, and I only paid 115 dollars for it! Quote Link to comment Share on other sites More sharing options...
fluidsteel Posted August 9, 2012 Share Posted August 9, 2012 She's a real beauty! $115? You stole that anvil! Quote Link to comment Share on other sites More sharing options...
bigfootnampa Posted August 9, 2012 Share Posted August 9, 2012 I believe that is a Trenton... I think I see the faint outlines of their diamond logo on the right side. The top plates on the Trentons seem to be exceptionally durable. Very good anvils! Quote Link to comment Share on other sites More sharing options...
EGreen Posted August 9, 2012 Share Posted August 9, 2012 now I know what my anvil is.feller gave it to me several years ago the base had been busted off and sombody had welded a big piece of channel iron to the bottem.still weighs in at about 100# tho Quote Link to comment Share on other sites More sharing options...
SReynolds Posted August 17, 2012 Share Posted August 17, 2012 I am no anvil expert, but from what I am looking at, the top edges look badly chipped, not sharp. Not knocking you find. I just don't see any sharp edges from these pictures. I am currently looking to purchase a used anvil. It has been very difficult to find one w/o badly chipped edges. Howevr, I'm told they are in great shape. I don't understand the anvil lingo I guess. Sure the dealer has many new anvils in stock and I guess I'm comparing his used ones to the new ones that have sharp edges. Quote Link to comment Share on other sites More sharing options...
stuarthesmith Posted August 17, 2012 Author Share Posted August 17, 2012 Please let me explain this to you. With the horn on the left, blacksmiths deliberately file the first two inches of the edge opposite the blacksmith round for tapering hot steel. This is called "dressing the edges". Please look at my avatar pic of my clean 700 pound hay budd. It is similarly dressed. Quote Link to comment Share on other sites More sharing options...
SReynolds Posted August 17, 2012 Share Posted August 17, 2012 Exactly. The radius I use to roll steel on which is near the horn. I don't have any problem with the anvil pictured however, I guess I don't understand it as the pictures shown, clearly demonstrate several chips aka chunks missing from the edge, not a single radius near the horn. I have this same anvil. I wil take a picture of the dimond on the side and of the top edge. It looks similar and I would refer to mine as rather worn/damaged. Quote Link to comment Share on other sites More sharing options...
Timothy Miller Posted August 17, 2012 Share Posted August 17, 2012 I am no anvil expert, but from what I am looking at, the top edges look badly chipped, not sharp. Not knocking you find. I just don't see any sharp edges from these pictures. I am currently looking to purchase a used anvil. It has been very difficult to find one w/o badly chipped edges. Howevr, I'm told they are in great shape. I don't understand the anvil lingo I guess. Sure the dealer has many new anvils in stock and I guess I'm comparing his used ones to the new ones that have sharp edges.Its an anvil not a precision machine tool. Quote Link to comment Share on other sites More sharing options...
SReynolds Posted August 17, 2012 Share Posted August 17, 2012 Its an anvil not a precision machine tool. I can't comment on that as I don't know what you mean there..........I didn't set the stage for " very sharp edges" in this thread. I would guess that this picture below would demonstrate "very sharp edges" when compared to the above pictures, would it not? It may be helpful to know that I visited with one of your own, a master blacksmith of well over thirty years, who had coached me in what to look for. Perhaps he is wrong. Quote Link to comment Share on other sites More sharing options...
Timothy Miller Posted August 17, 2012 Share Posted August 17, 2012 I can't comment on that as I don't know what you mean there..........I didn't set the stage for " very sharp edges" in this thread. I would guess that this picture below would demonstrate "very sharp edges" when compared to the above pictures, would it not? It may be helpful to know that I visited with one of your own, a master blacksmith of well over thirty years, who had coached me in what to look for. Perhaps he is wrong. The anvil pictured is in good condition but It has never been dressed. The edges are pretty much how it left the factory. Most smiths would agree the the edges of an anvil should be dressed, some don't bother. A sharp edge on an anvil will make a sharp cut into the steel this can cause a forging to fail. Because at the sharp shoulder, a stress fracture can form as the work is forged. This fracture can enlarge as vibrations work the two sides of the crack like tearing a sheet of paper eventually the forging will crack in two. So many smiths will round the edges of their anvils to prevent this. Also and probably more important is rounded edges give the smith additional working surfaces. For tasks like starting scrolls, bending, drawing out stock, shouldering and fullering. All that being said Stewart's anvil can have its worn edge smoothly rounded and the result will be a more useful anvil than one with sharp edges. Quote Link to comment Share on other sites More sharing options...
SReynolds Posted August 17, 2012 Share Posted August 17, 2012 Cool.......That is helpful. My instructor tells me that I need to have a sharp edge (on anvil) to forge a nail. The (nail) shoulder must be defined (by half on-half-off hammer blows) so the header will have a positive stop and to properly form the undeside of the hail head. I have to use one of few sharp edges on my anvil to make the nails. I have never attempted to forge a nail (shoulder) on a rounded edge. I don't believe it would work as the shoulder would be a radius, then again, I never tried it. Quote Link to comment Share on other sites More sharing options...
TechnicusJoe Posted August 17, 2012 Share Posted August 17, 2012 Nice to see my Peddinghaus anvil back in the posts @ SReynolds's #9 post. I do have to note my edges aren't 90 degrees sharp. They're lightly rounded, about a 3/16'' more or less. I find this to work perfectly. I rather leave the edges there than to remove them. I can forge nails, scrolls, whatever and it doesn't leave any marks. Fullers, hardy tools you can always make for the job, but edges you can never put back. I know you can weld them back, but one shouldn't touch a perfectly well working "machine". Also I have no worries this anvil will break on me any time soon. Peddinghaus's top from the waiste up are drop forged steel. My version is a little different. Mine is acutally forge welded at the waist (only done one the earliest models of Peddinghaus anvils, thus this a very old one) instead of arc welded like the new(er) ones of Peddinghaus today. And considering this anvil comes from a school where it was well used and no marks to be found, I'd say not to worry. So, I'd say leave the edges there, you won't realise how good they are until they're gone. Quote Link to comment Share on other sites More sharing options...
Timothy Miller Posted August 17, 2012 Share Posted August 17, 2012 Its you anvil do what you want with it. The idea of easing the edges of an anvil is long established, the book Practical Blacksmithing original published in 1889 on page 112 goes into detail on the subject. Its not my idea but I have found that enlarging the radius the edges of the first few inches of the anvil to be extremely useful. I my self would be slow to categorically dismiss a accepted idea I have not yet tried. Quote Link to comment Share on other sites More sharing options...
iron woodrow Posted August 18, 2012 Share Posted August 18, 2012 that could cover many modern social decisions timothy! Have you tried communism? Islam? There are millions who say they work! Quote Link to comment Share on other sites More sharing options...
Timothy Miller Posted August 18, 2012 Share Posted August 18, 2012 that could cover many modern social decisions timothy! Have you tried communism? Islam? There are millions who say they work! Down load the book its free make up your own mind. Practical experience has shown at least for me that a dressed anvil is more useful than one with factory edges. Quote Link to comment Share on other sites More sharing options...
Frank Turley Posted August 18, 2012 Share Posted August 18, 2012 In 1964, I was in horseshoeing school in Corvallis, Oregon, and we had a new cast, farrier's anvil delivered for our use. It had sharp edges. Our instructor, Charles 'Dick' Dickenson, took a new file to all face corners including the heel. He wasn't extreme, but he "broke" all sharpness and left a little radius all around. Admitted, that was not a blacksmith pattern anvil where we put a larger radius adjacent to the step for a little ways. He didn't do that, but he demonstrated that a new anvil sharpness was undesirable. Dick served an old fashioned farrier's apprenticeship in New Jersey, I suspect in the 1920's, and he shod horses on the harness tracks, very demanding work, so I always assumed he knew what he was doing. Quote Link to comment Share on other sites More sharing options...
HWooldridge Posted August 18, 2012 Share Posted August 18, 2012 There is sound engineering principle behind breaking the sharp edges. All materials are more or less subject to notch effect so any score in a smooth surface can cause a break. Notch effect causes all kinds of failures - I just had a 3/4" Grade 8 bolt break on my tractor's front end due to a fracture that began at the termination of the thread on the bolt body. I also work in a production machine shop and we always put at least .005 radius into theoretical sharp inside corners as a matter of habit - so "sharp" really belongs more in the world of knives and such... That being said, sharp edges raise havoc on forgings. In reality, most inside corners should have no less than a 1/16" radius - more is better if allowed by the final use. I replated my PW anvil many years ago so it wound up having sharp edges initially but I broke all of them before using it. Quote Link to comment Share on other sites More sharing options...
SReynolds Posted August 22, 2012 Share Posted August 22, 2012 This would appear to be the same as pictured in the first post at the start of this thread. THis is one of the ones I use at the historical society. I have had a number of visiting smiths and they comment on what a nice anvil this is and it is what anyone would look for in terms of overall condition. The point I'm making is that they are impressed with the sharp edges. And how so much of the work performed requires a sharp edge. But in this thread, I see an anvil which exhibits damaged edges and is said to be "very sharp" then I'm reading supporting statedment about how it isn't damaged and that the anvil in question is what you'd generally **want** Thusly my frustration with "what you want" and "what is good" seems to vary quite a large amount and probably much more than it should( in the opinion of a new smith), making the hobby very difficult to endure and get a "bead on". It ranks right up there with "A blacksmith would never buy tools". "You need to make them". I think sometimes advice can have a negative effect. The pictures of the anvil I posted here obviously doesn't show the damage as in the anvil posted at the start of this thread. That was my point. One can clearly see the radius near the horn on my anvil and the "sharp edge" along the top side of both edges with very little damage. Quote Link to comment Share on other sites More sharing options...
ThomasPowers Posted August 22, 2012 Share Posted August 22, 2012 Frankly in my 30+ years of smithing very little work has needed a sharp edge and sharp edges have cause problems for me. Now a small radius edge is handy for certain things and I have been known to use differing parts of an anvil's edges to get the radius I want---or even switching anvils or using a hardy tool with different radii on it. Just like I have 4 different radius swing arm fullers and use the one I need for the project I need. This might be like choosing a vehicle---different people have different needs and what makes a great commuter car is quite bad at moving 16 tons of gravel across a muddy field! I feel the problem with new people is they often want *one* answer when in reality there are a slew of answers to most question depending on various factors they may not even be aware of! This can be compounded when someone with a strong opinion comes forth that *their* way is the *ONLY RIGHT WAY* confusing people that may have a different set up and don't know when to follow and when to ignore. Some people would do better with machining as a metalworking hobby than smithing... Quote Link to comment Share on other sites More sharing options...
quint Posted August 22, 2012 Share Posted August 22, 2012 I seem to recall (very limited experience here) that they would dress one side and leave the other sharp. I won't get into what is considered a sharp edge. Personally being worried about making a chip worse I would smooth out any chips, radius the edges but pick one area and leave that non radius to use for those purposes. That's just me though. Both my old anvils are already radiused. My vulcan is not but I am selling that so I will let who ever buys it decide what they wanna do with it. Just my thoughts Quote Link to comment Share on other sites More sharing options...
ThomasPowers Posted August 22, 2012 Share Posted August 22, 2012 BTW we make nails as part of my "Intro to smithing" course. In general I have the students use smallest swing arm fuller of 1/8" or 3/16" to make the indents as being their first time at the forge they can't hit well enough to do it on the edge of an anvil. Quote Link to comment Share on other sites More sharing options...
stuarthesmith Posted August 22, 2012 Author Share Posted August 22, 2012 The anvil that is my avatar has been used by me fo shop r 36 years. It came out of a railroad shop where it was lovingly used for decades. Nobody has ever missed with hammer or sledge or torch. Other than the deliberately dressed "tapering" edge, this 700 pounder is pristine. Many a used anvil has been messed up by botchers, shoemakers, a.d overzealous welders with wAyward torches. NOT MY ANVILS!!!! Quote Link to comment Share on other sites More sharing options...
SReynolds Posted August 23, 2012 Share Posted August 23, 2012 BTW we make nails as part of my "Intro to smithing" course. In general I have the students use smallest swing arm fuller of 1/8" or 3/16" to make the indents as being their first time at the forge they can't hit well enough to do it on the edge of an anvil. I teach an into to smithing class because of so many requests for a chance to spend the day at the forge. It has been very popular and I too use the nails as one of the lessons. However, the students have a real problem making nails and especially forming the shoulder. I have been shown four methods of forming that shoulder and all employ the use of a "sharp edge" on the anvil. ThusIy I'd assume this is how it is done, though they differ slightly. I don't really understand what you mean by a "1/8 swing arm fuller". I'd be open to suggestions in this manner as the students get really tired of attempting to forge a nail and we must move on to other projects. You are talking about forging the shoulder of the nail prior to the draw out of the nail shank, right?? Quote Link to comment Share on other sites More sharing options...
ThomasPowers Posted August 23, 2012 Share Posted August 23, 2012 A swing arm fuller is a hardy (or vise tool) that has two bars mounted on some sort of an upright. The bottom one is stationary and the top one pivots on a bolt. The upright is usually drilled to allow you to shift the bolt up and down to adjust the top bar for the thickness of the work piece as you usually want it to be parallel to the bottom bar when it's hammered down the correct amount. The top and bottom bars have rounded faces where they hit the workpiece so they fuller it. The advantage being that you get exactly opposing even fullers into the work piece. As mentioned very handy for starting the blade/tang transition on knives---and for setting off the head from the shaft when making nails. The "traditional method was doing it with a hammer and the edge of a naylors anvil---but this was with people who made thousands (a day for some of them!) and so had perfect control of their tools. These days I sometimes get students who have never even hammered a nail and so instead of them wasting their time trying to do it the old way; I have them heat the nail rod, place it in the swing arm fuller and Bam one hit, turn 90deg Bam second hit and they have the shaft head transition. Then repeatedly telling them to KEEP THE HEAD SECTION OFF THE ANVIL they then taper the shaft working all the way up to the fuller. I use 1/4" stock for these nails and the bar thickness for the swing arm is about 1/8 to 3/16". Many people use a piece of angle iron for the bottom bar as it has a flat to weld the hardy stem on and another to weld the upright or uprights too. Some people weld a "hammer pad" to the top bar at the point you hammer on it the most. Clear? Quote Link to comment Share on other sites More sharing options...
SReynolds Posted August 23, 2012 Share Posted August 23, 2012 I am visualizing it.......... It is basically a spring fuller. I use a guillotien. I think they are far the best and the bits can be changed to different sizes. What I **don't** understand is the use of a rounded fullering tool to make the shoulders of a nail. It was stressed to me some years ago when I was trained, that the shoulder must be sharp and defined. I also found a web site with the step-by-step and read about forging nails. All require a sharp edge to forge that shoulder. Thus the anvil top edge is very imprtant. I can only imagine, that with your method, the nail head is quite hot and driven down into the header, allowing the header to perform the transformation from a radius to the sharp underside. What I have been acustomed to is forming the shoulder and the use of the header as a guage. If and when one forges the nail shank (draw-out) properly, then the nail is inserted into the header. If the header hole fits tightly up against the shoulder (underside of where the nail head will be) you have the properly sized nail and next step is forging the head. I too am talking about 3/16 square nails from 1/4" round or square stock. I do same for 1/8" nails (from 3/16" stock) Thanks for your help! Quote Link to comment Share on other sites More sharing options...
Recommended Posts
Join the conversation
You can post now and register later. If you have an account, sign in now to post with your account.