Dillon Sculpture Posted April 25, 2010 Share Posted April 25, 2010 Quote Link to comment Share on other sites More sharing options...
Dodge Posted April 25, 2010 Share Posted April 25, 2010 Great demo, DD! That would be a great "Tuesday Night Blue Print"......But at least, here it won't it won't get lost in cyberspace :lol: Quote Link to comment Share on other sites More sharing options...
beth Posted April 25, 2010 Share Posted April 25, 2010 thanks for that danger - so cool! great shots. am still getting my head round my power hammer so any picture demos are so helpful. thats a good technique for me :) Quote Link to comment Share on other sites More sharing options...
monstermetal Posted April 25, 2010 Share Posted April 25, 2010 Nice, efficient... A great proses.... Im going to give it a go. On a side note, whats with that Anvil? Looks like a interesting configuration... Quote Link to comment Share on other sites More sharing options...
SoCal Dave Posted April 25, 2010 Share Posted April 25, 2010 That was a great series of photos. thanks Quote Link to comment Share on other sites More sharing options...
Bad Creek Blacksmith Posted April 26, 2010 Share Posted April 26, 2010 Great demo easy to follow and to understand with the pictures. Thanks alot and keep the lessons coming. Quote Link to comment Share on other sites More sharing options...
HWooldridge Posted April 26, 2010 Share Posted April 26, 2010 Great set of pics and explanation. I do something very similar with bar stock for acorns and oak leaves. The oak leaves are fullered to provide the lobes and the acorn is shouldered to segregate the nut from the cup. That anvil looks like one of those old German cathedral patterns - like those shown in Otto Schmirler's books. Quote Link to comment Share on other sites More sharing options...
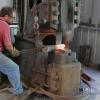
Dillon Sculpture Posted April 26, 2010 Author Share Posted April 26, 2010 Hope to add some more how-to, is the blueprints section where they should be posted? The anvil is indeed how Hollis described, church windows and steps on the feet. It has a a pretty good sway in the face so it has been used. Quote Link to comment Share on other sites More sharing options...
Dodge Posted April 26, 2010 Share Posted April 26, 2010 Hope to add some more how-to, is the blueprints section where they should be posted? The blueprint section doesn't seem to be active currently. You should contact Glenn on the Tuesday night blueprint procedures. I keep missing them but at least here in the forum, everyone can view them anytime. If you don't copy and save the Tuesday BPs, they go away by the end of the night :( Quote Link to comment Share on other sites More sharing options...
nuge Posted April 30, 2010 Share Posted April 30, 2010 Thanks for the photo sequence. This process is a great alternative to getting blanks laser cut if you have a large quantity to forge. It would be cost effective to have the guys at the local steel yard shear the diamonds and there's still enough forging to keep it fun. Good stuff! Quote Link to comment Share on other sites More sharing options...
HWHII Posted April 30, 2010 Share Posted April 30, 2010 Very interesting! I use a lot of leaves in my work and usually pound them out of solid round stock under the power hammer. I like your technique and have not seen it before and I am going to give it a try. Thank you for shareing it. Quote Link to comment Share on other sites More sharing options...
Mills Posted May 1, 2010 Share Posted May 1, 2010 That is a nifty technique will have to put it to use as well. Thanks for sharing. Quote Link to comment Share on other sites More sharing options...
kburd Posted May 29, 2010 Share Posted May 29, 2010 what is the fifty degree mark for? Quote Link to comment Share on other sites More sharing options...
Dillon Sculpture Posted May 30, 2010 Author Share Posted May 30, 2010 That is the layout for cutting the leaf blanks. Quote Link to comment Share on other sites More sharing options...
harrismetalsmith Posted January 29, 2011 Share Posted January 29, 2011 That's a really nice demo series of photos. Thank you for taking the time to post them. What alloy bronze were you using? Looks like it can stand a much higher heat than what I've been using. Quote Link to comment Share on other sites More sharing options...
Dillon Sculpture Posted January 29, 2011 Author Share Posted January 29, 2011 Thanks, 655 silicon bronze, its good up to the time it turns into a puddle. I did some rail cap out of 3/4" x 2" made a die for my 250 and used a 6 burner NC to get a long heat, To get an even heat I used a piece of heavy wall steel pipe inside the forge and put the material inside of that. Quote Link to comment Share on other sites More sharing options...
Recommended Posts
Join the conversation
You can post now and register later. If you have an account, sign in now to post with your account.