Andrew LB
-
Posts
14 -
Joined
-
Last visited
Recent Profile Visitors
83 profile views


-
wow. An Ys Tech TMD (tip-magnetic-drive) fan. Never thought i'd see one of those again. That little fan is the result of a great idea that just didn't pan out for an assortment of reasons, but mostly due to axial fans just being such a good design. These kinds of fans, as well as axial fans are not what should be used in a forge. I'm in the process of building a new forge and was considering a blown ribbon burner and saw how expensive most blowers people tend to use are, but for how big and expensive many of those blowers are, the specs aren't really all that great. A popular forge blower fan i looked at had the following specs. 125 CFM when damper is full open 2.7" H20 (mmAq) - 69mm 2" opening $125 110v ac Considering how it seems static pressure is more important than CFM for a forge, here is one Sunon fan i thought would work for a smaller ribbon burner. 44.2cfm 3.39" H2O (86mm) static pressure. 12vdc 1.25" opening fan type: blower $22 @ digikey. I use a slower version of that Sunon blower connected to a PID controller and thermocouple to control my 55 gallon drum smoker for making sweet sweet bbq. Also, Frosty... you've got some interesting fan terminology there. Most of which i've never heard before.
-
What are cable company amp cases made of?
Andrew LB replied to br5409's topic in Smelting, Melting, Foundry, and Casting
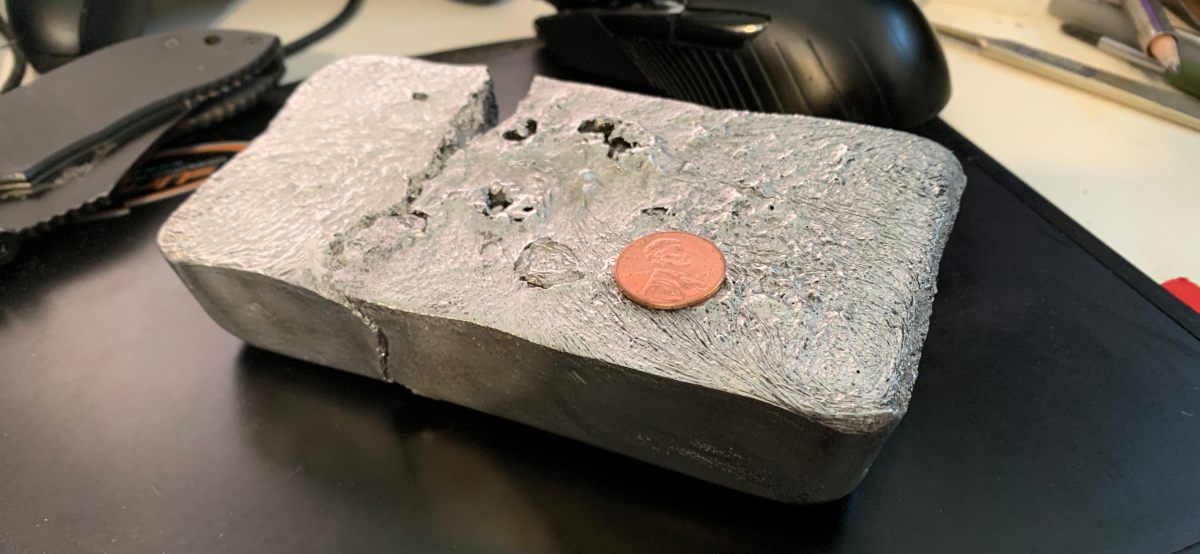
That seems pretty heavy to be magnesium or aluminum. I'll wager it's a zinc-aluminum alloy due to the weight as well as the use of the thin 'fins' which are easier to cast when zinc is involved. This would also allow for lower production costs since casting temp is lower and zinc is just cheaper in general. Also a zinc-aluminum alloy would have the best corrosion resistance. Zinc will react to acids while aluminum will react to alkaline chemicals. If you have some CLR, pool acid, or muriatic acid it will react with zinc shavings. -
3D printed plastic burner experiments (photo heavy)
Andrew LB replied to Another FrankenBurner's topic in Gas Forges
Wow. I'm new to the site and just came across this thread and am very impressed with what you've been doing here. I'm sure its been mentioned already, but if you haven't, you should probably get a patent on your designs that work real well. Because if you don't, you'll be seeing them on Aliexpress in a few weeks i'd wager. -
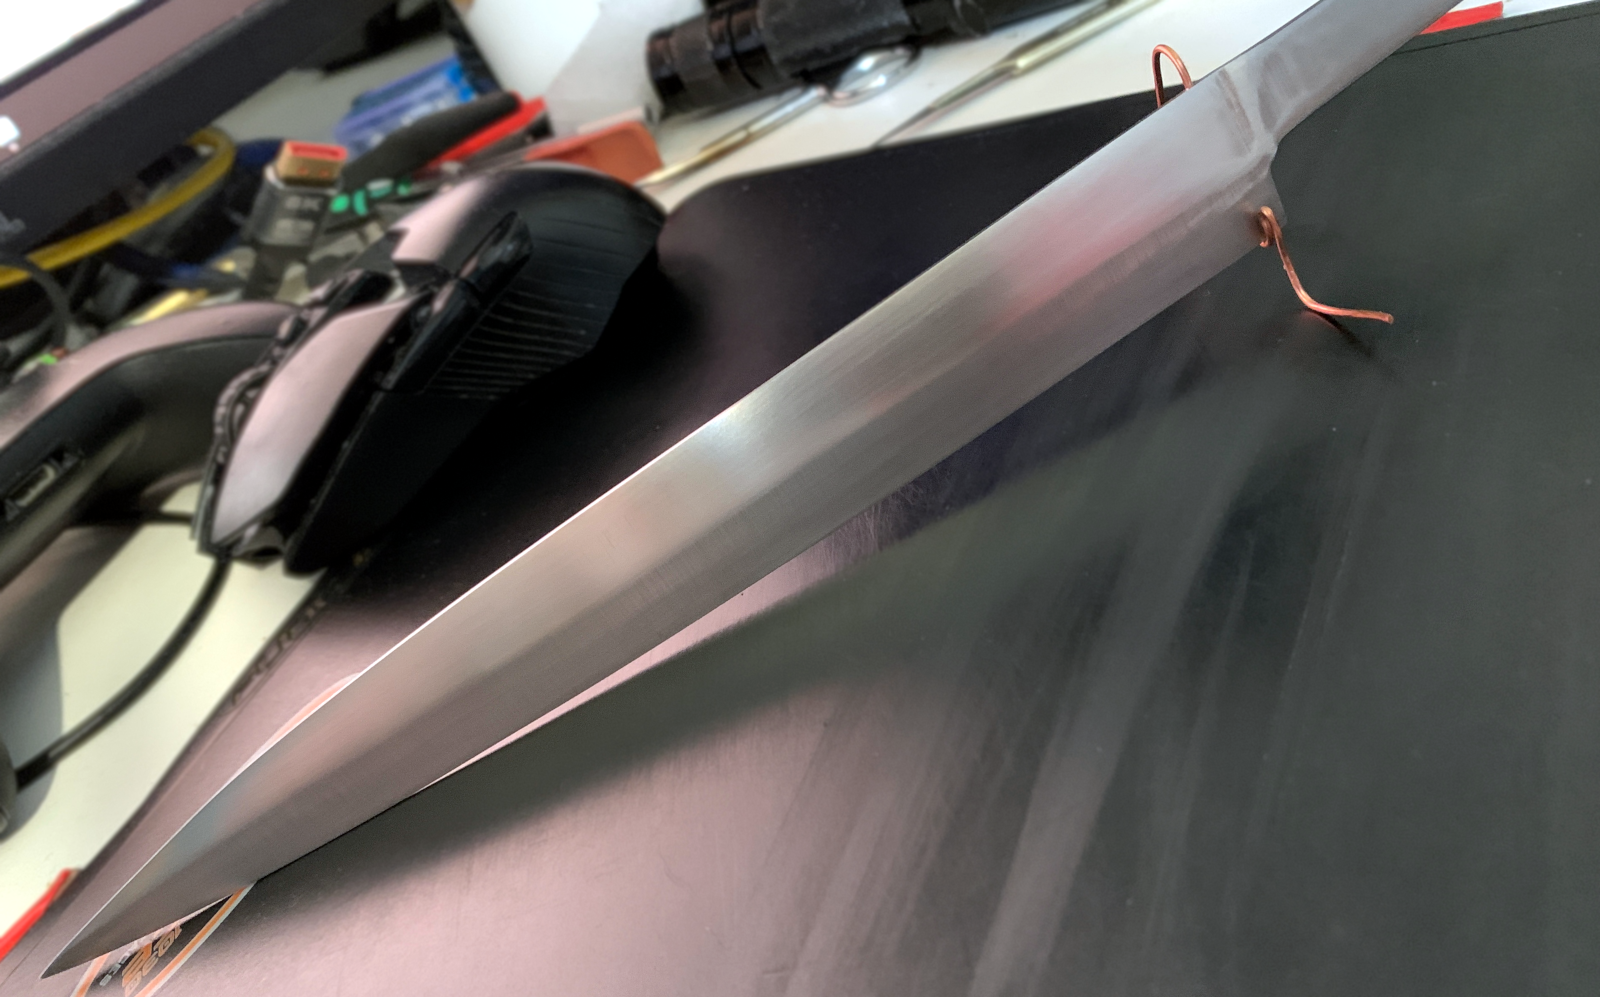
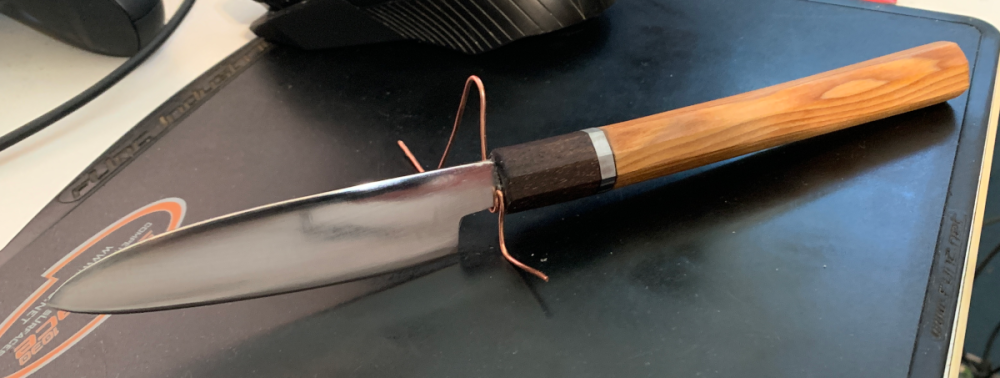
Hmm... wasn't thinking when i started making this Sujihiki knife. My mini-forge isn't long enough to handle a 240mm blade. lol. It just needs a little more work and i can heat treat and temper it before final finishing. I'm starting to regret not turning this 5 gallon air tank i have into a forge. hmm.. Here is the knife in progress.

-
I just used a Bernzomatic aluminum brazing rod. The overpriced ones that come in a 2 pack from big orange. To my surprise the handle hasn't fallen off yet. Crap. I thought i had hit send for my lengthy response but apparently windows update ate the message. Long story short, I do have a CO monitor and the side door to the garage is open and the garage itself is half way up. I also have one of those 20" metal shop fans (the ones that are self propelled if sitting on smooth concrete) blowing air towards the open door. I also keep my new 10lb ABC extinguisher nearby Also, I decided to make the 1/2" version of the Frosty T with a .035 MIG tip and WOW does that thing put out some serious heat. Much more so at the same PSI from the tank, so i'm assuming that means the additional air made a huge difference in combustion. I decided to line a bucket with 2.5" of Perlite and portland cement, then a layer of Kaowool, all coated in Satanite to make a small melting foundry. With that 1/2" burner I had aluminum melting in around 5 minutes. Fed in a couple crutches i had cut into pieces and poured an aluminum ingot that then broke because it was stuck to the little bread pan i poured it into. Messing around with molten aluminum is quite an experience. I had read a post from you a number of years ago about how dangerous it is, and i can totally see how things can go sideways if you're not super careful. I also made my very first knife from something other than an old Nicholson file. It's just a little japanese petty knife (photo taken prior to sharpening) and it's sharp enough to shave my arm. It's made from 1095 steel. Handle is walnut, steel, and some light hardwood scrap i had in the garage. I'm currently working on a Sujihiki knife.

-
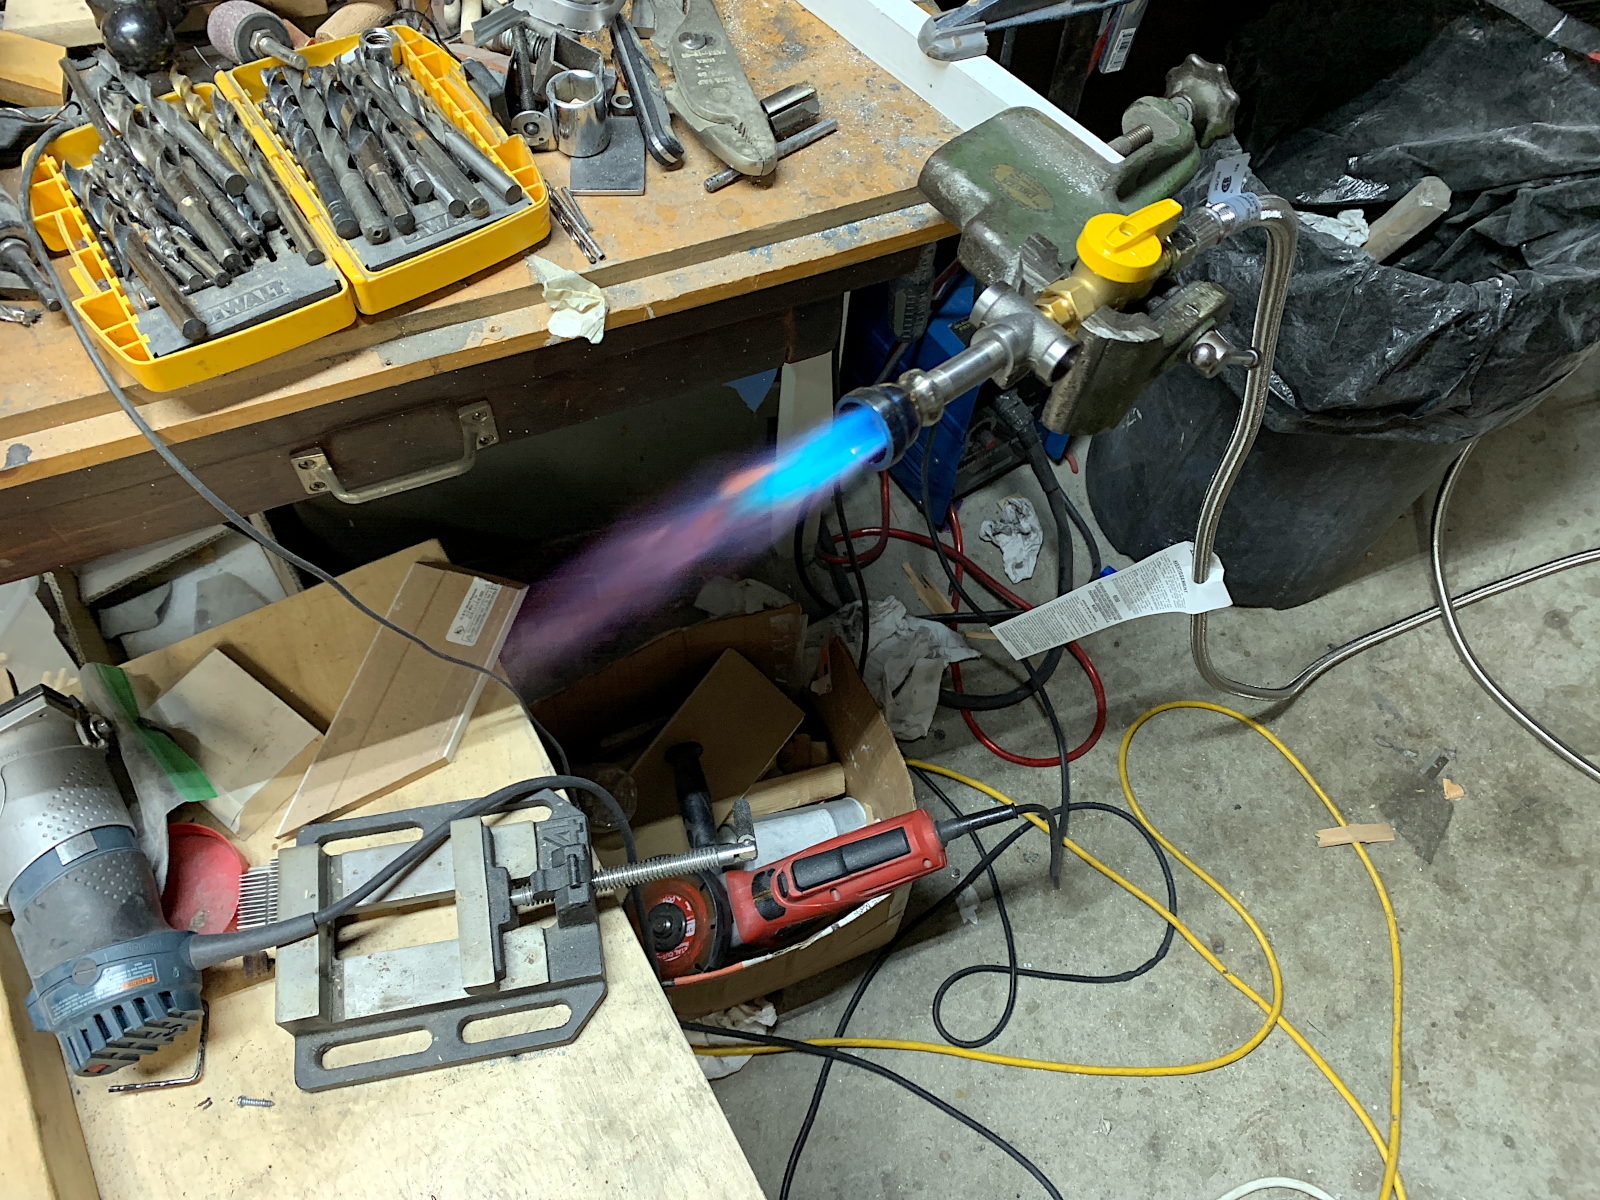
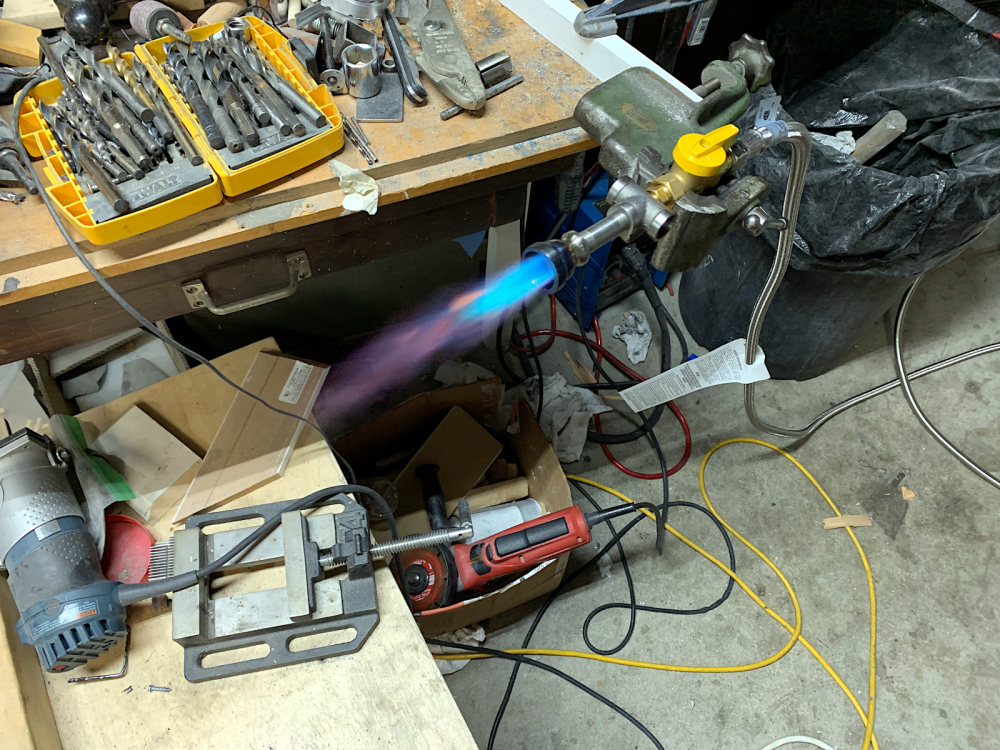
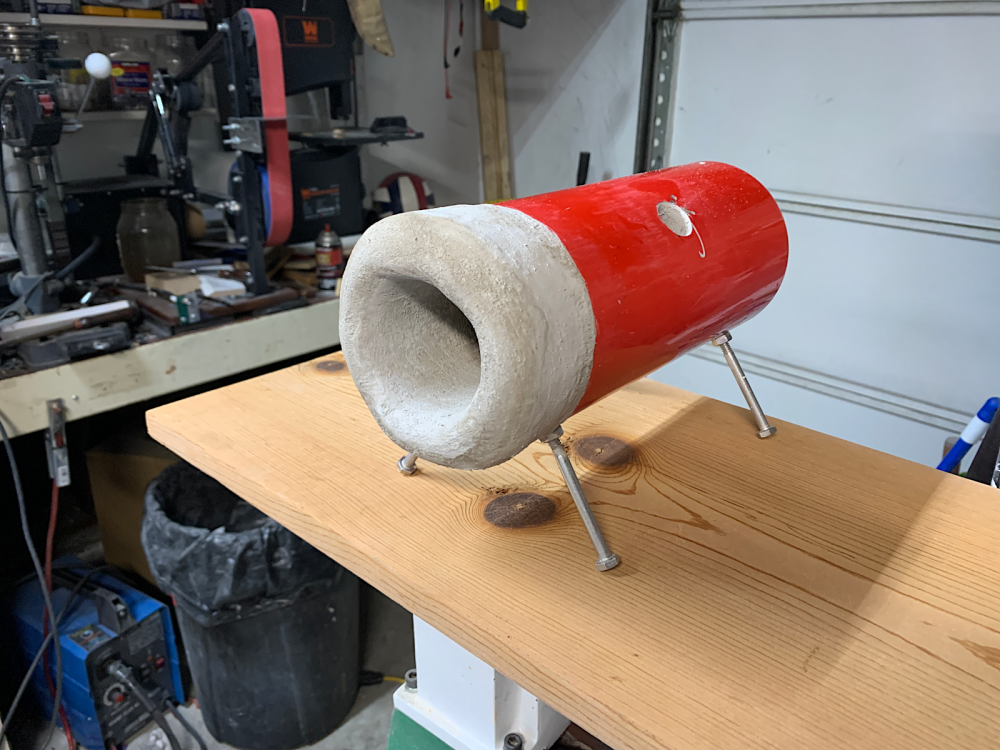
So here is how it runs in the little forge. The video is about 10 minutes after i fired it up and as you can see it gets pretty hot. Made a 1/4" thick piece of steel glow in just a few minutes. I think im going to re-do the burner in the 3/8" or 1/2" version and make it out of stainless steel. This was taken at around 4-5 psi. Oh i had it in the forge. it was just easier to take pictures of it outside the forge. Nobody is ignoring you. In fact i'm very grateful that such an experienced person giving advice. Speaking of hand-held... it works great for brazing aluminum. lol.
-
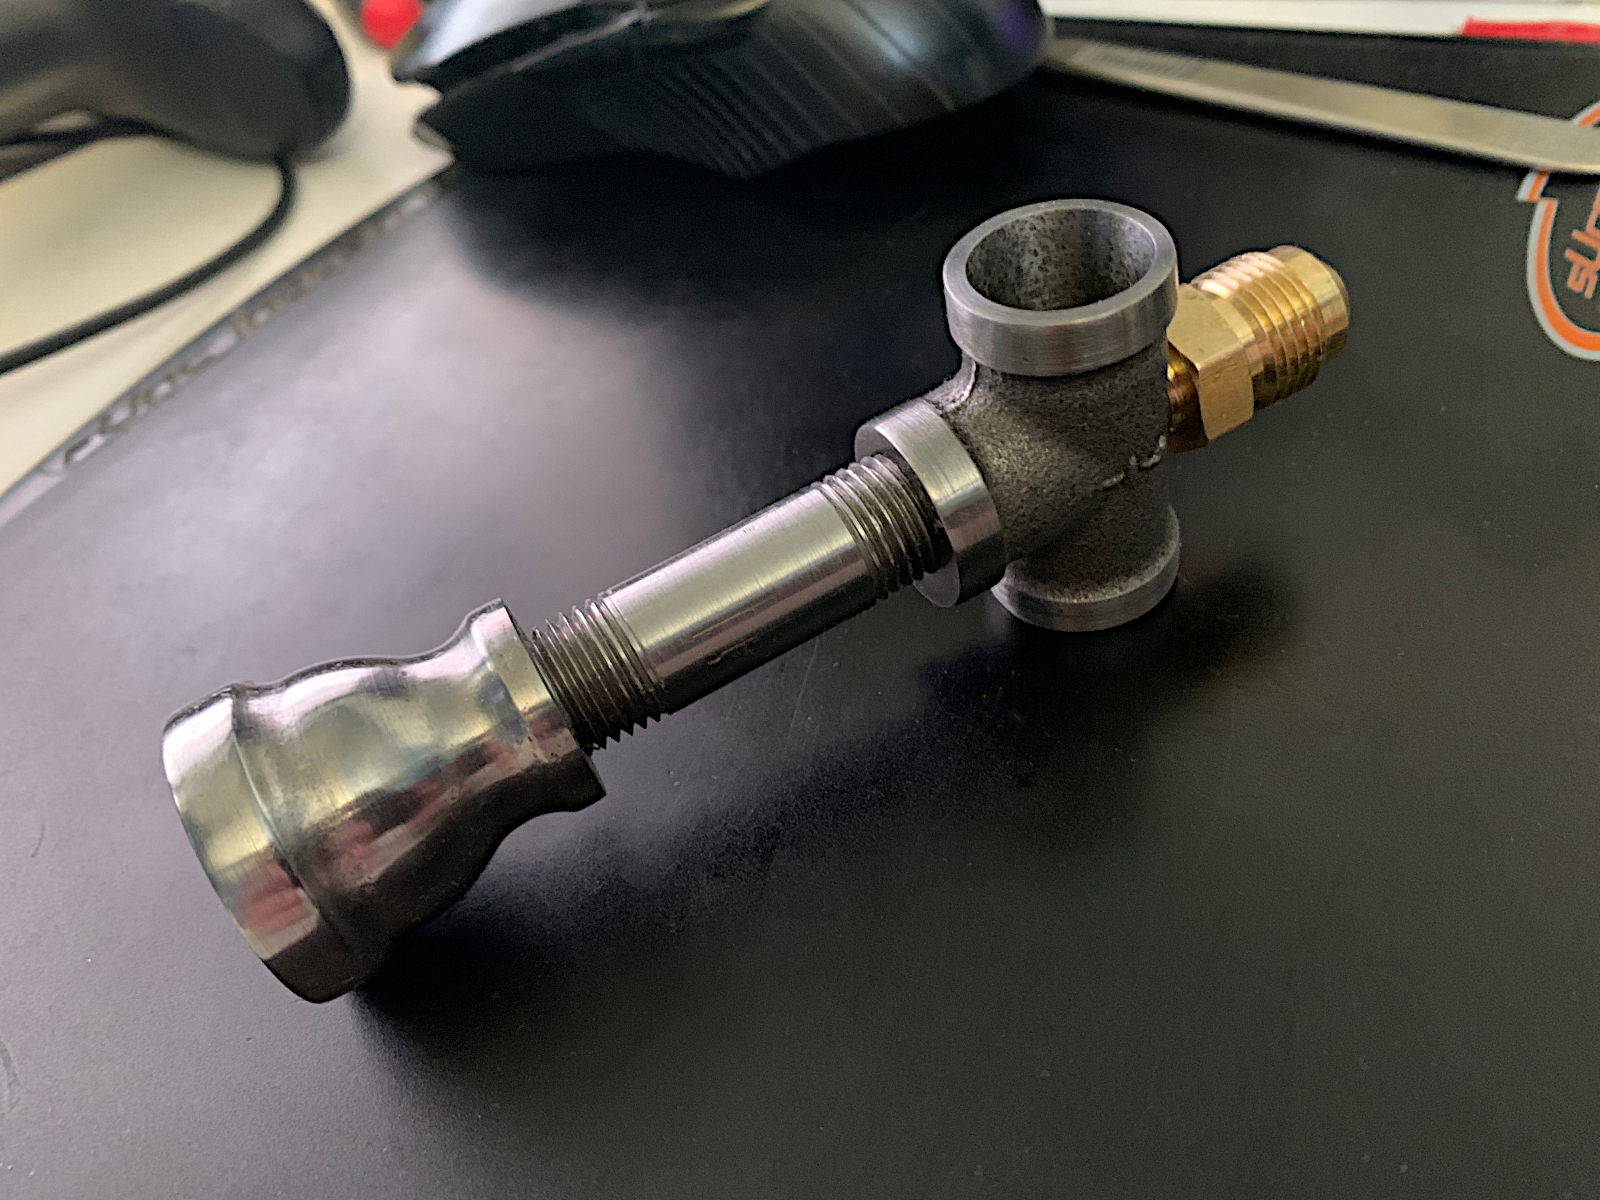
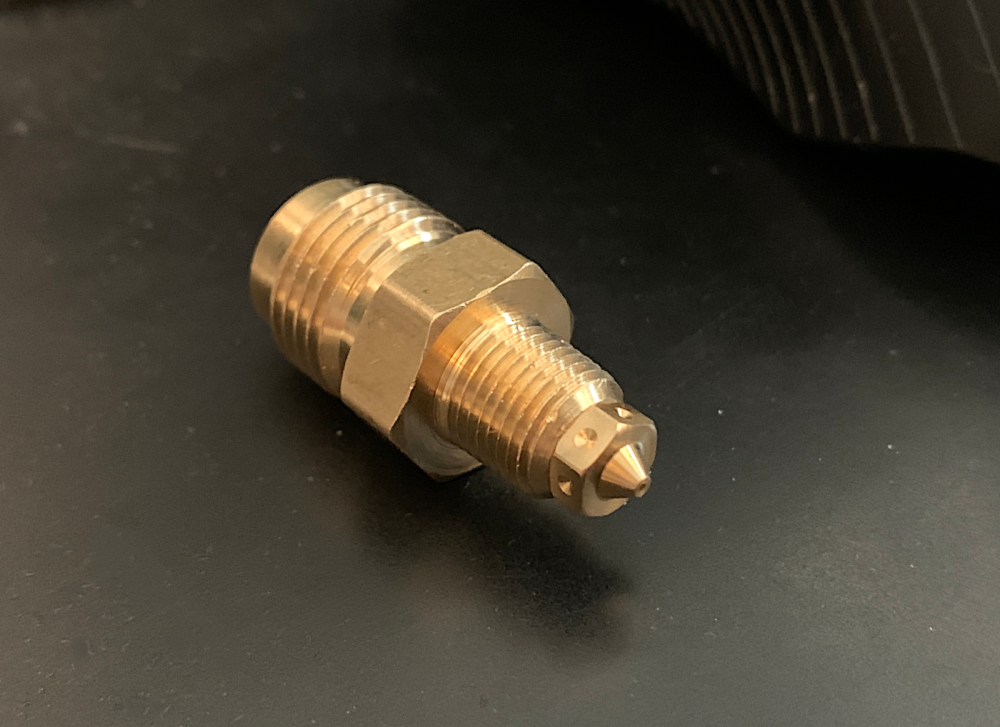
Thanks for the info. I'm going to drill and tap the other T fitting and I never doubted them for a moment. I was under the impression that when you're running lean its indicated by the yellowish flame kinda like how my gas range in my kitchen, the flame turns yellow when you blow on it. Upon further inspection and the advice of Frosty and Mike, it's definitely running rich. I need to lean it out some because when i use it in the forge with a merchant coupler as a nozzle instead of this reducer, it goes out if above 5 psi. I'm using a 0.6mm 3d printer nozzle. Maybe i should use one a little smaller? I know on the bigger versions, people use either a .030 or .035 MIG tip. 0.6mm = .0236". ill cut down an .030 MIG tip and see how that works. Here is a video of it burning while set up exactly how the photo i posted yesterday was.
-
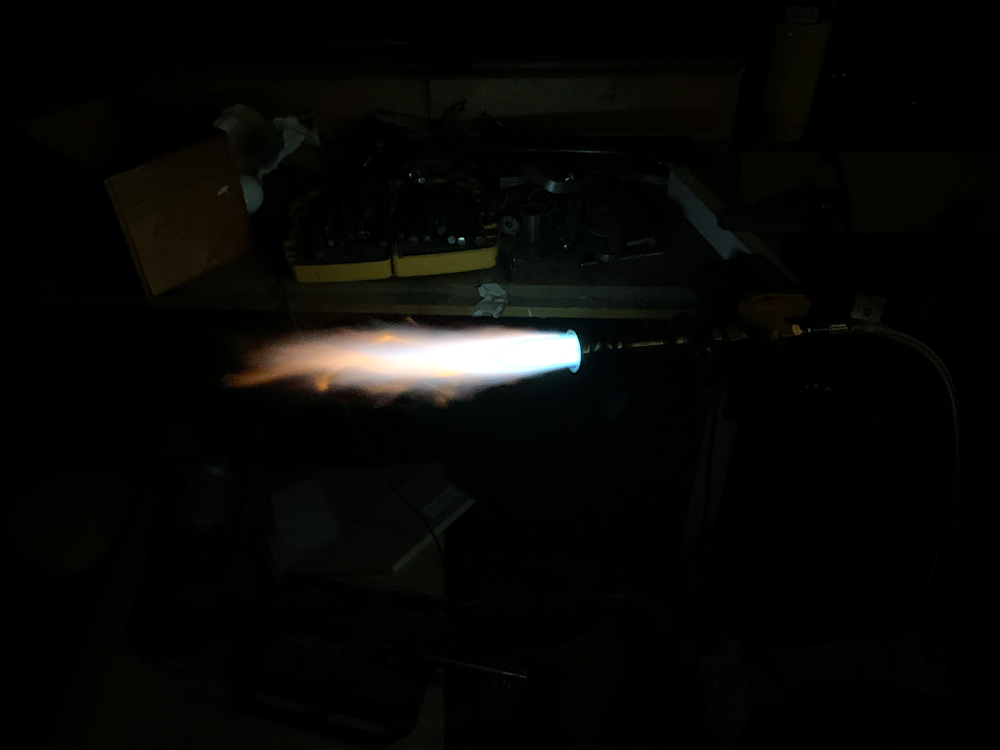
Finally got time to test it. It lit right up and i varied the throttle from 15psi down to probably under 1psi and it held the flame nicely. Judging by the color, it's burning a lean correct? I'm going to tap the other fitting that the printer nozzle screws into but first shave the 1/8-27 section down about 1/8" so the tip of the nozzle sits right in the middle of the air intakes when viewed from the side. I hear that's the sweet spot. I also tested it in the mini forge without this reduction coupling on it and instead using a merchant coupling that was straight. It ran pretty good but would occasionally "burp" for lack of a better term. Never went out or anything. Got real orange inside with faint blue flames coming out the front. Here is a vise shot of it in action as per the tradition on these forums. Also one in the dark which looked much more blue with the naked eye. Must be a camera thing.
-
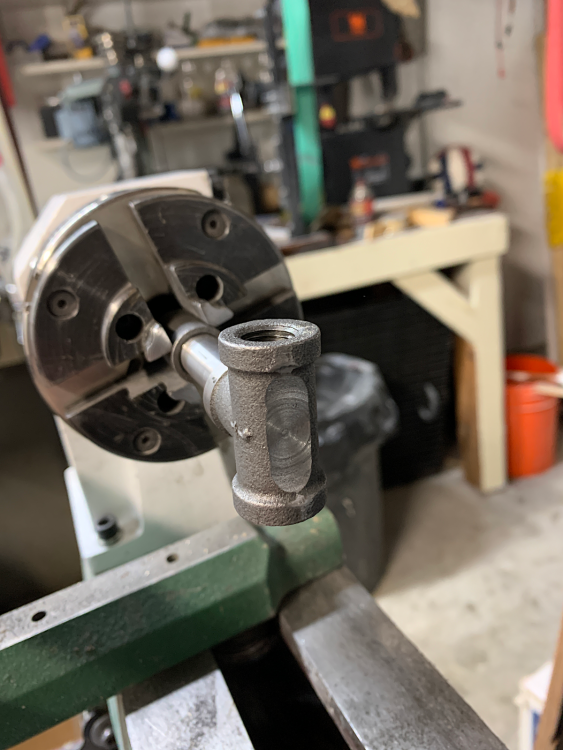
Oh those are nice. My only countersinks are the wood variety except for one metal one with the diagonal hole through it. It wouldn't have worked for this application. When i faced off the top of the T, i did so with it threaded into the nipple as well as a merchant coupling since the chuck held it far better in the coupling due to nice parallel sides. Most of these chinesium fittings are not made to the most stringent of tolerances. I wanted to face it off enough so the brass fitting would sit flush which unfortunately left that wall quite thin. I did get two of these T's so in case i screwed up. If i need to thread the backup T, ill put it in the lathe chuck and while turning, just hit the center area with my dremel with a carbide burr in it. I used one of those Burrs to de-thread the reducing coupling nozzle, and both air inlets on the T, as well as the inside of the interior of the nipple to reduce the "step" so it reduces turbulence. I didn't get a chance to fire it up this evening because the ball valve that i thought was 3/8 was actually 1/2" and i figured it would be good to be able to turn it off immediately instead of waiting for the gas in a 12 foot hose to clear out. Just for kicks i hooked it up to a the sink faucet using an barb adapter and some tubing and the little jet of water is almost perfectly dead center. So in the morning ill see if it works with propane. I give it about a 40% chance of success since I have this habit of straying from the tried and true instructions due to this condition i contracted as a kid where nothing is allowed to be left stock. lol.

-
Mini forge is done, just waiting on the parts for the burner which come sometime today (friday). I figured since i was placing the order, i'd get some extra Tee's in case i screw it up, and a couple of the 3/8" flare to 1/8" mip fittings that ill tap one of them with M6 for testing out some of the 3d Printer nozzles i have (0.6, 0.4, 0.2) and the other with for my .030 and .035 MIG tips. I also got a 3/8 tee and 3" nipple ijn case i get too frustrated trying to make the little one work. I was also thinking about chucking a Tee in my lathe and removing the threads on the two air intake ports and smooth everything out for better airflow. kinda reminds me of porting and polishing an intake manifold. The one thing i'm a little confused about is the burner nozzle. Is the flared nozzle only used for open-air testing of the burner, and not when installed into the forge? It looks like many people fit the end of the burner into a flange. I have a black pipe merchant coupling and possibly a stainless steel one that ill use between the shell and the burner opening on the forge. /edit Here are some photos of the mini forge, the 3d printer nozzle threaded into the gas fitting, and how i used my wood lathe to flatten and find center on the T-fitting. Since i lack a metal lathe, i used a very sharp gouge i didn't care much about ruining and when moved very slowly, it managed to cut the pipe. I don't recommend this because if it were to catch, the results could be catastrophic
-
ouch! You know... it's highly recommended to wear pants around heavy machinery. lol. On a serious note, i did manage to annihilate a nice boring bar not paying attention yesterday. It actually buggered the screw hole and the cutter is now slightly loose. So have there been any developments on the 1/4" and 3/8" burners? i'm ordering parts to build one for a fire extinguisher mini forge and am trying to decide between the two.
-
Excellent. I'm building this mini forge for knife making like every other yayhoo these days as well as shop tools that need re-hardening after turning tool steel into spring steel on more than a few occasions while sharpening. I decided to make mine out of a fire extinguisher that got used up when my neighbor set his garage on fire. Well... i thought it was used up. Not so pro tip: Never trust a fire extinguisher gauge. Nothing came out when pulling the handle and the gauge said zero, but boy was that a surprise when i unscrewed the top and covered every square inch of my garage with retardant. Luckily the head was secured in a vise and i was turning the bottle and not vice versa. lol. Apparently retardant + water hardened and clogged up the valve from releasing the remaining pressure. Anyways, i lined it with Kaowool, making sure to wear a respirator, and i just finished three coats of satanite. I'll be doing more tomorrow and perhaps going to get the parts for a scaled down burner. Question: Ill need a high flow propane regulator right? Not a regular BBQ one? Right now in Commiefornia most stores are out of the small bottles of propane, plus at $4.50 each, it's much smarter to just spend $13 and fill up a 5 gallon tank. Ill take some photos of it tomorrow when i get a chance. Now i just gotta find a local place that sells 1095 or 1084. I think Combat Abrasives does in Anaheim.
-
For Dremel brushes, just call Dremel. They actually have people that answer the phone and were very helpful last time i needed brushes. I should note that any rotary tool is going to have some visible sparks from the brushes rubbing on the commutator. It's just how brushed motors are. If the sparking is highly excessive, then its possible they could be shot. Out of curiosity, would the "Frosty" posting in this thread be the same frosty credited with the "Frosty T" forge burner? Ive been looking at burner designs for a mini forge i'm making and i like the simplicity of that design. I wonder if anyone has scaled it down from 3/4" fittings to 1/2" for smaller applications that need more heat than my handheld propane torch can put out.