hdvoyager319
-
Posts
57 -
Joined
-
Last visited
Content Type
Profiles
Forums
Articles
Gallery
Downloads
Events
Everything posted by hdvoyager319
-
Thank you for this info. I found out exactly what you wrote about in this first etching experience. My mix was FC/Water at a 50/50 concentration. I wrote to Ric Furrer about what I had done. He used a 1:3 concentration. I diluted my solution to about a 1:3 ratio, FC to water. The next knife will tell me if the solution is too weak or still too strong. I do a lot of experimenting but also ask others what they do. There isn't any need for me to reinvent the wheel.
-
Dry-welded, hand hammered pattern blade (8 photos)
hdvoyager319 replied to picker77's topic in Knife Making
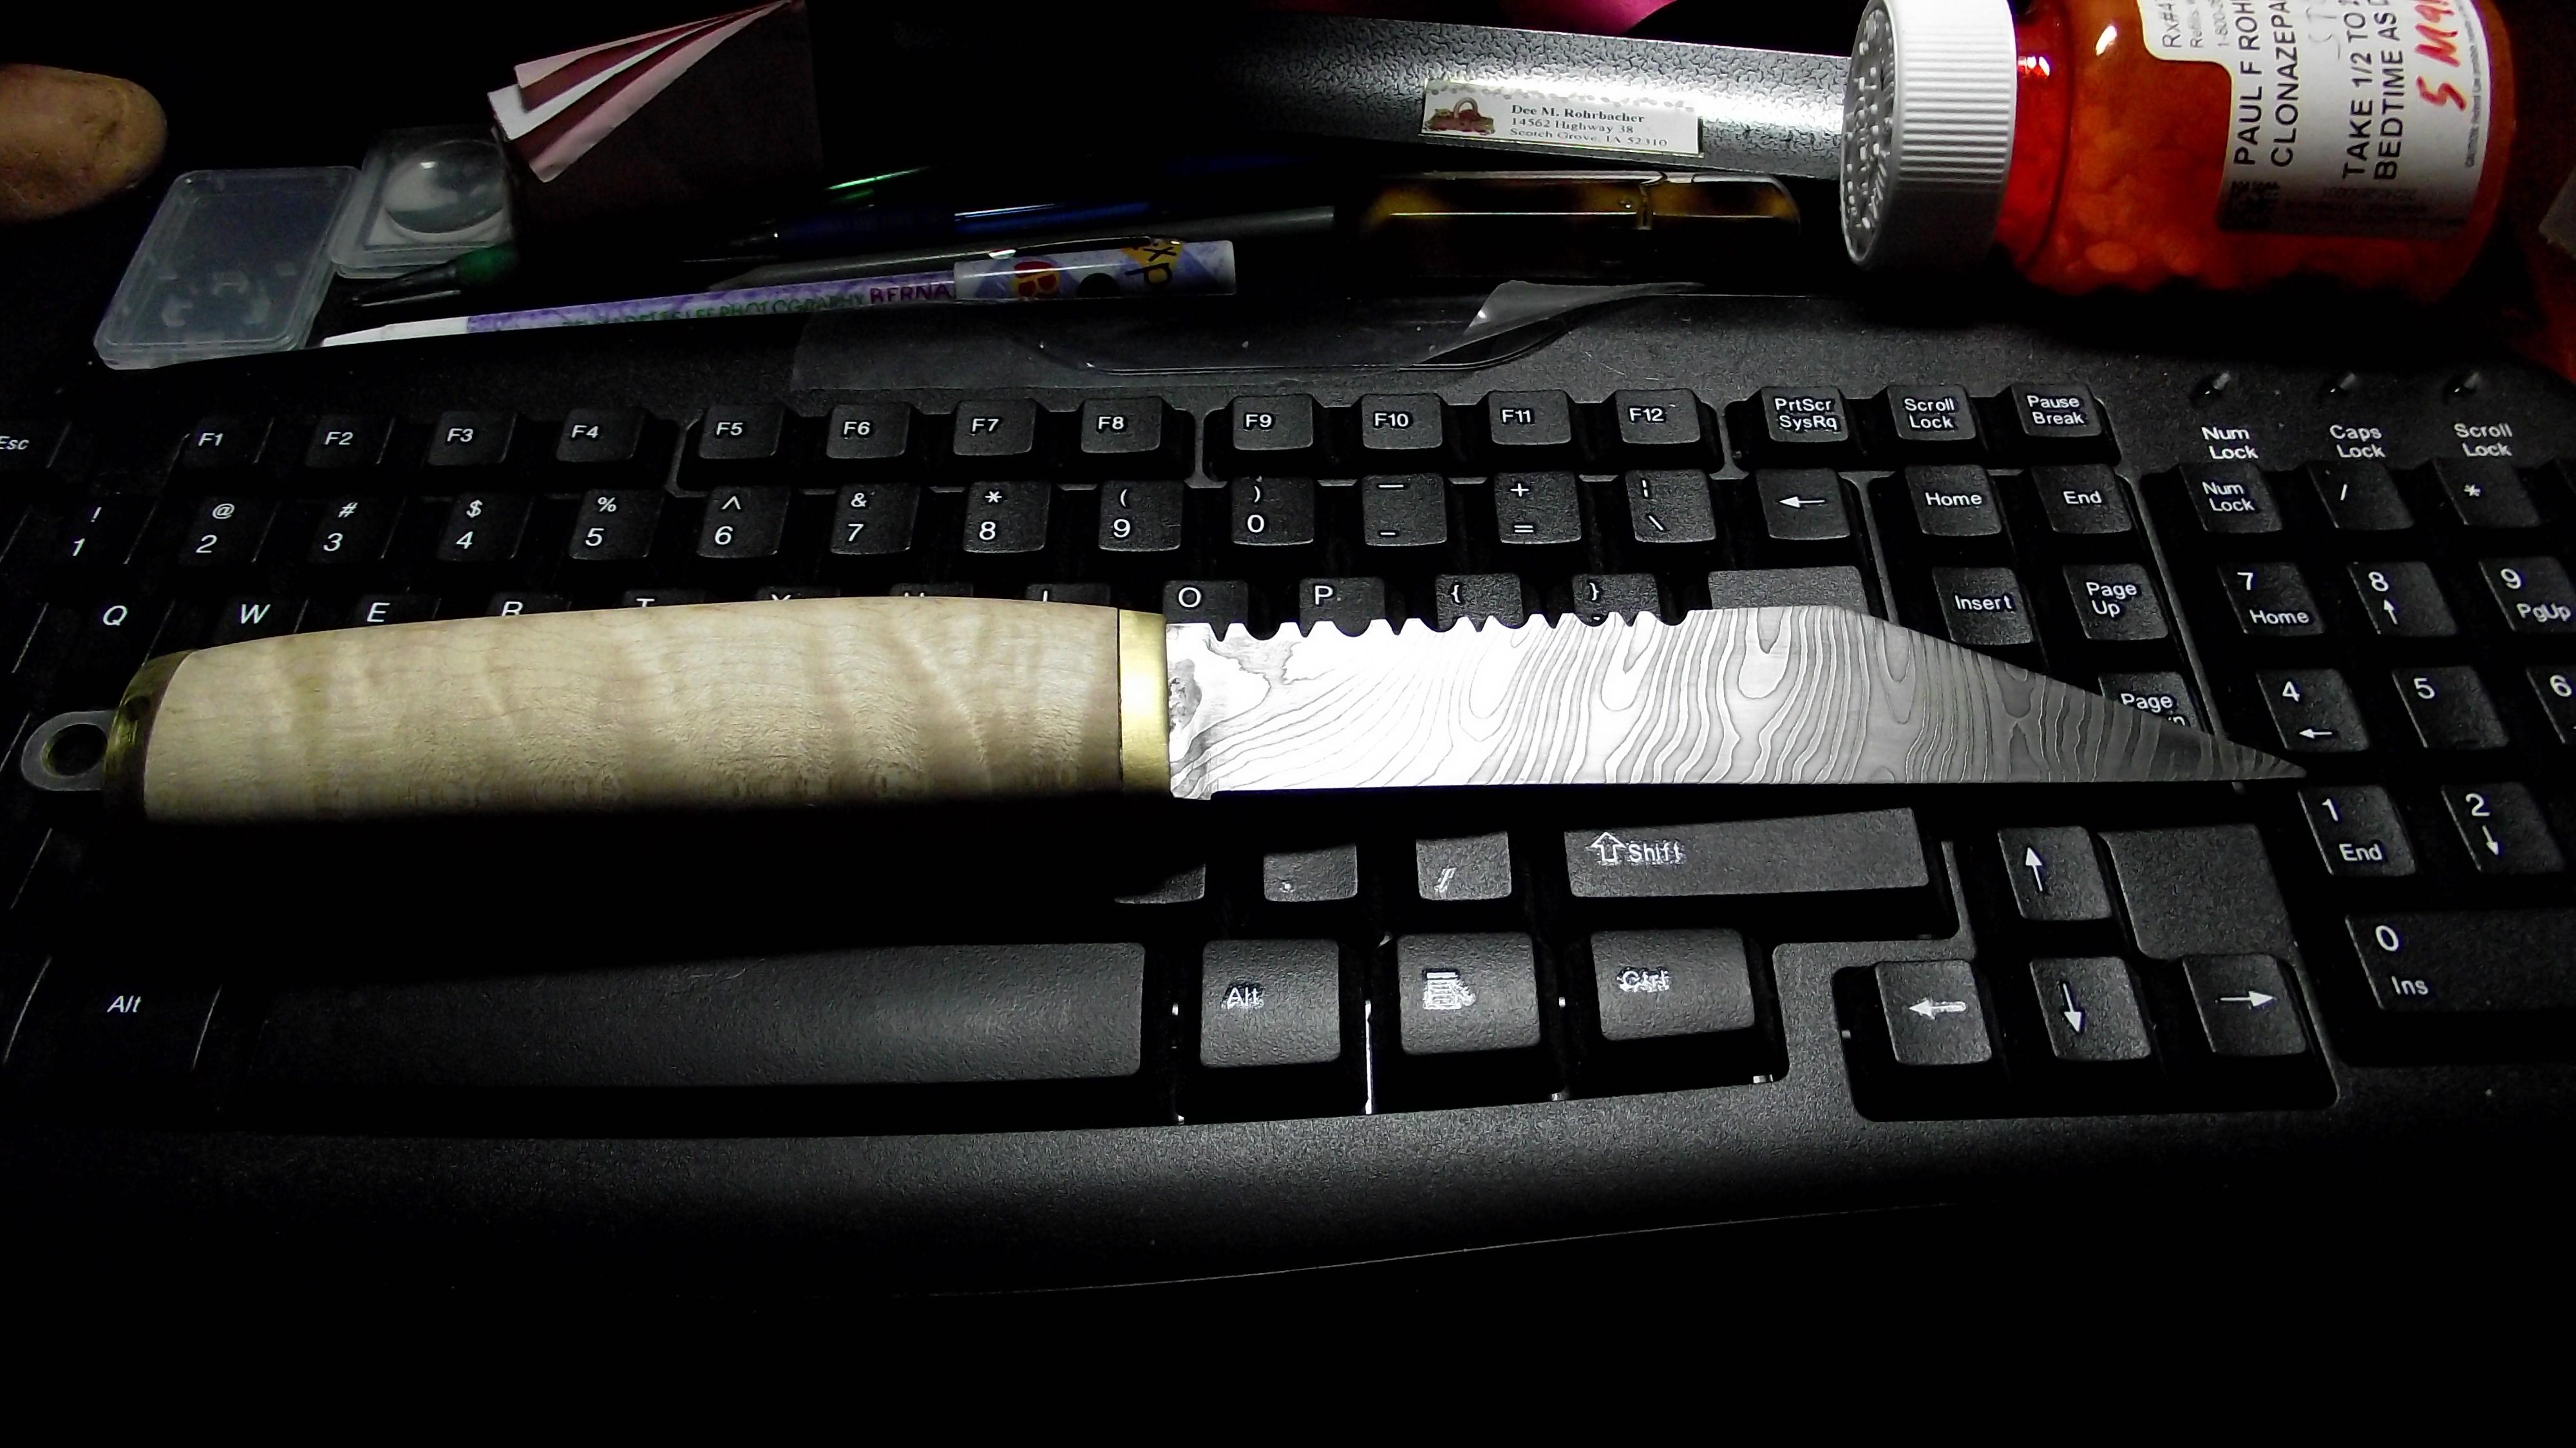
Thank you for the "no flux" welding information. I will give it a try in my Side Blast Forge that I am building.. I have used Borax in the past and it worked for the weld but the hardened flux on the outside of the billet was very hard to remove. I think that the flux may have been responsible for pitting on the surface of the billet. Cleaning the billet by using a side grinder removed a lot of metal to get to the bottom of the pits. I guess that the billet width was reduced by 1/16" as a result of removing the pits. To stack and weld the billet, did you squeeze the billet in a vice or clamp and then weld the ends together? Was the "tab" made from the billet material layup or was it a piece of flat stock welded to the billet?? Was the surface of the billet looking glassey at welding heat? Did the billet's color match the yellow/white color of the forge's interior? I have a one burner home made propane forge. In the bottom, I placed a common firebrick rated at 2200 deg F. The flux didn't eat this brick. However, the surface of the brick was molten at welding temperature. The melted brick didn't stick to the blade billet. I want to build a 72" belt grinder. I have a 1725rpm 2 hp 220vac motor to drive the belt. I will rely on changing pulley ratios to get the speed needed. I will have to order the 15N20 and 1084 thin steel for the billet. I have a lot of 1/4" thick and some thinner 01 steel which is fairly close to 1095 steel in forging and hardening/tempering properties. My coal forge has another weeks worth of work to get it operational.. Currently, I am working on the chimney mounting. I moved the blower from under the forge to the top adjacent to the air inlet tube. This resulted in moving the chimney opposite the Tuyere. Normally, the chimney is over the Tuyere on the same side. I hope that the Super Sucker Hood with a 10" steel chimney will work. If the sucking action of the chimney doesn't start easily, a hood will be made to be located directly over the fire to direct the smoke into the Super Sucker. Once the forge is tested, I will make a entry under Forges with my results, including pictures. Thank you very much for the dry welding information. I will use your information to make my next welded knife blade. On the tang end of my billet, I welded a 2' long piece of 1/2" hot role steel to be used as a handle for the Viking Seax Broken Back blade I made.. the cutting edge is facing up in this picture.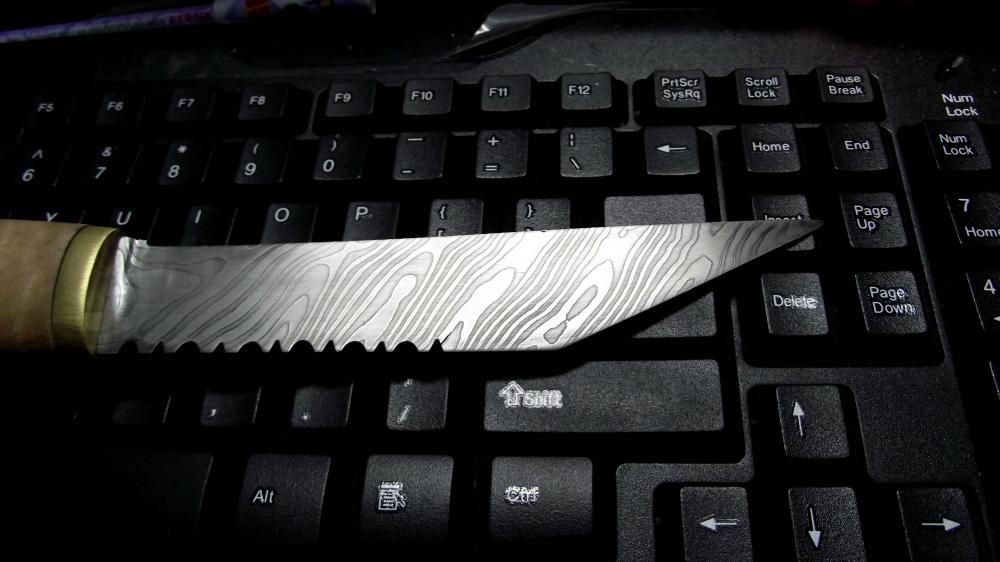
-
Dry-welded, hand hammered pattern blade (8 photos)
hdvoyager319 replied to picker77's topic in Knife Making
thank you for your return comment. Did you look at Black Bear Forge on youtube for proper hammering technique? There are several other videos on hammering technique. The key to hammering is don't grip the hammer with white knuckles grip. My hammer pivots a little in my hand. When the hammer reaches the top of the stroke, I allow my wrist to swing back. When the hammer comes down, my wrist swing in the down stroke is completed when the hammer hits the metal. Think of hammering this way. If the hammer was held rigidly in the hand with a stiff wrist, the down velocity of the hammer would be much leas than if on the down swing, the forward stroke of the wrist would add significant velocity to the stroke without any mussel or tendon strain. You must get the sensation that the hammer is doing all the work and you are just guiding the hammer to its target. Could you explain how you prepared the individual pieces of the Damascus stack to allow a dry weld. From what I have been told about dry welding is the layers of metal must be clean and flat.. I use borax from the grocery store as the flux. The flux seals out the scale forming oxygen while allowing any contaminants to be expelled from the weld. I use a 1-1/2# round faced hammer for welding. After the stack reaches welding temperature (when the color of the stack is the same as the forge walls or coal embers) and the surface has a molten glassy appearance and the stack has been rotated while heating, I strike quickly and rapidly down the center then pound another series of hits toward the sides Then I reflux the stack and repeat the process on the other side facing up. If I tap on the sides of the stack, the individual layers will look as if they are one welded stack. If a dark spot is seen anywhere in the stack, there is a void in the stack.. If the stack is hit too hard, the slushy melted steel will be expelled from the weld along with the flux and contaminants. welding takes a lot of hammer control with just enough force to expel contaminants and allow the slushy steel to fuse together. -
Your completed knife is fantastic with the color contrast in the blade and the burl handle. When you mentioned "stabilized" is this when the wood has dried to ambient conditions or it is impregnated with a plastic compound? Did you heat the FC solution to aid in the etching process? Have you ever tried Muriatic Acid for the etch solution? If you had used it, how was the color contrast of the steel layers? Did the 15N20 stand proud?
-
Can I save my anvil base?
hdvoyager319 replied to mpc's topic in Stands for Anvils, Swage Blocks, etc
You are dealing with nature. As the log dries from the outside in to the center, the outer wood shrinks faster than the wet inside wood. To slow the splitting, melt paraffin and pore it over the ends of the log. This will slow down the drying out of the log. Band the log with heavy strapping but leave the strap about two inches short. The ends of the strap should be bent up at a 90 degree angle to accept tightening bolts/nuts. Since the log is now sporting three straps top, middle and bottom, for the top strap weld vertically two inch long flat stock, spaced two inches apart. Then weld a strap over the protruding flat stock to make a place to hold your tongs and hammers. From what I see in old blacksmith shops, the log anvil base also sported a place to hold the tongs and hammers that are being used for the project. An alternative is to buy 2X12 lumber, cut the lumber to the correct length and use ready Bolts to bolt the lumber together into a anvil base. Add the tong & hammer rack around the top. Make sure the base sets rock solid on the floor. I advise hollowing out the bottom about 1/8" so the anvil is setting rock free on the ground. For added stability, 2X4 lumber can be bolted around the base. -
Thank you for the feedback. I did a lot of things wrong. The FC/water ratio of 50/50 was too strong. The blade was etched at room temperature for 10 min. which resulted in the 15N20 standing quite proud. I have the Green Buffing Compound and several different buffing disks, ranging from a hard wheel to a loose very floppy wheel. I buff on a wood lathe. What buffing wheel do you recommend, hard, medium hard or loose/floppy? I can turn the wheel at any speed from 50 rpm up to 3500 rpm . I like the coffee stain approach to pop the 15N20 from the 1084 carbon steel.. After completing the remainder of the process, I will show the knife pictures so the improvement can be observed.
-
Dry-welded, hand hammered pattern blade (8 photos)
hdvoyager319 replied to picker77's topic in Knife Making
I like your new knife. You indicated that your wrist took a beating while forging. Years ago, I tore up my elbow forging 1/2" bar stock for 1/2 Hour. The pain lasted over 6 months. The problem was very poor hammering technique. First, chose a hammer weight that you can handle. Second, don't have a white knuckle grip on the handle. Don't ware gloves as they will require more squeezing effort to hold the hammer. Hold the hammer mainly between the thumb and forefinger with the fingers around the handle and loose enough to allow the hand to be partially relaxed. If someone was to walk behind you and grab the hammer at the top of your swing, the hammer should be plucked from your hand. Third: Hold the hammer handle relatively close to the hammer head for hammer control. Fourth:The hammer should pivot with your hand/wrist motion. When the hammer hits the hot metal, you must get the sensation that the Hammer, not your arm or wrist is doing the work. Fifth: Wrap the hammer handle in the area you hand is located, with cloth friction tape to aid in you grip retention with less squeezing effort. Sixth: Use the hammer rebound from the struck metal and your back mussels to lift the hammer for the strike. Don't make your swing centered at your elbow. Youtube Video of Black Bear Forge has an excellent video on proper hammering techniques. I am 80 years old. I can forge at least 4 hours a day using a 2# to 2-1/2# hammers without any arm, elbow or wrist strain. While demonstrating, I usually forge for well over 4 hours using a coal forge that required continuous cranking. -
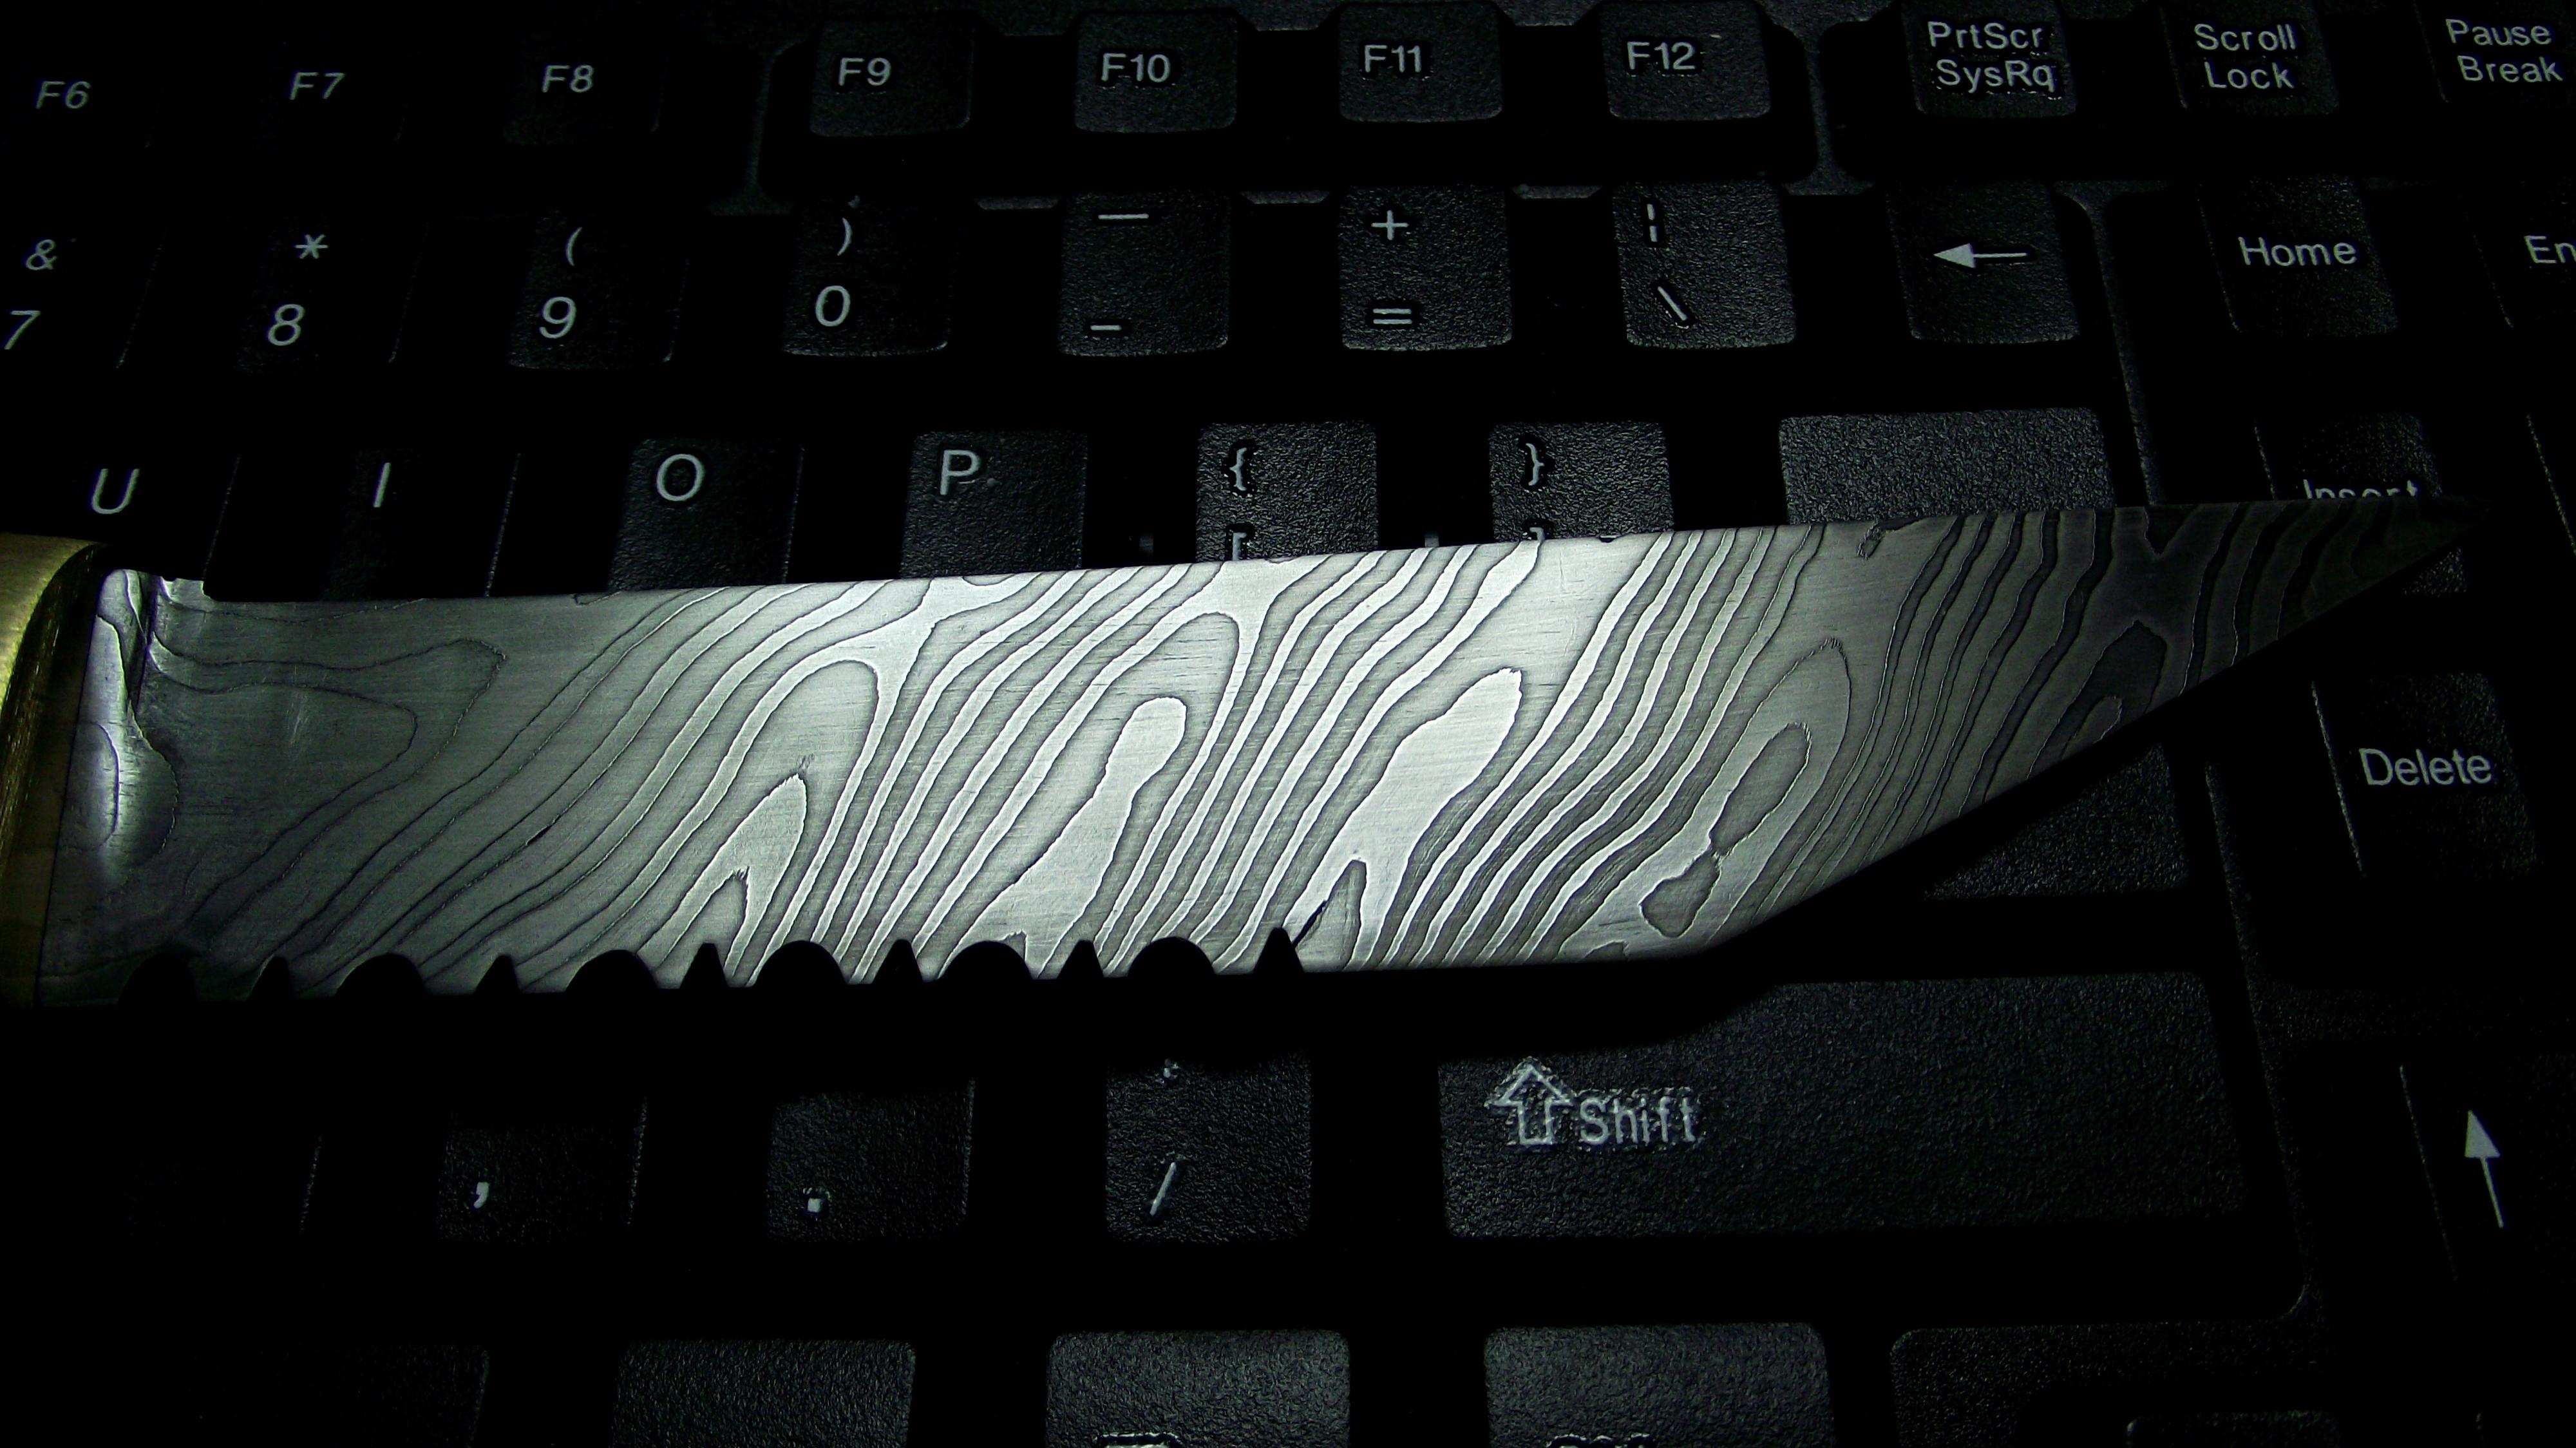
Can you go into detail about your etching and finishing procedures. I have made a Damascus Twisted pattern Viking Seax broken Back style knife. My pattern is very bold but there is little color contrast between the 15N20 and 1084 steel. There is a thin dark border at the junction of the two metals. .


-
Three legged anvil stand.
hdvoyager319 replied to Matthew2's topic in Stands for Anvils, Swage Blocks, etc
That is "tdriack"'s post. I agree that the vice is a great addition. I have the perfect "Leg" vice to add to the tripod anvil mount. However, it will be added off the rear of the anvil at a distance so it won't interfere with any work pieces. The vice will have a leg with a socket for the vice leg. the vice will be easy to remove or mount as needed.. Another option is to make a machinist vice mount in the Hardy Hole. I have seen this at the Vesterheim when Tom Latane was demonstrating. -
I am in the process of making a Viking Broken Back Knife and Sheath. The sheath uses two rings to attach to a thong that your belt passes thru. The traditional ring was Copper or Bronze. I purchased 2" of heavy grounding wire to make the rings out of. I could solder the copper ring together but that wouldn't be age correct. Just bending the copper into a loop wouldn't work as the copper is soft enough to open up under a strong tug. I decided that welding the ring together could be a possibility. I scarfed the ends of the copper and layer one scarf over the other, the same as forge welding chain. If the ring is placed in the propane forge or in a torch flame and brought to a red heat, will the copper scarfs weld? Second idea is to use Brazing Flux in the joint and try to forge weld the joint. The last idea is to use brazing rod and try to join the copper scarfs together. Does anyone have experience forge welding copper? If so, what was your process to make the weld? What are the chances that my ideas to forge weld could work?
-
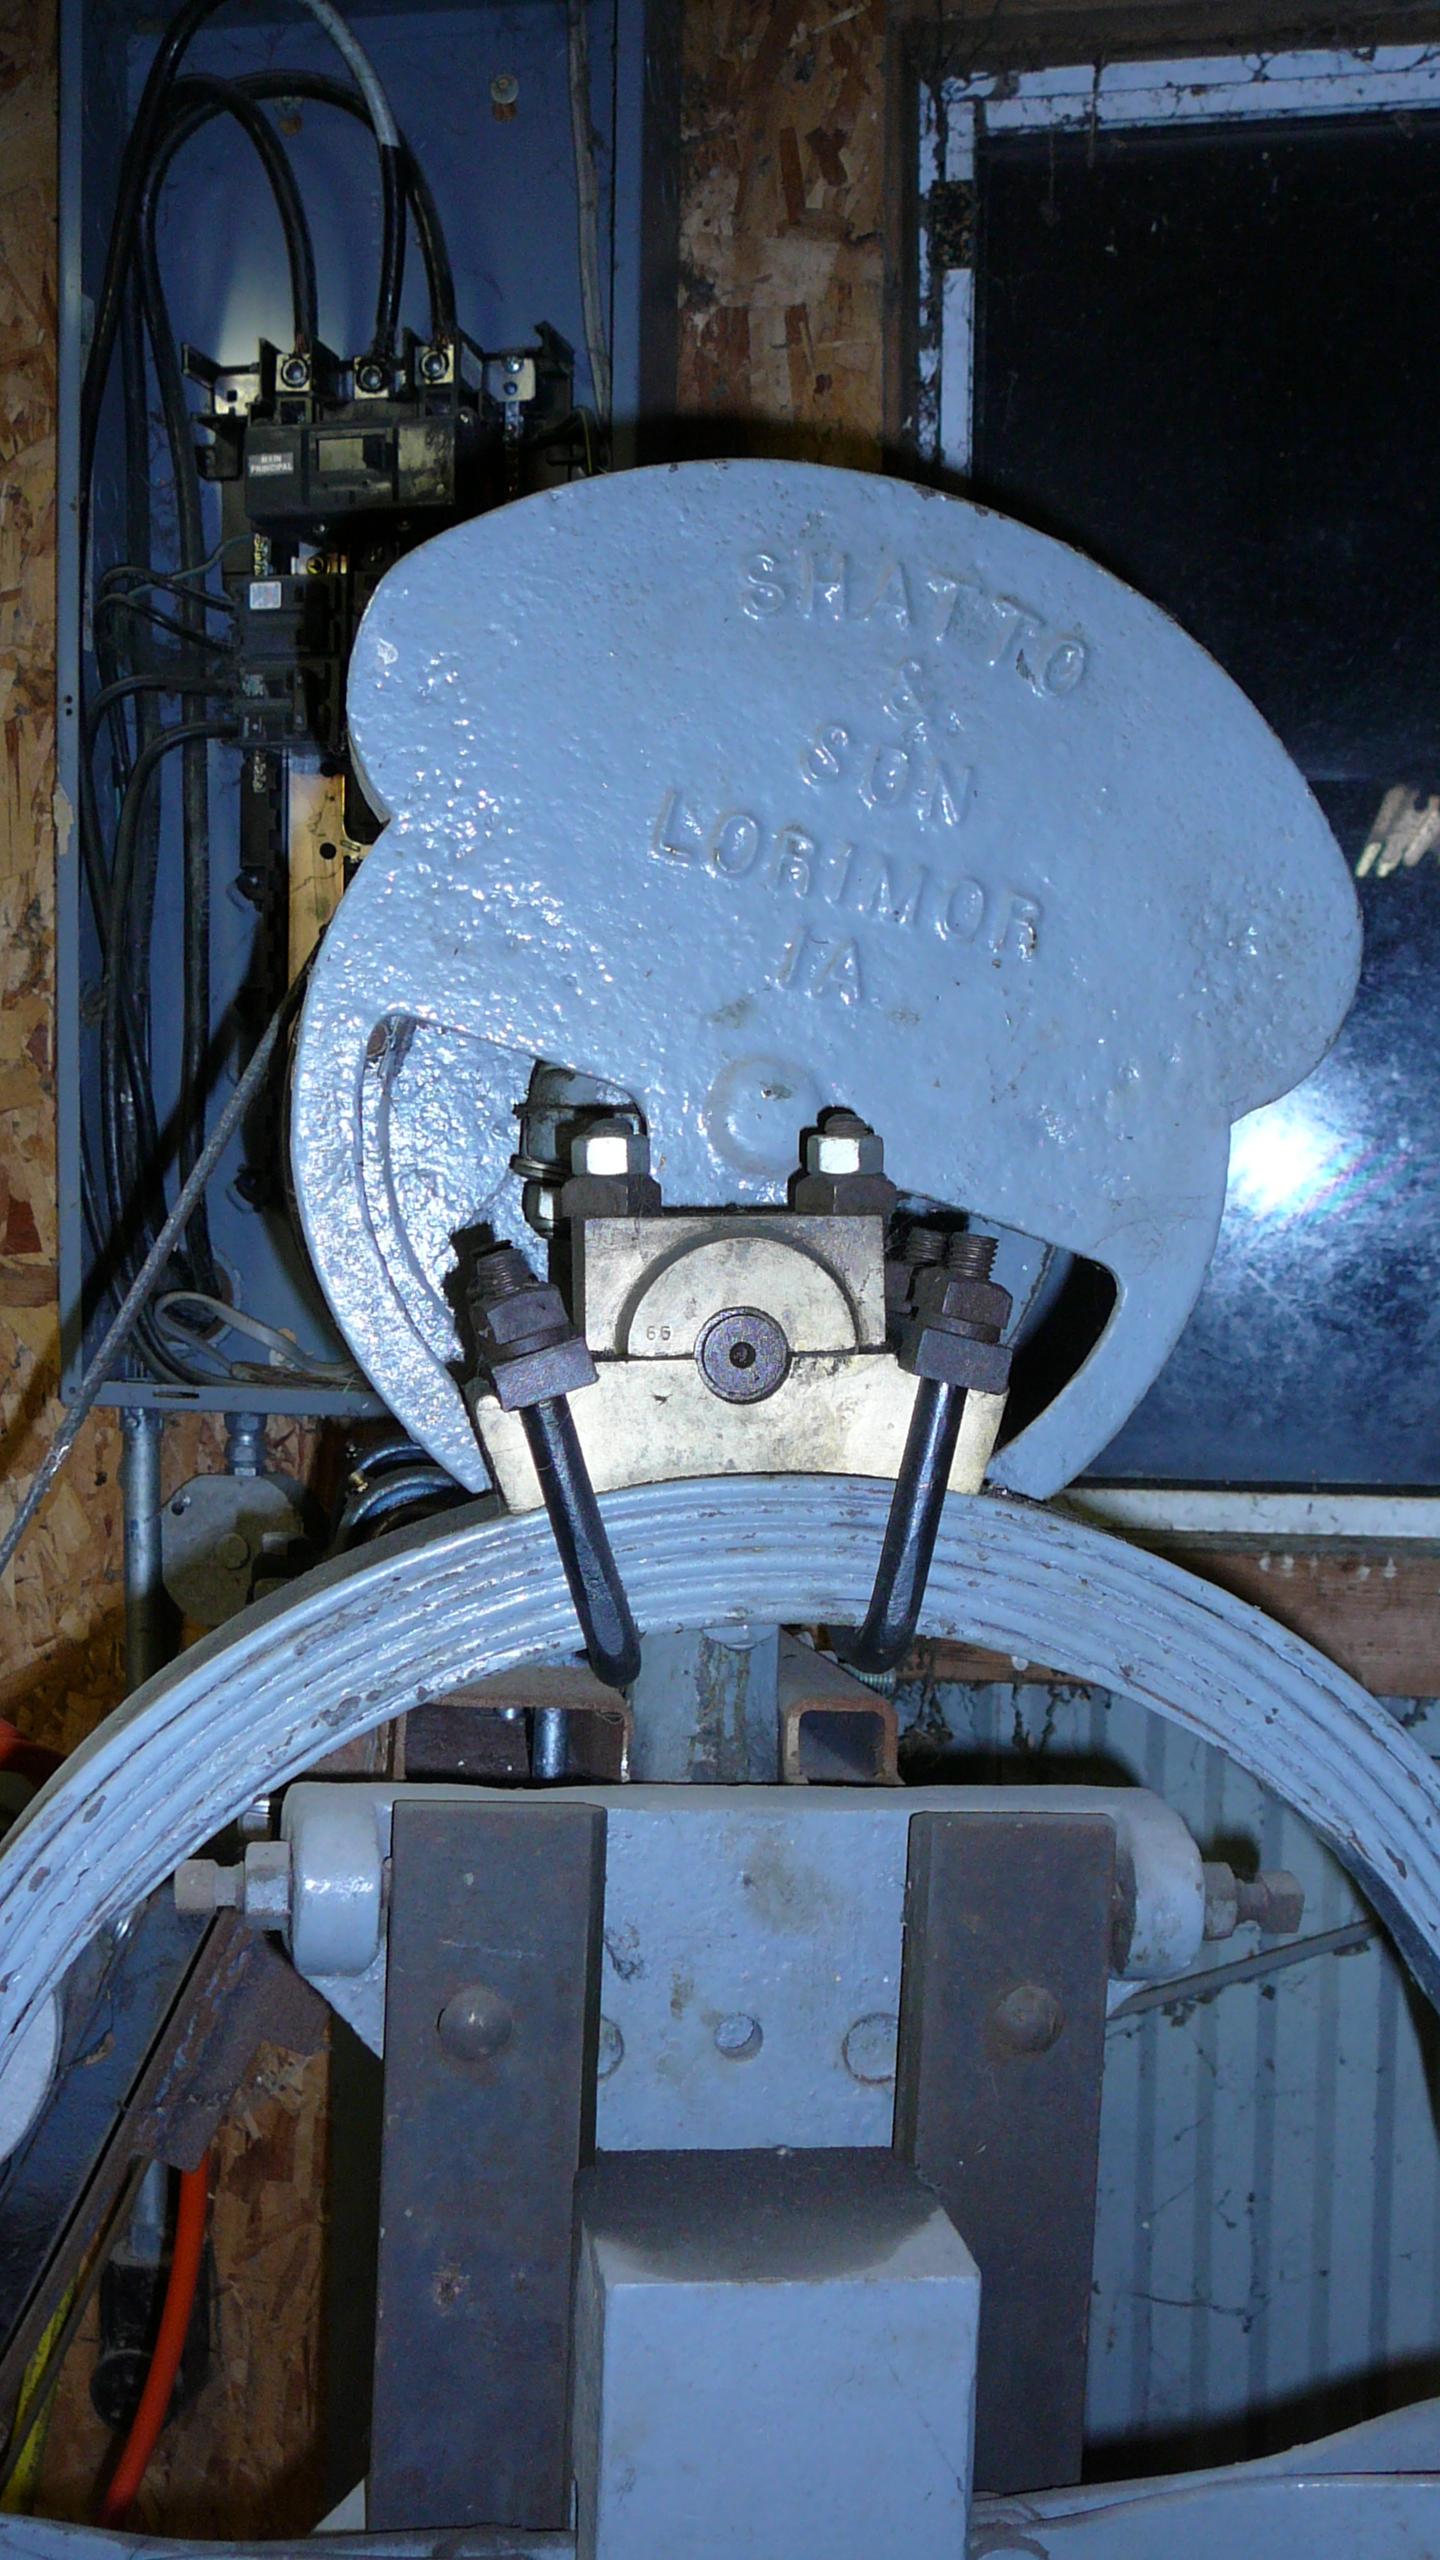
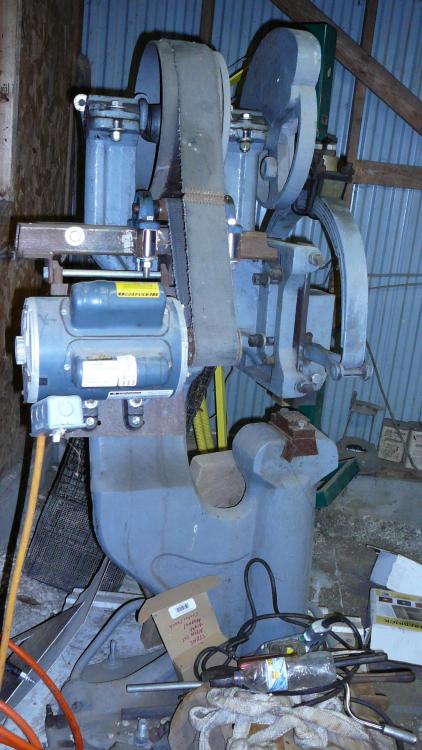
You are very observant. The Pitman Pin has a ball end, much like a ball hitch for towing a trailer. The Pitman Housing appears to be brass and it definitely was recent made. I would assume that the original housing was cast iron. The ball would allow for any out of alignment conditions to be resolved by movement of the ball in the housing. This hammer is ultra simple in design. The engagement of the clutch is accomplished by the Toggle (part of the rear bearing cap) presses against two well oiled washers. The washer positioned towards the front, which presses the large belted flywheel against the Clutch Plate which drives the main shaft. The iron eccentric plate with the Pitman Arm, is counterbalance against the weighted sliding hammer. The weight of the hammer is a little more than the counter balance's off center weight so the hammer goes to the down position when the power is turned off. When I got the hammer, the Driving Plate (The iron plate to the right of the belt driven Flywheel)was bare. There are counter sunk holes in the Driving Plate. I assumed that an oiled piece of leather may have been attached to plate by flat head bolts. I couldn't find a large thick piece of leather locally. Then, I got therm idea to mount a piece of thick belting to the plate. The bolt heads depressed the belting into the pocket under the screw head. So, there is no metal to metal contact. I don't know how long the belting will last. I believe that Little Giant uses wood blocks that expand inside against the Flywheel. On the Shatto there isn't room to fit the thickness of a wood surface on the driving Plate, that is why I assumed they used a leather clutch plate. I have no idea of how old the hammer is. A clue is it is designed for an overhead shaft drive. This makes me think that it was made prior to having individual electric motors available, A gas engine could have driven the overhead shaft that could run the Shatto plus other machines (drill press, lathe, grinder---) in the blacksmith shop. The poured babbitt bearings are another clue. My shop is in an old Hog House that isn't heated. So when winter arrives, I will be back in a heated woodturning shop turning wood Bowles.
-
I am building the Mark A. design Side Blast Forge. The location for the tuyere has been determined but is yet to be installed. I built the Lester Beckman Super Sucker Hood and am getting ready to mount it above the Tuyere. My chimney is a 10" steel grain auger tube. The chimney was cut in two because of a large kink in the middle. This is my mounting plan: With the Tuyere mounted thru the side ofthe Hearth, the hood will also be mounted to the same side of the hearth just above the end of the Tuyere. From pictures I have seen of the Supper Sucker Hood, it is drawing smoke and fire from the forge into the hood. How far above the Tuyere and back from the end of the Tuyere should the Super Sucker Hood be mounted? I am concerned about how hot the hood and lower pipe could get. The steel square tubing that I want to use to mount the hood is galvanized. Will the hood get hot enough to vaporize the galvanize off the mounting tube? There will be 10' of chimney going straight up inside the building and another 10' above the roof. How hot can I expect the hood and chimney inside the building get? The chimney will be in contact with the steel mounting bracket and the sheet steel roofing where it passes thru the roof. The steel chimney supporting brackets are 4" from a wood beam.
-
Gas forge refractories and where they go
hdvoyager319 replied to Glenn's topic in Insulation and Refractories
I made a small propane forge using 4 large white soft bricks. What type of brick or other insulating brick can be placed on the floor of the forge that will withstand Flux and not melt? I place a hard 2200 deg F brick in the bottom. The flux didn't affect the brick but the brick melted! That was a clue to find something else to place on the forge floor. The white high temp brick on the top of the forge cracked and then melted like a candle and dripped down into green glass puddles. Flux eating the firebrick is a great reason to use a coal forge. -
Side Blast Forge Design, Eliminate Water Cooling Tuyere
hdvoyager319 replied to hdvoyager319's topic in Solid Fuel Forges
Is this cured clay? Does the air come in thru the trough at the top of the picture or does the air enter thru a clay mound to the left that isn't in the picture? As soon as the water cooled forge is finished, I am going to build a portable JABOD forge. However, my thoughts are to use 2200 deg F rated fire bricks to contain the fire and provide an air entrance by stacking the bricks accordingly. The hearth will be a used SS Sink placed on a stand. That way, the bricks can be positioned to make the Duck's Nest Yesterday, I burned a huge brush pile. I went over today to remove some wood ashes to line the Side Blast Forge. The pile is still red hot charcoal. With luck, the rain that is forecast will put the coals out. Then I will have ashes for the Duck's Nest and hopefully a lot of charcoal. -
The hammer was listed several years ago in the Gazette for $500. I hopped on the motorcycle with $500 in my pocket. I built a special pallet to set it on in my trailer. After bringing it home, I built a mount for it, three layers if RR Ties, criss crossedI with steel siding over the top for the base. It is setting in a hole dug for the base in the old Hog House. When I looked up the hammer on Google, I found a Ebay notice where they sold one. I googled Lorimor Iowa but their history was silent on the Shatto's. I haven't pounded hot metal with the Shatto, I just got it to run. I have been oiling it heavily before testing it. I think that the thinner grade of bar/chain oil may be the way to go. It is "clings well to the chain saw bar so it should also cling to the bearings and slide. If the oil is too thick, it probably won't flow into the bearings. On top of the two bearing caps, there is a trough with a oil hole in the middle. I filled the trough with oil. I am afraid to release the leaf springs to place a hose over them. I don't have a spring compressor to get the springs back together.. The large top spring has a half circle ends capturing the pin that holds the hammer goggles. As you can see, I don't know the correct names for the hammer parts. A cage of expanded steel mounted behind the hammer's front section could work. Sone of the bolts will need to be replaced with longer bolts. Thanks for the heads up information.
-
As you see, there Shatto & Son hammer uses leaf springs to hold the Hammer. I am concerned that a 100 year old spring could break, especially the large outside spring.. From the pictures in my first post, what is the best way to cage the springs? The cage can't cover oiling points. What is the recommended oil for the Babbitt Bearings and the hammer slide rails? When I checked the babbitt bearings, there wasn't any oil groove in the top half of the bearing. So, I used a knife tip to scratch a groove 1/16" wide and about 1/32" deep oil groove. Info needed: Safety Spring Cover and what oil to use in the bearings and hammer slide rails..
-
Side Blast Forge Design, Eliminate Water Cooling Tuyere
hdvoyager319 replied to hdvoyager319's topic in Solid Fuel Forges
Charles, Your forge nailed the design perfectly. The only difference is then African forge used inner tubes for the bellows and your forge isn't setting on the ground. I am delighted with your response. Are you burning coal or charcoal? Have you ever used the forge inside? If so, was the smoke a problem? Charcoal would eliminate objectionable smoke, however it will make a shower of sparks with a strong blast. -
Side Blast Forge Design, Eliminate Water Cooling Tuyere
hdvoyager319 replied to hdvoyager319's topic in Solid Fuel Forges
The JABOD forge design forge appears to be very close to the African primitive forge. -
Smelting and forging iron was invented in Africa thousands of years ago. On Youtube, I watched several primitive African smithies forge steel. The anvil was a rock, the hammer a piece of axel and the forge a simple Side Blast design laying on the ground. The Tuyere was aimed at the fire and terminated short of the charcoal fire. In another smithy, the tuyere ended behind a mound of clay. The clay had an air hole directing air to the burning charcoal mound. The English Side Blast Forge has the Tuyere terminating in the fire. As a result, the steel or iron Tuyere must be water cooled so it doesn't melt. However, if the Tuyere followed the primitive African design, the Tuyere wouldn't be in contact with the fire. The entire water cooling system would be eliminated. Has anyone built a side Blast Forge with the tuyere protected from the heat of the fire by stacking firebrick between the tuyere and the fire? The firebrick would be stacked to provide an air hole to the fire. A mound of clay could substitute for the firebrick. The Duck's Nest would still be required.
-
I am searching for any information on my power hammer. The Shatto & Son hammer doesn't appear in any book or literature . I searched Lorimor Iowa and can't fine any information either. The 1-1/2HP motor is mounted on a clamped assembly around the upright bearing posts. The motor hangs down to make the belt wrap almost 180 degrees to get enough traction for the belt to drive the hammer. The hammer operation is ultra simple. To the left of the big bully wheel, there is a Bearing Cap that also holds a lever pivot. When the hammer is activated, the Floor Rod w\thru linkage presses the large bully wheel into the thin iron wheel to the right of the pull wheel. The thin iron wheel has a piece of belting material attached with counter sunk screws. When the Iron Wheel turns, itis directly attached to the counter weight wheel. Then the counter weight wheel drives the hammer weight up and down. The hammer rides between two "V" shaped slides, the dark steel bars located each side of the hammer. Slipping the belt with various degrees of foot pressure on the foot bar drives the hammer, The foot pressure can just slip the belt or with heavy pressure, lock the iron wheel to the pulley wheel to hammer hard at the max hammering.. I have an almost perfect unused Blacker anvil with stand. The anvil has 2 Hardy holes each end of the face and the notch cut out in the center. A wild guess the anvil weighs 500# and the base 200-300# The anvil was salvage from a closed military base.I wish that I had the hammer part to go with the anvil. Because of its size and space it takes , I don't have any use for it in the shop..

-
Three legged anvil stand.
hdvoyager319 replied to Matthew2's topic in Stands for Anvils, Swage Blocks, etc
For traveling, I mounted a 70# Trenton on a three leg base. I can walk the assembly on the legs to where I will be demonstrating. The three legs are 3" Thin wall tubing. The legs are tied together towards the bottom for rigidity. The base of the Trenton is secured to the bottom frame which is two "U" beams welded together. Problem, Forging with a 1'1/2# - 2# hammer results in the anvil and stand walking a short distance with each hammer blow. When the anvil has walked about 1', I return it to the "start" position. -
I stumbled into a youtube video taken in Africa of a village blacksmith. The blacksmith was setting on the ground, pumping a truck inertube bellows which fed the air thru a tube to the edge of a wood/charcoal fire. The air tube ended several inches short of the fire. The fire was in a pocket dug in the ground. Guess what the anvil was??? a rock. The hammer was a steel bar. The fire reached welding heat!!!. The blacksmith had cut apart steel wheel rims with a chisel for the steel.
We sure have it good using a stand up forge, steel anvil, tongs and many hammers. But, It is amazing what can be accomplished with only the bare minimum equipment.
-
After several hours of my first test firing, the top hose was too hot to touch and the bottom hose was still cool. The top water in the tank was steaming. If the water boils then I will add a wire mesh cooling "A" Frame over the tank. This cooling method was used in sone gas engines and tractors in the early 1900's . Yes, the water was circulating nicely. The water will rise to enter the screen by using then coffee percolator principle.
-
Newbie, Gasser, Forge Welding, Sweat, Frustration
hdvoyager319 replied to wrickm's topic in Blacksmithing, General Discussion
Forge welding chain is a challenge. If the metal from Lowes is cad or zinc plated, the plating must be ground off. The correct scarf for chain is the entire bottom arc is scarfed. The two ends must lie on top of each other, not side by side. Bring the link to bright red where the flux will immediately melt. raise the temperature until the link color matches the inside of the forge. Have the anvil directly in front of the forge.Bring the link out and using a 1# hammer quickly tap-tap-tap the overlapping metal together. reflux, reheat and with a heavier hammer finish forging the two ends together. Repeat the weld one more time to make sure everything is welded. Don't make the welded metal thinner than the 3/8" stock. forge over the horn to make the weld round to match the stock diameter.. Forge two links and hook them together with the third forged link. Then you take 3 and 3 links and forge them together with the 7 th link. continue this process until the chain is in two pieces. Then forge the final kink to connect the chain together. I don't think a propane forge lends its self to making chain. A coal forge will heat only the weld area link not length of chain when you are forging 7 links, then 15 links and so forth. The propane forge will have to take all the links up to welding heat that are inserted in the forge.. I suggest that you go to your raw metal dealer and buy hot role stee. I bought 20' of 1/2" sq. steel this week for $10.00, 3/8" would be less$$. I go to Marion Iron in Marion Iowa for all my steel. At no charge, they will saw it into pieces so they will fit in my truck, usually 7'-7'-6' = 20' Let me know if this helps you make chain. suggestion: You propane bottle will freeze up in a little over an hour. To extend the time to freeze up, place the propane bottle in a tub of water. Better, go to your propane dealer and have them make you a manifold to connect 2 bottles together. It will take a lot longer for the two bottles to freeze but they will freeze when the propane level gets below the 1/4 mark. -
I am in the process of making a height adjustable bracket to be able to move the Tuyere up and down to be able to tune in the best height of the air tube to the bottom of the Duck's Nest. I like your idea to use a Chimney Cap instead of the sealing plate. ??? Your cap has a bottom plate on all four sides. Is this plate used to allow the smoke to break free and not follow the chimney back down? I believe that smokestacks have a protruding ridge at the top so the smoke can break free of the stack. From everything I have read, the Hearth is filled with sand or wood ashes. The Duck's Nest is then made in this media. Has anyone used bricks to fill up the extra space and then used Fire Brick to build the Duck's Nest? I am concerned with sand or wood ashes mixing with the coal when the fire is pulled. My test firing of the forge, without a chimney, shed doors full open, revealed the Tuyere was too low, the fire brick under the Tuyere was glowing red, and the Tuyere air outlet kept plugging up. Raising the Tuyere so the air outlet is about 5" above the bottom of the Duck's Nest may solve the plugging problem. I am redesigning the air input. The 2-1/2" air pipe will have a new "T" section welded to the Tuyere. The rear of the "T" will be plugged but the plug can be removed so a rod can be run straight thru the air tube to clear any obstruction. The "T" probably will restrict air flow because of the 90 degree turn in the air supply tube. This problem can be resolved by altering the motor/blower pulley diameters. I have no idea how much air a side blast forge requires to reach welding heat. Is the air supply equal to the bottom blast forge??. Once the Tuyere is mounted in the new mounting plate, the forge will be test fired up to find the proper location for the air blast. Second will be finding what angle the Tuyere should be mounted: horizontal, or facing down ???degrees. The water tubes are located to the rear of the Tuyere. A few degrees downward tilt won't expose any free space where water can't reach. If I find the water boiling in the tank, (the water was steaming in the test) A screen type water cooling system will be added like was used in some 1900's gas engines/tractors. Rising hot water should be able to rise several feet into the cooling screen. I also plan on raising the water tank so the bottom of the tank is equal to the top of the tuyere's hot water outlet tube. That will increase the water pressure in the tuyere. If you or anyone else has suggestions or comments please correspond with me. I am all alone with this project, no other smithy has a side blast forge. You'll be my sounding backboard for helping resolve problems. PS: I got my power hammer running today. It is a 25# Shatto & Son hammer. The rabbit bearings appeared to be relatively newly poured. I made new spacers for the bearing caps. I haven't been able to find out anything about the hammer. It doesn't appear in any book. Does anyone out there know anything about this hammer? To get adequate belt traction, an idler pulley was added so the belt would make a 180 degree contact with the motor pulley. I made the motor bracket as the hammer is designed for overhead shaft drive. The driving block travel in a "V" groove, each side, see the two dark vertical steel bars. When the hammer is engaged, the large pulley is pressed against a flat disk, (visible to the right of the belt) which applies rotational power to the hammer .his is a very simple designed hammer as compared to known hammers;L Little Giant ---. I also have a 500# anvil (in like new condition) that was part of a Blacker Hammer. It is possible that Fisher may have made the anvil. I also have 3 Trenton, 1 Peter Wright, 1Fisher, a no name 112#, 2 Vulcan anvils and 4 swage blocks. Three stationary forges and 3 farm or Rivet forges. Two Cones, a hollow 4' tall and a solid cone 30" tall. I have been collecting blacksmith items since 1980. Are we having fun yet?