hdvoyager319
-
Posts
57 -
Joined
-
Last visited
Content Type
Profiles
Forums
Articles
Gallery
Downloads
Events
Everything posted by hdvoyager319
-
Pop just gets your attention. KABOOM!!!!! Gets your attention and a possible disaster. Go back to what you were doing with the fire to determine the cause of the pop. Many years ago at the Dixon's Gun Makers Fair, the blacksmith from Williamsburg were forging gun barrels out of wrought iron. They would forge weld several inches, bank the fire and forge another several inches an hour or so later. After lunch, we heard a loud BOOM coming from the forge. The forge exploded when the hand crank blower was started. The explosion sprayed hot coal/coke all over the shop. These blacksmiths were 100% experienced in blacksmithing and how to operate a bottom blast coal forge. So, with the wrong conditions, your POP could turn into a serious explosion that could burn the shop down and send you to the burn ward. The little POPs are a warning,. the explosion problem is more serious with a Side Blast Forge because the fire and air system are at the same level. But, coal gas can back up in either the Side Blast or Bottom Blast forge. If you are using bellows, now there is a real potential problem waiting to happen if the coal gas backs up into the bellows. I would guess that Box Bellows that are used with a side blast forge could be very interesting. Hopefully they have a reverse flow check valve.
-
In a Bottom Blast forge, the red hot coals do fall past the Clinker Breaker and accumulate. I would seriously doubt that they will LIGHT an explosion. The fuel for an explosion is coal gas that has backed up below the clinker Breaker and filled the blower and air tube. when the blower is turned, the explosive gas is blown from the bottom into the hot fire--Boom! This can result in the hot fire coals being blown all over the shop and on the blacksmith. The explosion conditions can be eliminated by opening the Trash Gate under the Clinker Breaker. As heat rises, the air feeding from the bottom thru the clinker breaker will keep the fire burning. NEVER PUT GREEN COAL OR WET COAL ON THE FIRE UNLESS THE BLOWER IS RUNNING! THE FIRE MUST BE ATTENDED ANY TIME THE GREEN COAL OR WET COAL IS ADDED TO THE FIRE.
-
Since the explosion, I have been very careful to disconnect the air pipe at the Guillotine any time the blower is turned off. With the Air Tube off, and green coal is being coked, the heavy gray flammable smoke flows freely back out of the Forge and air intake Guillotine. This is the same looking smoke that rises up out of the fire when making coke from green coal. This smoke burns when hit with a flame. Any time I leave the fire, the Blower is off and the Air Tube is pulled out of the Guillotine. The Guillotine is closed so there isn't any air feeding the fire, so the fire goes out safely at the end of the day. If I break for lunch, the guillotine is partly opened so the fire stays lite. There never is any green coal on the fire when the fire isn't being used. Remember, this is a Side Blast Forge so it operates differently than the Bottom Blast Forge. Both forges can explode when the conditions are present to allow the coal gas and smoke to flow backwards into the Air Tube and Blower, and then turn the blower on. The glowing coals in the fire are the ignition source. I haven't had any explosions after figuring out the conditions and cause. In a Bottom Blast forge, the red hot coals do fall past the Clinker Breaker and accumulate. I would seriously doubt that they will LIGHT an explosion. The fuel for an explosion is coal gas that has backed up below the clinker Breaker and filled the blower and air tube. when the blower is turned, the explosive gas is blown from the bottom into the hot fire--Boom! This can result in the hot fire coals being blown all over the shop and on the blacksmith. The explosion conditions can be eliminated by opening the Trash Gate under the Clinker Breaker. As heat rises, the air feeding from the bottom thru the clinker breaker will keep the fire burning. NEVER PUT GREEN COAL OR WET COAL ON THE FIRE UNLESS THE BLOWER IS RUNNING! THE FIRE MUST BE ATTENDED ANY TIME THE GREEN COAL OR WET COAL IS ADDED TO THE FIRE.
-
Thanks for your comment. Conditions for an Explosion are:: a, a hot fire. b, green coal is added around the hot fire. c, the blower is off. d, the green coal is making coke. e, Coal Gas is flowing back filling the Air Tube and the blower, up to the air intake level, with gas. Result is an Explosion Coal gas is heavier than air. As a result, the coal gas flows down. For a Side Blast Forge, there is no down as the Air Tube and Blower are level with the Tuyere, thus, back filling the Air Tube and Blower with gas, when the blower is off. With the blower off, there was rising smoke from the coking process that was flowing up the chimney. But the coal gas apparently is also flowing back out of the Tuyere. Remember, I am using a Side Blast Forge that does not have an Ash Gate. If you have a Bottom Draft Forge, and the Ash Gate is open, the coal gas will flow down and out thru the Ash Gate, no boom. I am going to try an experiment. The conditions for an explosion will be set up with one exception-the Air Tube will be removed. Hopefully, I will see smoke/gas coming back out of the Tuyere's air intake.
-
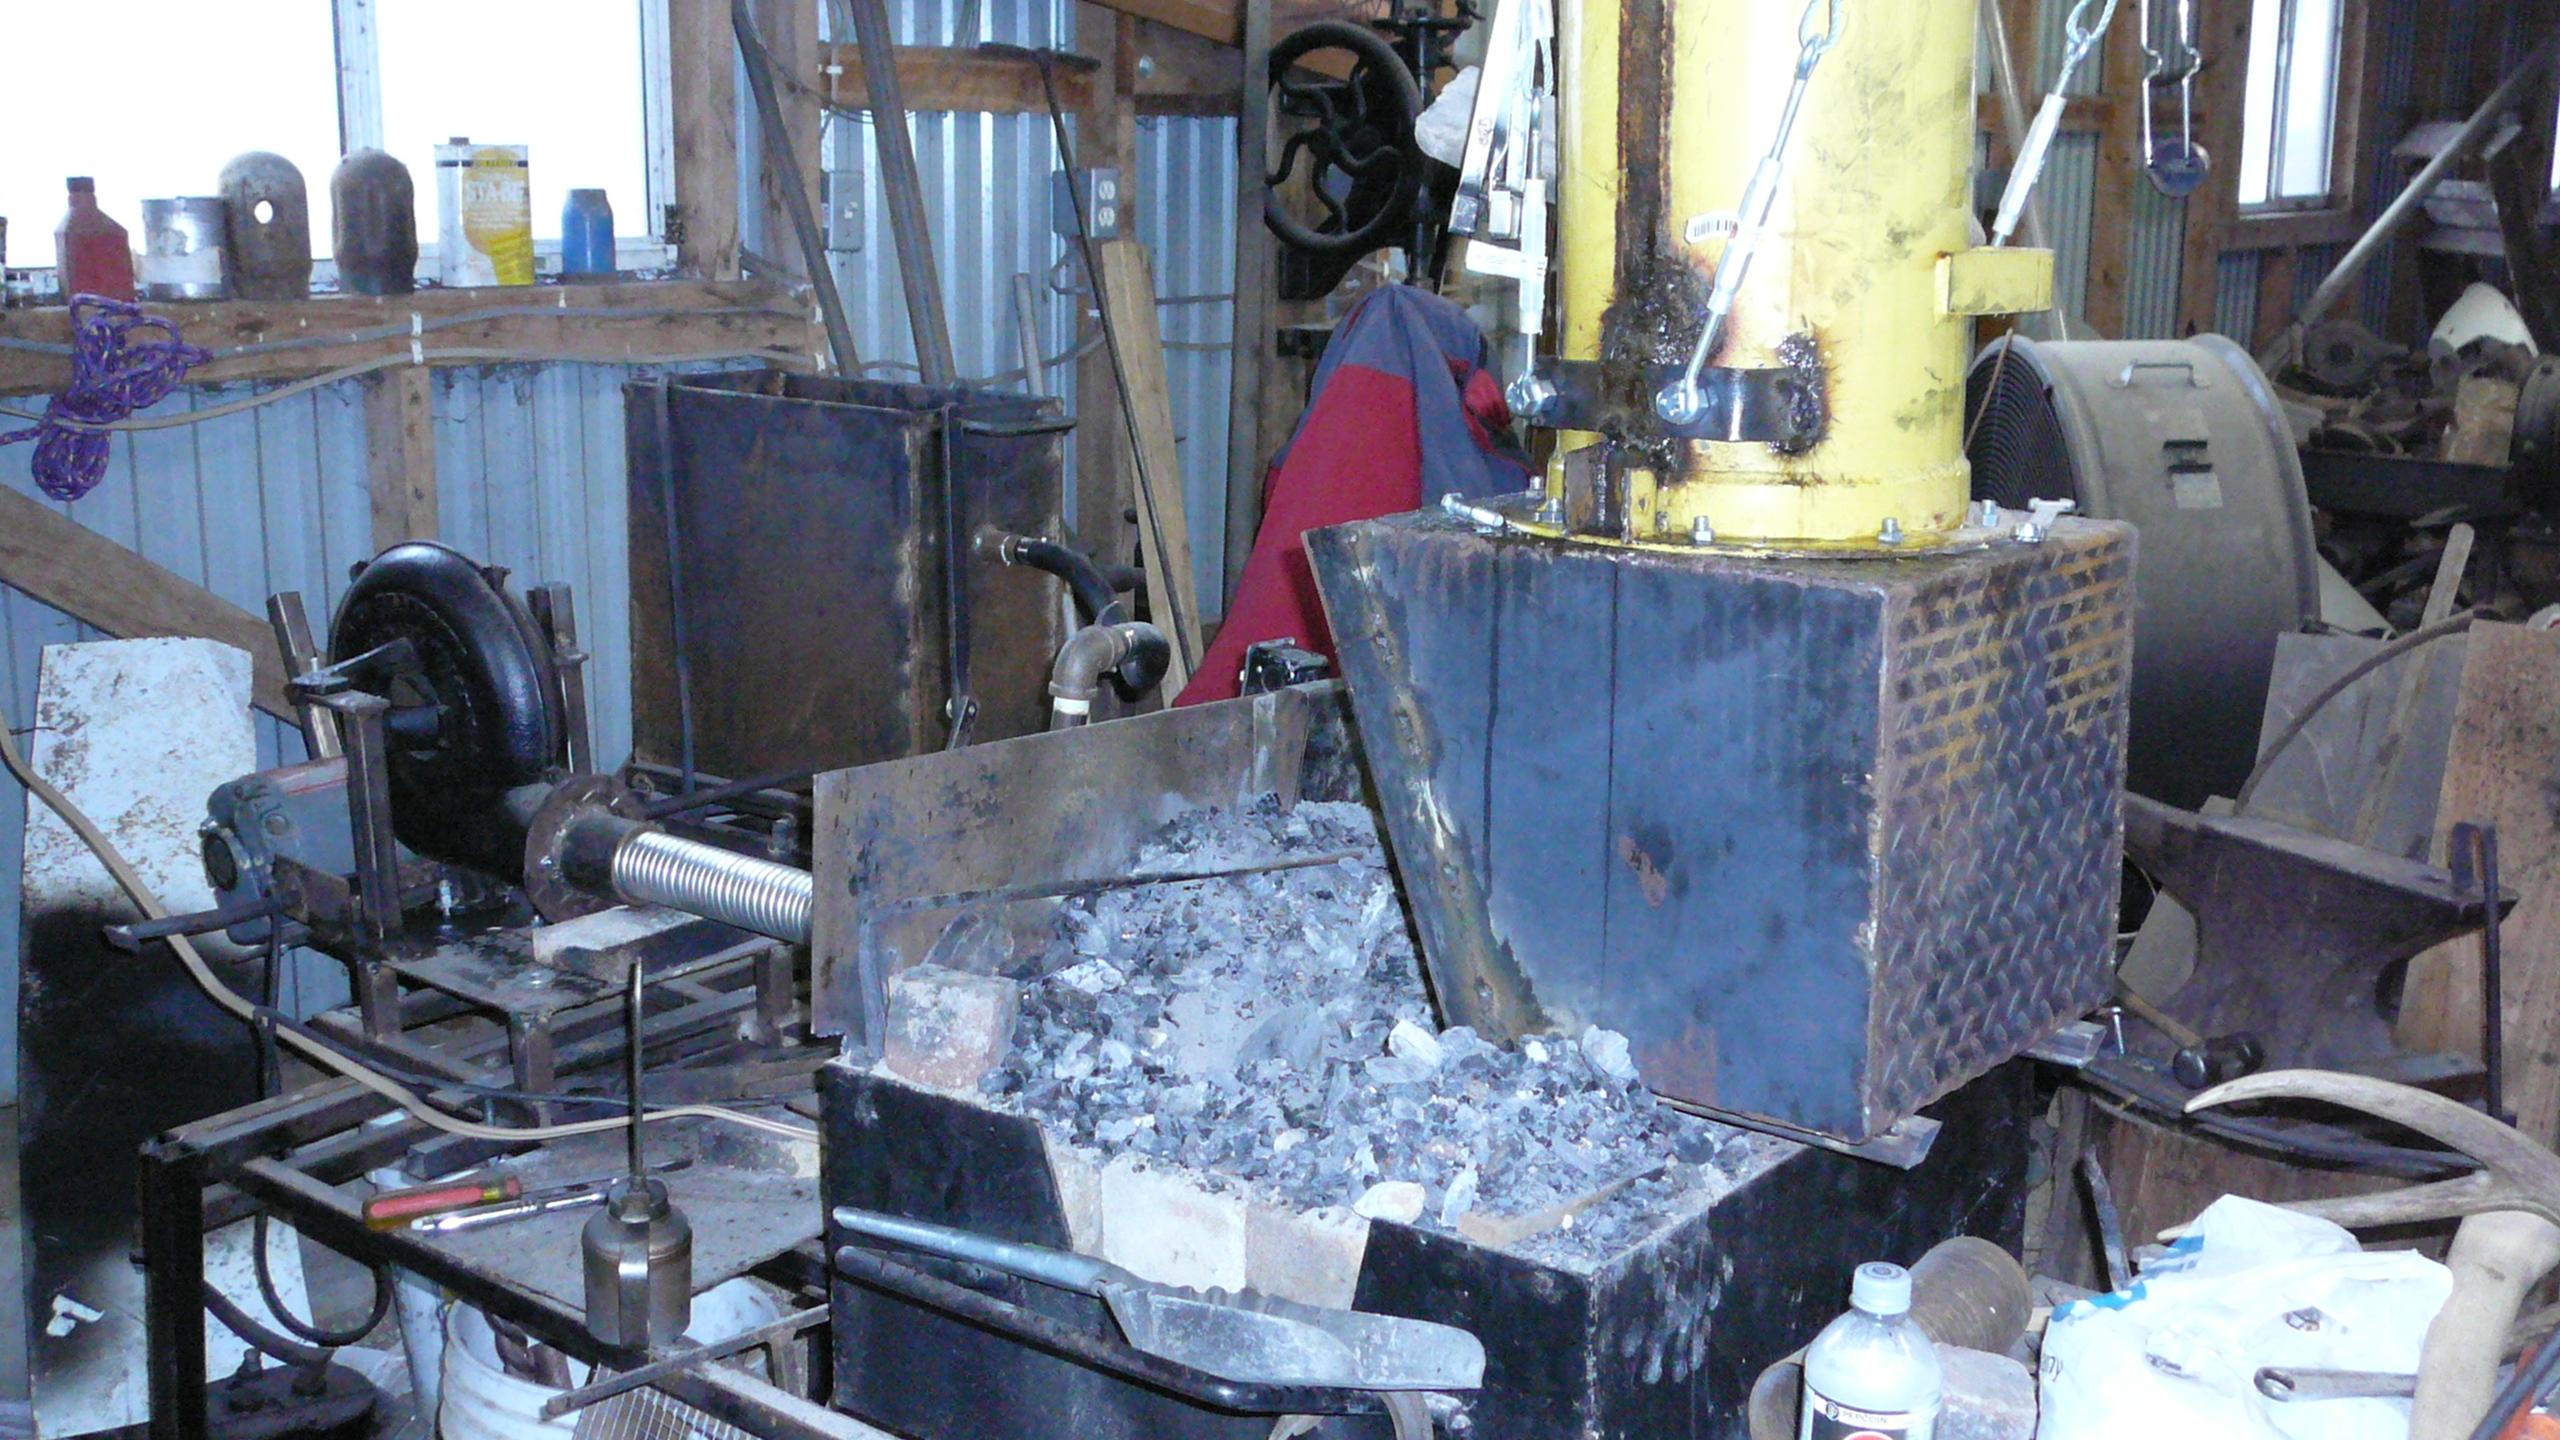
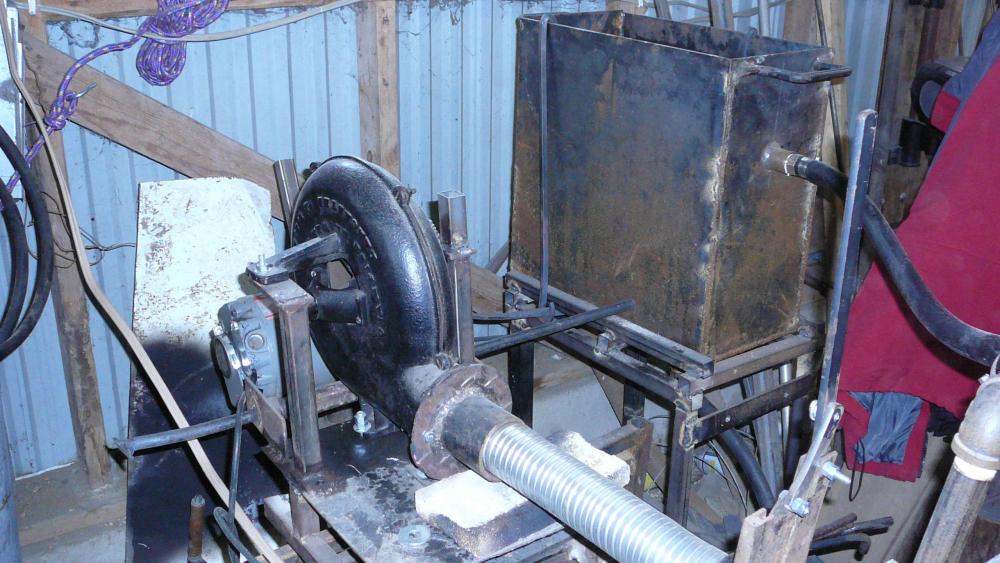
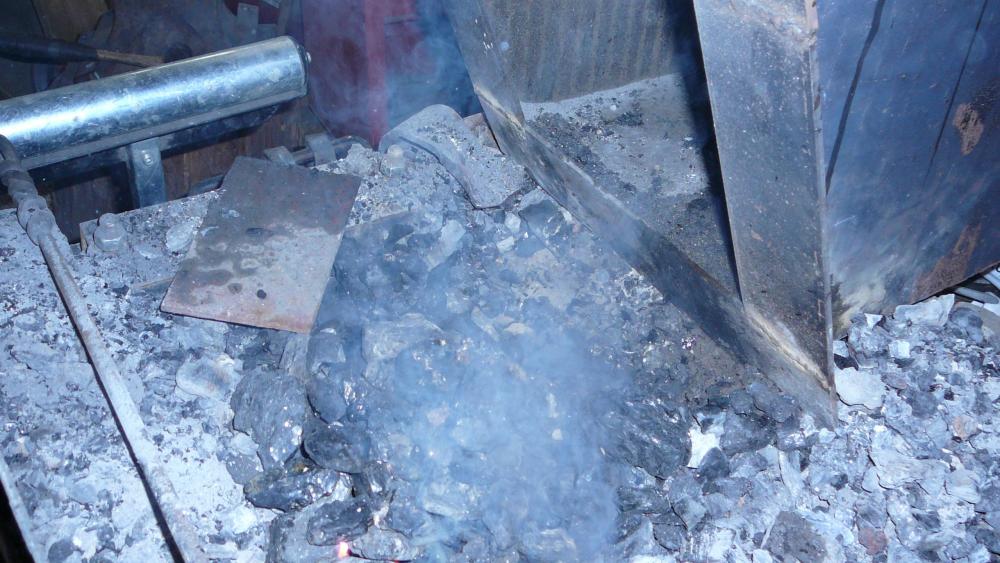
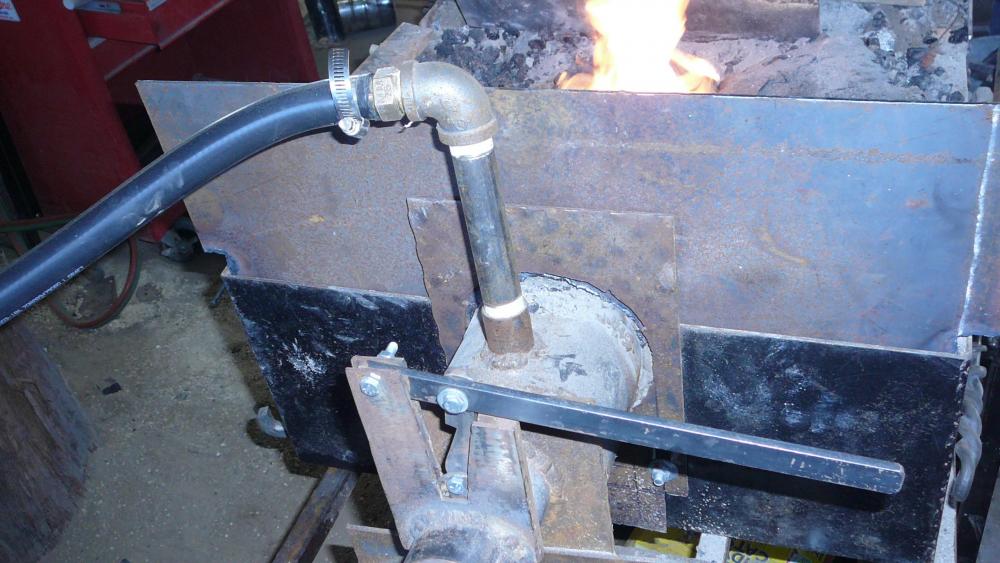
Coal gas is as explosive as propane, and natural gas. Coal gas is a byproduct of the process of cooking green bituminous coal into coke. From the responses, most of you are using coke, not soft coal and a Bottom Draft forge with an Ash Gate. . I wrote to Mark Aspery, designer of the Side Blast Forge that I built. Adding green coal to a burning fire will produce Coal gas. Coal gas is not an issue with coke and bituminous coal that has been coked. The problem is caused by the exact conditions that I created. a, have a good hot fire going. b, add several shovels full of green coal, green coal that contained 20% fines. Fines are even worse for forming coal gas as they blanket the fire and keep outside air away from the top of the fire. Since most of you are using a Bottom Draft Forge, if you add green coal to a hot core fire and turn the blower off and open the ash gate, the prospect of having an explosion is slim. But if you keep the ash gate closed tightly, with the blower off and a load of green coal cooking away, you also may experience skid marks in the jockey shorts. Many years ago at the Gunmakers Fair held at Dixons at Kempton Pa. the blacksmith from Williamsburg were forging gun barrels. They were using a bottom draft forge that they brought to the show. They would forge a few inches of the barrel and then quit for a half hour or so. When they came back to forge another few inches of gun barrel, they started the blower and they had a real big Boom. The boom cleared a lot of the burning coal/coke out of the Tuyere. I believe that I may have a solution to the Side Draft Forge potential to make coal gas when green coal is added. As long as the blower is running, the coal gas goes up the chimney. The idea requires the flex air tube to be removed temporarily.. Now, the air intake end of the Tuyere isn't connected to the air tube and blower. So, the tuyere now has a free opening to suck air, in similar to opening the ash gate on the bottom blast forge. The convection air should exhaust the coal gas with the smoke up the chimney. If this new idea makes sense to my fellow blacksmiths, let me know by your comments. I can remove the connecting air tube as easy as you can open the ash gate. This picture shows the Blower, the Air flex Tube and in the far right, the Guillotine air volume controller at the entrance to the tuyere. All I need to do is remove the air tube if I leave the forge for a few minutes or for a longer break. The natural draw will keep the forge warm and possibly coke some green coal in the process.
-
The explosion was like a 22 pistol going off behind me. The blower had only been off for about 2 min. which gave the gas time to fill the air tube and blower. The smoke and hot gases rise to go up the chimney, no problem here, even with green coal giving off volumes of smoke.. The rising smoke is combustable and will burn if a flame is present. This isn't the problem on the top[ side of the fire. it's the bottom side there coal gas is the problem. Green coal added to a hot fire is another matter. In the coking process, coal gas is released. ( In the past, the coal gas that was formed in coking plants was piped to home owners and businesses to be burned for gas lights.) Since the coal gas is heaver than air, it can sink down or if enough gas is formed it can be pushed up, even to bellows mounted above the forge. So far the only preventive procedure is leave the blower on in the side blast forge. In a bottom draft forge, leave the ash dump door open. I believe that in the side blast forge the tuyere has a small air hole around 1" or a wee larger. In front of the tuyere is a pile of burning coal/coke which presents considerable resistance to the force of a minor blast. The blower side has the air tube and open blower which presents very little resistance to the blast, thus the blast should exit thru the blower opening as it did in my incident. . As you can see, I have done a lot of research on the problem, cause and prevention.
-
Thank you for your concern. I did not get burned. Scarred me more than you could believe, made my ears ring. The fire stayed undisturbed but the blast went thru the air pipe and out the blower air intake.
-
My Side Blast Forge just has an Explosion in the Air Supply Flex Pipe and Blower. I had a hot fire burning and added green coal around the fire. I was getting a lot of smoke from the green coal and the Supper Sucker Hood was sucking 99% of the heavy smoke up the chimney. I turned the Blower OFF (big mistake!!!!) When I turned the Blower on BOOM!! A Side Blast Forge doesn't have a Ash Dump. Running the Blower with the Guillotine closed allows some leaking air to pass into the fire.


-
New Side Blast forge with Supper Sucker Hood, First Fire
hdvoyager319 replied to hdvoyager319's topic in Solid Fuel Forges
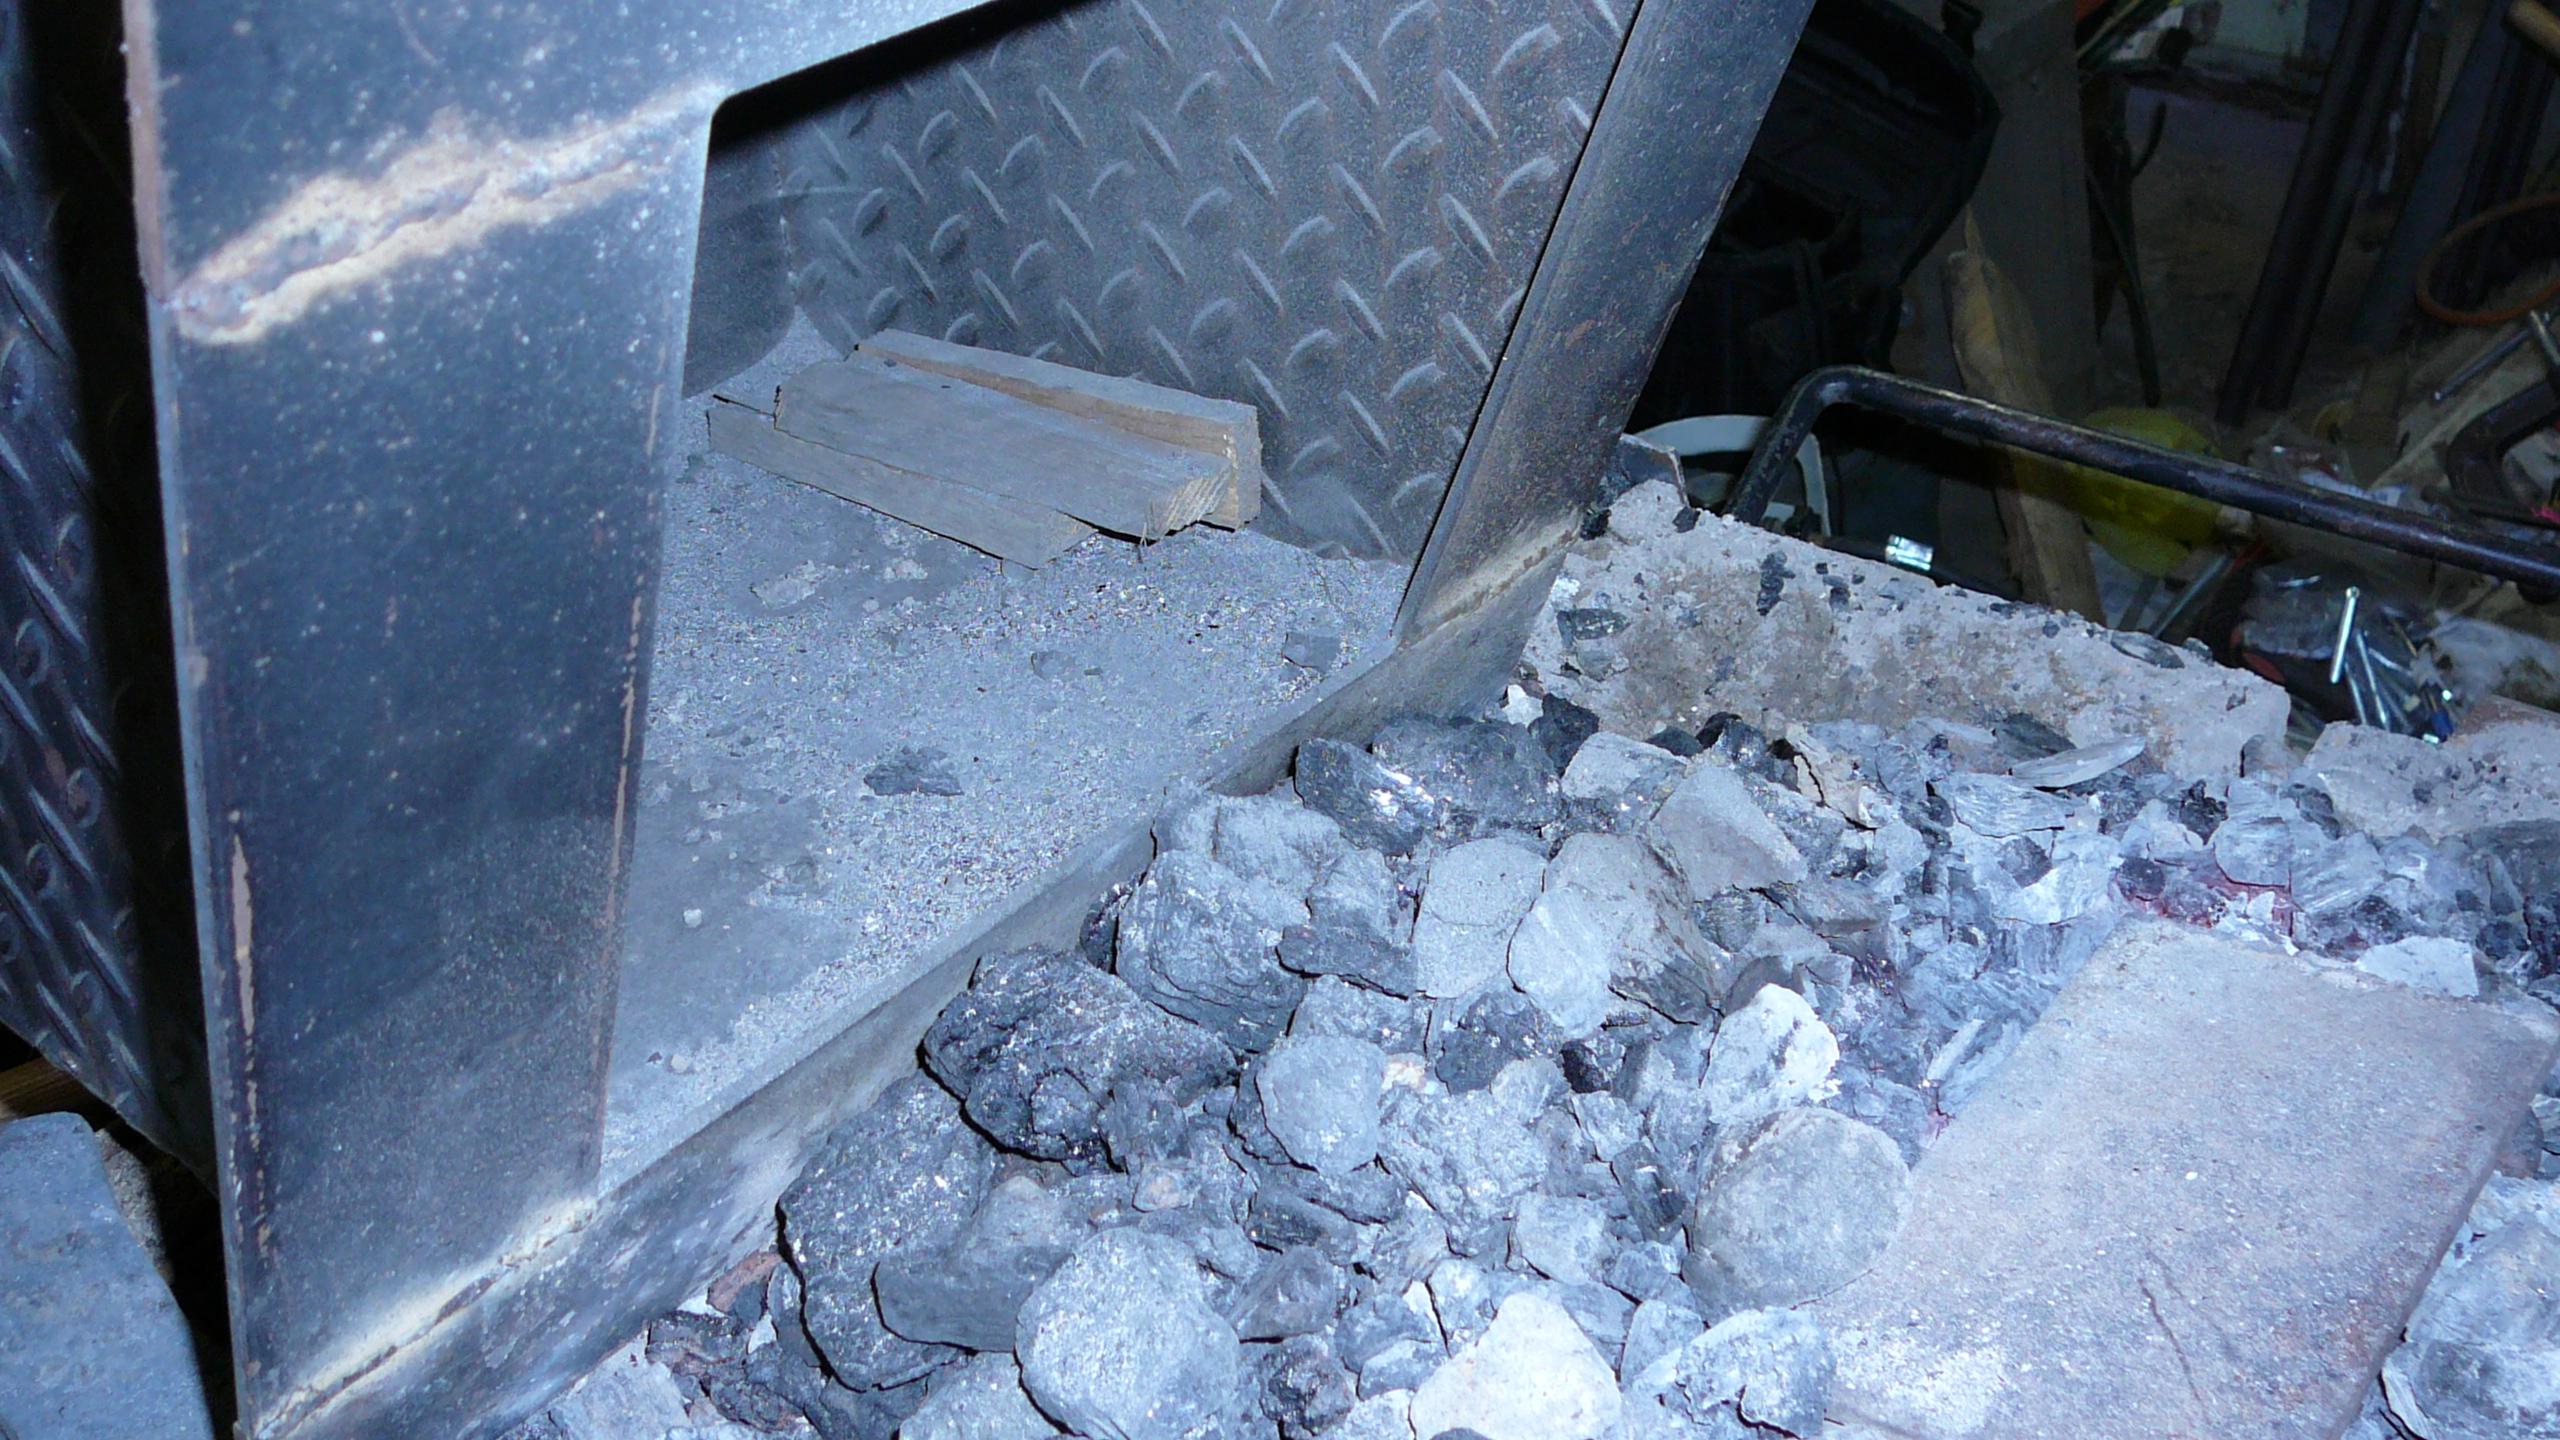
These are pictures of the forge as I have it set-up. You will get a much better idea of the forge. This is a view of the complete forge. From left to right, the blower, Bosh, hearth and hood/chimney. This is the Supper Sucker Hood drawing smoke at the initial lighting of the fire. The hood/chimney system has a significant draw. This is the duck's Nest, Tuyere to the left and hood to the right. The fire stays close to the air inlet. The hearth is filled with coal. As the coal is consumed, I rake the sides of the hearth to put more coal into the hot spot. I think that I may not have adequate depth to the fire. Next time the coal will be heaped higher against the air inlet. From most Youtube videos, Coke is the fuel of choice. I am burning Bituminous coal. and some Anthracite coat from Tractor Supply. When the air is shut off, the fire dies out quickly at the end of the blacksmithing session. I just rake out the red hot coal from the Duck's Nest and then remove the clinkers. If there is only one advantage to the Side Blast Forge, it is the clinkers don't interfere with the air flow, No clinker Problem!! If anyone has suggestions on using the Side Blast Forge please send me your comments and suggestions. Are we having fun yet? Paul

-
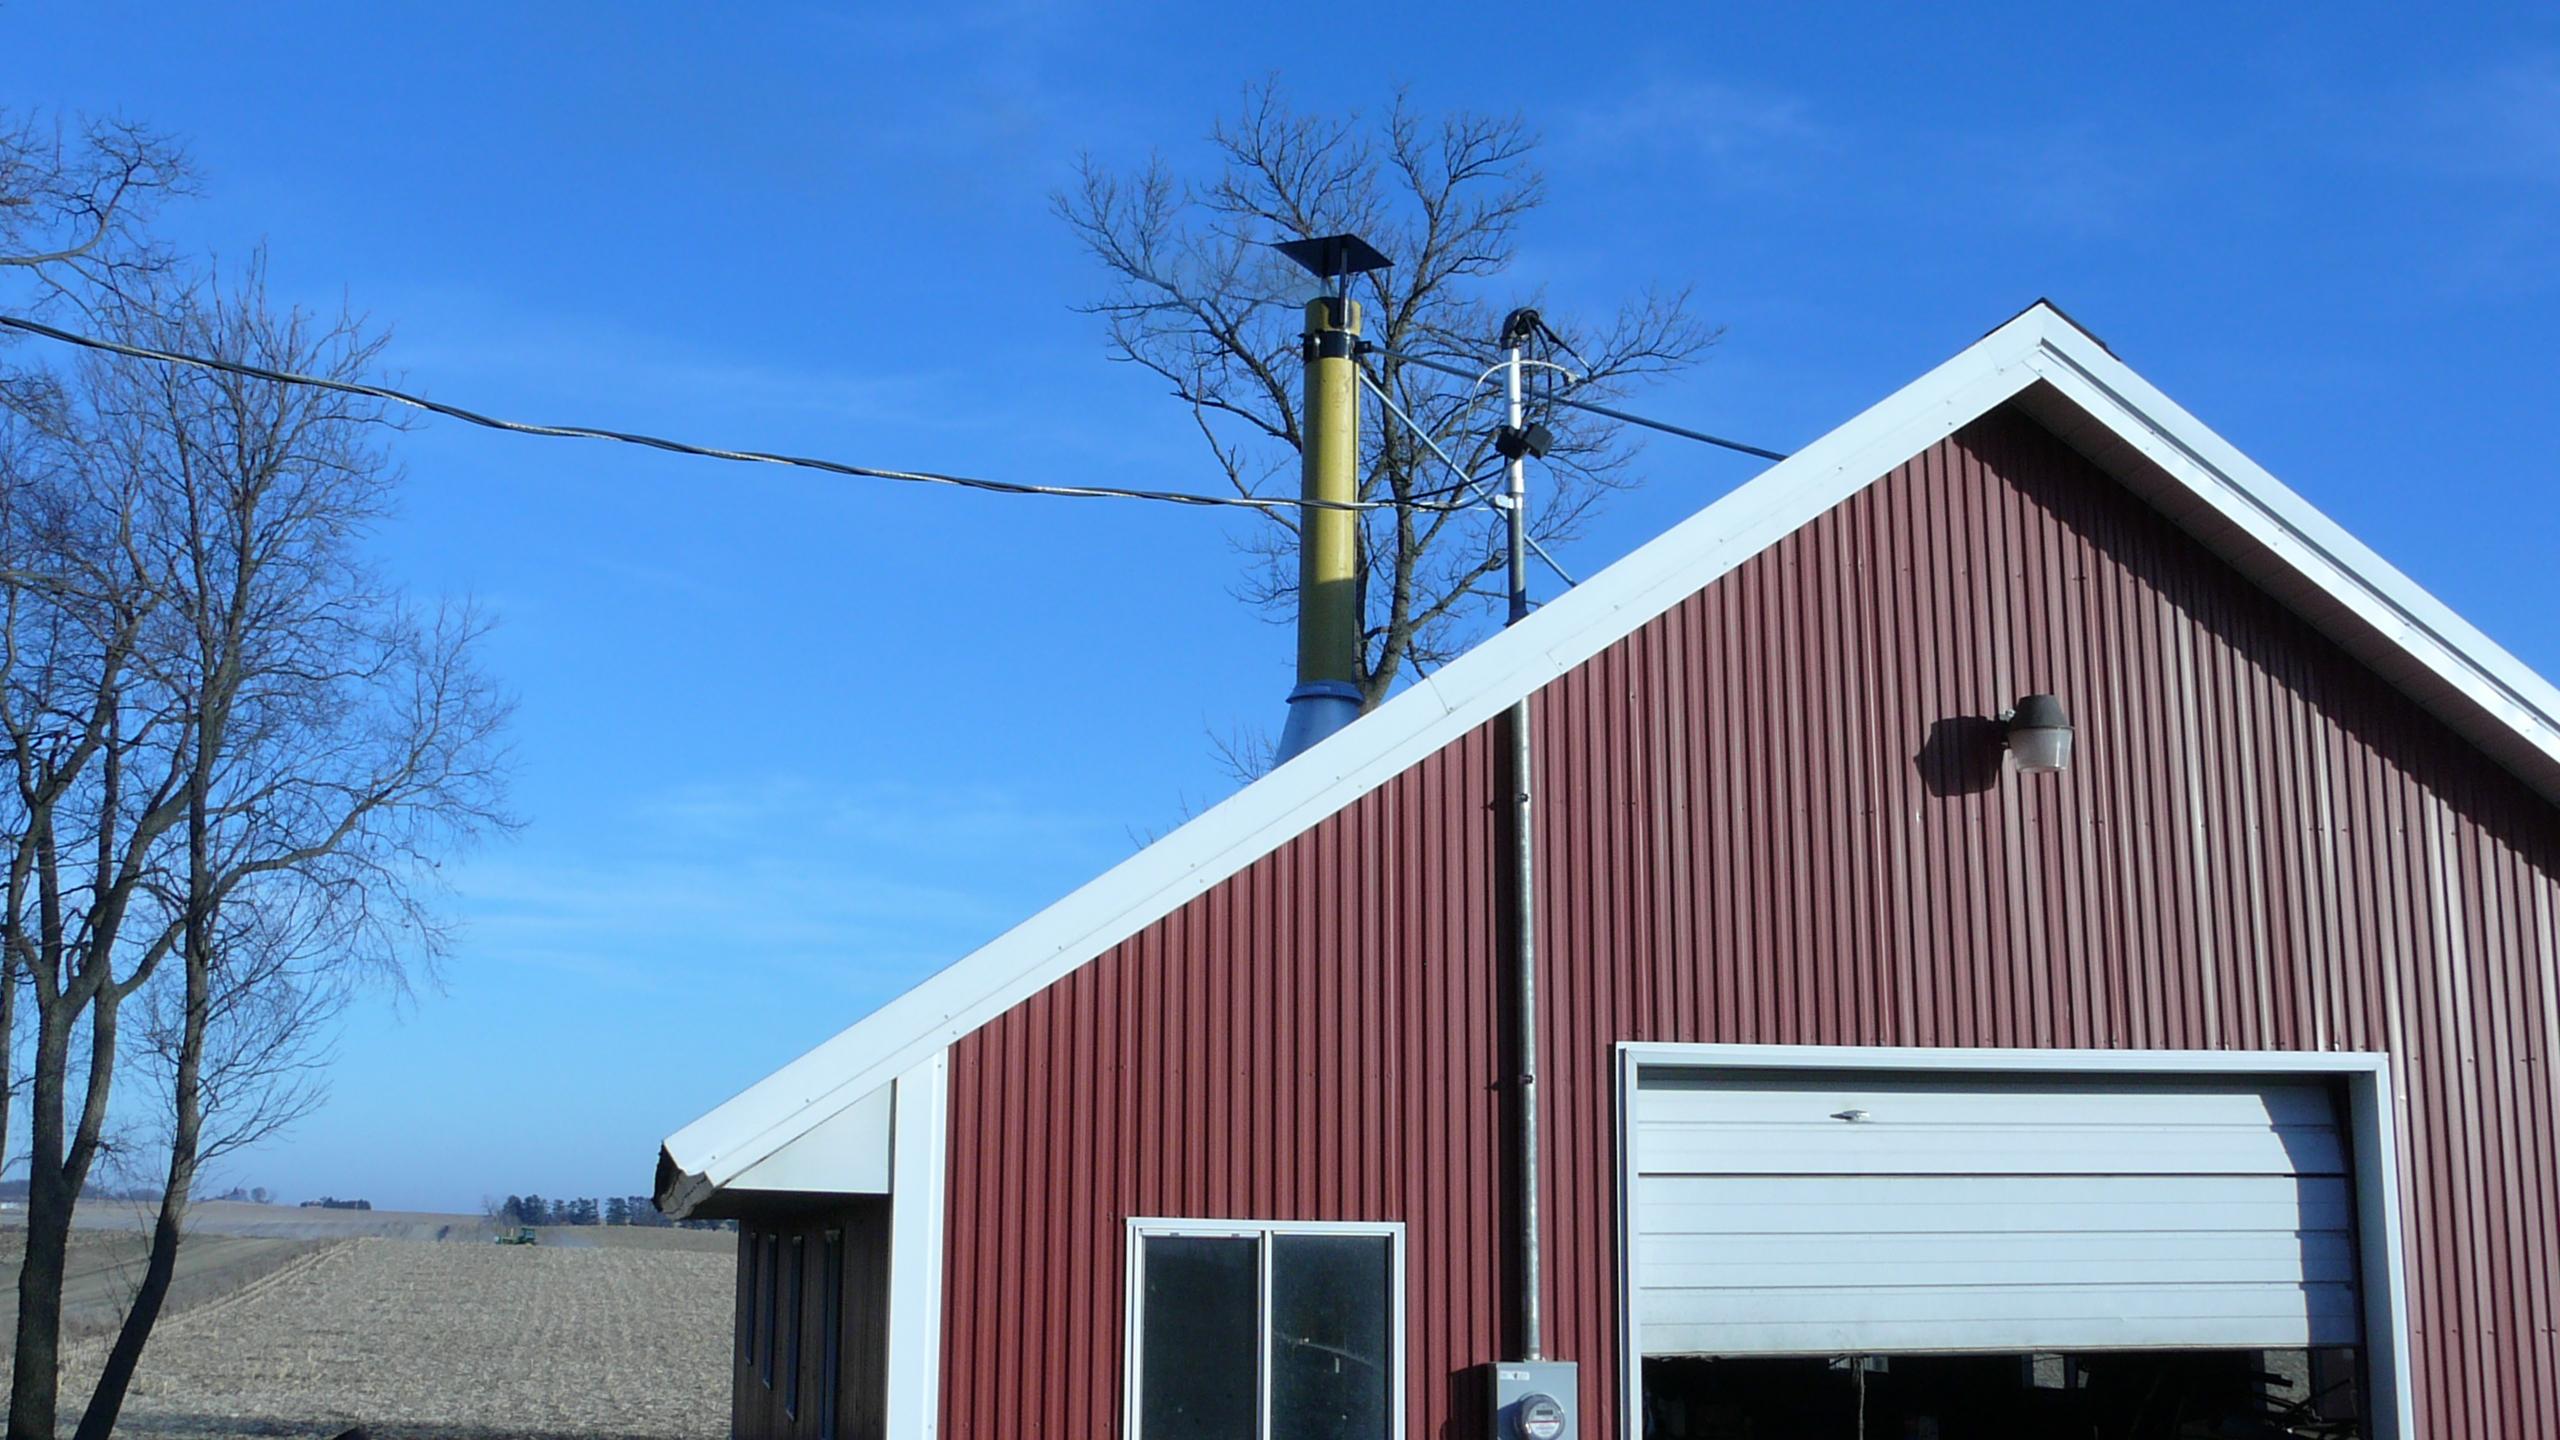
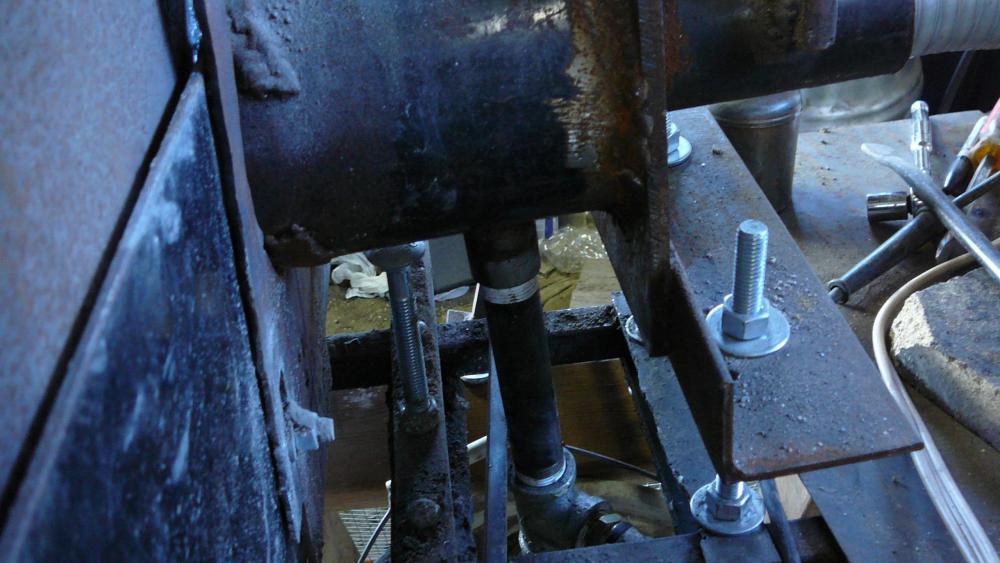
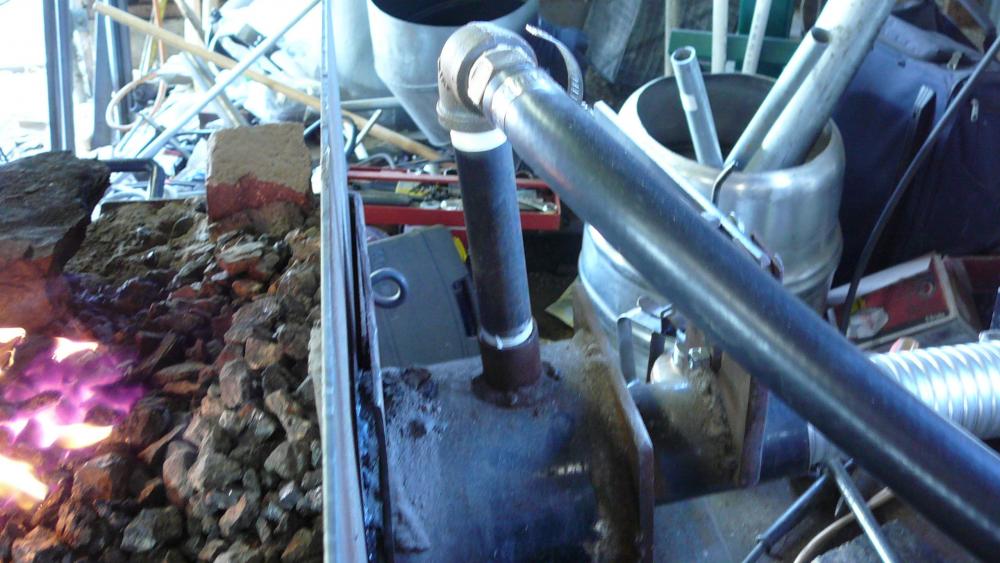
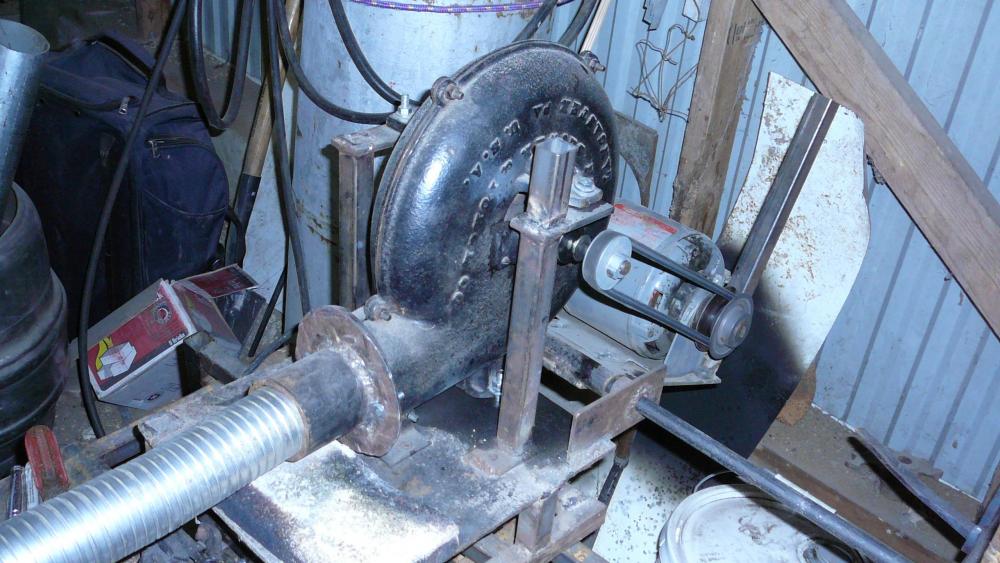
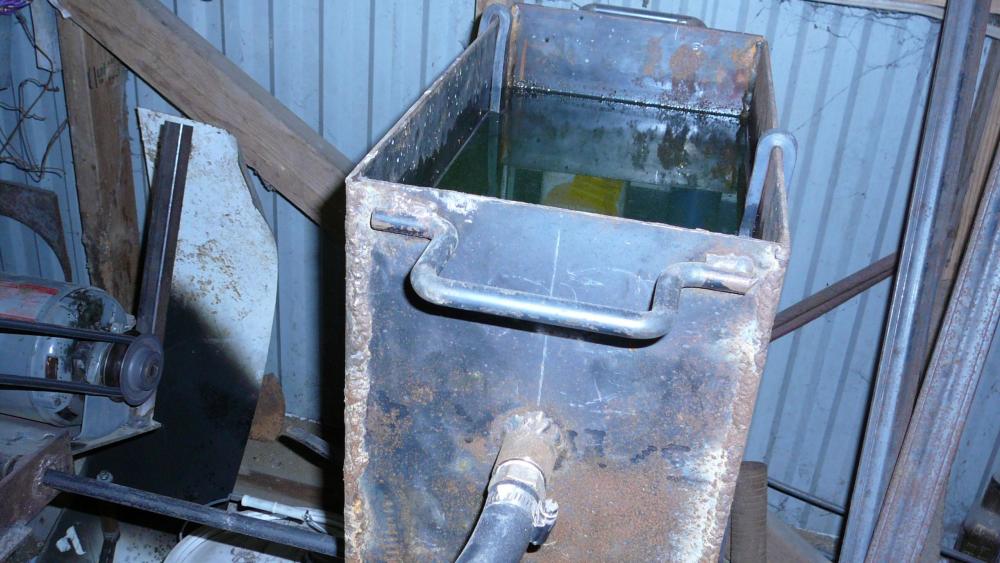
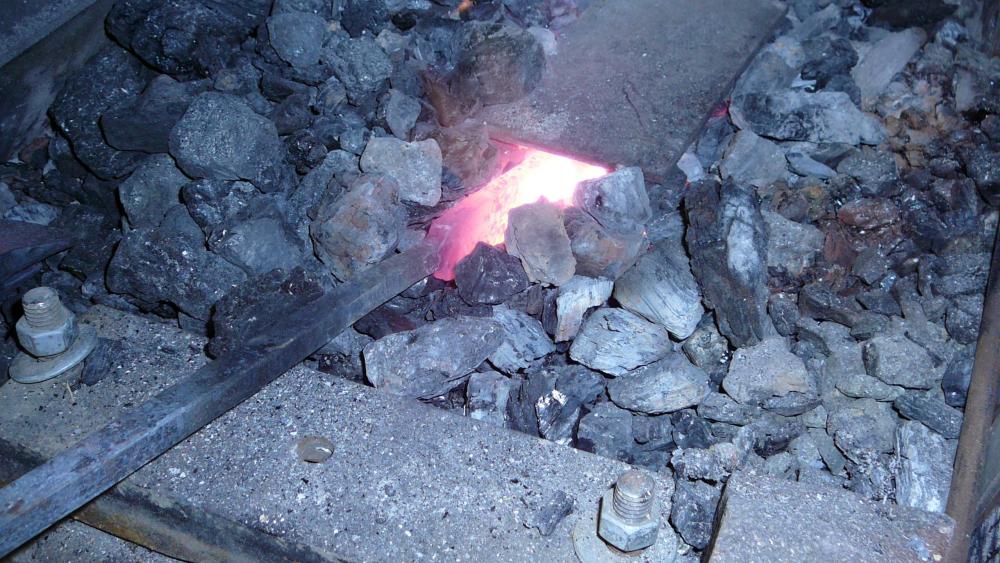
This is the Mark Aspery design Side Blast Forge with the Super Sucker Hood first fire test. The Hearth is 2' sq. by 9" deep. The Tuyere is Antifreeze cooled with the top hot pipe and bottom cold pipe connected to the Bosh by 7/8" ID hoses. The Bosh holds about 12 gal. of antifreeze and is mounted to be above the Tuyere. The Chimney is a 10" dia. Grain Auger Tube that had been scrapped. This is a permanent size forge. My criteria was to make the components of the forge weigh no more than 50#. To meet the goal the Bosh had to be separated from the Tuyere and connected via pluming. At initial start up, the smoke and flames were directed into the hood by placing a piece of sheet metal over the fire and leaned against the hood. Once the fire heated the hood, the draft pulled the fire into the hood which further heated the hood and chimney increasing the draw. The fuel was bituminous "Basement coal" that was removed from an old house. The coal ignited easily with a base of split sticks and ignited with a Propane Brush Burning Torch. The air supply was supplied by old Champion Blower and a 1/3hp motor. The Guillotine regulated the air supply along with using the ON?OFF switch. The coal was placed in the Hearth about 3"-4" deep over the wood ash bed both sides of the Duck's Nest. The Duck's Nest bottom is 4" below the center of the air outlet. The Hearth is filled with Wood Ashes which are tamped into a rather solid consistency. The Duck's Nest is 8" wide , 8" long and 6" deep. The green coal coked nicely but with a lot of smoke. Once the fire got hot enough, the smoke ignited. Except at start up, the smoke wasn't a problem. The Supper Sucker Hood lived up to it's name by sucking the flames and smoke in and up the chimney. The test item was a Twisted Damascus Knife blank. By positioning the blank in the fire, small portions or the entire blank was heated. As you can see from the picture of the blank in the fire, I cover the fire hot spot with a piece of steel plate. This forms an oven under the piece of steel which concentrated the heat where needed. To work on the knife tang, the blade portion of the blank was pushed thru and out the other side of the fire hot spot. The forge burn time was about 5 hours. Fresh green coal was raked into the fire as needed. Several sizable Clinkers formed below the Tuyere but it never interfered with the air flow or fire. The Bosh started to feel warm at the top but remained cold in the bottom 1/2 of the Bosh. At the end of the forging, the blower was turned off and the red hot coals raked out of the Duck's Nest. The fire went cold in about 20 min. Since the full was Bituminous coal, I was concerned that it would continue to burn consuming all the green coal. In conclusion, the Side Blast system outperformed the Bottom Draft Forge, especially in the clinker department. The forge has a small learning curve that must be mastered to be able to fully utilize its capability. The next test will bar forge welding. This is the Grain Auger Chimney with a flat sheet Top Hat. The flames being sucked into then Supper Sucker Hood This is the Cold Antifreeze pipe coming out the bottom of the Tuyere This is the Hot Antifreeze coming out of the top of the Tuyere. The Supper Sucker Hood positioned above the Heart This is the Blower system. The long silver flex pipe can be removed to cleat clinkers out of the Tuyere. also, the forge will be equipped with a Hand crank blower which will be connected to the Tuyere by redirecting the flex tube.to the hand crank blower. This is the Bosh. The Hot antifreeze tube is seen. The Cold tube is connected to the bottom of the tank. There is a drain faucet which is part of the bottom cold tube. This is the test knife being heated under the piece of steel plate. View of the Guillotine air control, the rear od the tuyere, the Hot Antifreeze pipe, and the fire in the Hearth.


-
For the test burn, a bed of cedar strips was laid and then Tractor Supply Anthracite Nut coal over the kindling. The Anthracite coal was also an experiment. I have Blacksmith coal, stoker coal, and very large chunk coal (baseball to football size). I bought about 700 # of "basement coal" that consists of 50% fines that pass thru a 1/2" mesh screen and 50% 1/2" to 3/4: size pieces. This will be the coal of choice after the fines are sifted out. The Anthracite coal burned with few clinkers, The forge easily heated a 1/2 test rod. I didn't like the location of my hot spot which was directly in front of the Tuyere's air outlet. I will pile the coal much higher for the next test. I also moved the area for the fire closer to the hood opening. This was done by sliding the forge forward. My Super Sucker Hood. Next test fire will reshape the Duck's Nest closer to what is pictured above, especially the long slope up to the hood entrance.. I will be taking pictures of the forge next firing when it warms up.
-
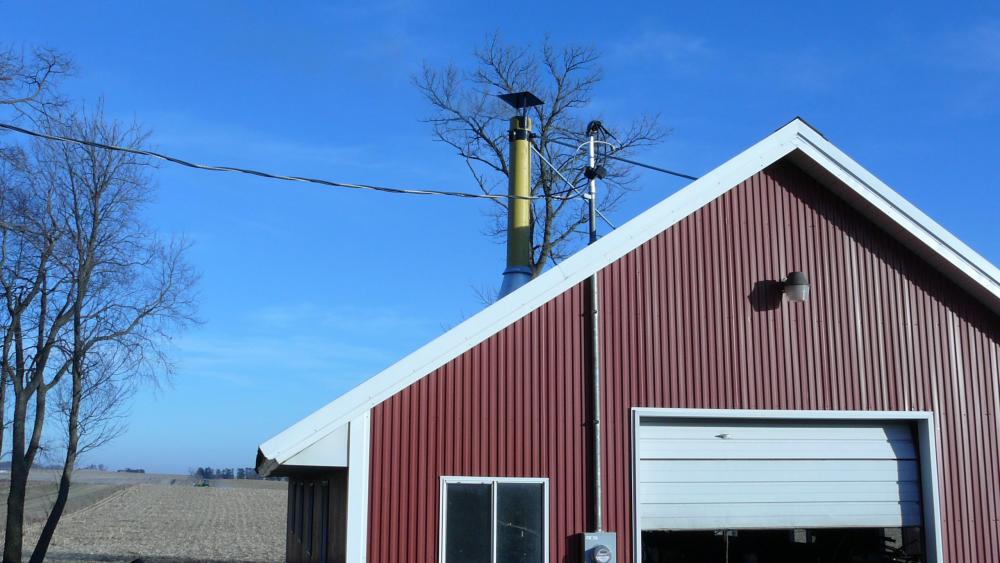
I just completed building a Mark Aspery style Side Blast Forge with a Supper Sucker Hood. the chimney is 10: diameter and terminates 4" above the roof peak. The Top Hat is 15" sq. and 11" above the end of the pipe. (The Chimney pipe is from a damaged grain auger ). The Hearth is lined with fire brick, sides and bottom. The interior is filled with wet Wood Ashes tamped down wet. The Hearth is 24" x 23" x 9" deep. The Tuyere is cooked with old antifreeze as the forge is in ab unheated building. The Bosh is a separate tank that connects to the Tuyere thru top and bottom hoses.. This system appears to work perfectly. Test Fire had the hot spot of the fire against the air tube,Tuyere. .My Hearth is full to the brim with wood ashes. Can anyone detail where the Duck's Nest should be made in relationship to the . I am burning coal, not charcoal or coke.
-
I was at Harbor Freight where I found a 20 ton Air powered Jack on sale for $89. The Air Supply hose had a hand held lever that allowed the air to enter the jack. To lower the jack, there was the traditional Cross Pin to turn. Has anyone tried a building a press out of a Air Powered Jack? if so, could you discuss what you made and how well it works.
-
I am also interested in building a box bellows system. Just thinking about the criteria of the Box bellows, the stroke should be relatively short, yet be easy to push/pull while delivering the needed volume of air to reach welding heat. I like your idea tp be able to pump from both sides. My current side blast forge set-up has the anvil and power hammer on one side and the vice on the other side. Currently I will be using an electric blower until the Box Bellows are built. I watched a video of a Japanese sward maker using a Box Bellows. It appeared that his normal stroke was a little over 2' but when he went to welding, the stroke was reduced to about 1' but with very fast strokes. The air blast in his forge didn't appear to be interrupted when welding as was with the full stroke used while forging. 18" x 18" x 20" stroke gives a 650 cubic inch volume per side. If adequate volume of air is achieved by short pumping the existing bellows, then increasing the piston to 21" x 21" decreasing the stroke to 13" per side you would have a volume of 570 cubic inches per side. I believe that a total in/out stroke length of 26" would be easier to manage than the 40" or longer full stroke. Short stroking the 18" x 18" piston would give much less air volume. The larger piston will increase the pumping effort unless all the air inlet and air outlet openings are enlarged to the maximum possible extent to reduce drag. . The air outlet pipe would likewise need to have the ID increased as large as possible. From what I have read, the box dimensions are determined by what can be made from a 4' x 8" sheet of plywood. Going with different box piston size and stroke length dimensions, probably will require more than one sheet.
-
Dry-welded, hand hammered pattern blade (8 photos)
hdvoyager319 replied to picker77's topic in Knife Making
I just viewed the best hammering technique as part of this video on Youtube. see: (That Works) "How to Forge Bevels on a Blade- the Right Way". The advice on hammering technique, shown in the last part of the video, should solve your or any one else wrist or elbow pain problems.. The anvil and hammer were dripping wet while forging the blade. Was water used to POP the scale off the blade while forging? -
Newbie, Gasser, Forge Welding, Sweat, Frustration
hdvoyager319 replied to wrickm's topic in Blacksmithing, General Discussion
Be observant, the borax may eat the insulation when it drips off the weld area. I haven't tried this yet, Clay Kitty Litter spread over the bottom of the forge will absorb the Borax or any other Flus. I am guessing that the clay won't melt at welding temperature. Any one else tried Clay type Kitty Litter to absorb flux drippings? If so, how did it work? -
I would love to place 36 or 40 grains of lead between the coon's eyes. But, they never expose themselves. That leaves trapping as my best option. Set spring loaded snares may work . And egg in the tube traps is an option also. I am going to set a trail camera to see what is happening while nom one is in the building. forge progress. I made the sleeve that will lock the outside chimney tube to the second tube section that ends just under the roof. As of now, the chimney is supported by a Come-a-Long. I think that the chimney base should have attachment loops welded on for cable/turnbuckle support on each of the 4 corners. That way, the chimney which is now bolted to then Super Sucker Hood could be free standing independent of the forge or any other support. That way, the forge could be relocated facing any quadrant. As of now, the forge is facing straight out from the wall which makes the power hammer very accessible and the leg vice. Several anvils would be located in strategic locations. Two smiths could work from opposite sides of the forge. The water cooled tuyere is positioned with the air outlet 1/3 the distance out from the back wall of the Hearth. That leaves 2/3rds of the forge free to build the Duck's Nest. The Hearth is 24" X 24" 9" deep. I haven't decided where to place the water tank. The best location may be over the outboard side of the Tuyere. The Super Sucker Hood is located on the side of the Hearth opposite the tuyere. The water tank is connected to the tuyere using 7/8" ID radiator tubing. By placing the tank high, both the top and bottom water connections will be above the tuyere. For the chimney Top Hat, the plan is to mount a flat 15" sq. steel plate, 11" above the top of the chimney. Just below the chimney top, two EMT tubes will be connected to a welded on bracket. The EMT will be spread 90 degrees to each other and be bolted to the roof peek.. I am slowly learning how to stick weld using a 110vac Forney inverter 100Amp welder. A 3/32", 6011 rod does a good job. My big problem is striking the ark. Once the arc is struck, I have very little problem keeping the arc going for the length of the rod. I have MIG welders in another building where there is 220 vac. Another handy tool is a Plasma Cutter. It beats cutting with gas and a saw.
-
WOW, thanks for the helpful suggestions on eliminating the coon and groundhog problem. I have several coon traps that are dog proof. The coon has to reach in a tube for the bait. Also, I have a live cage trap that hasn't worked very well in the past. The coon was able to steel the bait off the trap bait platform and get out leaving the trap door still open. I have spent many hours in the smithy and never saw a coon but I did get a glimpse of a groundhog. However, many times I hear the coon in the enclosed area under the roof eves where I can not get in for a shot. The 22 won't work unless I can get a look-see of the coon.. I keep a loaded 22 revolver in the smithy just incase a coon besoms visible for a shot. Since trapping season will be here in Dec.,my current thought is to get a trapper to set traps for the coon. The last time traps were set, I killed one of the sister-in laws cats in a conabare 220 trap. To play it safe, the tapper will need to use snares. I have a book on snares that may work for me to attempt to catch the coons.. A lesson in using moth balls to keep the critters away: I üst to go backpacking in bear, coon and porcupine country. Every night at camp, moth balls were spread a round the tent. The moth balls worked, no animal problems . Neighboring campers had their supplies destroyed by a coon and one time by a bear. Before using moth balls, we had our food supplies which were hung up between two trees taken by a smart bear and the coon raided the eating area even though there was nothing to eat.. The bear, coon, and porcupine problems were in the Adirondack mountains in N.Y. Before using the moth balls, I experienced a bear tripped on the tent guide rope and the coon rattled out cooking utensils looking for food. Another time a porcupine came up to the screen door on the back pack tent and was attempting to eat it's way in.. Smithy update: The inside portion of the chimney was erected yesterday. Next, the exterior portion of the chimney needs to have the tube junction clamp made and the Roofer hired to set the chimney up. I used a Come-a Long and several guiding roads to raise in one joined piece, over 100# of chimney tubing. It took a lot of thinking to work the chimney up between several beams to rest on the Super Sucker Hood. Stainless steel bolts will be used to make the attachment. I am one giant step closer to making the forge operational. I decided to splice a hand crank blower into the air system using a "T" adapter that I had made. The electric blower or the hand crank blower outlet can be blocked individually or they can be used together. The forge is now setting perpendicular in the shop. Now, I can chose to stand on either side of the forge. One side is 6' to the power hammer and the other side close to a huge leg vice mounted on a welding table. I have several large anvils that will be set up for each side. A small 70# Trenton will be the weld setting anvil located under 2' from the fire.. An added benefit is two smiths can be working off opposite sides of the fire, safely.
-
The cooling reservoir tank is secured to the forge table. The hinged steel lid will keep the coon and my sister-in-law's cats out of the antifreeze. There aren't any dogs in the area. Rest assured the antifreeze will be well secured against any animal intruders. I am glad that the antifreeze poison problem was brought up as I never thought of this problem. Now a little background information: I do have a coon and groundhog invasion in the smithy building. They have dug holes under the buildings footing, in the dirt floor and leave their foot prints everywhere including the seat on my tractor. My Smithy is in an old Hog House surrounded with corn and bean fields here in Iowa. The cats are a real big problem as I will catch it if any one of the cats get poisoned. The only way to keep the animals out is to concrete the floor of a 30' x 60' building, which would be nice but cost prohibitive. .For those who live in cities, the wild animals probably are not a big problem. But for those who live in the farm country, they can be a huge property damaging problem much more severe than just being a nuisance . They leave their piles of scats everywhere, Coon will break into a house thru a hole that they make and live in the attic, or basement. Over the past few years, the coon have chewed a entrance hole thru the roof, and baseboard in our farm house. The coon fur prices have been down for several years. As a result, the fur trapping isn't worth the effort. This accounts for part of the explosion of coon in the farm country.
-
I will make a steel lid to be placed over the tank so the coon can't get to the antifreeze.
-
Great!!! now the coon that have holes in the shop dirt floor may pass on to the next world without passing "GO"!
-
My forge building progress: Today the chimney portion inside the building was completed. It took two of us, a come-a-long and several ropes to lift the chimney bottom two sections into position. The connection joint is made by cutting a piece of the tubing into a 6" high piece with a 2" wide strip removed so the chimney section can be squeezed to be stuffed into the top of the chimney section. The section is then welded to the top end of the tube section to make the male joint. The Female section is made by making 8 each, 4" long slits in the bottom end of the tube. The tabs are pounded out. The two chimney sections are checked for a proper mating. A 3" wide clamping collar was made to go around the tubing joint. Since the Side Blast Forge is water cooled and winter is approaching I had two choices. a, fetch 10 gallons of water for the forging session and then drain the water when thru forging. b, go to used antifreeze. I opted for the used antifreeze that I got from the local car dealer. The antifreeze should not cause the steel tank and tuyere to rust. Antifreeze conducts heat a little better than water. ??Has any blacksmith used antifreeze to cool their Side Blast Forge?? If so, what is your evaluation of using antifreeze in stead of water? Is there any surprise problems associated with using antifreeze as a coolant? Are we having fun yet? Paul
-
I am left handed so having a box bellows that can be moved to accommodate either a left or right handed blacksmith or student will be a huge plus. How does a Box Bellows compare to a Traditional Bellows and to a rotary hand crank blower to maintain a hot forging and welding fire? The fuel I will be using is Anthracite Nut coal mixed 50/50 with Bituminous Blacksmith coal. I have tried the combination and found that it works. The Bituminous coal keeps the Anthracite coal burning, the flames from the Anthracite coal eats the smoke from the soft coal. They both coke nicely. Since the portable Side Blast Forge is in the planning stage, I don't know how much air will be required for forging and welding. Is the Box Bellows intermittent air blast a problem for welding? From the above comments, it is encouraging that the box bellows is very easy to pump. What are the bore and stroke dimensions of the box bellows that you use?
-
I am interested in building a Japanese Box Bellows. The Push Rod travels about 4' per stroke, push about 12,700 cubic inches of air per stroke, double action. Push/pull the PushRod 4' per stroke seams like ergonomics issuet because of the stroke length. Has anyone shortened the stroke by increasing the cross section area of the piston? A piston measuring 24" X 18" area would push about the same volume of air with a 29" stroke as by the 24" X 11" area with a 48" stroke. The air flaps would need to be increased in size to allow the free flow of air with the short stroke piston. The effort to move the piston may increase because of the increased area of the piston and the resistance of the outlet air tube's diameter. With the box bellows resting on the ground under the forge, the blacksmith could attach a vertical pivoting lever to the push rod to make pumping easier.. Add a counter weight system to the lever, all the blacksmith would need to do is pull the lever handle and the counter weights would push the piston back while forging. The forge fire wouldn't cool as much because air would be pumped continuously to the fire. The blacksmith would operate the lever back and forth to pump the needed volume of air to the fire. The bellows system would be positioned so a right or left handed blacksmith could pump the box bellows with their dominate arm. My forges, Rivet and stationary, have the rotary blower set up to the left of the forge for a right handed blacksmith. Being left handed, forging and cranking with the same arm is doubly tiring. Has anyone altered the box bellows piston size and/or changed operating push rod to operate with a lever as discussed above?
-
Dry-welded, hand hammered pattern blade (8 photos)
hdvoyager319 replied to picker77's topic in Knife Making
After reaching welding temperature, how long did you let the billet soak at welding temperature? Did you turn the billet over once the welding temperature was reached? What did the billet's surface look like at welding temperature?