picker77
-
Posts
212 -
Joined
-
Last visited
Content Type
Profiles
Forums
Articles
Gallery
Downloads
Events
Everything posted by picker77
-
Congrats, Nconoan! Nice job, that's some serious refractory. And I echo the Frosty attaboy, he's been a big help, as have a couple of his co-mudgeons. Yep, I was started down a similar build road, but it would probably have been close to cold weather by the time I was actually forging something, so I wimped out and went commercial. My new forge will be here tomorrow, will be picking up a 30 lb bottle from my friends at Home Depot this week to feed it. Building a mobile stand, and also need to mount my refurbed post vise. I've been reading about CO on the forum lately (!!). I've seen hundreds of photos of gas forges being run full blast inside shops on the forum, but little mention of CO concerns or precautions - seems most folks don't seem to worry much about it. Anyway, being increasingly cautious in my "get off my lawn" years (too soon old, too late smart), I'm picking up a a digital CO detector today. I might even also revise the plan for my intended work area a bit because of CO concerns, as in move the forge location just outside the shop when it's being used. It would really tick me off to foolishly shorten the limited play time I have left on this planet. Forge on, looking forward to joining you, and don't forget a CO detector.
-
Would have gone with neon green, but all the neon paint formulations I've seen fade rapidly, especially outside, and unfortunately neon green fades to something resembling baby poop yellow, which I always figured is where Caterpillar originally got the idea for their paint. P.S. You scared me with the photo posting thing, so I re-thunk.
-
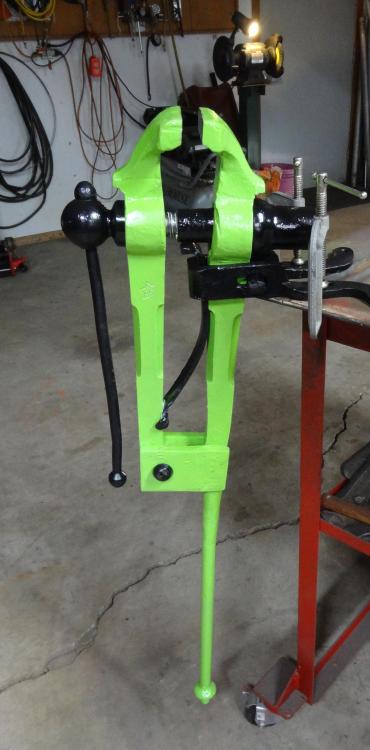
Neither, Chris. I just have an understanding wife, and I also don't mind selling a toy to get a different toy, lol. Yep, it's getting there, CGL, sure will be happy to get my hands on the little Diamondback Knifemaker forge, maybe next week if Diamondback & Fedex get off the dime. And TP, that's a fine idea. I'd hate to get this fine looking vise wet. Speaking of fine looking, the paint job is done, so put on your Shade 3's and hide the womenfolk and kids, because here it is: I never was one for muted colors...
-
I'm of the age that I value my time more than I used to, Frosty, and you're right that time was a factor. Not to worry, I'll continue to wear you guys out with questions. Right now I'm starting to research an idle circuit for this little forge, which seems to me to be practically a necessity - but there doesn't seem to be a lot of specific cookbook how-to info out there on actually putting one together. Could this be an opportunity for a new Frosty PDF file? Heh. I did see a diagram on Ron Riel's website, but that's it so far. Larry Zoeller has a kit of parts to build what looks like a fairly complex idler circuit for $75, but there's no indication that any instructions are included with his kit. Lots to learn yet!
-
Thanks, Mikey. I'll check it out.
-
IFC, if I read their website correctly they don't require any further work, other than a trip to the propane tank store. "Exterior dimensions are 9 1/4" long, 7 1/4" wide and 7 1/2" high, Interior dimensions are 9" long, 4 1/2" wide and 3 1/4" high, End Openings are 4 1/2" wide x 2" high. There is an opening at each end of this unit to allow long stock to pass through. The liner is lightweight refractory, with the burner flares cut into the refractory material. The walls and ceiling are insulated with Ceramic Hardboard. The floor uses a dense refractory brick to handle the high mechanical wear the floor must endure. The floor is easily replaced without having to take the Forge apart, it simply slides out the end openings" I'll know for sure sometime next week.
-
Just ordered the single burner version of the Diamondback "Knifemaker/Welding" forge. Wanted the idler valve kit but not in stock. Guess I can add it later.
-
She’s in the paint shop right now, I will reveal her in glorious Technicolor tomorrow. Still mulling over mounting options, thanks for the tips.
-
Thanks Mikey, I’ve read a lot of your stuff and I value your opinion. It was really a no-brainer when I took time to think about it and was honest with myself about what I really wanted. I very much want to learn to forge, but learning all the ins and outs and little niggles of proper forge building, although interesting, is way down my list.
-
Thank you, Frosty. In the last hour or so I did a little exercise. I totaled up the projected cost of actual materials, item by item, including shipping costs, tax, etc. of everything I could think of that I'd need to buy in order to build a two-burner forge (purchasing everything new, without scrounging around for junk parts, using salvage materials, cutting up barrels or old tanks, etc.). The total, which was quite an eye-opener, came to just about $400. A Diamondback 2-burner "Knifemaker/Welding" model is $440 plus about $50 shipping, delivered to my door by Fedex and ready to hook up to a tank and use. Considering the time and effort required to put my home built version together, even if I had all the materials sitting in front of me right now, and considering that my end product may or may not work well and efficiently because I've never done this, it makes no economic sense whatsoever to continue down this home-built path for my first forge, when for about the same money I could be actually forging next week with a well-known and proven commercial unit. So I think I'm gonna order a Diamondback and start learning to forge instead of learning to build forges. When I have gained enough experience and skill down the road to see a reasonable need for a second "specialty" forge of some type in my shop, I should be able to build what I need quickly and with a lot of confidence it will work. But for now, I think it makes more sense to actually learn to forge starting right away using a good, proven forge rather than spend a lot of money and effort to build one myself over the next month or two, especially given the economic considerations.
-
Frosty, I see the general rule of thumb everywhere of 350 cu in of volume per burner, which raises a question: With my current penciled-up forge plans (9x9x16 shell, two layers of wool, Kast-O-Lite, Matrikote, and a 1/2" high alumina kiln shelf floor, I'm ciphering almost exactly 350 cu in of volume. That puts me right on the fence between one or two burners. I'll do mostly hammering out knives and small work, but would like to have the option to learn to forge weld, with an eye toward eventually doing some San Mar sandwich knives, maybe trying some bicycle chain or ball bearing damascus, and even experimenting with layered kitchen cutlery a la Japanese style. Since I'm sitting on this 350ci volume fence, which way ought I be leaning? I don't want to simply waste fuel most of the time, and a simple single burner setup is very attractive in my mind, but I'm concerned I might run out of horsepower when I get into trying to forge weld and I don't want to limit capability to do that right out of the gate. Sage advice, please?
-

Took a wild chance today on a 100# Kohlswa
picker77 replied to picker77's topic in Anvils, Swage Blocks, and Mandrels
Thanks, Frosty. How's that? Can't compare to yours, very few moose around Oklahoma, but I could probably scare up an armadillo or maybe a coyote or two. -
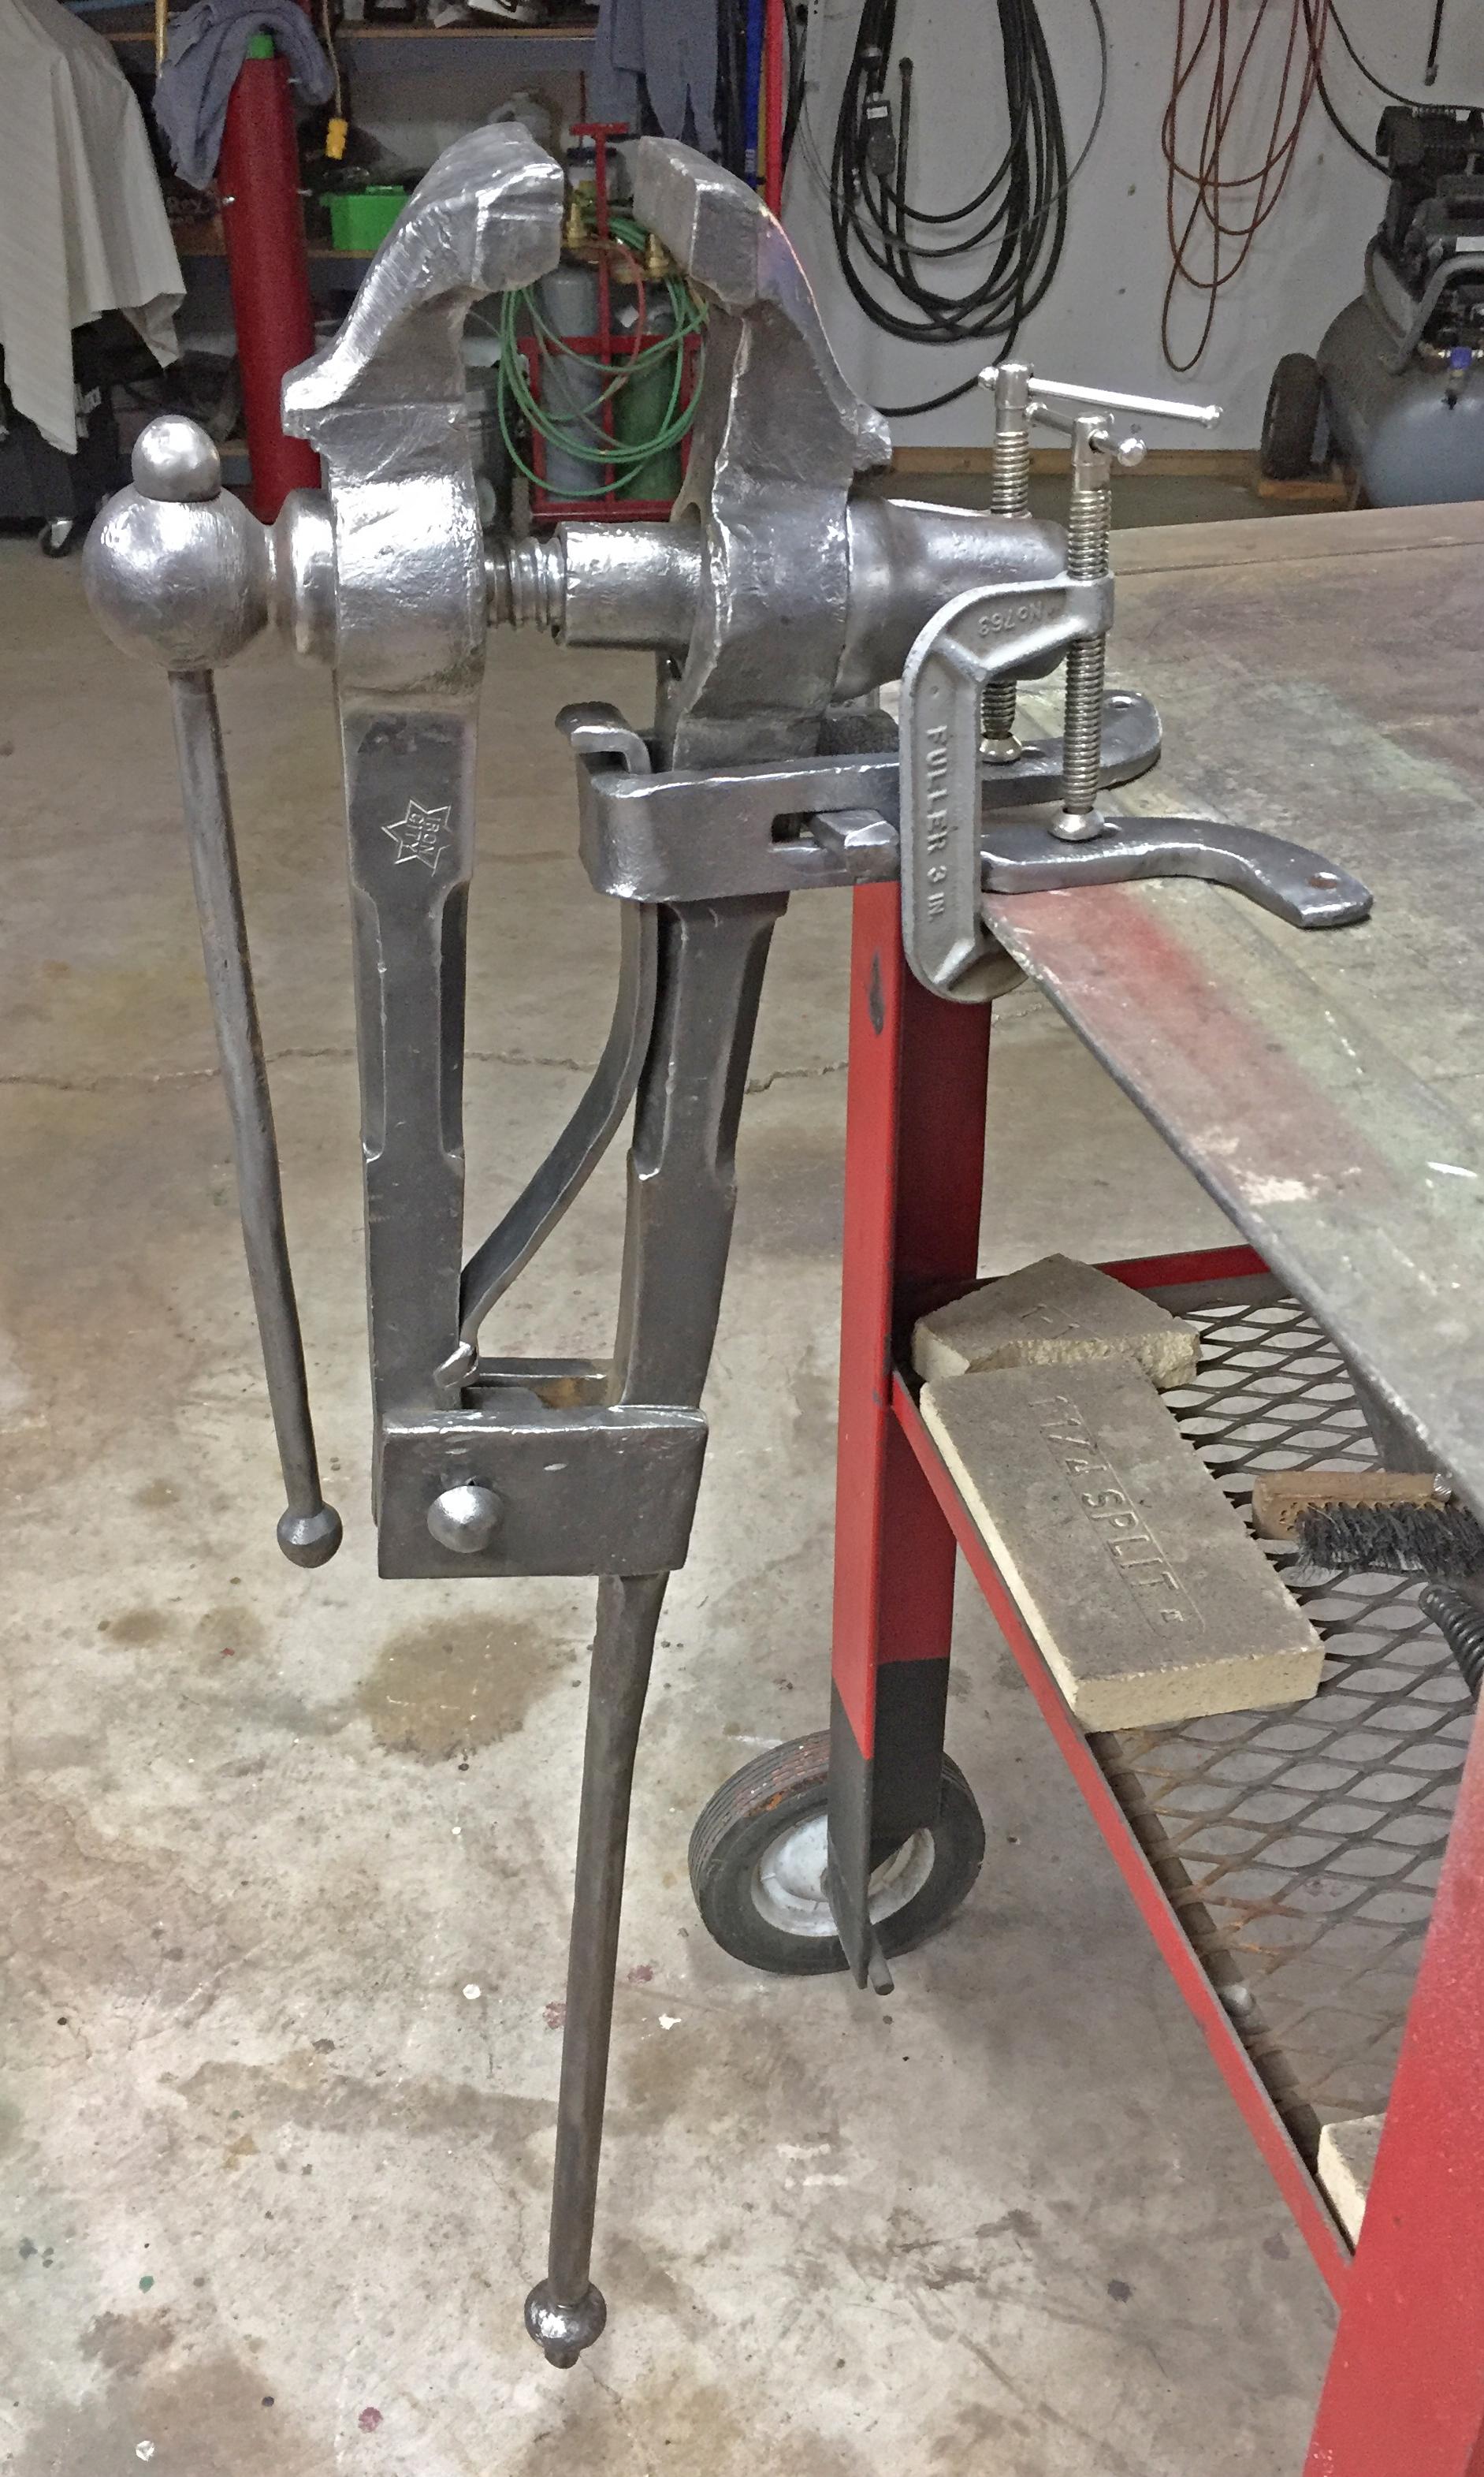
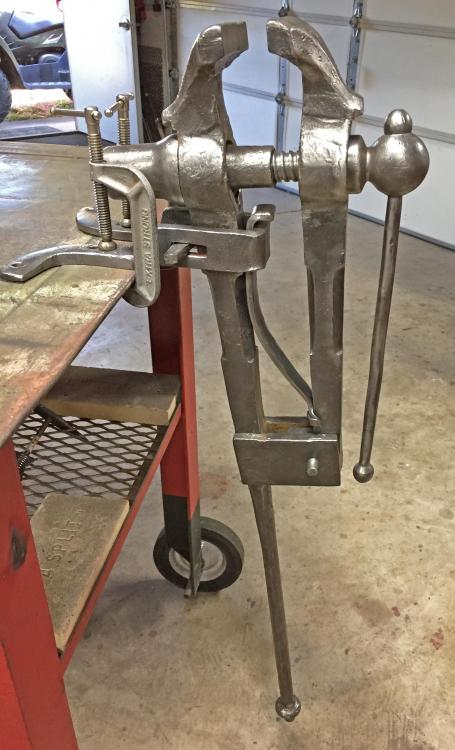
I was happy to run across this one, killbox. I've never heard a discouraging word about Iron City vises, and I'm sure I'm going to like this one. Serious smiths generally prefer the bigger ones like yours, but I have no real need in the foreseeable future for a larger one. These things are basic engineering at its best. I love the simple, logical way post vises are designed, and the ease with which they can be disassembled. Two quick raps with a hammer, no wrench needed, and it's apart, but when assembled (again, two hammer raps to lock it together) it's solid as a little granite boulder.
-
Picked up a very nice little 4" Iron City post vise yesterday at a decent price for my area ($110), from a retired farmer about my age who recently moved to town for health reasons, but couldn't bear to leave some of his favorite tools behind for the auction vultures. Got it cleaned up a little this morning and I think it's going to be just the right size for what I need. It will probably spend most of it's life here outside, so I'll probably paint it. Threads are very good, vertical alignment is excellent, horizontal is off about 1/8" and I'm leaving it at that. The little SOB bit me before I even got it out of the truck, I suppose to show me right off the bat who's boss. Got away easy with only a small blood blister and a bit of language, excellent lesson learned.

-
Took a wild chance today on a 100# Kohlswa
picker77 replied to picker77's topic in Anvils, Swage Blocks, and Mandrels
These are all useful ideas for shops with relatively smooth floors, but sadly 35 years of cracks and settling have taken their toll on the front 25 x25 section of my concrete slab. My shop is 25 x 55 but the front 25 x 25 was added after the original build, and poorly done, probably a DIY job by the previous owner. He cheaped out on rebar, and/or did a crappy job of ground prep before the pour, so cracking/settling has been a problem, and rolling things need a pretty forgiving clearance to keep from hanging up on one of several miniature grand canyons. I have one of those foot pedal hoist up/roll-around bases under my table saw, but it lifts the legs well over an inch, so it works ok. Looking back, I clearly didn't think this caster thing through, probably because I'm so used to putting wheels on literally everything around my shop, ha. Likely I'll end up just replacing the casters with leg extensions and using a cart if I want to maintain the current anvil height. Of course, should 39" anvil height prove too tall, then the caster problem becomes a non-problem, because I'd simply cut them off and trim the front leg to match, dropping overall height almost 3". Picked up a pretty nice little Iron City 4" post vise yesterday for a decent price, will post photos in the Vise forum. Still working on plans for the gas forge, been kinda re-thinking the need for two burners for what I want to do, in addition to refractory stuff being a little intimidating to a newbie forge builder like me. How do I get something to appear with my posts instead of the initial "P"? -
Took a wild chance today on a 100# Kohlswa
picker77 replied to picker77's topic in Anvils, Swage Blocks, and Mandrels
Thanks, Goat Lady. If you go metal, the heavy duty tripod thing does work well (but I'd go for 20 degrees vice 15 on the leg slant if I did it again). G'day, ausfire, I have no clue on the age. Steve Sells has one of these also, and I believe his copy is marked the same as mine (and probably yours): "45" and "Kohlswa Sweden", no other discernible markings. Steve's version wasn't used for chisel practice all over the sides, either, like mine was. But at least they didn't use the face, so I guess I shouldn't complain. I need to do a little homework on the origin of the Kohlswa brand. -
Took a wild chance today on a 100# Kohlswa
picker77 replied to picker77's topic in Anvils, Swage Blocks, and Mandrels
Thanks to you both for the nice comments. Dang, Frosty - I'm embarrassed I didn't think of using the hardy hole for a steering handle. Sheesh. I overthink everything these days. -
Took a wild chance today on a 100# Kohlswa
picker77 replied to picker77's topic in Anvils, Swage Blocks, and Mandrels
Ok, finally done. I promise this is the last photo of this thing.
-
Took a wild chance today on a 100# Kohlswa
picker77 replied to picker77's topic in Anvils, Swage Blocks, and Mandrels
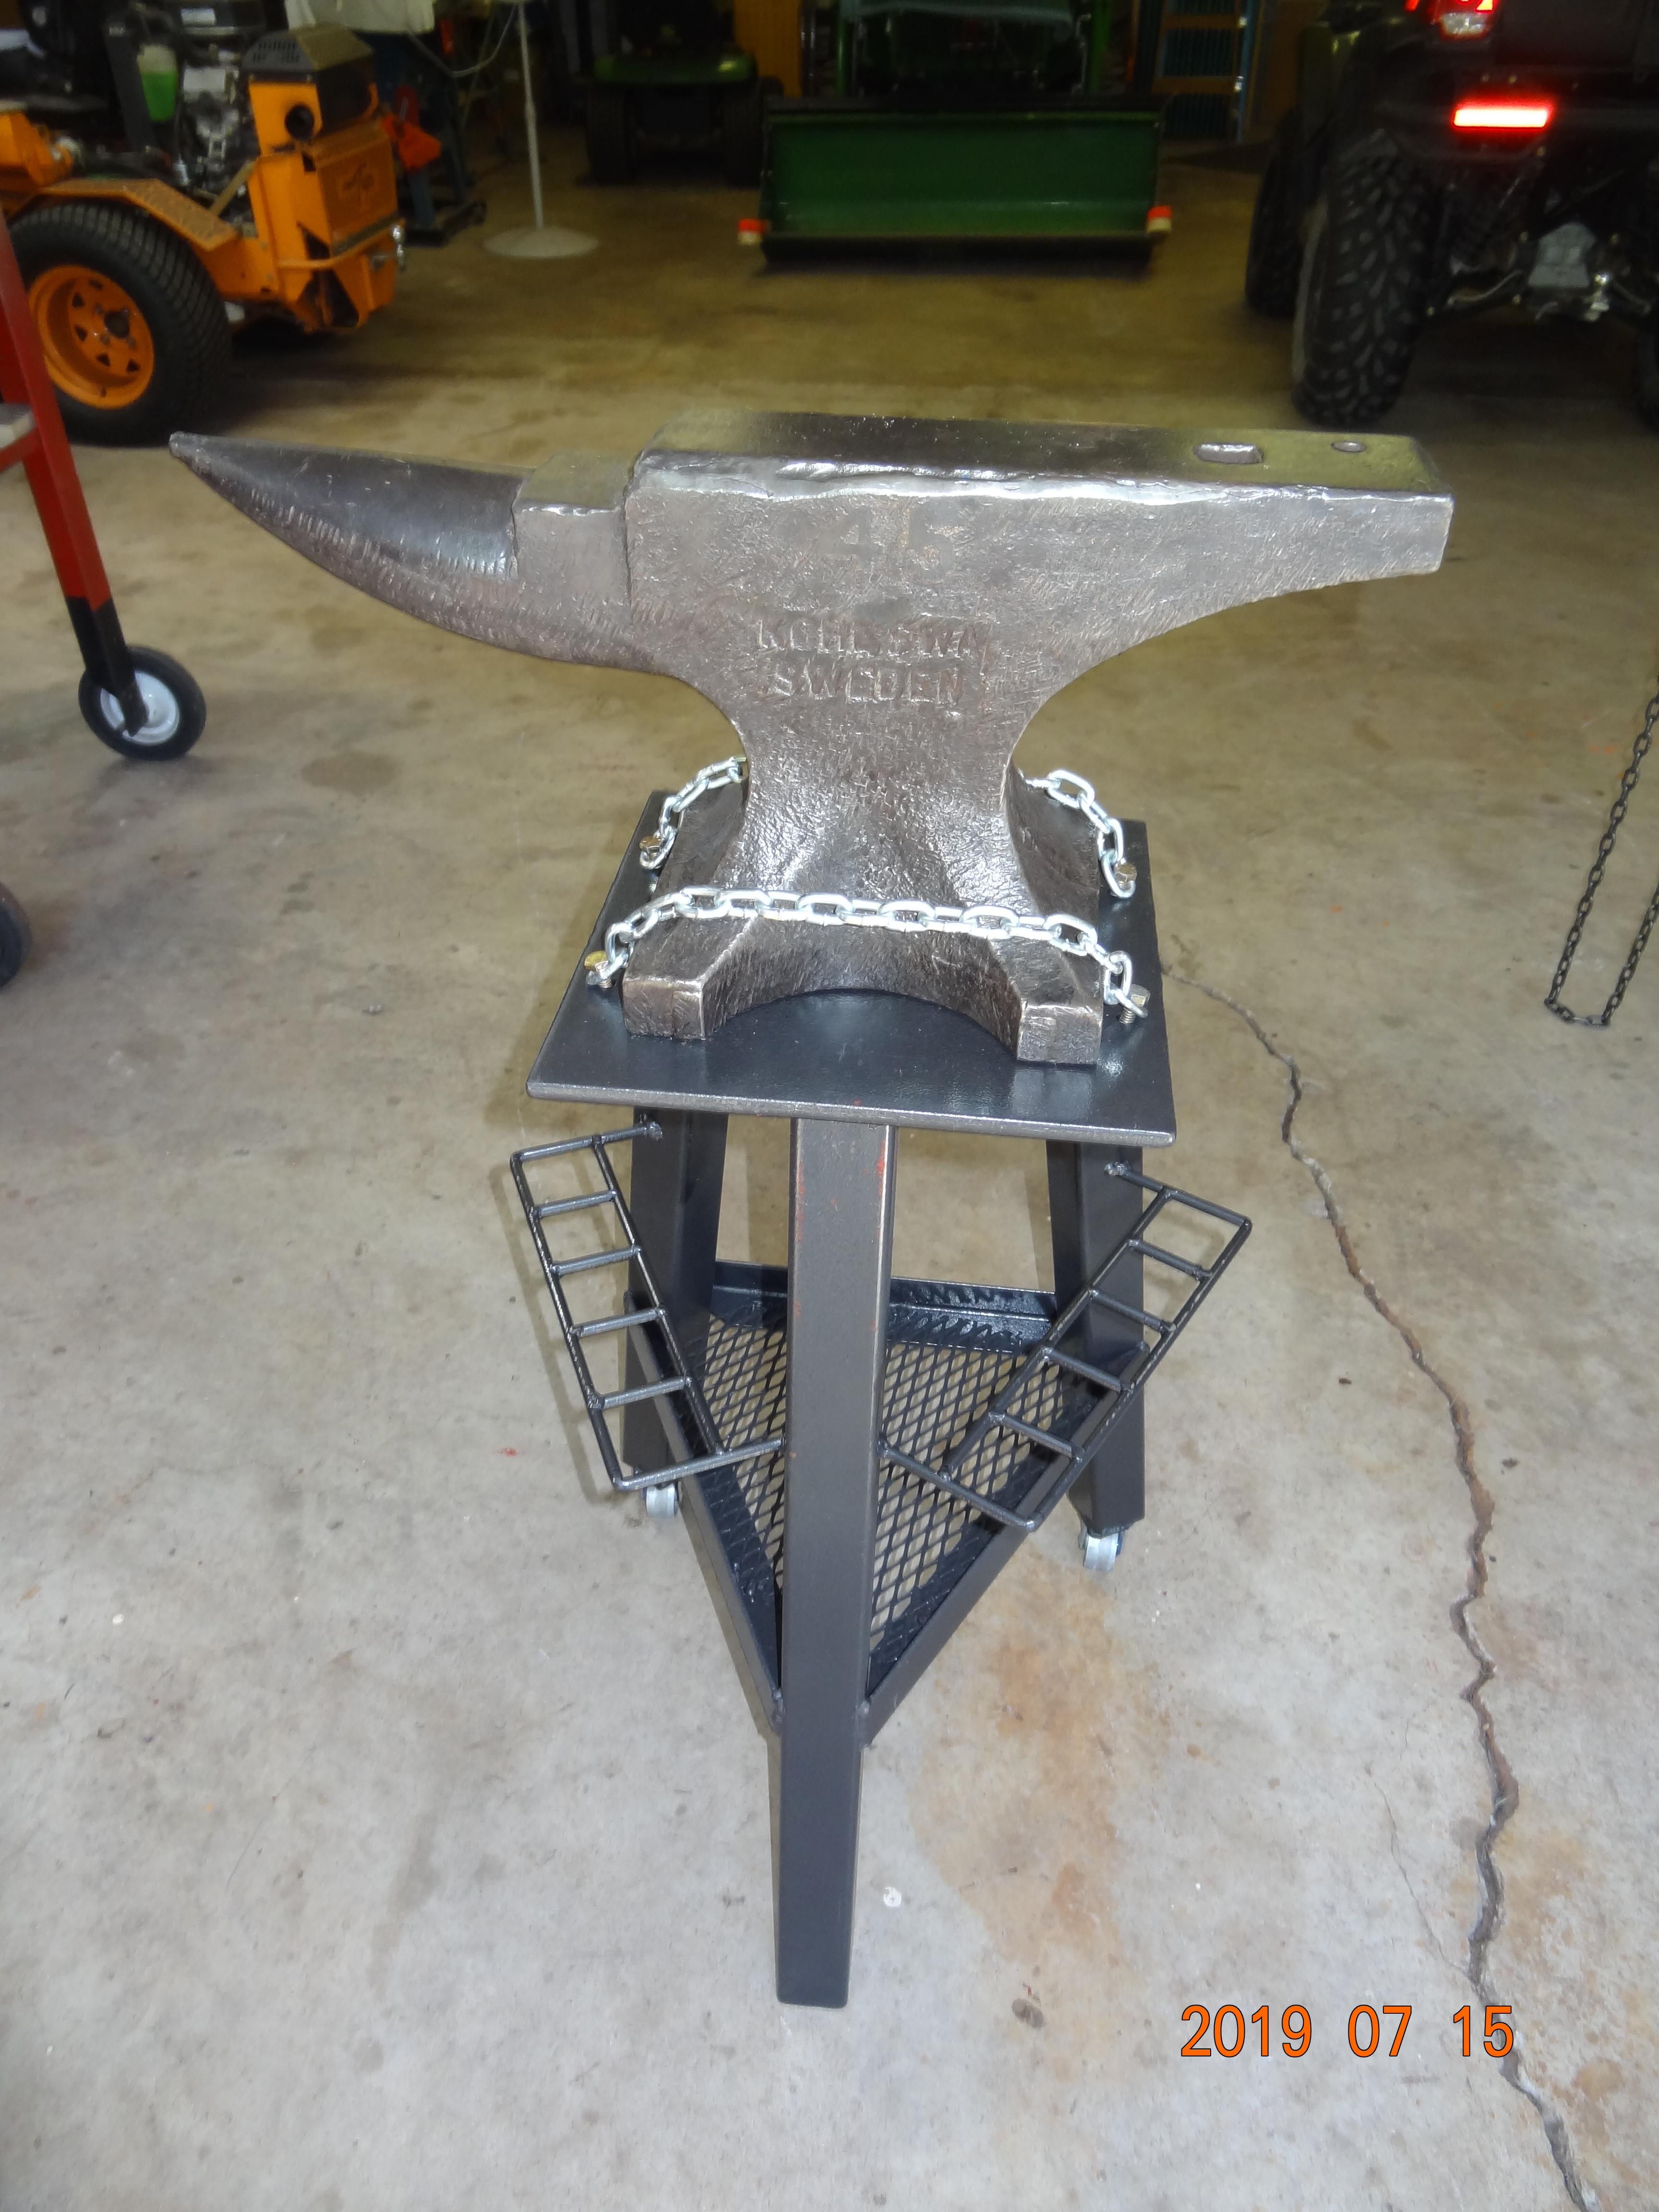
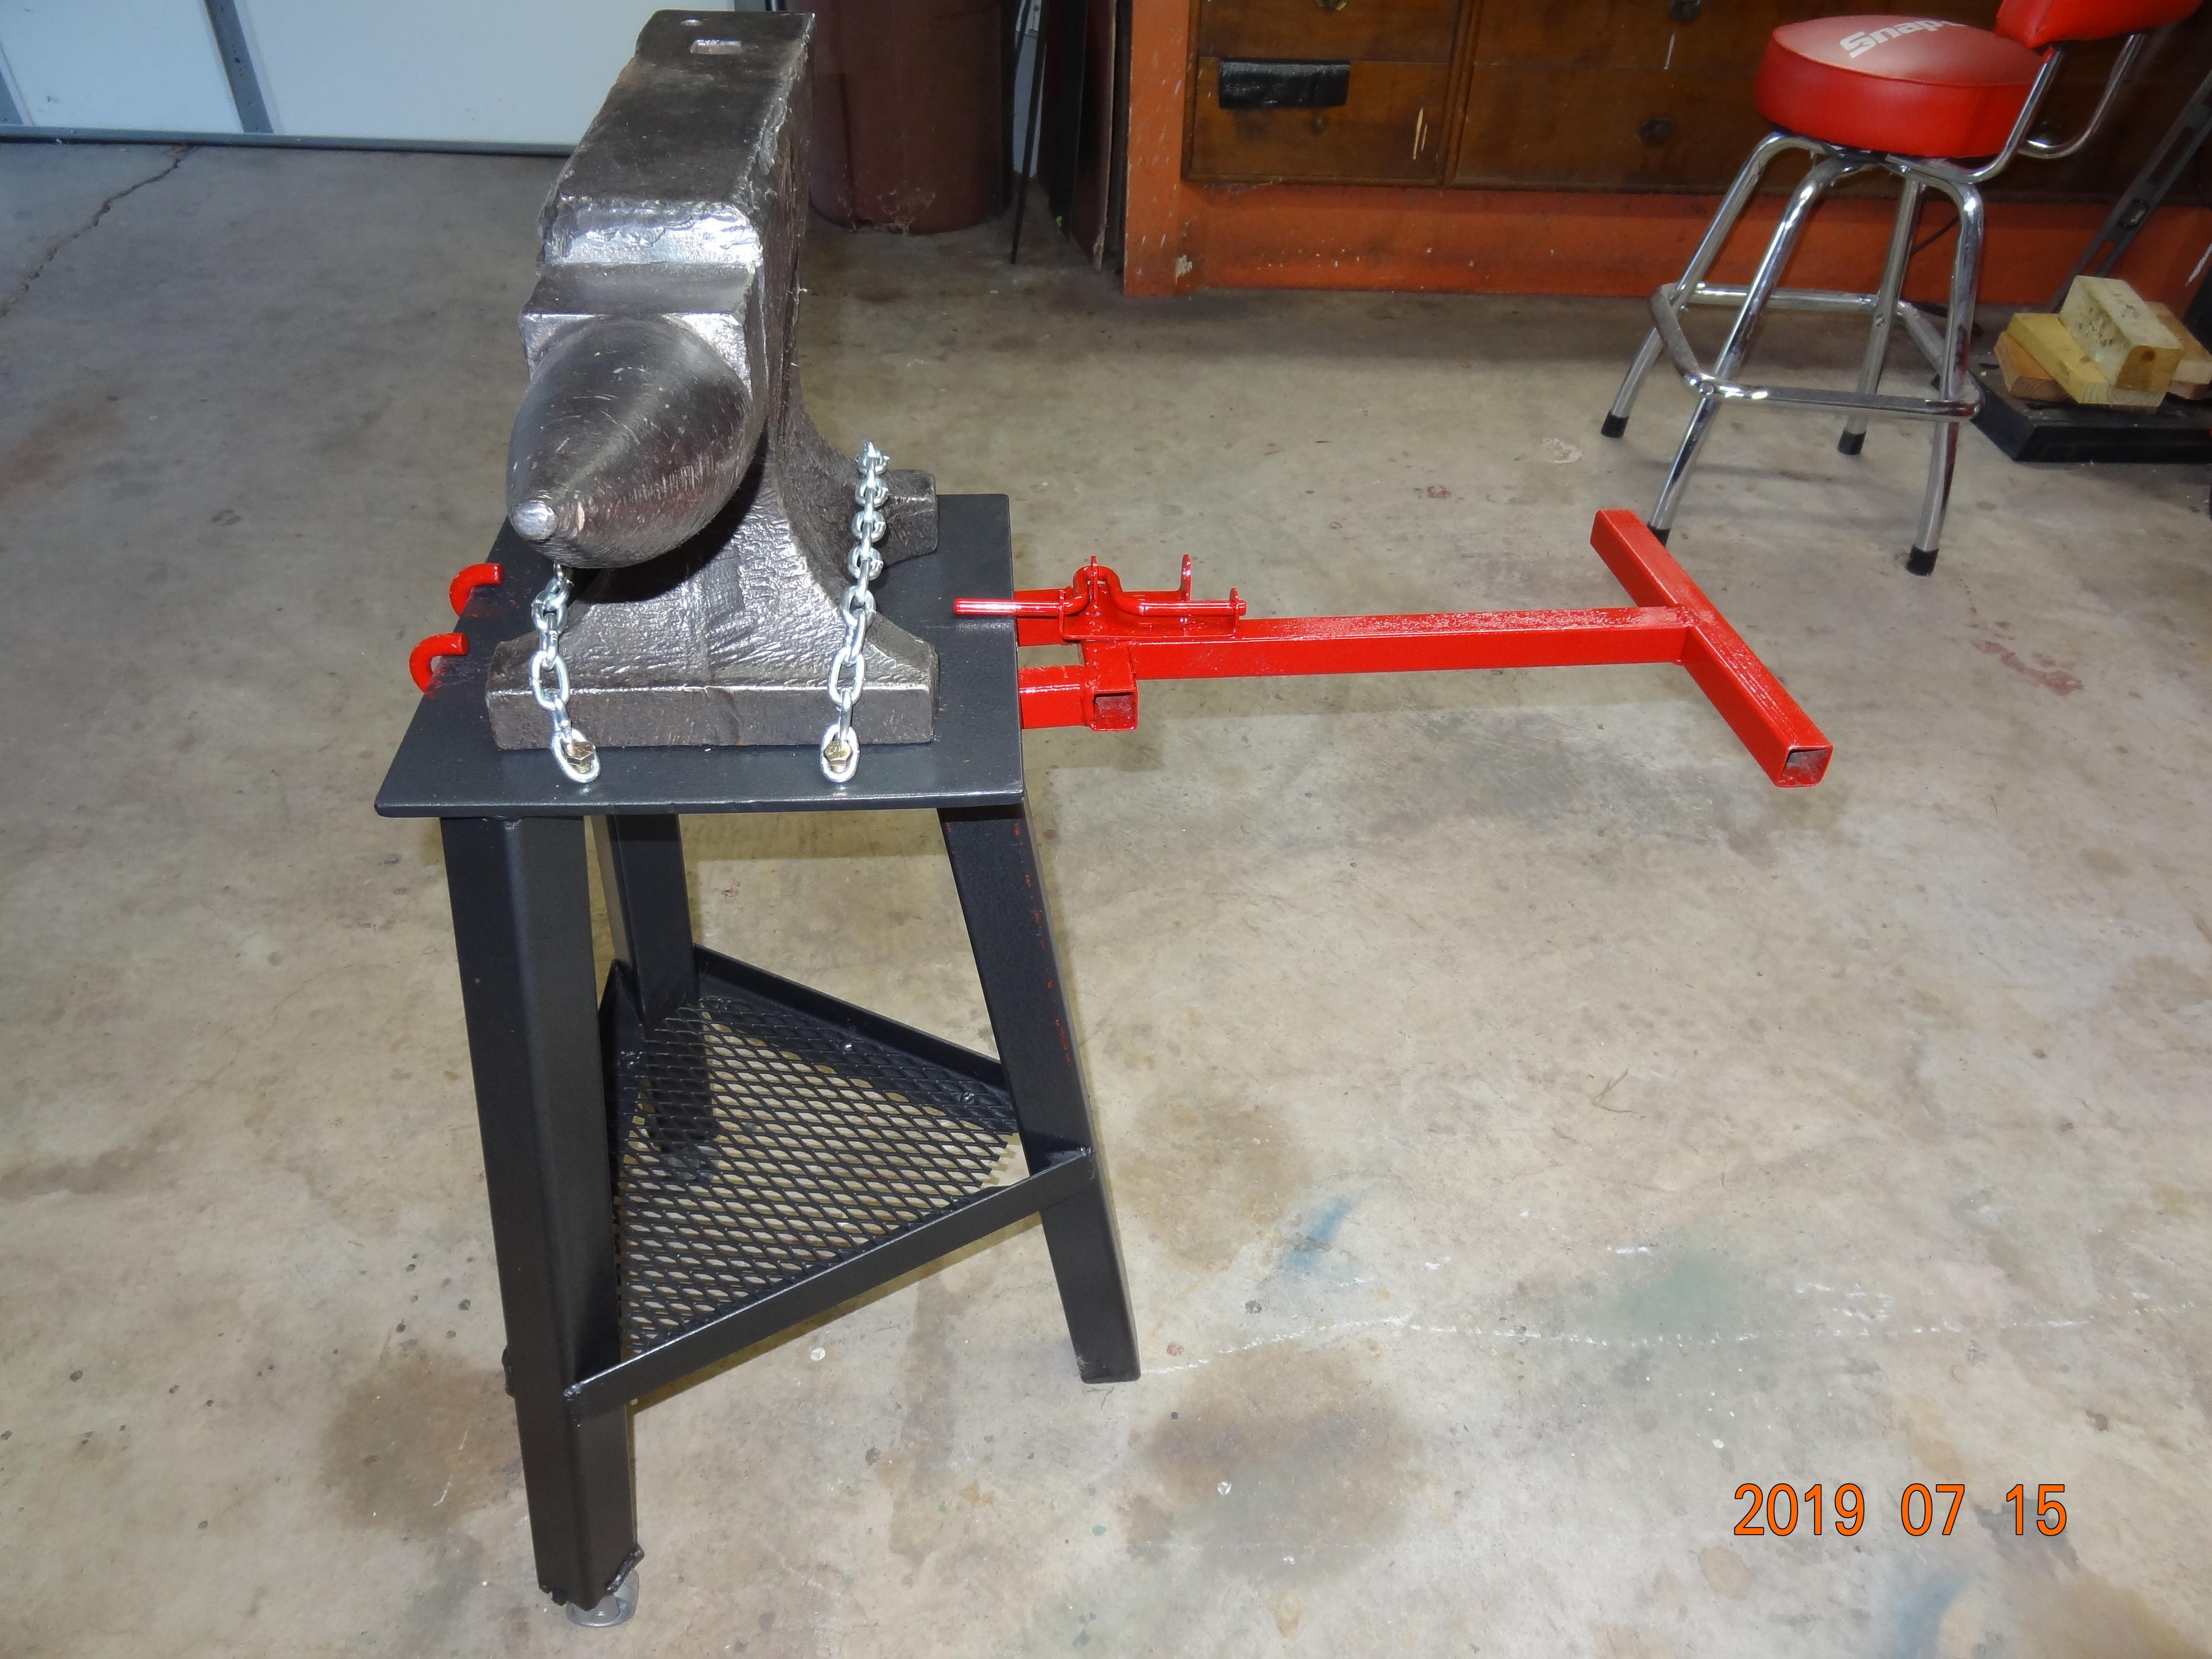
I expect to have to move it around often, would rather be able to grab & drag it around rather than mess with the cart each time. I cobbled up a Rube Goldberg "lifter/dragger" that latches onto the 3/8" plate, and makes it easy to lift the front leg off the concrete an inch or so and lead it around using the casters without messing with all those titanium screws in my 78 year old back. I'll try it this way for a while and if the casters prove out badly I'll replace them with a 2" piece of something and use one of the carts. Wouldn't even have tried this method with a heavier anvil. This little rig including the stand tops out at less than150 lb, or about half or less what many real blacksmith anvils weigh without a stand, ha.
-
Took a wild chance today on a 100# Kohlswa
picker77 replied to picker77's topic in Anvils, Swage Blocks, and Mandrels
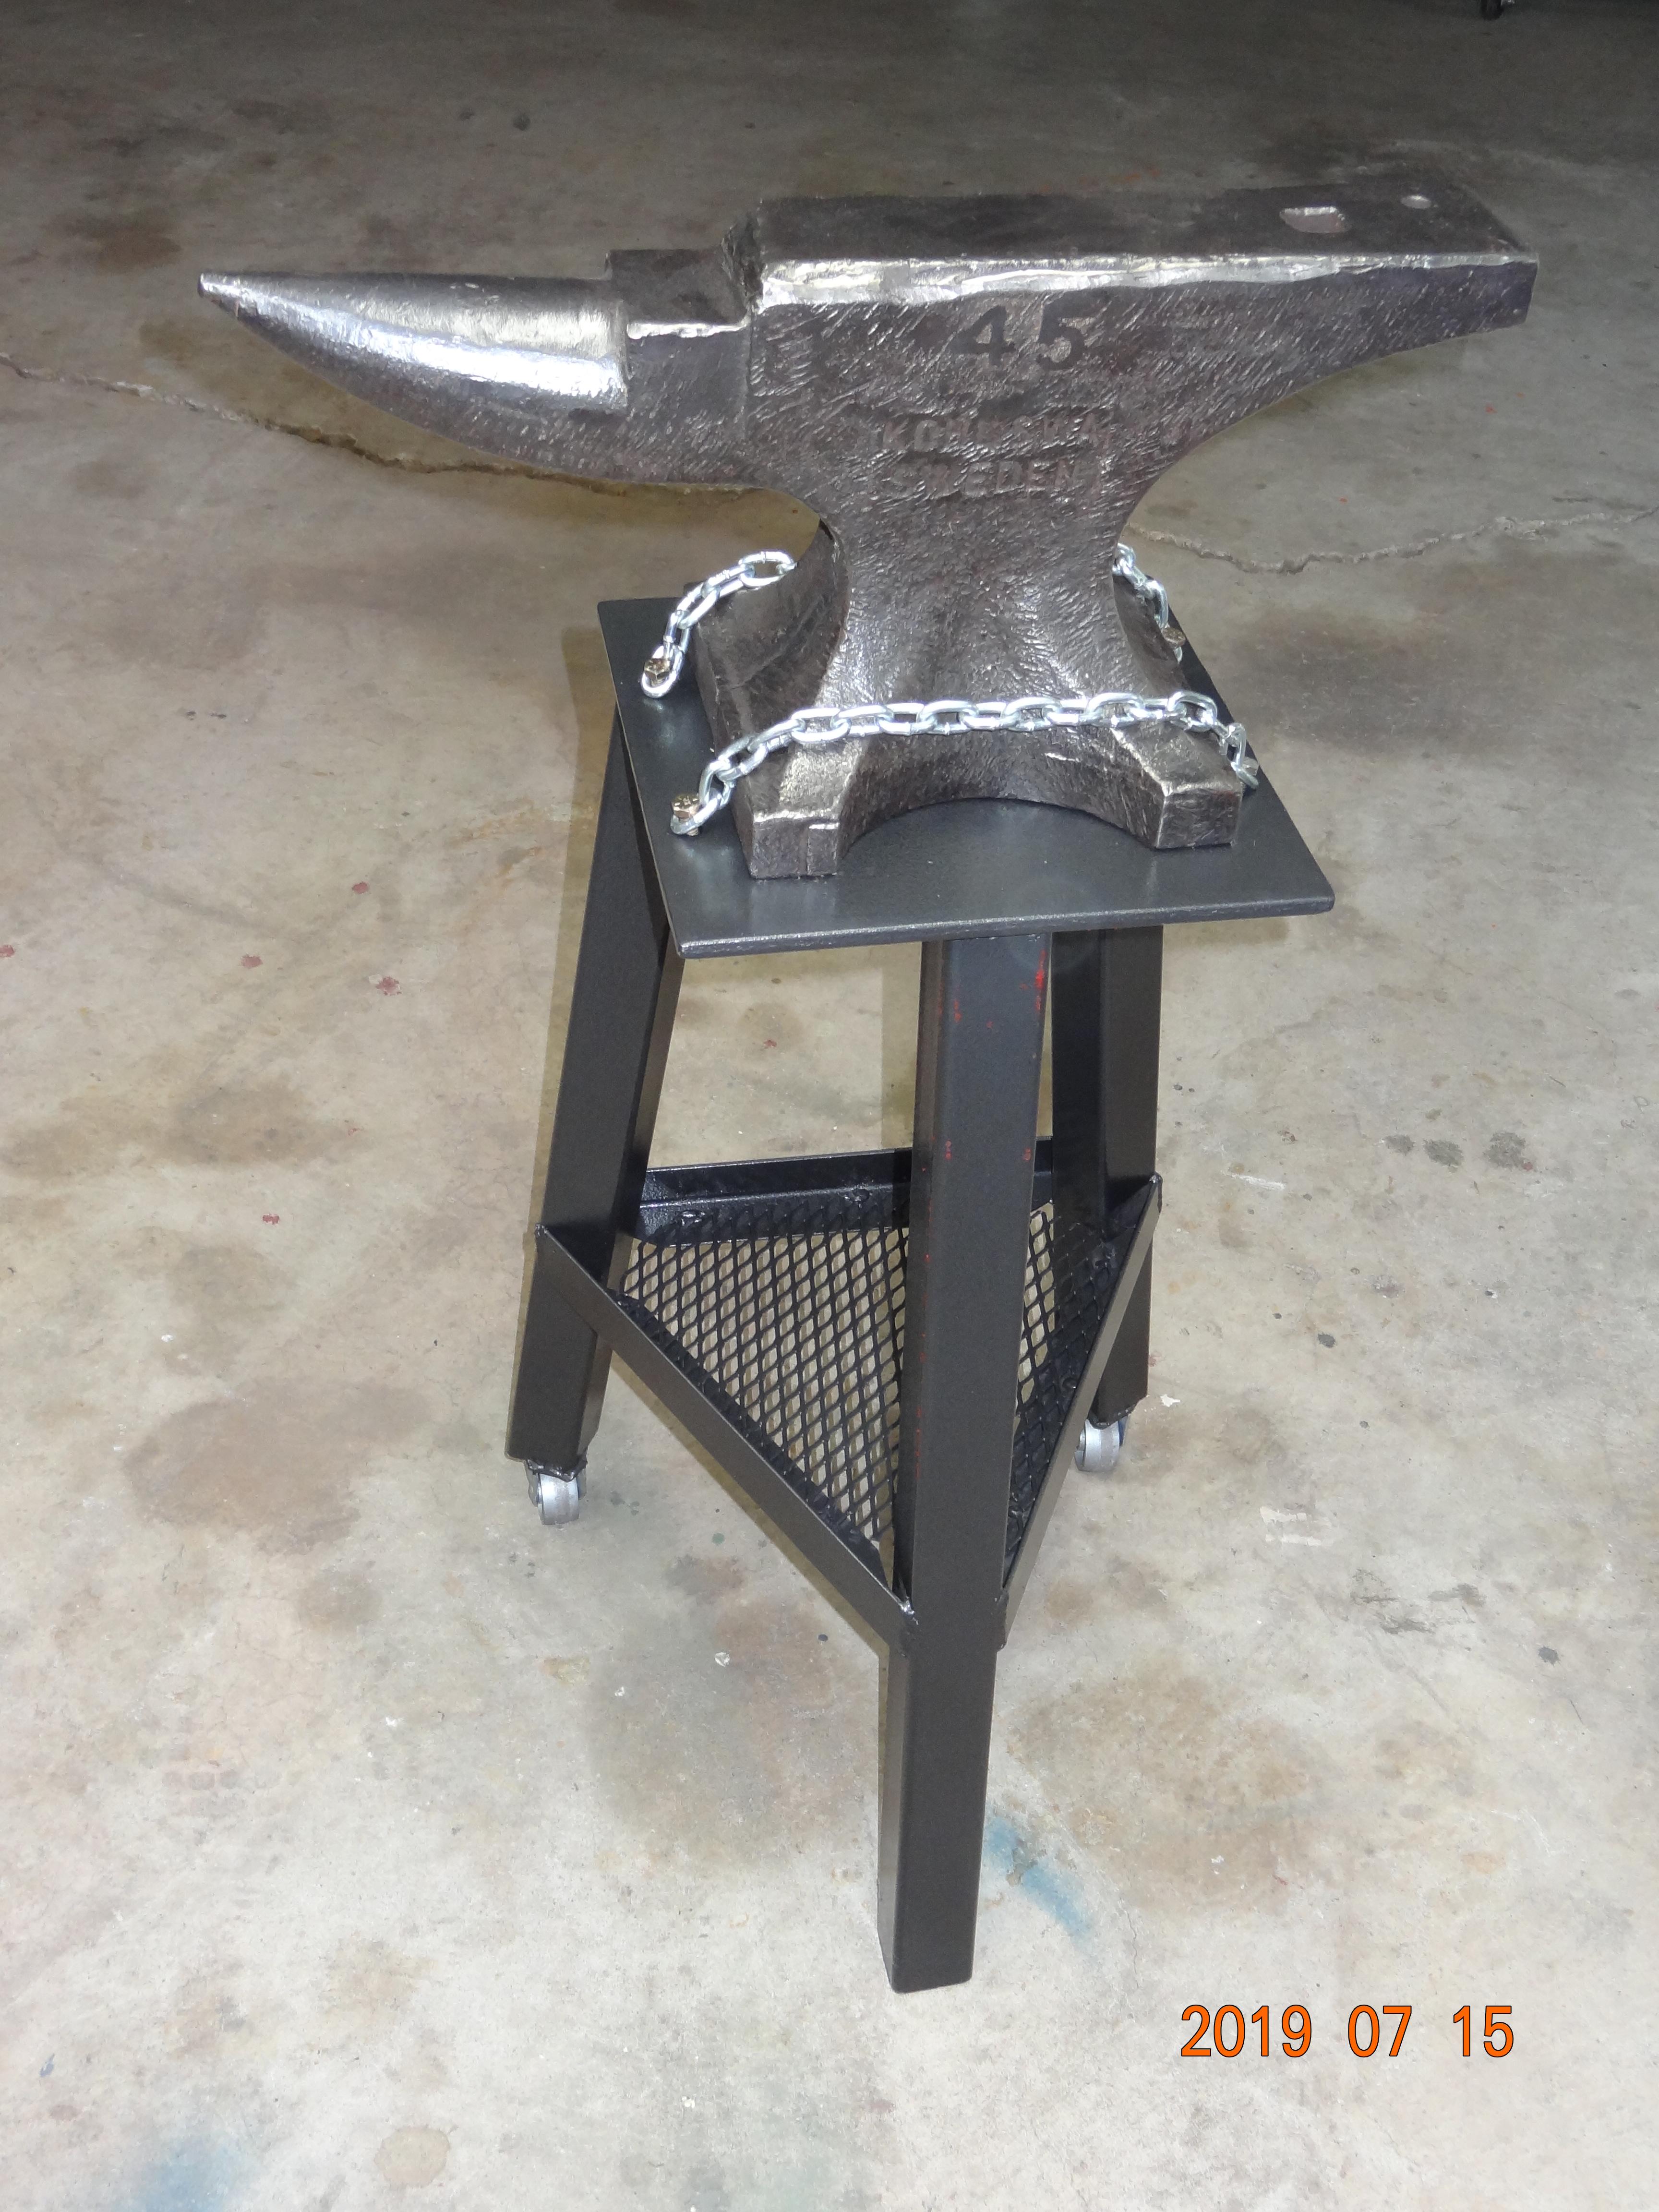
The stand. Very simple construction, 3/8" plate on 2x2 legs @15 degree angle (might should have gone to 20 deg but I won't be using a striker lol) and steel-wheeled casters. Still thinking about tool/hammer rack setup. It's tall (39" to anvil face, same as my D2 round stock anvil), but that puts the anvil face right at my wrist bone.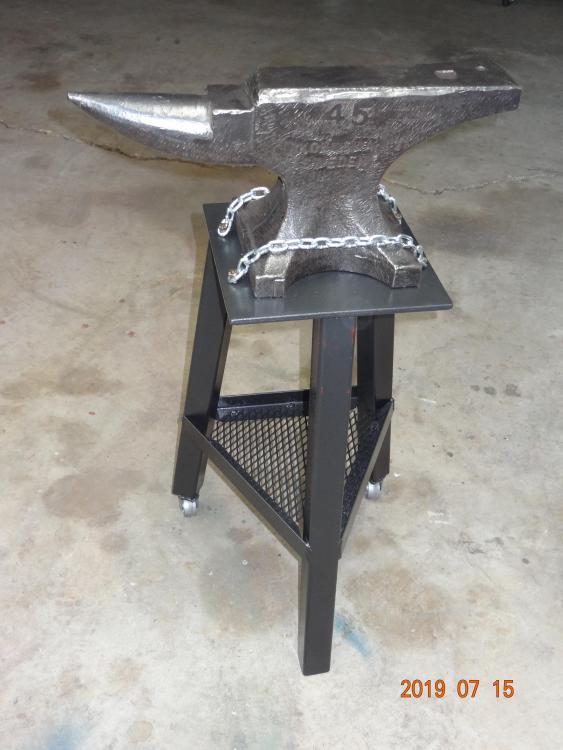
-
Took a wild chance today on a 100# Kohlswa
picker77 replied to picker77's topic in Anvils, Swage Blocks, and Mandrels
Chris, this guy down near Lawton had three anvils, I bought the Kohlswa 100#, but he still had two others, a Hay-Budden 100# and a 200# that looks like a H-B to me but I couldn’t see any markings. Both priced at $4.50/lb but between you me & the fence post he will take $4. I liked that 200# and it bounced a bb pretty good but the $900 price kinda killed that idea for me. If you are interested pm me for more info, be happy to point you to him. Thanks George, was wondering about that. Your theory probably makes sense. Not a big deal but had my curiosity up. -
Took a wild chance today on a 100# Kohlswa
picker77 replied to picker77's topic in Anvils, Swage Blocks, and Mandrels
Thanks, Moose. That’s a novel idea and good inventive thinking, especially the ratchet strap resizing trick. I’ll definitely make note of it for future use. However, it so happens I just yesterday picked up some 11 ga cold rolled sheet, having decided to more or less duplicate the rectangular 2-burner forge on Larry Zoeller’s website, but using tacked-up 11 ga sheet instead of square tubing, and using the pair of Frosty’s T-burners I just finished building. I want to use a version of the slick adjustable/removable front door arrangement Larry came up with, and I plan to also add one of those NC Tool cast iron swinging-door ports that Larry sells in the rear wall. The shell will be 9 x 9 x 16 with a kiln shelf floor and the two burners will have to feed only about 350 cu inch of interior volume, and so should be able to run plenty hot. In return for stealing Larry’s ideas I plan to buy most of my refractory supplies and a regulator from him I spent today welding up a caster-equipped tripod for my “new” old Kohlswa anvil. It will be ready for paint sometime tomorrow, after I add hammer/tool racks. After that, the forge assembly project is on deck. -
Took a wild chance today on a 100# Kohlswa
picker77 replied to picker77's topic in Anvils, Swage Blocks, and Mandrels
Sigh... yep, it's a sad situation. Makes me doubly glad I stumbled onto this fairly decent little 100# Kohlswa. Wasn't cheap by any means, at least to my wallet, but after all the looking around this area, $4/lb suddenly didn't look so bad. Frosty Alert: There's a beautiful 520 lb Soderfors with a 1916 date on it that's currently at $500 with 21 bids and 2 days left. The guy had two (where in the heck to guys like that find these things?) and sold the first one a while back for as I recall $3200. Bill Gates and Jeff Zuckerberg are probably among the current bidders. -
Took a wild chance today on a 100# Kohlswa
picker77 replied to picker77's topic in Anvils, Swage Blocks, and Mandrels
Thanks, CGL. Not sure who put the word out that anvils in the Texas/Oklahoma area are all cast from solid gold, but it seems that way sometimes. Personally I hope “Forged in Fire” gets canceled after this season. Anvils around here are priced like beanie babies or Holland tulips used to be right now, mainly because of that show. OTOH maybe in two years there will be a flood of fire sale anvil prices as many of the FIF fans figure out it’s not quite as easy as it looks, and I’ll be able to pick up a 300 lb German double horn for what I paid for this one! -
Took a wild chance today on a 100# Kohlswa
picker77 replied to picker77's topic in Anvils, Swage Blocks, and Mandrels
No big deal about the edit, it's pretty self-explanatory anyway. I did have a bit of a search to find those brass 1/8 NPT to flare connectors, turned out they are Parker p/n 2P178 (that p/n is for a 10-pack). Not expensive at $6 a 10-pack, just not common. I stopped at a welding supply this AM and picked up a handful of official Tweco-branded .035 tips, and lo and behold they fit exactly into the same M6-1.0 threads I had already tapped for the Cal-Hawk and Vulcan brand box store tips I already had. I compared the two types of tips (Tweco brand vs others) by comparing the amount of "wiggle" when partially screwed into the brass fittings, and the fit was identical. So the thread thing (1/4-28 vs M6-1.0) appears to be a non-issue anyway, I just left mine tapped metric. Oh, and many thanks for the heads up on ITC-100, I have not bought refractory stuff yet but will certainly make a note of that. I do have a forge design question about burner capacity vs volume (will probably have many more, ha) but should I PM it? Don't want to clutter up the Anvil thread...