picker77
-
Posts
212 -
Joined
-
Last visited
Content Type
Profiles
Forums
Articles
Gallery
Downloads
Events
Everything posted by picker77
-

Troy-Bilt Tiller knife project finally underway
picker77 replied to picker77's topic in Knife Making
I'm more like a 10-book newbie, ha. I've read so much about forging, making knives, tools, heat treating (yes, Steve, I have read your HT posts) the past few months my brain is drowning in information. After a while it all just runs together like fruit thrown in a blender until I was able to finally heat up some metal and try to apply some of the methods and practices. I've been actually using a forge for all of about 3 weeks now, haven't even used up my first 30 lb of propane, so I'm heavily experienced, ha. A little spooky at first, had to get used to the dragon's breath, the noise, handling hot metal, etc., but every minute of it so far has been fun, even the screw ups. When things don't go like I expect it's still a blast because even failures point out new things I want to try the next day. Tomorrow I'm going to do some "destructive testing" on a couple of these tines and see what happens. -
Troy-Bilt Tiller knife project finally underway
picker77 replied to picker77's topic in Knife Making
Lol. You guys sound like you think I was arguing with you. Far from it, this was a partially done sample of one blade of unknown alloy, and I haven't even had the chance to harden and test a second sample of the same steel. I meant no pronouncement of general fact regarding tempering, just because I read about the accepted ranges of tempering for carbon steel a couple of places, and I was certainly not questioning anyone's technical knowledge on a subject I know squat about. Thanks, Steve, I'll read up on blue embrittlement (whatever that is) but there's not much danger of my tempering above 400C with my little toaster oven that struggles with 500F, ha. Please remember I'm just a few months down this road you guys have been on your whole lives. I didn't mean to imply I'm forever going to do non-tempered blades, not sure where that idea came from. Just this one blade. And if needed I'll temper it. Looking forward to learning more and experimenting more. That's how I like to learn. -
Troy-Bilt Tiller knife project finally underway
picker77 replied to picker77's topic in Knife Making
Thanks, Buzzkill. That makes perfect sense and if I decide I need to temper later I'll try that. Although this blade seems to be quite hard, my little "chopping" test didn't tell me much about toughness or flexibility. However, if I try a bending test, it will be with a second tine that I have set aside for just that purpose on the sage advice of BigGunDoctor. Have a great weekend and I hope everyone can (a) dodge Dorian, and (b) enjoy some cooler weather down the road soon. Tired of sweating in the shop. -
Troy-Bilt Tiller knife project finally underway
picker77 replied to picker77's topic in Knife Making
Well, Mr. Sells, if it's important, it was the website of Industrial Metallurgists, LLC - a company that apparently creates and conducts training courses in metallurgy for the metal industry. They said "During the tempering process the steel is heated to a temperature between 125 °C (255°F) and 700 °C (1,292 °F). At these temperatures the martensite decomposes to form iron carbide particles." That, btw, differed a bit from another metallurgical engineering site in that the other one (don't remember which it was) said normally 150C is the generally accepted lower limit for tempering carbon steel. I suppose that's where I got that 150°C number. I've read much of the heat treating info, including the pinned posts, but there is practically a lifetime of reading involved in all that, so I am still trying to absorb the huge amount of (and sometimes conflicting) expert advice on IFI and elsewhere. Most of it, however, properly pertains to known alloys, and in this particular case I'm experimenting with an unknown alloy, although it is certainly tool grade steel of some kind, and is demonstrably hardenable. At any rate, about an hour ago this particular knife just hacked easily (well, easily is a stretch, it took some help from a stout mallet - this is a small lightweight blade after all, not a "chopper") through a 1-1/2" x 2" piece of very hard red oak with no visible or detectable tactile damage whatsoever, and will still shave my arm. Certainly from a technical HT standpoint that simple test means nothing, but from a practical use standpoint it means a lot in my eyes. So with all due respect and appreciation for your helpful advice, I think this is still a knife I'll "want to keep" as I'm working my way up the learning curve. Have a great weekend. -
Troy-Bilt Tiller knife project finally underway
picker77 replied to picker77's topic in Knife Making
Well, scratch my idle thought about the possibility of tempering with the scales still on the blade in case it's too brittle. I looked up the specs on JB Weld (I have both kinds, the regular and the "JB Quik" 6-minute stuff). Sadly, I used the Quik version on this one, and the specs say it's good to 300°F. The regular version is good to 500° with a max limit of 600. I've read elsewhere that 150°C (302°F) is about the lowest temp commercially used for tempering carbon steels, so 300°F would be walking a little close to the edge for a toaster oven. -
Heck, Billy, I might try that. At least it would be the size billet (maybe) that my ancient wrist/arm could handle with a hammer, ha. Don't have a power hammer and at my age I definitely am not going to try to hand-work a normal size billet. I have some 0.049" 15N20 in 1-1/2" and 2" width. I suppose I could band saw a 12" piece of the 2" lengthwise into three approx. 5/8" wide strips and stack some of that with the 1/2" 1095 feeler gauge material, maybe using two 1095's for each 15N20. Sounds like more experimental fun!
-
Troy-Bilt Tiller knife project finally underway
picker77 replied to picker77's topic in Knife Making
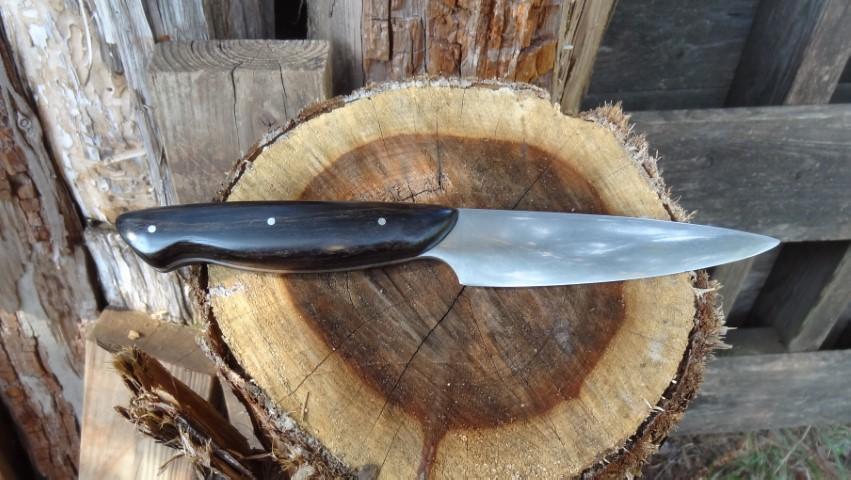
Just for fun I finished this "tine knife". After drilling the handle holes, it hardened just fine quenched in canola and skated a new file no problem. I did NOT temper it after quenching, we'll see if that was a mistake after I use it a little to see if the edge chips up (it was not yet sharpened when these photos were taken). I'm pretty happy with it for a first-time experimental forged from scratch knife. The handle is polished and waxed ebony with stainless pins. I still have about 14 more of these tines to play with. I plan to harden and destructively test one as suggested above by BGD (but not this one, lol!). If the test tine shatters after quenching without tempering I guess I'll just have wasted some time on this one, unless I get ambitious and temper it with the handles still on it, which would certainly test the limits of good old JB weld, which according to them could take it without letting go. Anyway, I am definitely interested in seeing the grain of the test tine, looking forward to that.


-
Troy-Bilt Tiller knife project finally underway
picker77 replied to picker77's topic in Knife Making
Thanks, BGD. I'll do some more experimenting. Kinda fun to sort this stuff out (with help from IFI members like you and Kozzy) and I'm learning a lot as I go. -
Troy-Bilt Tiller knife project finally underway
picker77 replied to picker77's topic in Knife Making
Pretty interesting, Kozzy. Never hear of Hadfield steel, but the "symptoms" you mention fit the situation at least. So, if that's what this is, what's the prognosis for knife material? Seems like it would make a blade that would hold a great edge, but be hard to sharpen if it gets dull. I looked it up and it appears to be very popular with the exotic Japanese blade makers for swords. Go figure. What doesn't fit, though, is why this annealed blade I'm working on made from this stuff has not work hardened. I've given it every opportunity to do that, but it still works like mild steel. I've hit it with a couple of grinders, some stones, files, sandpaper, ad infinitum... still feels like mild steel under a file or abrasive. Would multiple heats and forging act to negate some or all of the characteristics of manganese steel? Of course, metallurgically speaking I'm in the deep end of the pool here and way over my head. -
Troy-Bilt Tiller knife project finally underway
picker77 replied to picker77's topic in Knife Making
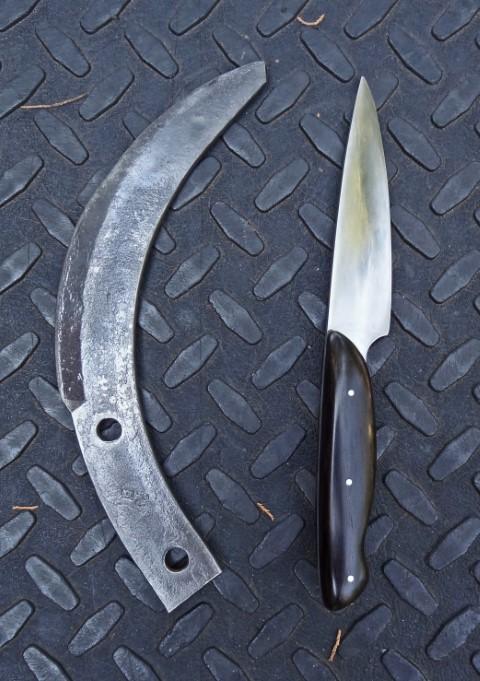
I got around to trying what BigGunDoctor suggested, with somewhat puzzling (to me) results. I pulled one of the tines from the "annealed only" group and gave it a routine HT process, i.e. heated beyond magnetic, held there for several minutes, then quenched immediately in canola oil, and (starting about 20 minutes later), tempered for 1 hour at 350 and let cool in still air. I had a standard oven thermometer on the shelf inside the oven, plus I monitored the oven temps several times with a non-contact IR thermometer by quickly opening the door, taking a reading, and closing it again. My little toaster oven's thermostat proved surprisingly accurate (at least at the 350 setting), with both thermometers. After an initial 5 min or so overshoot to 400 and back, the actual temps stayed steady at 350 the remainder of the hour. NOTE TO SELF: Prewarm the tempering oven longer! Anyway, the photo below is the result. The top one is the only original "unheated" tine I have left (I cut the tip off cold with a band saw back when), the middle one was annealed with it's 14 brethren in a 6-gallon pail of vermiculite for 24 hrs, and the bottom one was today's victim. It was annealed, heated, quenched in oil, and tempered to 350. What has me scratching my head is that side-by-side with a brand new file it's pretty hard to tell the difference between all three. All are very hard, the bottom two are not quite as hard as the original, although that difference is not very much. The bottom (tempered) tine did take on a nice light golden color, as expected. I don't know quite what to make of the fact the annealed-only tines appear to have remained nearly as hard after annealing as the one I quenched and tempered, and that neither the annealed only or HT'd tines are a whole lot softer than the factory original. All three will skate a new file unless I really lean on it. The only thing I could think of is maybe this is air-hardening steel, not oil-hardening as I first thought? Further adding to the newbie head scratching is the knife shaped object I've been working on (made from one of the bucket of "annealed-only" tines), is nowhere near as hard as any of these three, and has been relatively easy to file, shape, and grind since I started on it. It's currently in the early sanding/polishing stage. It's only difference from the others is it was repeatedly heated and pounded on the anvil while I forged it into shape. If this was air-hardening steel, why would forging and beating on it make it softer?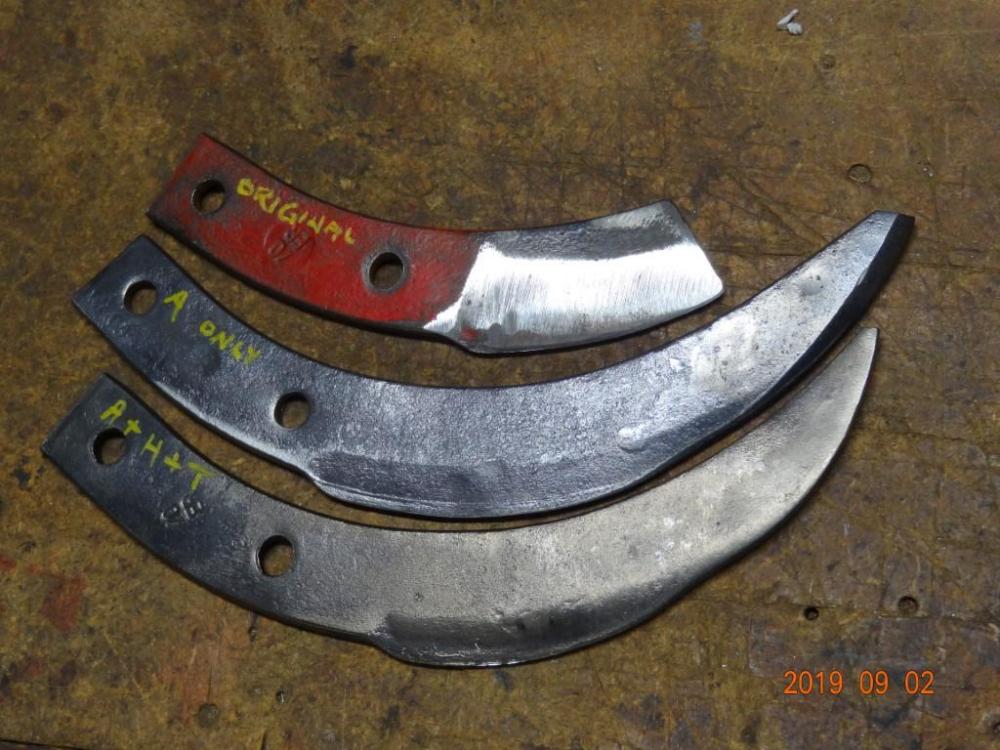
-
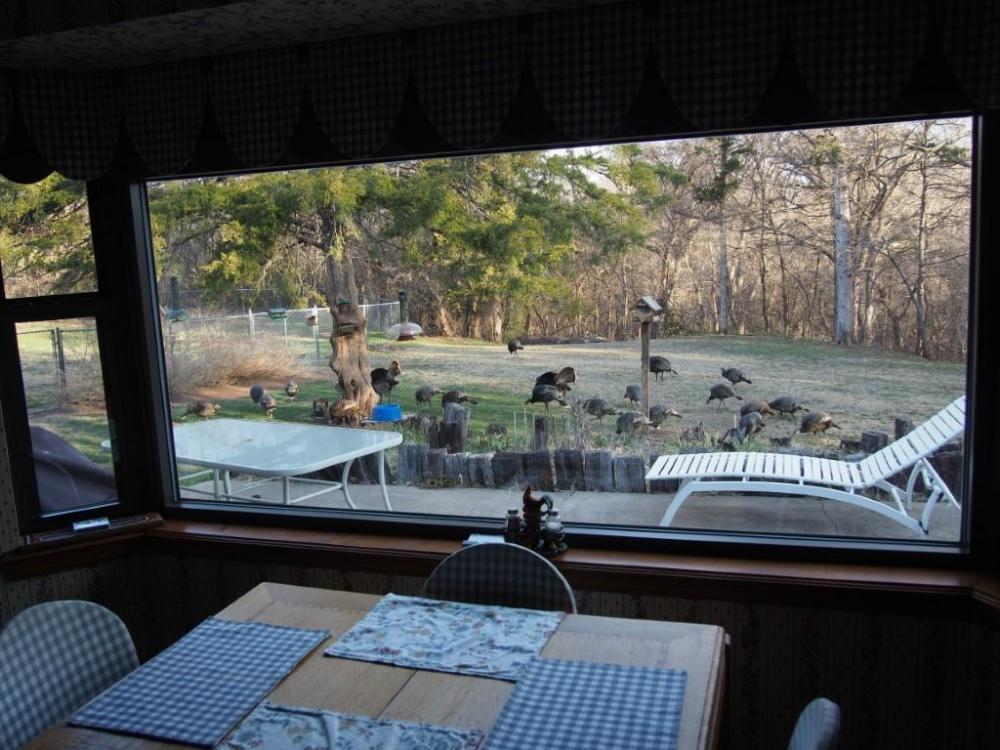
Typical day here in our back yard in winter and spring. We usually get 30 to 50 per day hanging around.
-
I'll do that, BGD. Thanks for the suggestion.
-
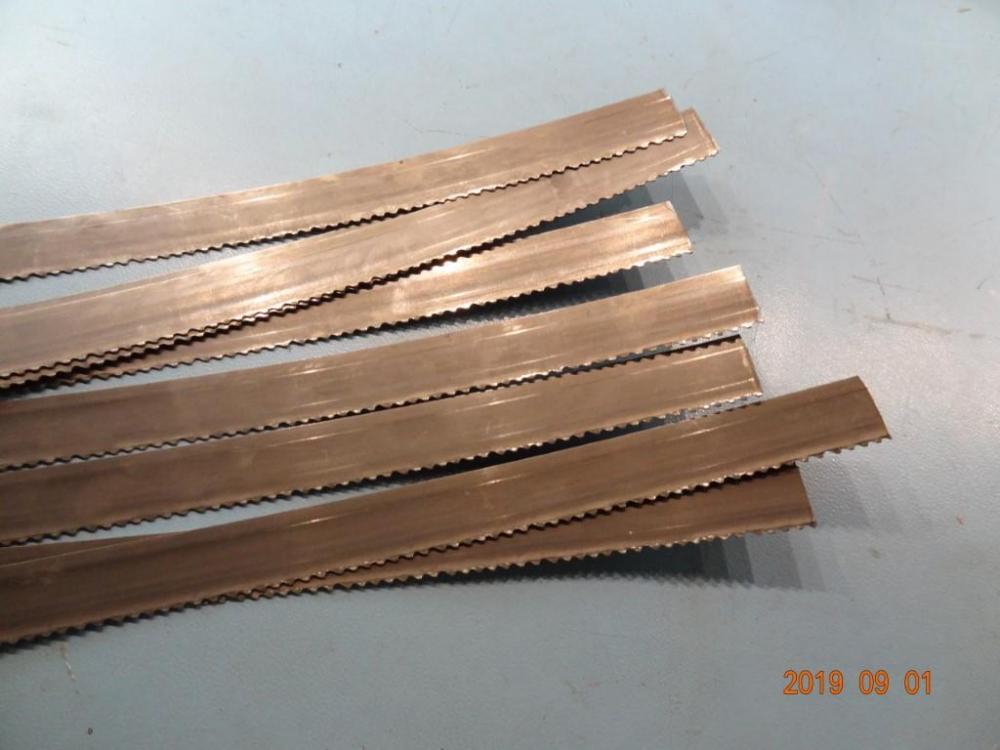
Hmm.. I have a batch of this stuff, which is old 1" wide .035 thick band saw blade. I am a damascus babe in the woods. Would it be possible to successfully weld a damascus billet made from this 1" wide bandsaw blade layered with 1/2" wide feeler gauge pieces laid side-by-side? Never read of anyone layering a billet with some layers being pieced together, but I suppose that doesn't mean it can't be done. If I tried that, should it be stuffed in a canister with 1095 powder?
-
I'll work on that. Thank you, Mr. Sells.
-
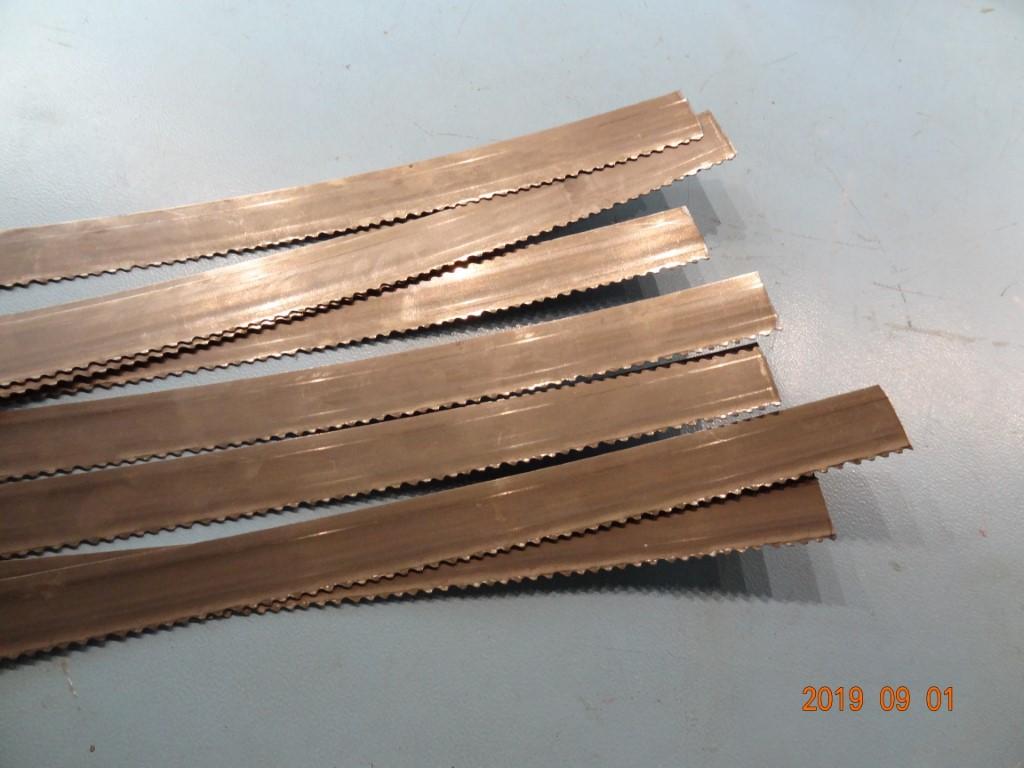
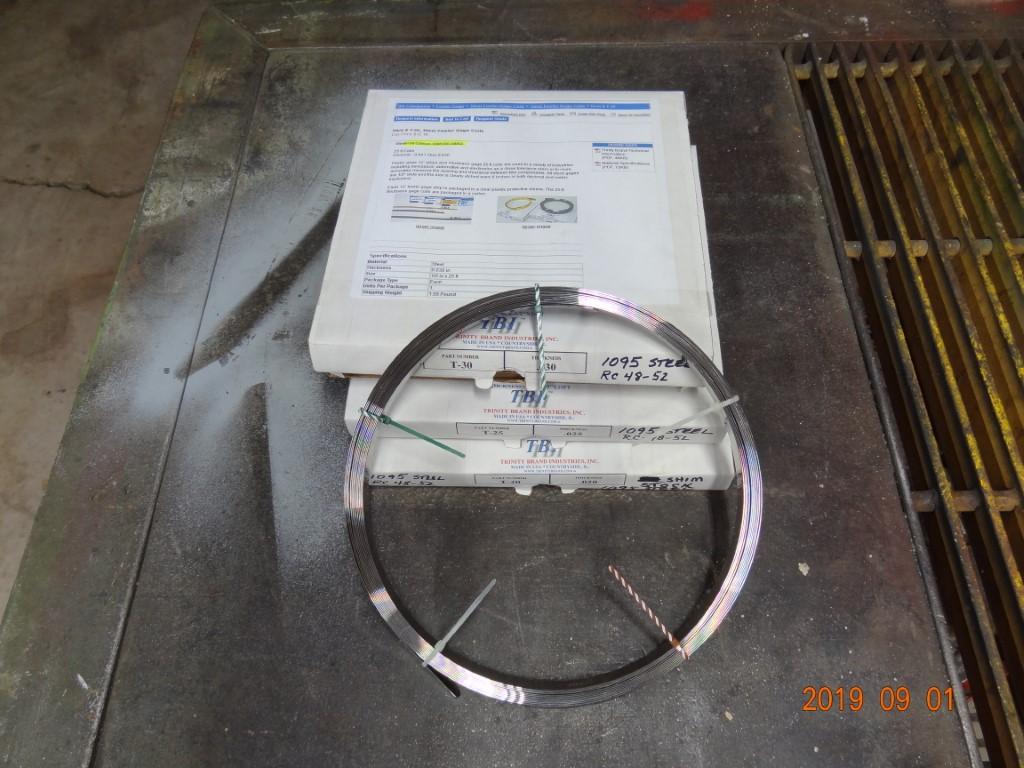
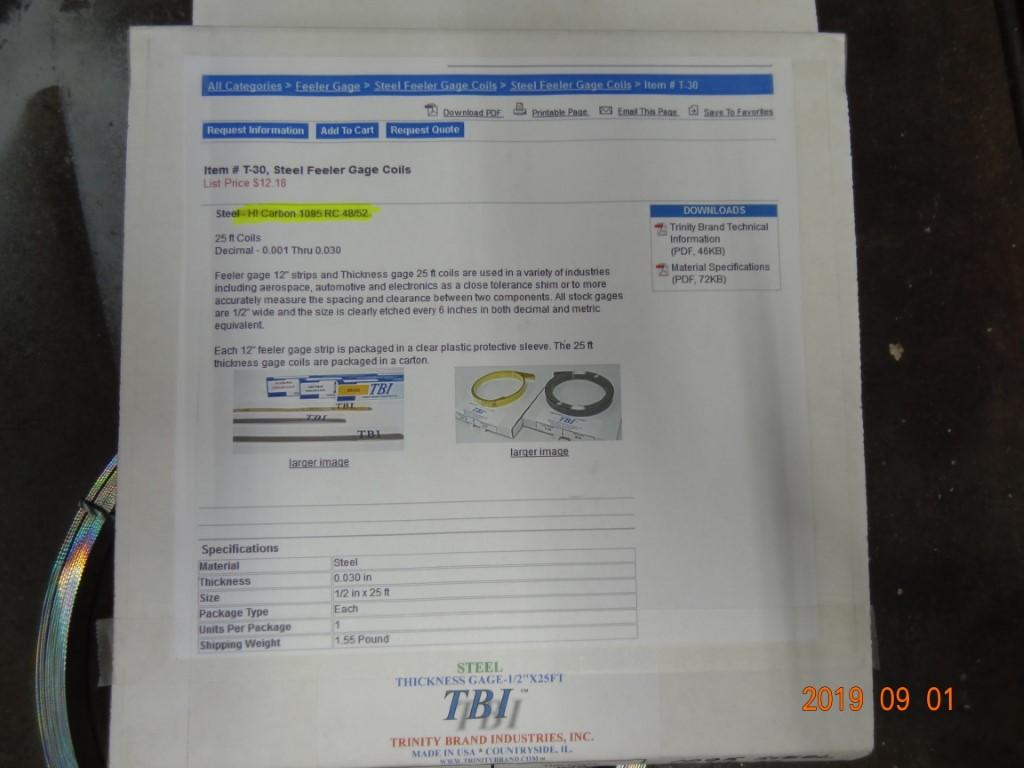
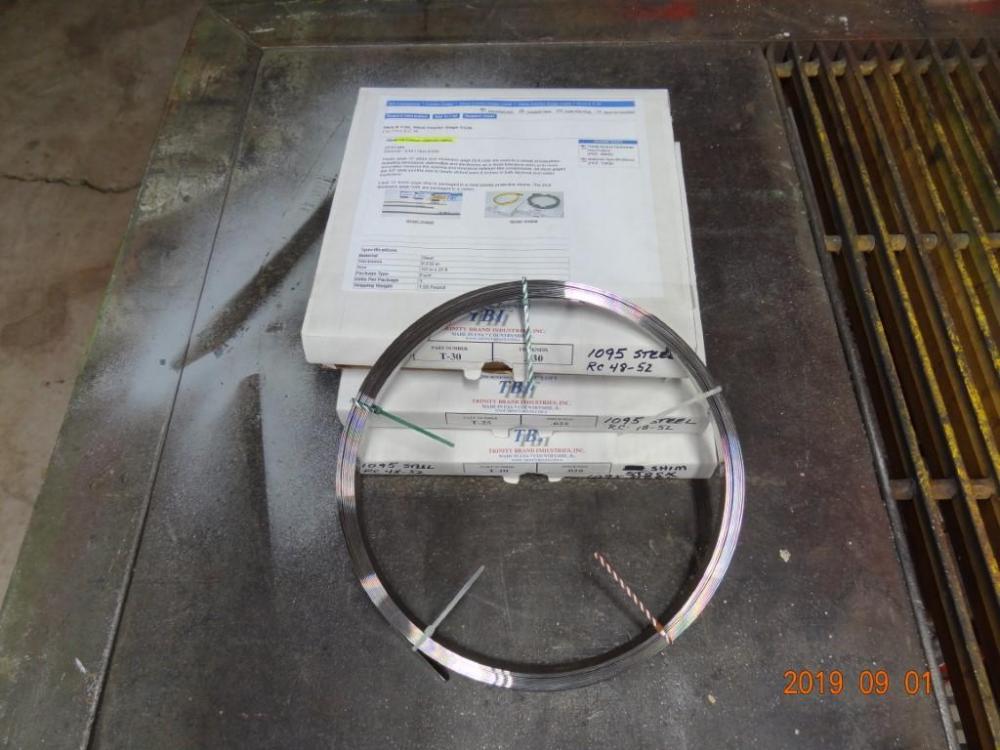
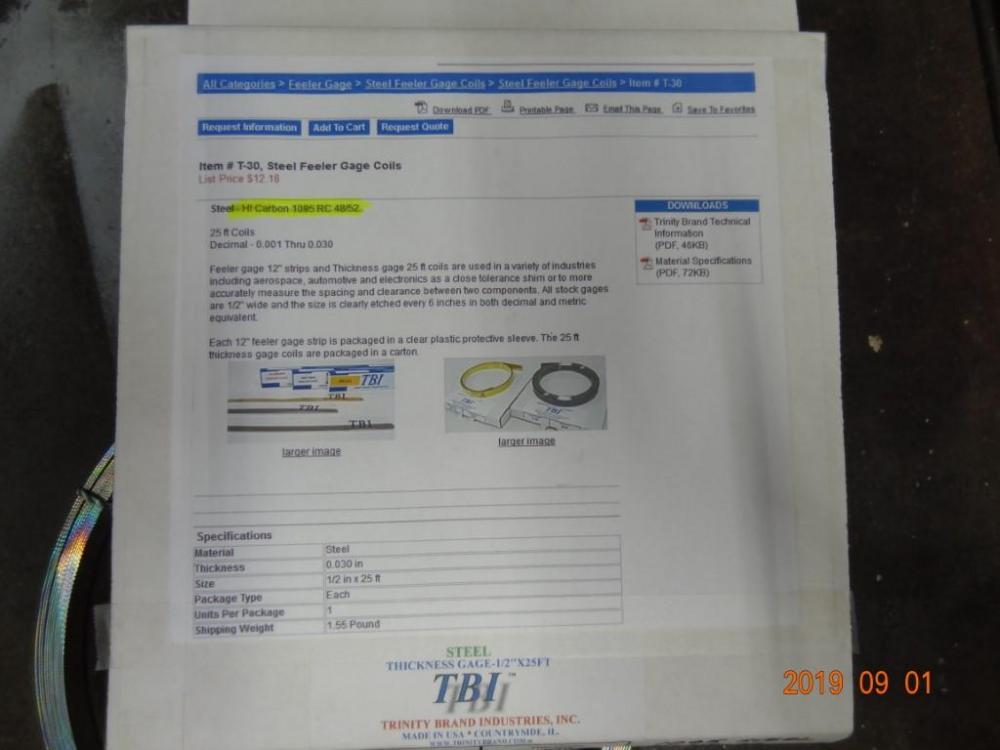
This followed me home several years ago for a project (building a view camera), and didn't get used at the time. It's good high carbon steel, just in an unusual form. It's precision ground and polished 1095 feeler gauge stock, in three 25 ft 1/2" wide rolls in three thicknesses. I have a roll of 0.020", a roll of 0.025", and a roll of 0.030". Specs say Rockwell RC48-52. I've been kicking around what it might be useful for in the smithing or knife making world, but so far haven't come up with any brilliant thoughts. Anybody care to toss some ideas around?
-
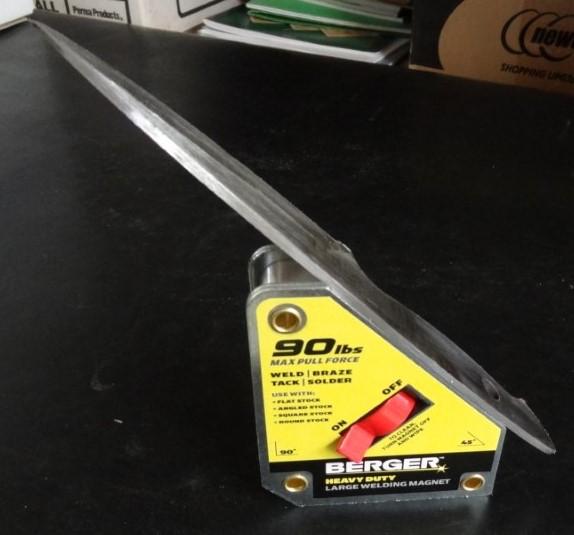
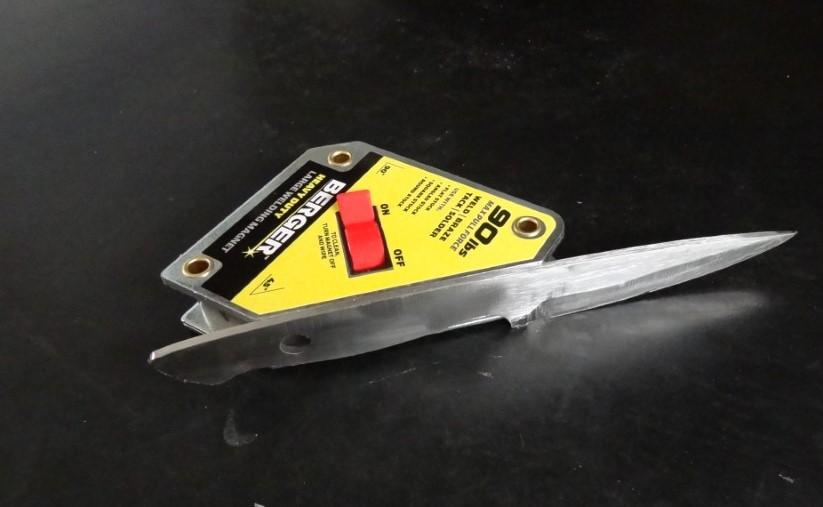
I might be the last guy to get the memo on these, but I took a $27 chance on it at Harbor Freight. Like most people who weld, I use the standard non-switching welding magnets a lot, and they are extremely handy, but the larger ones are pretty "grabby" to work with and require a good bit of tapping back and forth with a hammer to adjust. I decided to try one of the switchable type when it occurred to me it might do double duty as a "handle" to make grinding blades on a platen easier and safer than some of my usual bare-handing or jerry-rigged grinding methods. Regular welding magnets have similar great grip, but are useless for grinding because of the steel dusts collection problem. Turns out I love this thing, second best $27 I've ever spent at HF. It of course collects grinder dust like the others, but simply turning the switch off allows me to literally just wipe off the steel dust. Not sure if it's got the claimed 90 lb grip, but my hands aren't strong enough to pull the blade off when the switch is "on", and it works fine as a grinding "handle". This one appears to be a ripoff of the "Stronghand Adjust-0-Magnet", which claims 80 lbs of grip and generally runs about $10 or so more. Disclaimer: Like anything else related to blade work on buffers, grinders, and other rotating machinery, always keep the point down, wear stout eye, face and body protection, don't wear gloves, don't work when you're ticked off, distracted, frustrated, tired, or in a hurry, and be generally cautious to the point of borderline paranoia. Bad things happen with rotating power tools in milliseconds, MUCH faster than your eyes and brain can process. You will only realize there's a problem after you've stared in shock at the blood for a few seconds. One last thing: NEVER turn your back on a blade in a vise, it only takes seconds to remove it and lay it on the workbench.
-
Troy-Bilt Tiller knife project finally underway
picker77 replied to picker77's topic in Knife Making
Nope, haven't tried it, BGD. I know for certain they WILL harden, just don't know for sure if generic HT methods will do it. I have 15 of these already annealed I can play with, so I can afford to cut one in two or three pieces and see what happens before I try anything on this first test blade. If it matters, this is steel from 40 year old technology/metallurgy, so not sure if the boron thing would be likely to apply. Besides, I only have available water or canola oil at the moment, don't have any of the fancy Parker oils, and my HT options are pretty primitive: a forge, a toaster oven, and O/A and propane torches. I don't have a real HT oven. I'll report back here after I try some things. -
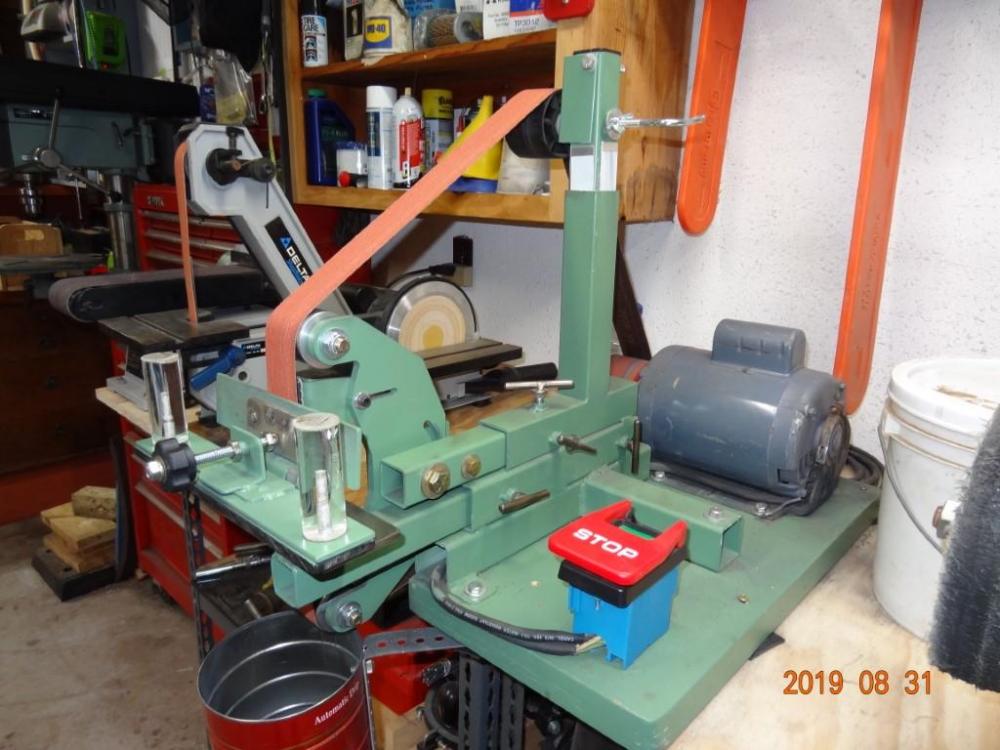
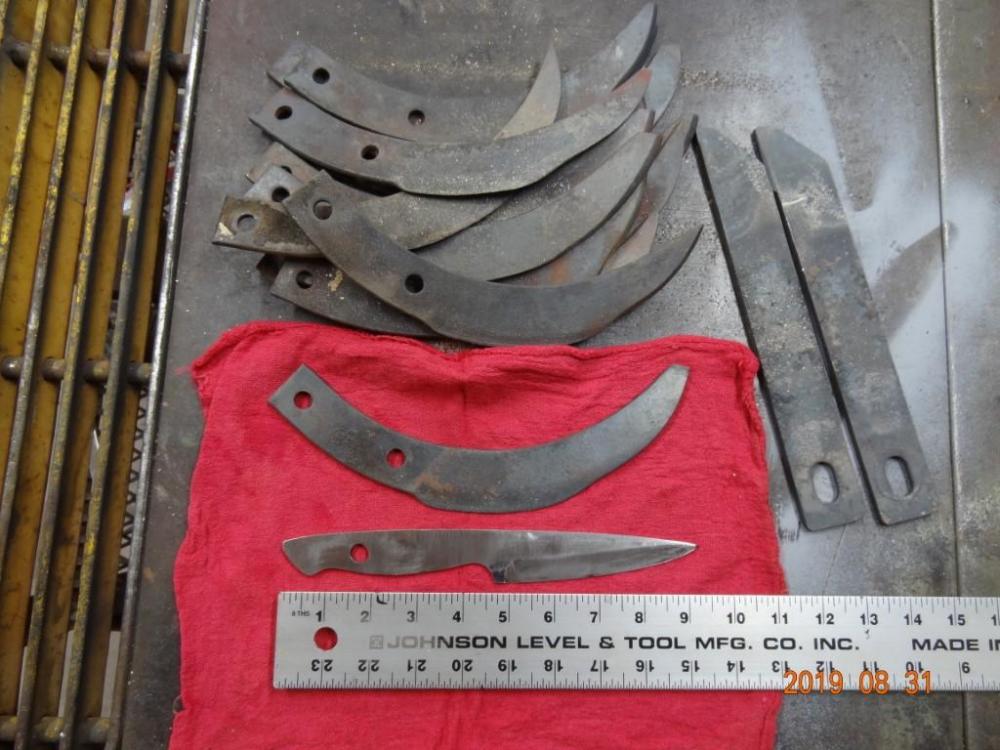
Changed out the tines on my 1980 model 8 HP Troy-Bilt tiller a couple of years back, and saved all the old worn tines, since they are made of what seems to be very good metal - probably 5160 or 1095. After all, they were used hard for nearly 40 years, and still had life in them. Of course this was back when Troy-Bilt tillers were 350 pounds of cast iron and heavy wall steel, unlike today's big box store versions. Before annealing, these tines would skate any file in my shop. Now that I finally have a forge up and running, I dug them out and straightened and annealed them, thinking they might make some decent utility knives. Coincidentally, last week I finally got around to adding a vertical platen to my home built 2x72 grinder, which up till now has been running with just an 8" contact wheel and a tool rest. I also put together a simple blade grinding jig. Today I started roughing out the first sample "tiller" knife, a 9" full tang drop point. The other two flat bars in the photo were front bumper mounts for a pickup truck of some sort, from a body shop friend. Very decent steel also, haven't decided what to make with them yet. Not gonna run out of tiller tines for a while anyway, lol. Anyway, finally getting some scale generated and having lots of fun.

-
Very slow day here, even our resident wild turkeys took the day off.

-
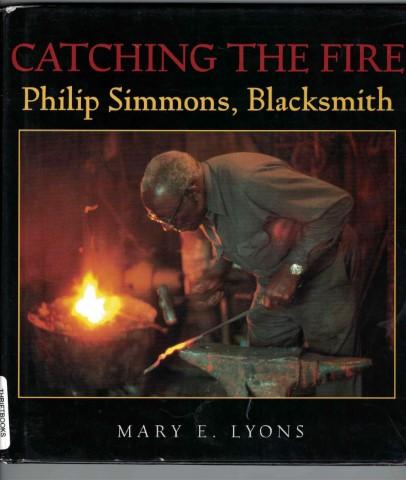
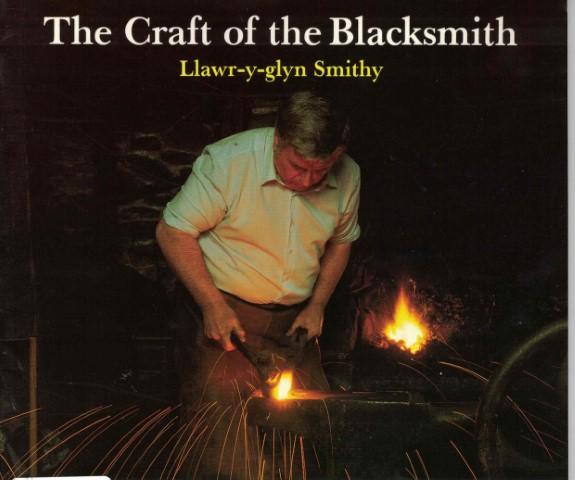
To add to the summer reading list, here are a couple I received recently from Abe's online used book store for about $3 each... Catching the Fire tells of Philip Simmons, a famous blacksmith in the Charleston, SC area. In addition, Simmons was the first well known black blacksmith in that area, and he created hundreds of the historically significant artisan wrought iron works extant in that area. Some of his work is in the Smithsonian. In addition to original artistic work, Simmons rescued many of the original old wrought iron works done by very early smiths in the Charleston area. Until he came along, the wrought iron craft was dying out in the area, and many of the beautiful wrought iron gates and such were in seriously deteriorated condition for lack of smiths who knew how to repair and maintain them. Includes some photos, but it's mostly the story of Simmon's early life and how he got started as a total newbie/apprentice. The other book was (to me) the most interesting. The Craft of the Blacksmith is a fairly detailed overview of the blacksmith's craft and traditional tools, along with a detailed record of the restoration of an original English smithy, Llawr-y-glyn, a Montgomeryshire smithy from the 1860's. The Llawr-y-glyn has been carefully restored and is now part of the "living history" portion of the Welsh Folk Museum, which is likely operated in a similar fashion to Virginia's Colonial Williamsburg. Many old photos, copies of business records and payment receipts, etc. Photos of some tools I had not seen in use, such as wheel iron bending and installation tools, etc. Intensely interesting reading to a newbie like me, especially since the wife and I visited England earlier this year, although I'm sorry to say we did not visit Llawr-y-glyn.
-
Hawk, did you actually find this thing at a residential garage sale? In any case, looks like welding a chain grab loop on one edge for a "handle" is in order.
-
BillyBones, first hand info like that is solid gold (coming from the horse's mouth, so to speak). Thanks for posting it.
-
Good idea, Chris. Thanks. I'll check that out.
-
Excellent, I envy you having a good supply like that. Recycled spring steel in small sizes seems to be relatively rare around here, although large junked coil springs are available if you can get help to carry one to your truck.
-
Wow, a little gold mine. Reeltree, I suppose they would certainly make really nice (and very strong!) hooks, but it would seem overkill to use good quality spring steel on things that are usually made from cheaper, easily obtainable mild stock. Were it me, I think I'd save those for a "higher use" application, ha. Anyway, lots of good material there, Les, have fun with it!