lanternnate
-
Posts
183 -
Joined
-
Last visited
Content Type
Profiles
Forums
Articles
Gallery
Downloads
Events
Everything posted by lanternnate
-
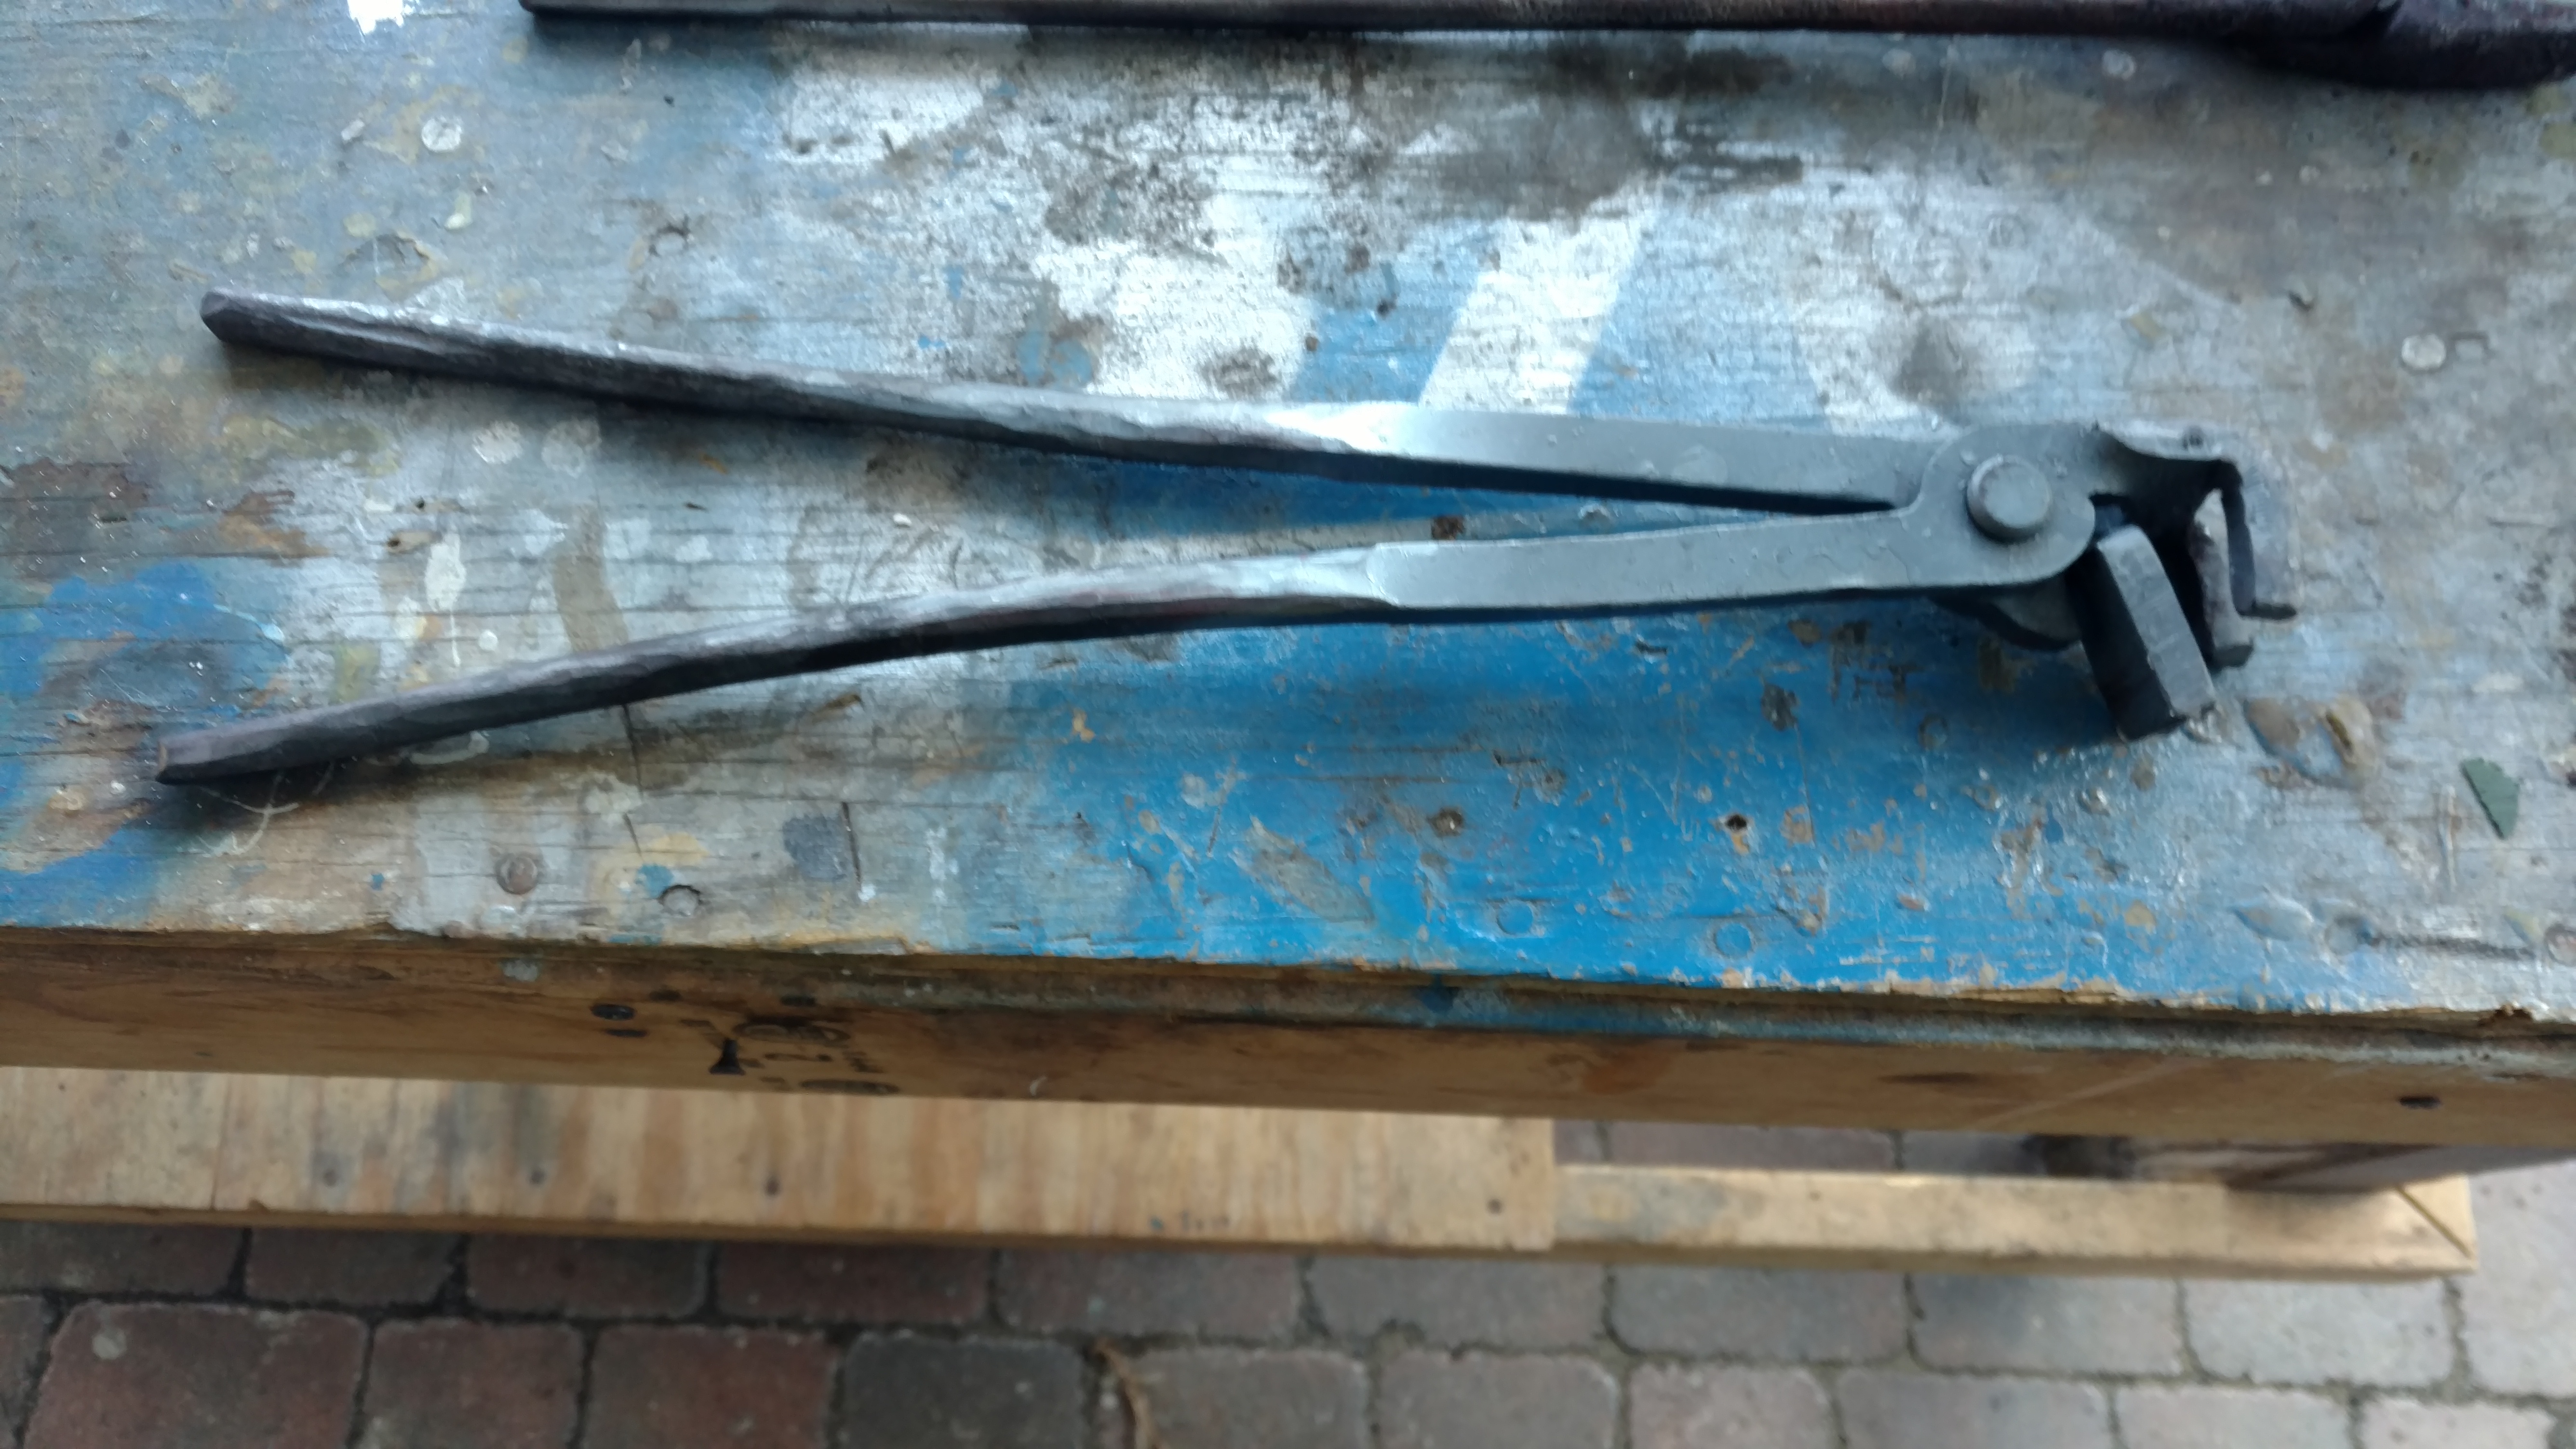
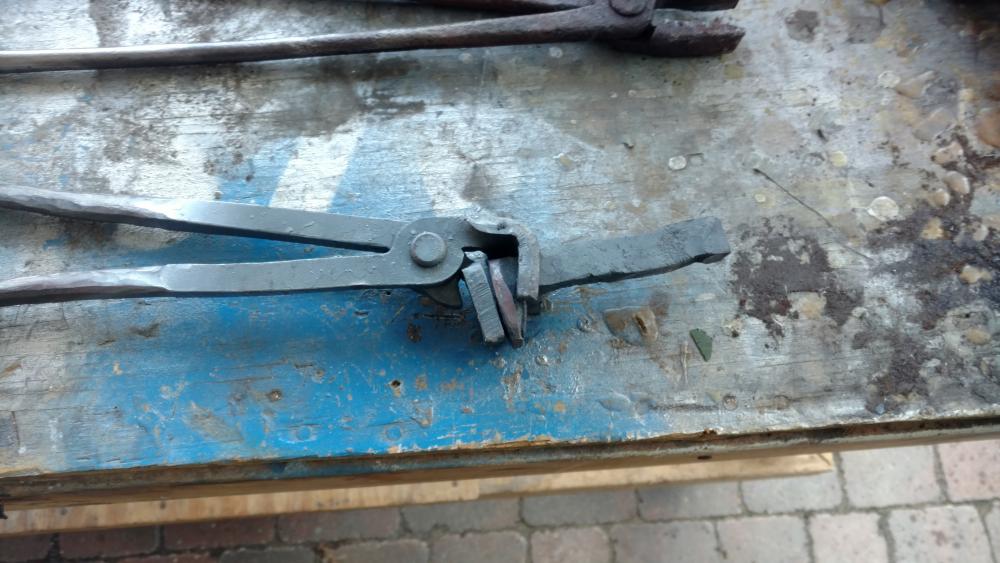
Finished these today. These are my first set of tongs I've made, though I only get partial credit because I used a kit from Ken's Iron. I was looking for better tongs to hold a spike, and I found these that hold it by the head. They were only sold as a kit though. I decided it would be a good two for one to get new tongs and use a kit to baby step into learning how to make tongs. I also ordered a few other kits of various kinds so that once I figure out more of what I'm doing and what I need I can make some to suit whatever I find myself needing. It'll be a bit before I take on the next pair though. I need to step back and practice some of the basic techniques. I've been mostly doing bladesmithing, so I've been working on making things flat and square. Taking something flat and square and trying to make it round is a wee bit harder (or at least seems so to me). I'll have to get some cheap square stock and practice making it round so my next set can have nicer reins. I also had to tweak on the jaws quite a bit to get them gripping right because my initial bend wasn't sharp enough. They're functional though! Picture they are holding a spike I upset today for my next hatchet project (I'm going to try forge welding in a bit this time!). I also used them to hammer out a practice spike knife and they made it much easier than before fumbling with my regular tongs.

-
Railroad spike "tomahatchet"
lanternnate replied to lanternnate's topic in Axes, Hatchets, Hawks, Choppers, etc
Hey arkie, yeah I put it in quotes for a reason . The HC spikes are a bit better than mild steel as I understand it. I've read in the range of .30% vs the .18% of mild. I mixed up the superquench early on after reading a supposed test where a HC spike was superquenched then hardness tested out at 54-55RC. Of course that was just someone on a forum, so it could have been total hooey. I'm not actually trying to advocate that an all spike blade is suitable for more than learning and novelty blades. Eventually I'll work my way up to the forge weld attempt. -
Railroad spike "tomahatchet"
lanternnate replied to lanternnate's topic in Axes, Hatchets, Hawks, Choppers, etc
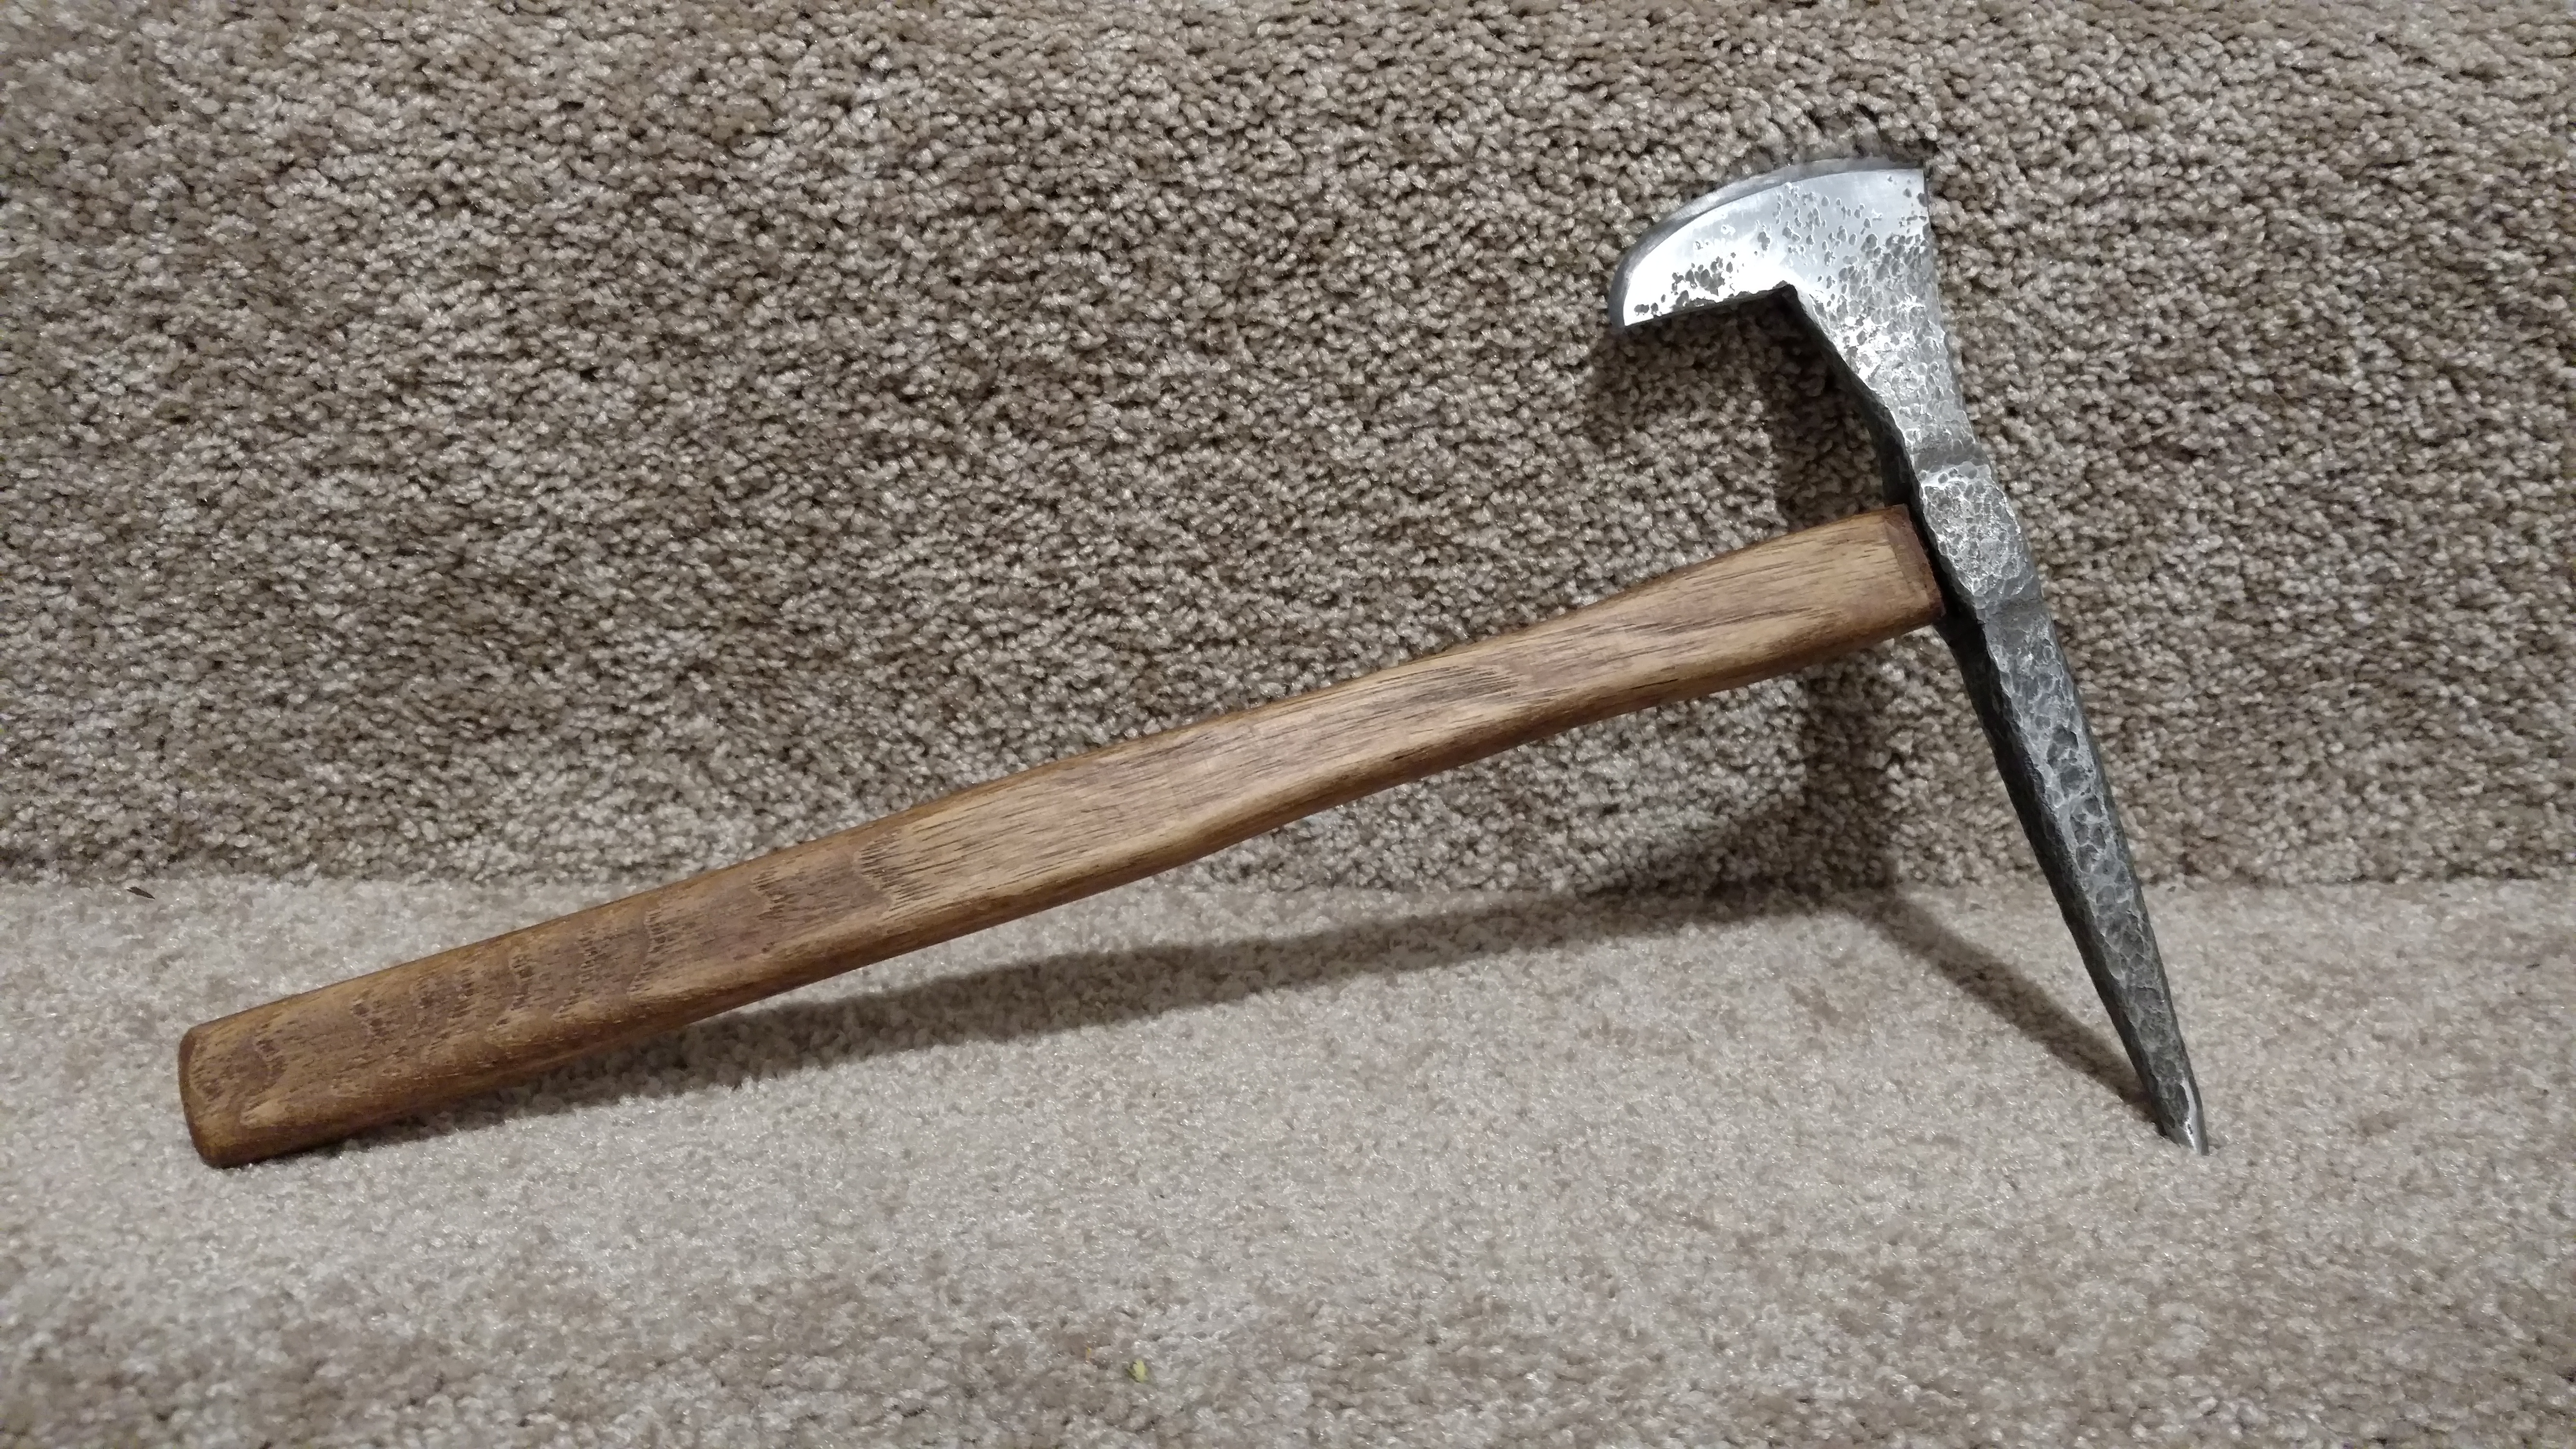
Thanks RaggedEarth. I have not worked up to forge welding yet, so it is pure "HC" spike. I used "superquench" to eek out whatever hardness I can from the barely carbon spike metal. I've read some say superquench actually does something and I've also read it's fools alchemy that doesn't do anything more than cold water. I don't know which is true, but I had mixed up a 5 gallon batch when I started this journey so I just keep using it. Seems to do the trick to get the spike hard enough to handle novelty level use. I doubt it would hold up well to any real use, but honestly can't say that I've ever put it through serious testing to say. I can tell you it holds an edge well enough to widdle some wood to test sharpness and still cut your thumb good when you wipe off the blade, DOH! Here are some more pics after staining the handle and just filling in the little extra gapping in the eye. I am considering nail polishing the cutting edge and giving the blade end another bath in vinegar. I had to do some grinder work to get the flow to the blade to where I was happy with it, so there is an awkward bit that is shiny.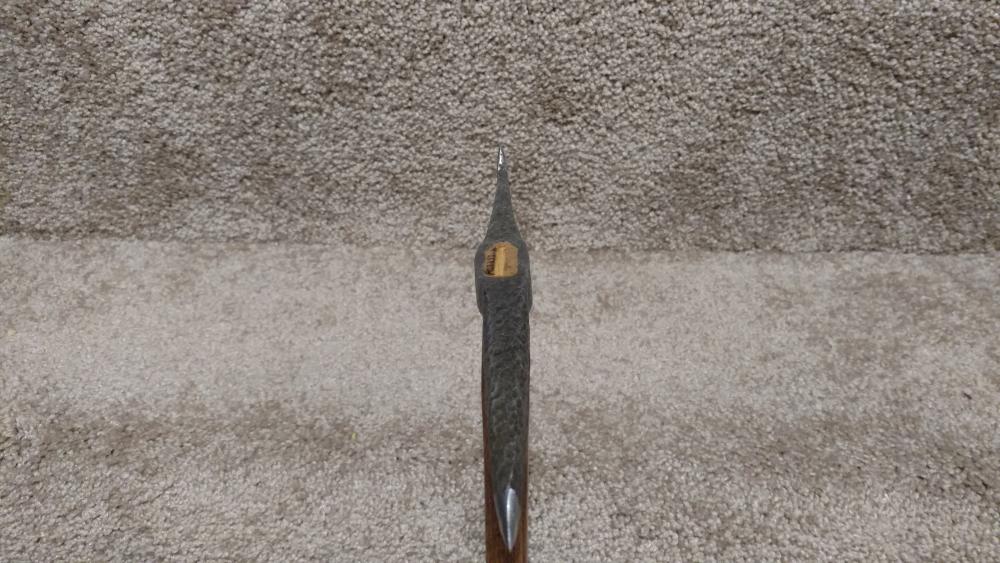
-
I really like the subtle contrast between the woods you selected. It's enough to be interesting without being jarring. Cooking is another thing I do to relax, and that looks like it would be a very calming knife to use of that makes sense. In other words, I like it!
-
Hey LBS, I'm a novice blacksmith (your skills are far better than mine), but some general concepts might be helpful when applied to your work. The way you use your body on the downswing isn't really the concern point. It also isn't likely giving you as much benefit as you might think. By keeping the hammer in tight and swinging at the waist you are limiting the distance the hammer travels and the velocity it reaches. Think about you tennis ball analogy. You get up on your toes to give space to bring the ball to speed. People often incorrectly want to think about acceleration as they remember f=ma, but keep in mind that's really the equation of force to get something moving. In the case of a hammer blow we're dealing with the force of stopping something. It's actually about momentum converting to force (force equals the change in momentum over the time to make that change). That's why falling on hard ground hurts more than a mattress. The mattress absorbs you and lengthens the time over which your momentum is reduced thereby lessening the force. That means if you give the hammer more room to get to velocity (even letting gravity help handle that acceleration to velocity) it will do more work for you. By bending at the back what you are doing is giving yourself more muscles to lift the hammer with after the swing. That is where I'd wager you are actually getting some "benefit" but also what is putting you at risk. Your back muscles are designed for stabilizing not for lifting. Joints are also inherently weaker than straight bone, and your back is one big stack of joints. Repeated lifting with your back will do a number on those muscles and joints. The biology and physics of it all says cap out your hammer size at the one you can comfortably lift a good height and swing with your arm. You can likely cheat a little heavier by pulling the hammer in to your body and keeping it close to your core and lifting vertically after the swing. Think about splitting wood. You choke up on the maul and bring it close to make it easier to lift than let it slide out to get a bigger arc and more velocity. You can use your arm as though it is the handle being choked in then slid out. A low cost investment to increase what you can work would be a tripod. Then you can put the camera on that and make your old man come hold the stock so you can swing a big hammer two handed
-
Haha. We'll just be careful to avoid "mild" rock. Granite is notoriously tough hard stuff. Not all rocks are created equal I suppose concrete would be the cast iron of rock. I can attest from misguided attempts to become a blacksmith when I was a child, using concrete as an anvil only produces a very angry father
-
Cool neotribal vibe to it. Free to you because you had it kicking around, but wouldn't a piece of granite that size with a polished face actually be a pretty pricy anvil? I guess if you can find someone getting rid of scrap, but I've seen the cost of granite countertops
-
24 hours in vinegar followed by a Windex spray down for neutralization. The vinegar bath will change the color of the steel also just to be aware.
-
I'd say listen to the old fellers, they know a thing or two. I'm only in my early-mid thirties, but once you cross that thirty line your body just doesn't do the same things it did in your twenties without complaint. I'm a small guy myself. I'm 5'9" and I only weigh 130lbs if I'm soaking wet I'm new to this blacksmithing thing, but I did plenty of other things in my younger years where I used some "full body techniques" to compensate for my lack of size. Like you I often found a way to not be held back by size, but my back and knees now tell me I should have maybe been more accepting of my own physical limitations. At this point not even using my back to throw weight around like you are, just getting caught up in what I'm working on and bending over too long to see closer while light hammering means my back will complain mightily for the next day or two.
-
Possible anvil find
lanternnate replied to lanternnate's topic in Anvils, Swage Blocks, and Mandrels
I am mostly doing bladesmithing (well attempting to at least), so I only care about smooth fine finishing on essentially everything I'm working on ah well the hunt continues. Thanks for the help gents. Would have been a regrettable 6 hours in the car... -
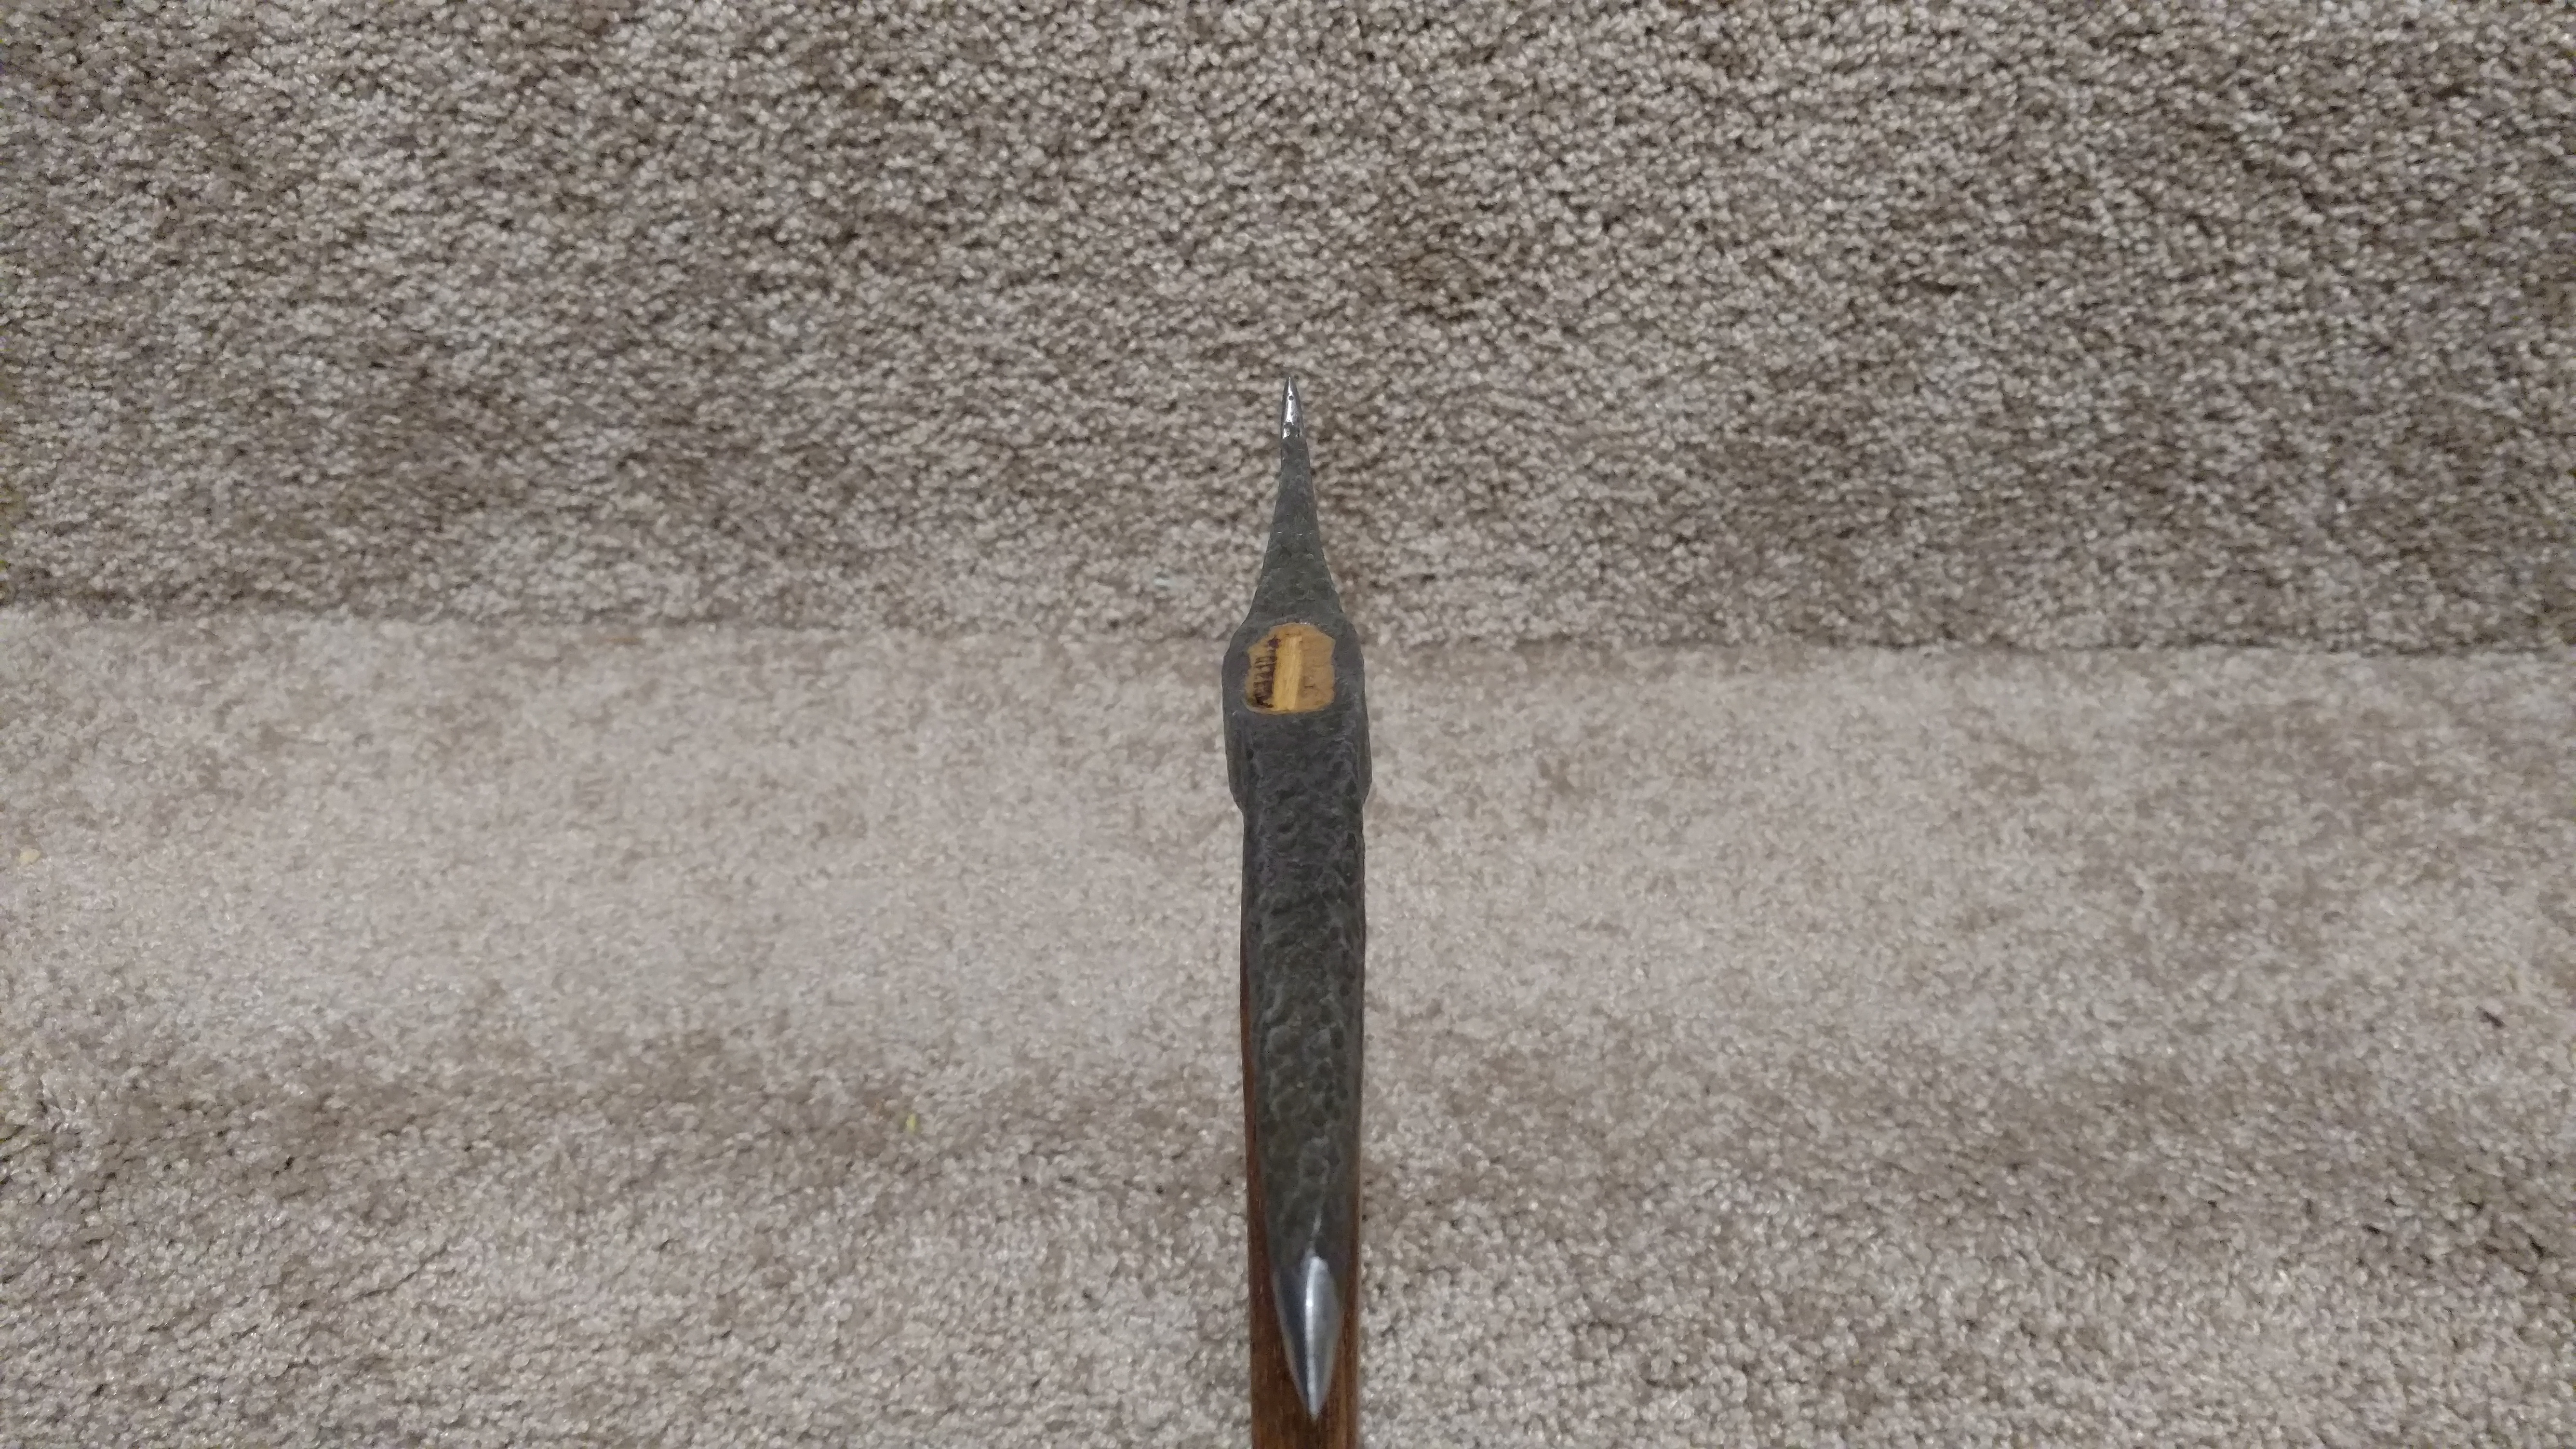
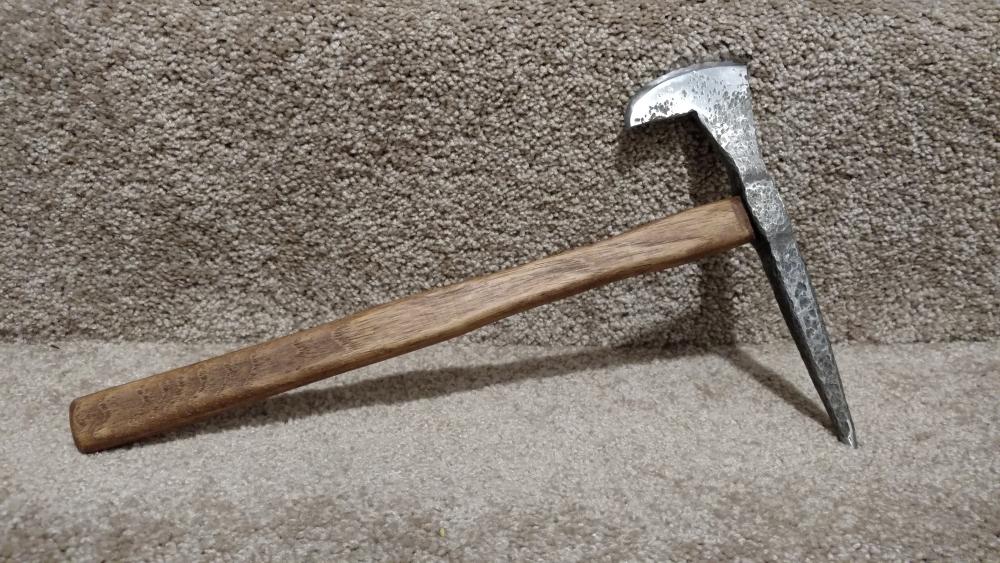
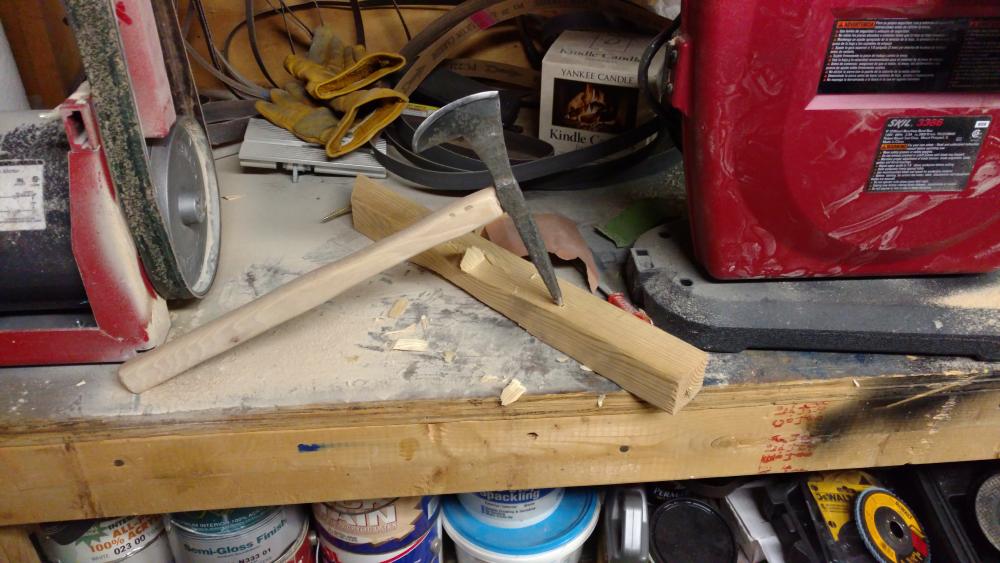
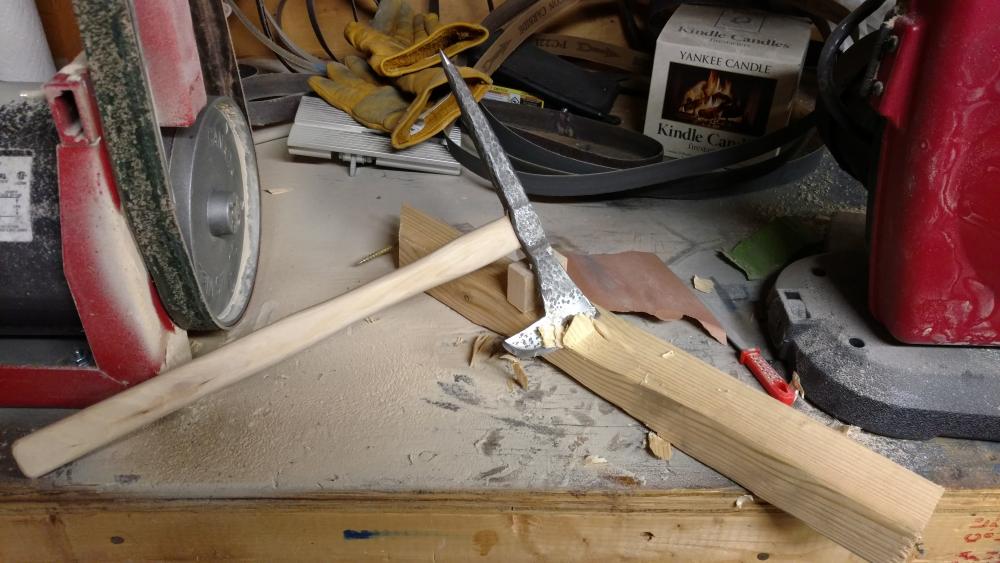
A friend asked that I make him a spike tomahawk, so I had a go at it. I have made one other tomahawk/hatchet type device out of a railroad spike before, but last time I kept the spike head as a "hammer" and made the blade from the spike end (after upsetting). This time I had a go at forging the spike head into the blade because my friend wanted it bearded. I cut and shaped the handle from a leftover piece of hickory floor board. I call it a "tomahatchet" because the handle is attached like a hammer not a tomahawk. I actually patterned the handle after a little ball peen hammer handle I liked the feel of. My friend's intended use is placing on a shelf not throwing, so I think my handle will hold up I've been trying to keep track of lessons learned from each project: - I'd like to purchase or make a larger drift so I can try a true tomahawk handle (currently using a drift I made out of another railroad spike). - I made my drift with more aggressive of a taper than needed, so there is some gap around the handle at the top of the eye after wedging. It doesn't take much taper for a fairly noticable size difference top to bottom. - I had a hard time upsetting the spike "backwards" by putting the head down and hitting the spike end. It seemed logical at the time because I wanted to beef up the blade side, but I think if I did it again I'd upset normal or maybe try from both directions because I feel like it ended up too thin through the middle. - I ended up with multiple cold shuts on the blade from forging down the spike head into the blade. My post reading tells me I needed to go to heat more often and also perhaps get it hotter each time to start. I was able to chase out any major issue ones at the grinder luckily. - I tried to duplicate a texturing technique I'd seen in a video about forging crosses. The technique involved using a ball peen hammer to add the texture. I got a texture, but not really matching up to what I was attempting. As best I can tell it is an issue of my inconsistent spacing and force of blows. Goes to prove things in blacksmithing can look and seem simple (oh just hit it a bunch of times with a ball peen, I can do that!), But actually require a lot of practice and technique. I think I'll try figuring out textures some more on scrap pieces before attempting on a full project again. Here are some pics. I need to decide how to finish the handle (and yes my shop is a complete and total mess)
-
Possible anvil find
lanternnate replied to lanternnate's topic in Anvils, Swage Blocks, and Mandrels
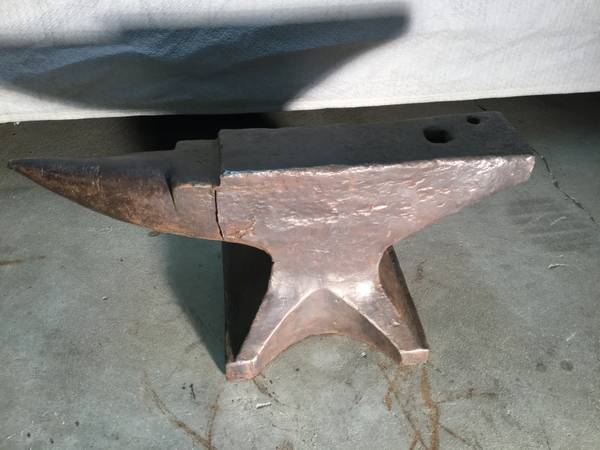
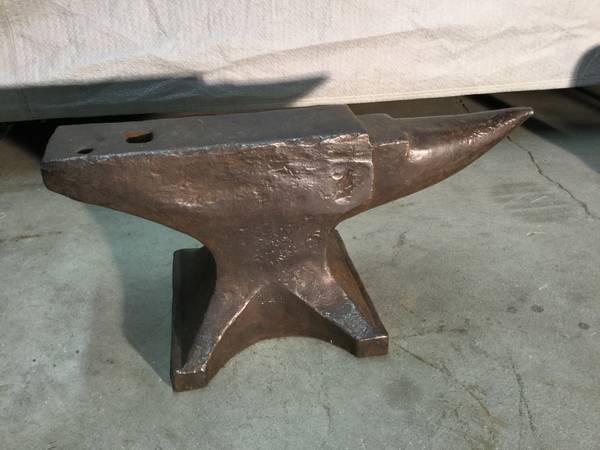
Hmm alright sounding like maybe a pass. Asking price is $250 (USD). Cheaper than everything else I'm finding in the area, but maybe not cheap enough to be worth it if the face appears to be unfavorable. I guess I'll hammer on my railroad track a little longer and continue the hunt. -
Possible anvil find
lanternnate replied to lanternnate's topic in Anvils, Swage Blocks, and Mandrels
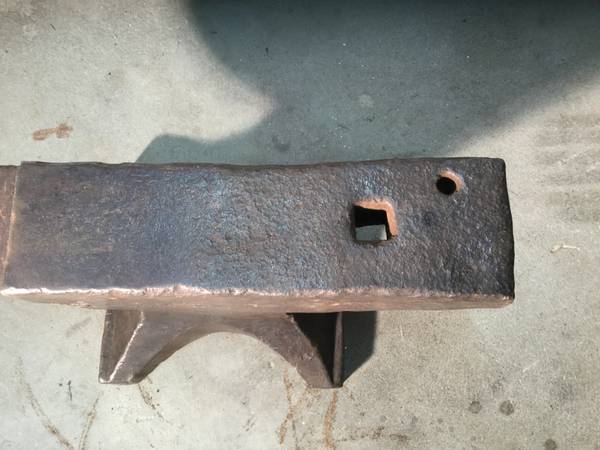
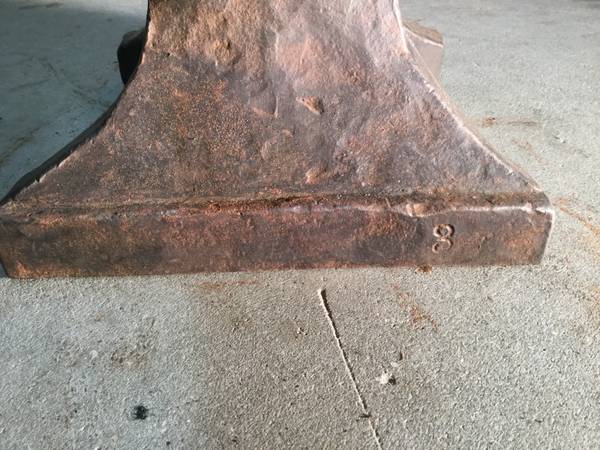
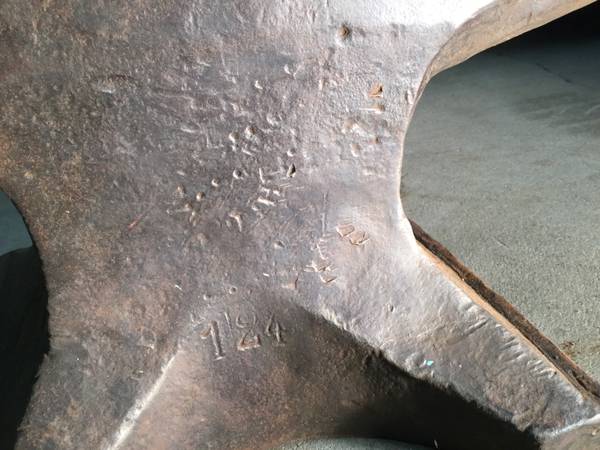
Don't know on the rebound yet. It's a 2.5-3 hour drive, so trying to make a decision if it looks worthy of driving to check rebound and give a personal inspection. It was a barn find according to the seller. After looking at more anvil ID pictures around the web, I'm wondering if this is actually a Trenton. I found pictures of Trenton that had the solid wrought written on them in what looks like about the same spot as this one. The numbering looked similar too. Comparing to some Peter Wright pictures it looks like the solid wrought is higher on those? And the Peter Wright pictures I have found have the number higher with the middle number inside the solid wrought words. That isn't the case with this one. -
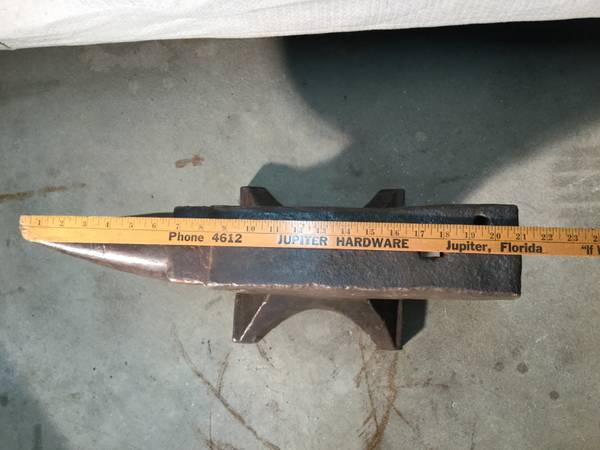
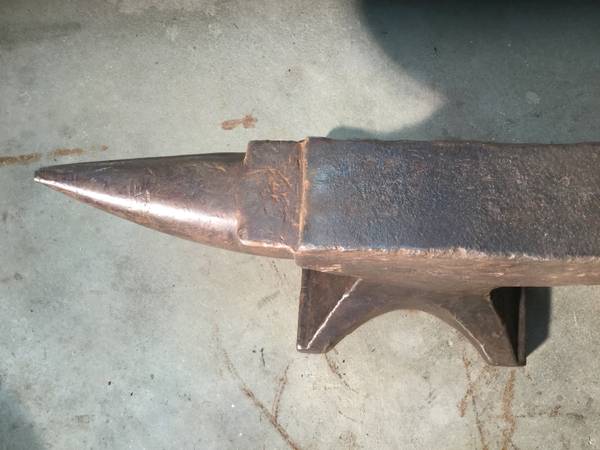
I've been on the anvil hunt. Most that I have come across in the area have been in too rough a condition or too high a price (or both) for me to bite. One recently came available that isn't perfect, but I think could be usable condition and at a better asking price than others I've found. Looking to see if others might be able to identify the anvil and give some input on if there are visible condition issues to look out for. I haven't seen it in person yet to do the tests. It isn't a short drive to look at it, so I'd like some confidence it might be worth the trip. I think it might be a Peter Wright because of what looks like a mark that I think says Solid Wrought, but would love some insight from the more knowledgeable. It's also marked 124, but I know based on brand that might be pounds or stone weight. These are pictures that were provided by the seller so apologies if it's missing an important angle for identification.
-
They called it hada, but my understanding of hada (purely from reading and not practical) is the Japanese technique of folding the steel and forge welding it to itself many times. What they gave Theo looked like a stack of bars of the same type of steel that he tacked then forge welded. I guess if they have him five pieces it was essentially the same as if it had been one bar that was folded five times. Maybe having multiple pieces made it more visually obvious forge welding was required rather than giving one piece and saying fold it? I also didn't get why the other gent kept trying to slit that little piece of mild. I expected either draw it wide and make a taco or draw it long and fold around. I shouldn't say too much though as I've learned this all sooo much easier in theory than practice. I was also a little surprised Theo and the other guy clayed their blades but Walter didn't. Given his background is Japanese swords and he did traditional Japanese technique otherwise it would have seemed logical (and maybe prevented his failure by giving a softer spine).
-
Congrats Theo. You represented well with your skill at blacksmithing and puns! I've been watching A LOT of Walter Sorrells videos as I try to teach myself this craft, so it was very cool that you and he were on the same episode. I would have been star struck of him, now I'll be star struck of you Your work came out awesome.
-
So tonight's the night? I'll be watching!
-
Frosty and The Unlucky
-
From one beginner to another try not to make it too complicated, which I am going to say is far easier said than done. Also, building your own is an option, and if you are properly equipped and skilled you can save some money. I wouldn't feel like you need to though. There are options out there that are not significantly more expensive than the sum of the parts (especially if you would need to acquire certain tools to do the job). I ended up buying a forge because for me this is a hobby, and I have limited free time to spend on it. I wanted to spend my time forging rather than building a forge. For some I think the project of making the forge is in and of itself an enjoyable part of the hobby, and if you think that would be the case for you go for it. Nothing wrong with buying a forge to get going quicker though. The trap I fell into was trying to find a forge that could do ANYTHING I might ever want to do. I'll save you the hassle of repeating my search, such a forge doesn't exist. Figure out what it is you really want to do (and have the other needed equipment to do) right now and get something appropriate for that knowing you might need to buy or build something else for different purposes down the line. For me right now it is bladesmithing, so I bought a Graham Forge from Atlas Knife Co. that is made specifically for that purpose. That forge also proves out the don't make it too complicated point. The burner is a piece of pipe with a gas jet welded to it. It's super simple, but it just works. It isn't a recommended forge for lots of welding because the liner is soft fire brick that wouldn't like flux. He has a "budget" model that uses the wool liner that might be more appropriate for sacrificial flux devouring. Your post said you were looking to have the forge for forge welding, but I noticed both forges you linked to are "knife maker" forges. What type of forge welding are you looking to do? From what I've found those that are looking to do serious forge welding of Damascus are using vertical forges often. Also keep in mind some of the other requirements beyond the forge. If you are planning to forge weld big stacks a power hammer or hydraulic press start to come into the equation. Lower layer count stuff and other forge weld techniques like san mai should theoretically be doable by hand. I've yet to build up the confidence to try. If it is just coincidence you were looking at knife maker forges you can promptly ignore what I just said Also consider the fuel needs of whatever forge you go with. Something with 3 burners needs more fuel than something with 1 obviously, but there are other tag along things with that. The larger forge with more burners is going to need more fuel and therefore be more expensive to run, but it will also draw fuel much faster giving you potential tank freeze up issues. My single 100K BTU burner runs just fine on a regular 20lb propane tank. The guys with bigger forges with more burners are running 40-100lb tanks to avoid freezing up. Also, keep in mind if you are going the bladesmithing route you only need to be able to work a certain amount at a given time. As long as the forge has a rear opening it does not need to be as long as the blade you want to make. I would assume the same is true about the general blacksmith folks, though I wager they care more about width to have room for scrolls etc.
-
Broad axe "refinement" for Peter Gott
lanternnate replied to Frank Turley's topic in Axes, Hatchets, Hawks, Choppers, etc
Judson, does that count as cutting once measuring twice? -
Bow Tie Camp Hatchet
lanternnate replied to Benton Frisse's topic in Axes, Hatchets, Hawks, Choppers, etc
Purdy is right. Very impressive. -
Few " Almost finished " ones I have in process.
lanternnate replied to Malice9610's topic in Knife Making
My understanding is a clip point is a blade with approximately the last 1/3 "clipped" to the point and that clip may be straight or curved. It does conjure a feel of a broken back seax. -
Few " Almost finished " ones I have in process.
lanternnate replied to Malice9610's topic in Knife Making
I like the handle on the little sheepsfoot. I'd almost call the last one a clip point. All three look great to me. -
Are those hard or soft bricks? The hard ones usually meant for fireplaces etc. are not very good insulators. They're more meant to be tough. The soft ones made for kilns do a better job in a forge application (they are weaker because they are less dense, but that also makes them preferable for insulation). If they are the hard ones you might not get the performance out of your forge/burner that you are hoping for.
-
For comparison stats, my purchased forge that was designed for knife making has the following stats: Single 100k BTU burner 5" diameter 12.5" long chamber 4"x2" front opening 3"x1" rear opening It works very well for the general forging and doesn't seem to be an issue to turn down for heat treating. Theoretically it can be cranked for forge welding as well. I have not attempted yet due more to lack of confidence in my capabilities rather than the capabilities of the forge. For an "all around" knife forge those might be pretty good specs to start from.