bobasaurus
-
Posts
170 -
Joined
-
Last visited
Content Type
Profiles
Forums
Articles
Gallery
Downloads
Events
Everything posted by bobasaurus
-
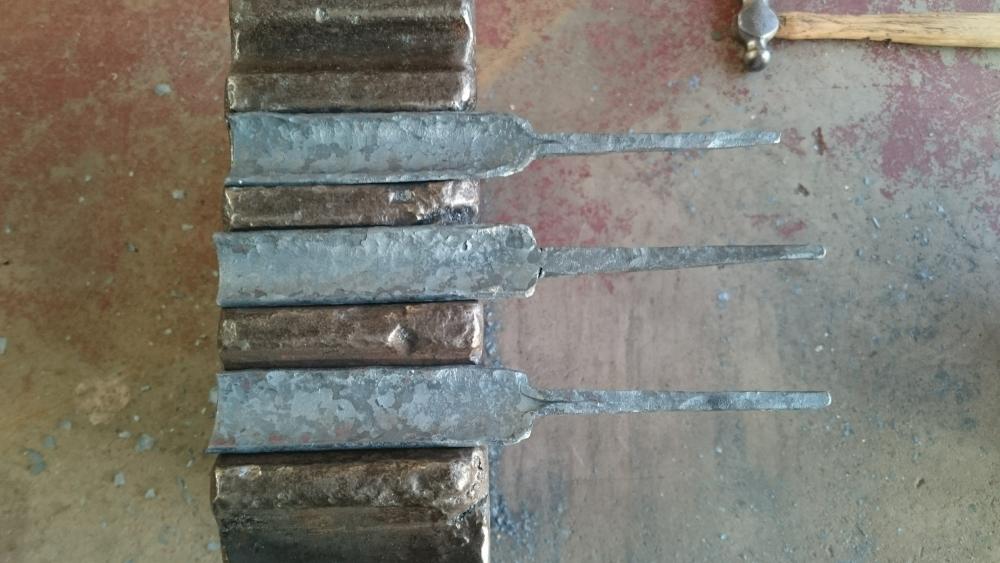
I really wish I had a good way of forging shoulders that the handles could sit on, instead of the tang going right into the gouge body. I might try to make some dies that would work with this, or some kind of guillotine / spring fuller tool.
-
Yeah, it can crack easy if worked too cold. I've made a couple knives from it without trouble before, being careful about the heat.
-
If you have some round bar stock, you could use that to shape the concave/inside flute while hammering around the convex outside. Maybe even a tin can filled with plaster would work okay for a round fuller?
-
Thanks, I started with 1 1/4" wide 1/8" (or maybe 3/16"... can't remember) thick 1080 stock from Kelly Cupples.
-

starting to forge my first full-scale damascus
bobasaurus replied to bobasaurus's topic in Knife Making
Yeah, it ended up as a lot of steel... almost bit off more than I could chew. Rounding the corners a bit before twisting would have helped, I'll do that next time. I'm going for low layer count more for interesting patterns than historical accuracy. -
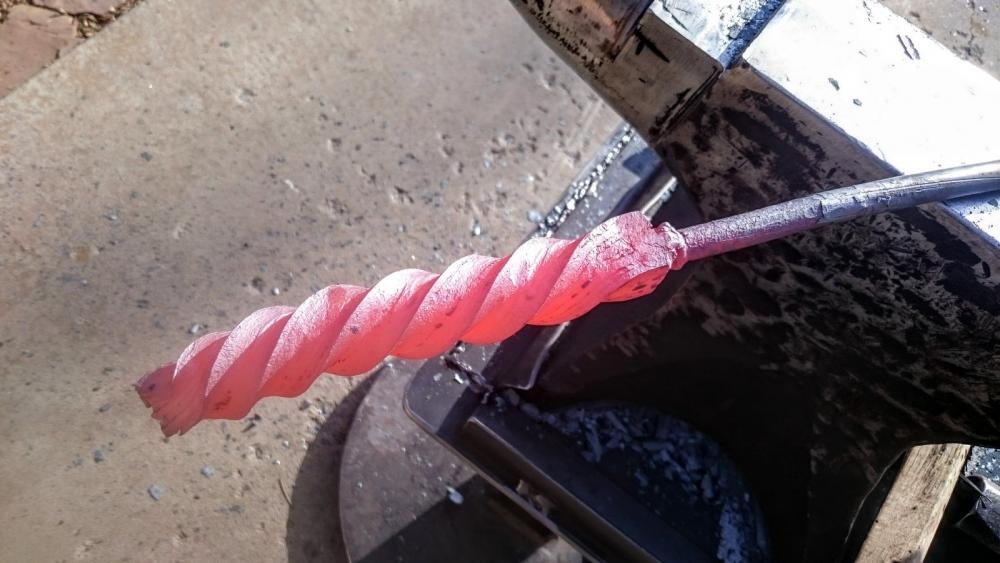
This weekend I worked on forging my first full-scale pattern welded damascus billet. I've previously done one miniature damascus test with a bandsaw blade and pallet strapping and it turned out okay. This time I used 1.25" wide 1080 and 15n20 pieces tack welded into an 8 layer billet after a lot of grinding to make things square and shiny. I welded on a handle and heated it to about 2325 deg F in the forge until uniform temperature. I did fluxless forge welding for the first time and it seems to have worked perfectly so far, I didn't see any separation while drawing later. After drawing out the bar to about 1" square I twisted it (took a few heats... 1" is pretty thick for my small twisting wrench). After I took the neat picture below, I forged it nearly square again. That's all I was able to do with my arm power for the time being, I don't have a power hammer or press so this is all hand hammered. Not sure what to make with it yet, maybe an axe or kitchen knife.
-
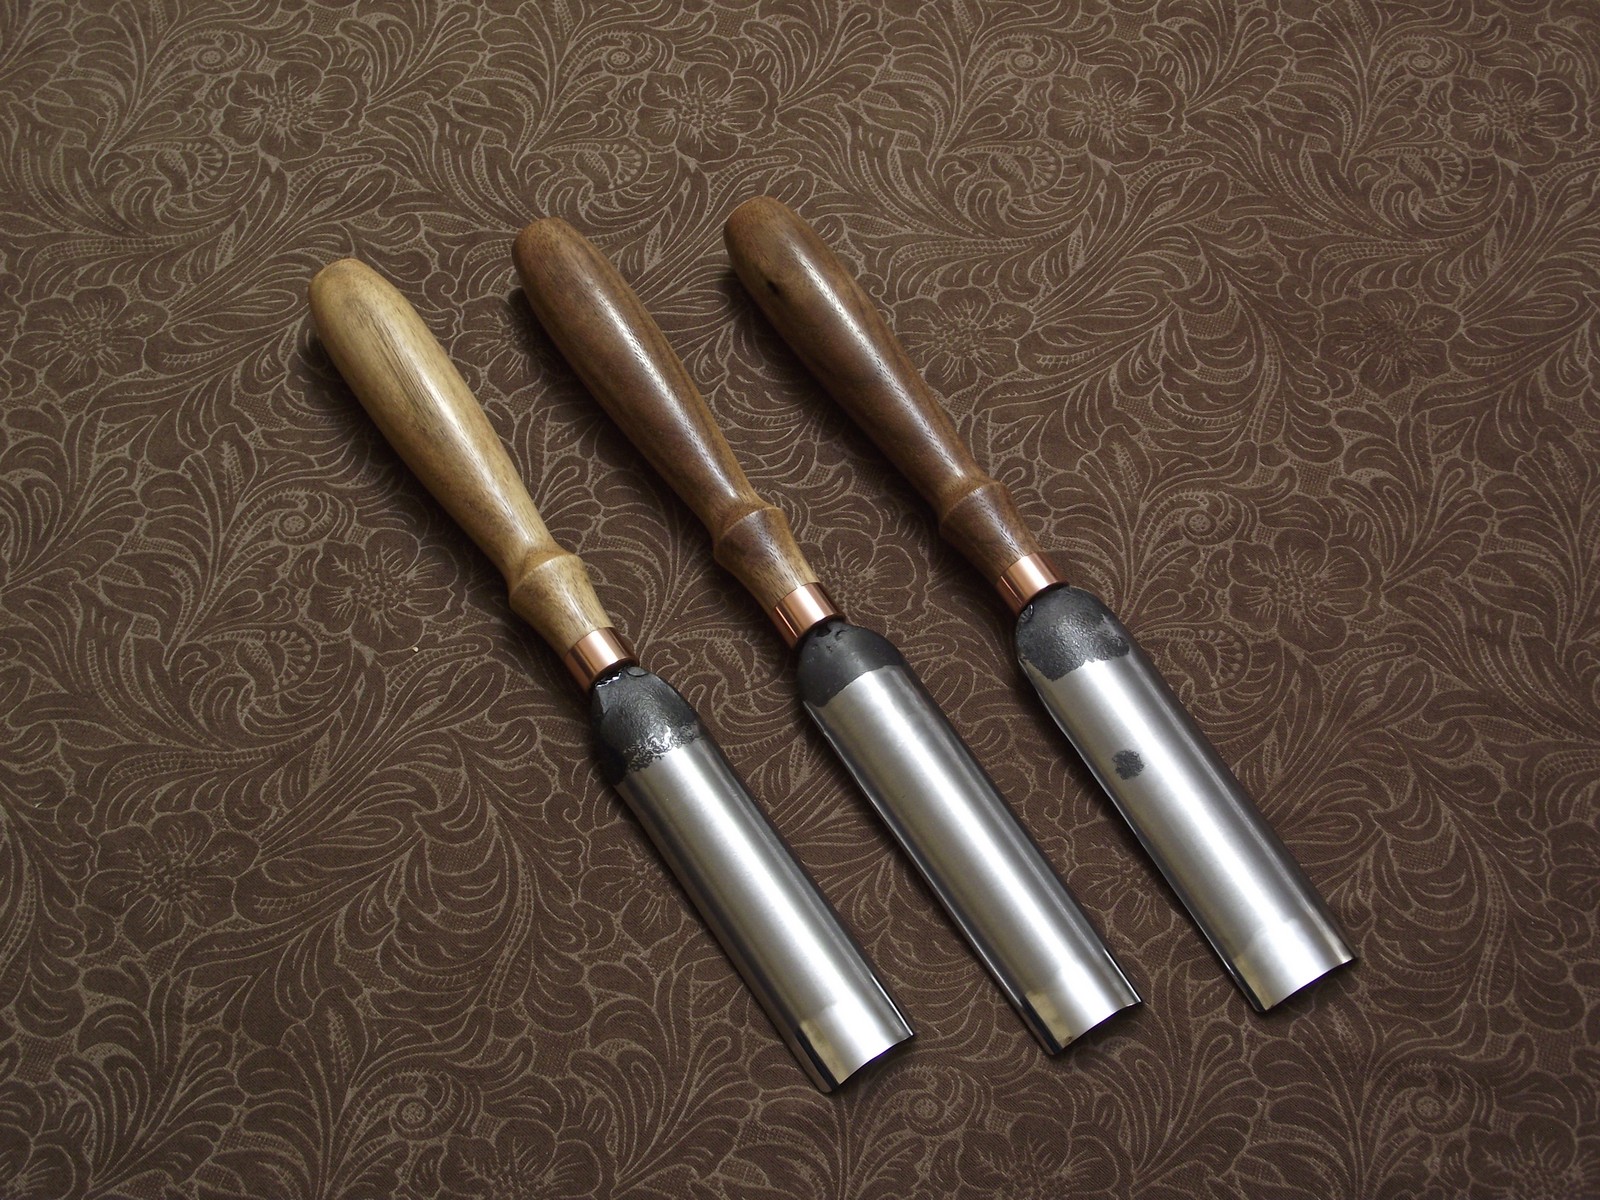
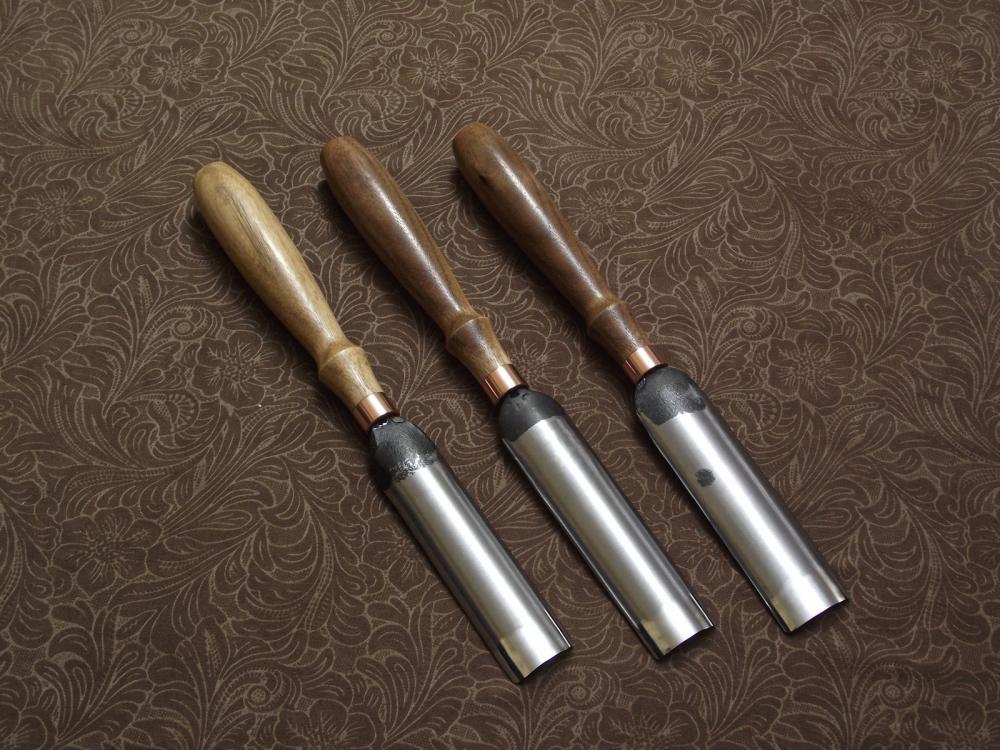
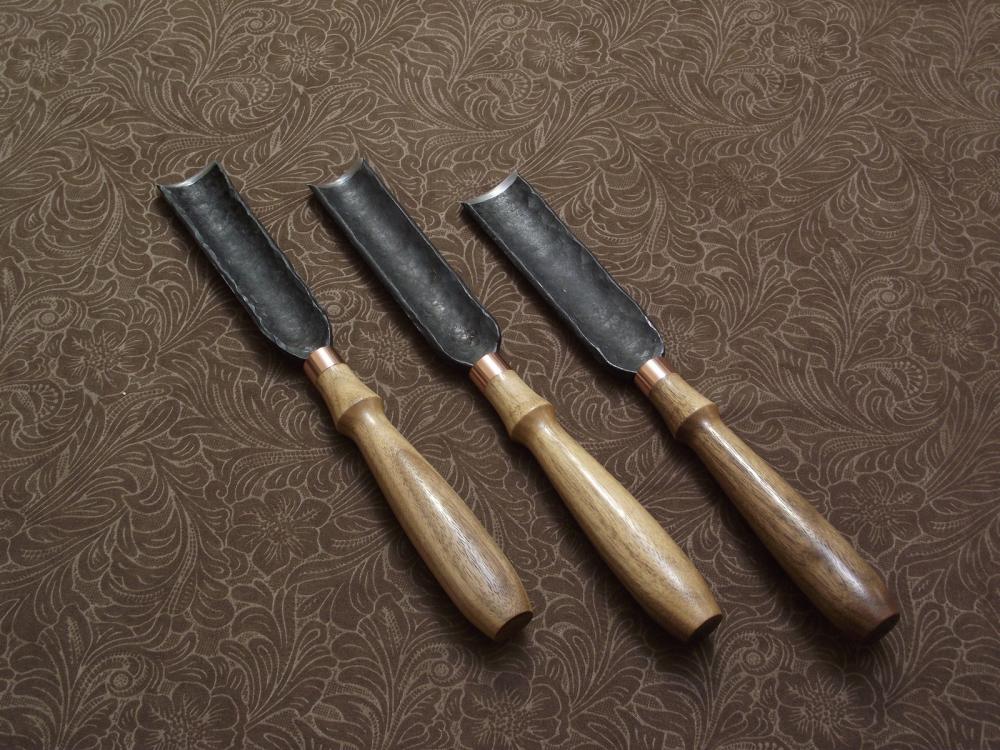
Thanks. No jig, I just used a flat stationary 6x48 belt sander and pivoted the gouges while grinding. As a finishing step, I briefly used the slack of the belt to polish things up.
-
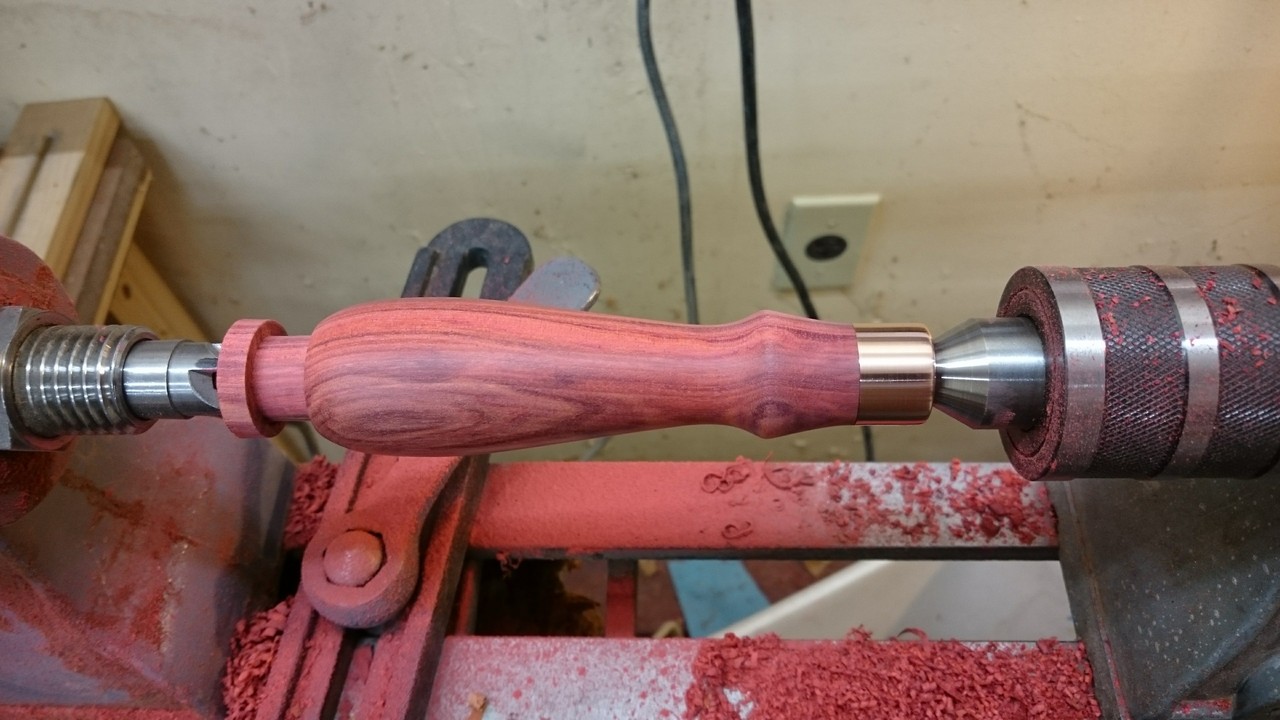
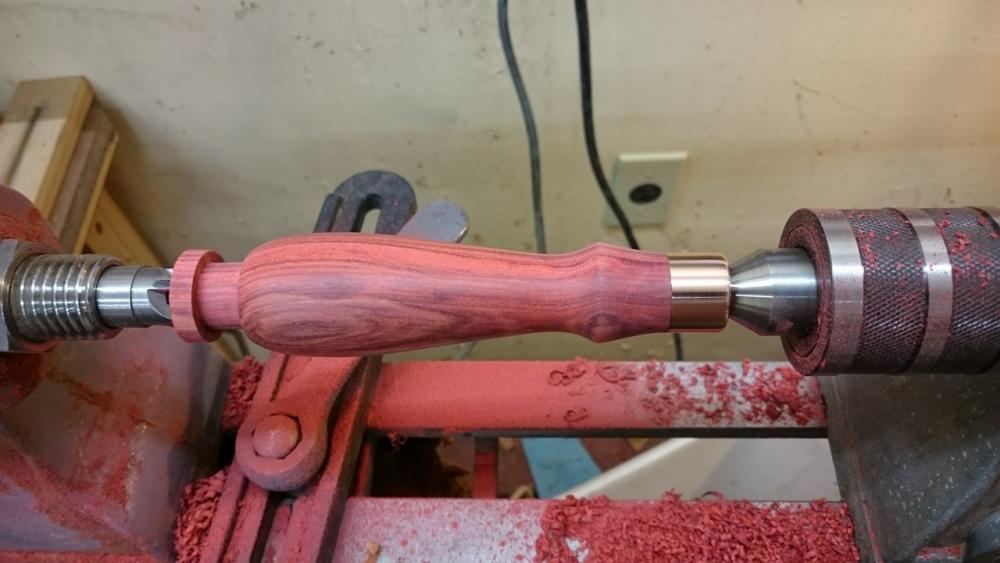
Thanks. I didn't hot fit them, I drilled out the tang holes a bit wider than necessary then used a lot of glue. Thought about burning the tangs in, but the last time I did that the wood beneath the ferule shrunk and the CA glue burned out, making the ferrule loose. I'll try using a good epoxy next time instead.
-
Those are both clever ideas, thanks.
-
You know it. That thing works great: They were pretty simple to rough forge thanks to the swage block. Drawing out the tangs was the hardest part. If I cut the tangs instead, I could really crank these things out. That's a good reference, thanks. Mystery sweeps, from three different positions on the swage block. I could try to work out their radii, but it would take some math.

-
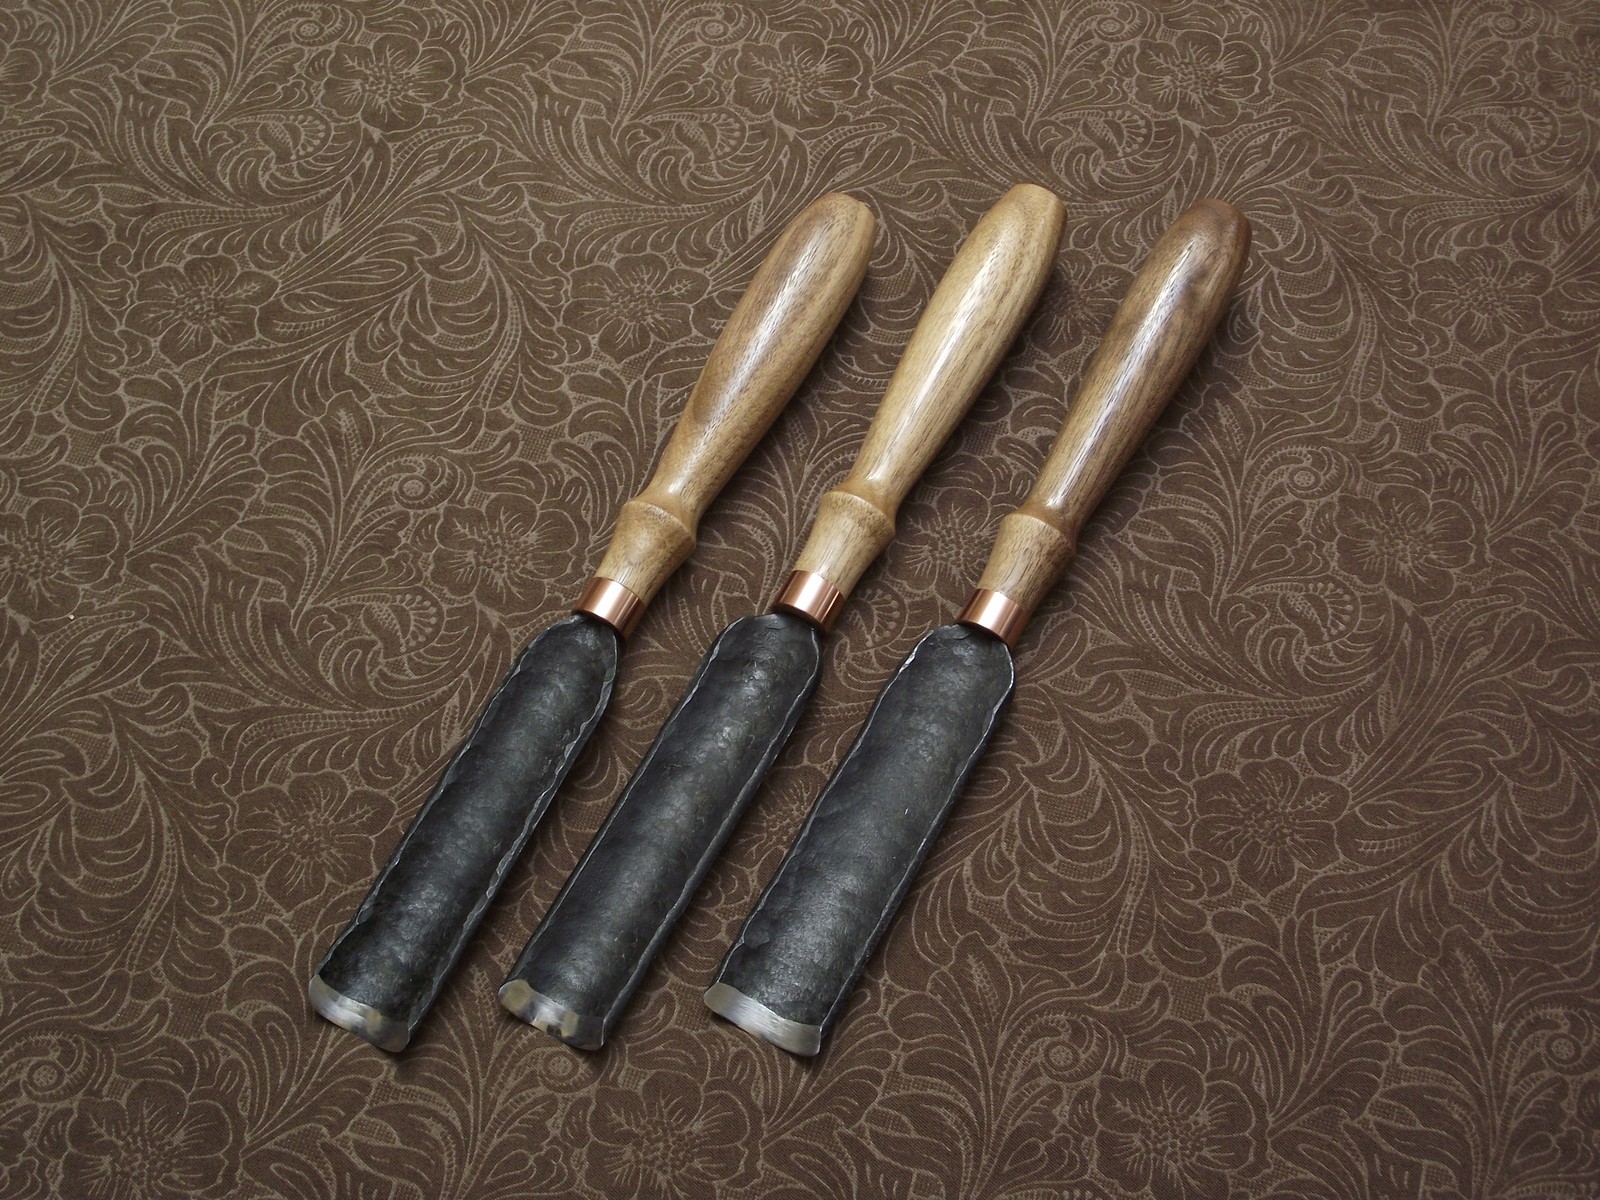
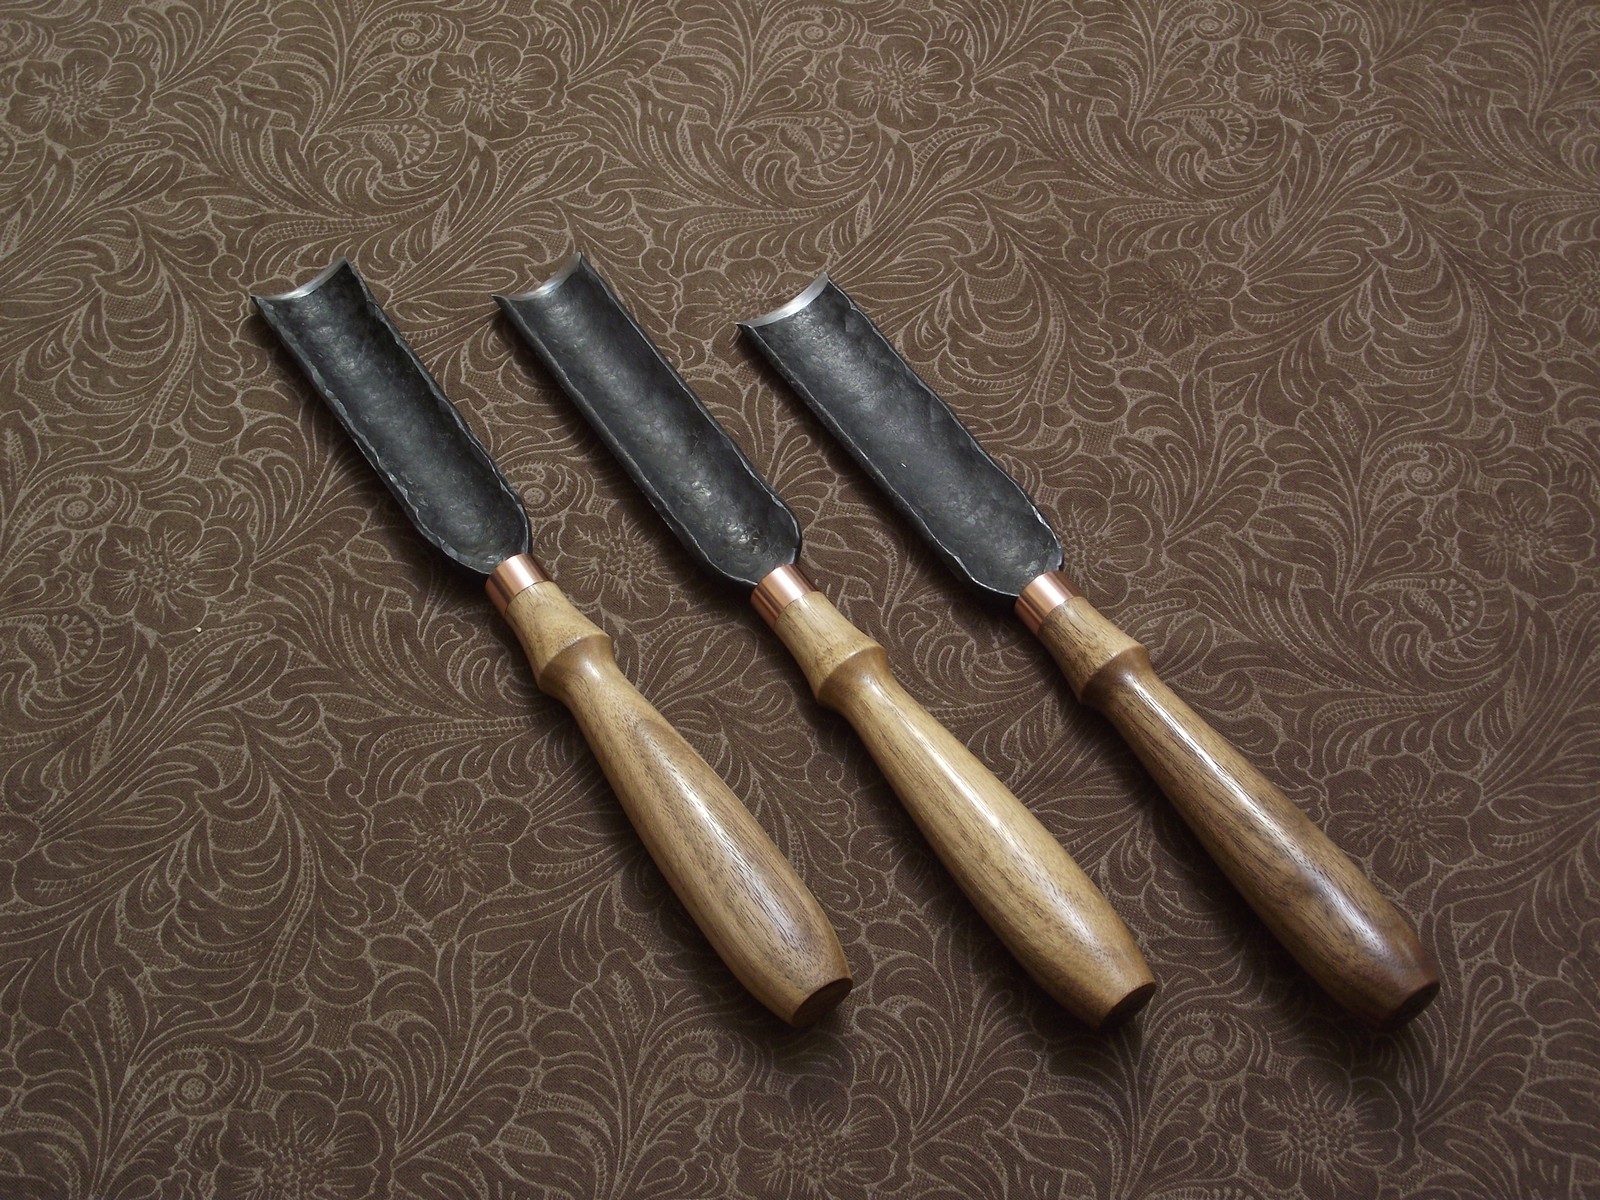
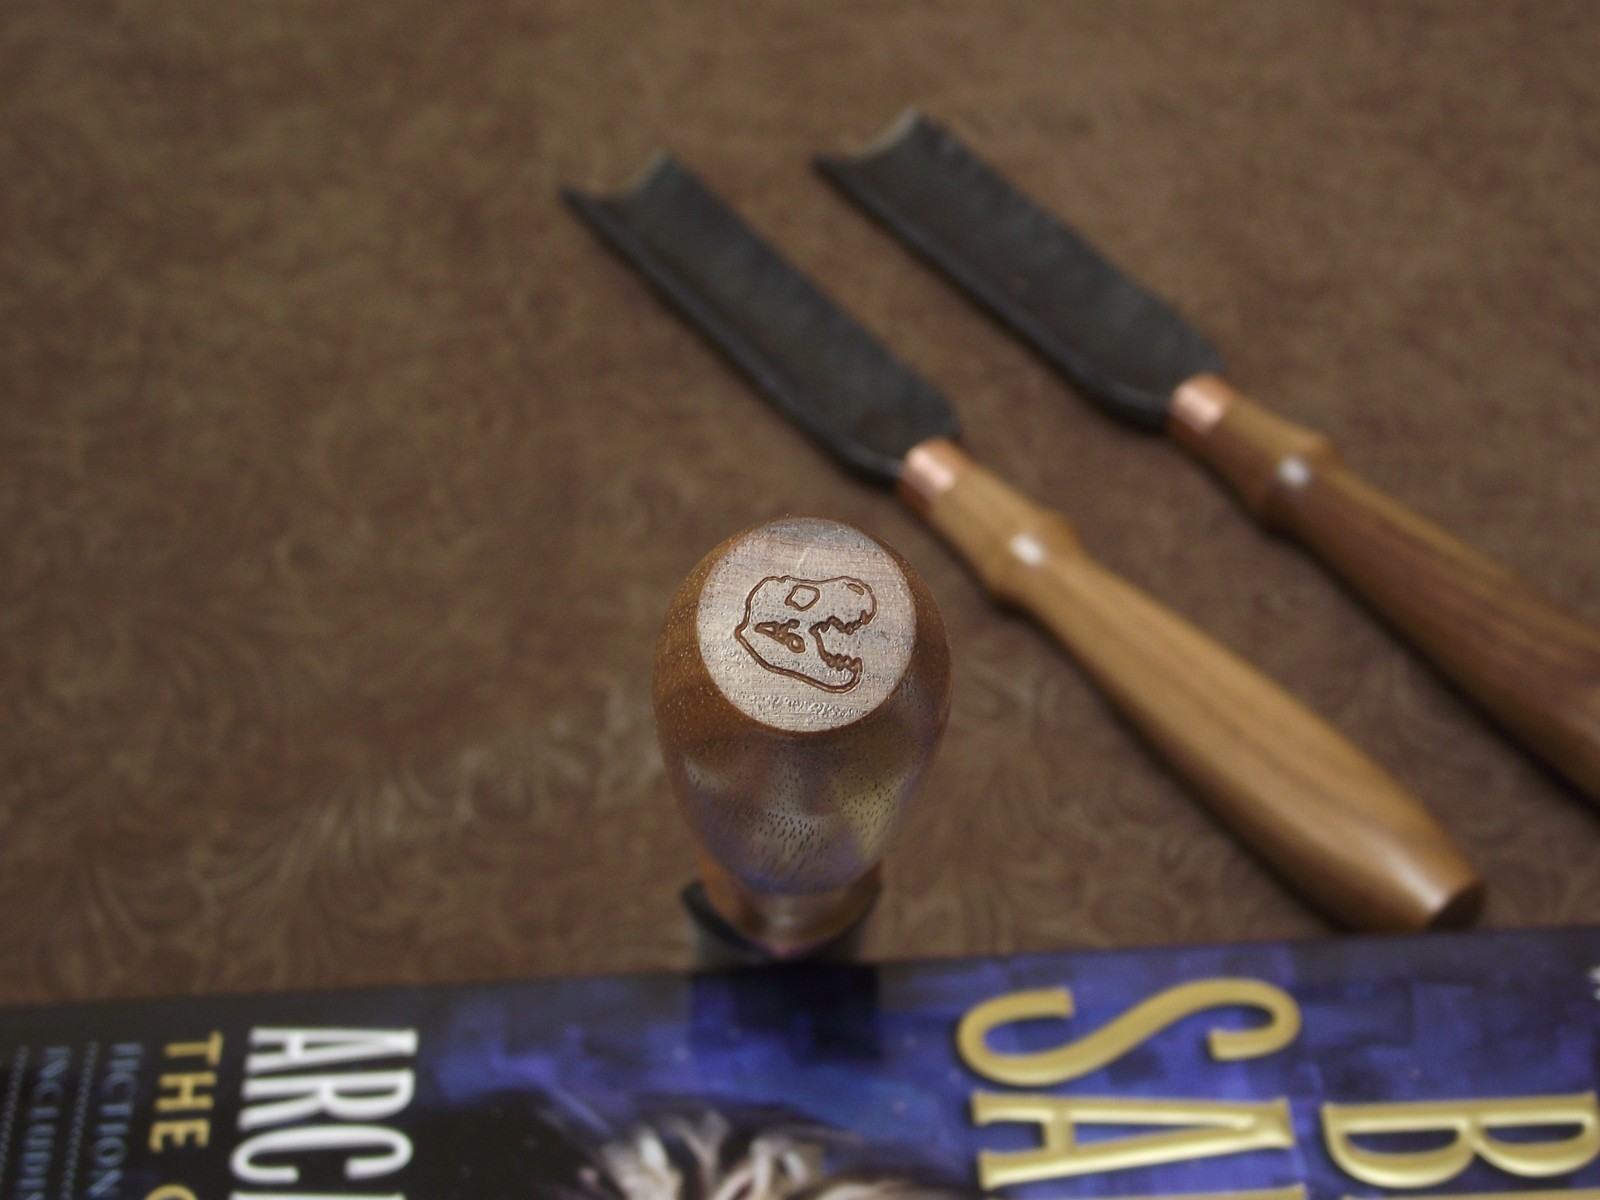
I forged this set of incanal wood carving gouges from 1080 steel. The handles are walnut and copper.


-
Really great work, I love these things.
-
Blacksmith / Forging Simulator
bobasaurus replied to ForgingSimulation's topic in Blacksmithing, General Discussion
As a programmer and hobby blacksmith, I find this project really interesting. I don't have much to add, the previous replies sum it up really well. Would this be in 3D, and would you use a mesh deformation physics simulation package? -
J.W.S., where did you get that chunk of steel for so cheap? Ordering a piece like that online would be $300 or more.
-
Picked up Peter Wright Anvil
bobasaurus replied to ChrisPTF's topic in Anvils, Swage Blocks, and Mandrels
I have almost the same anvil (a mere 129 lbs, though). Looks like it's in great shape. How will you secure it down? I haven't secured mine yet, it needs it bad. -
Hewing Axe step by step (pic heavy)
bobasaurus replied to Judson Yaggy's topic in Axes, Hatchets, Hawks, Choppers, etc
Really great work, love the welded edge and clean lines. -
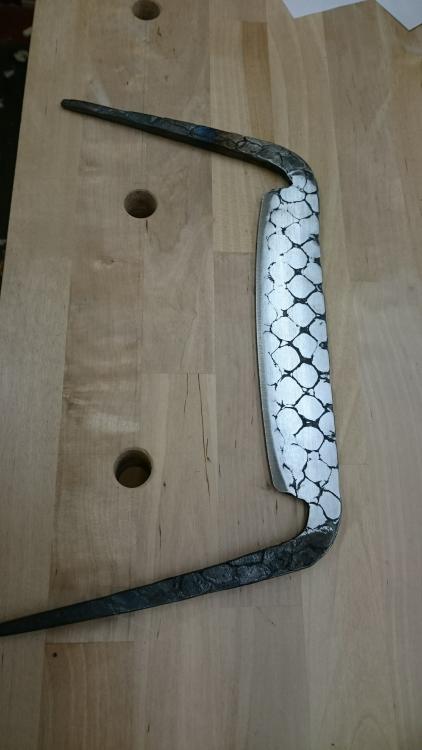
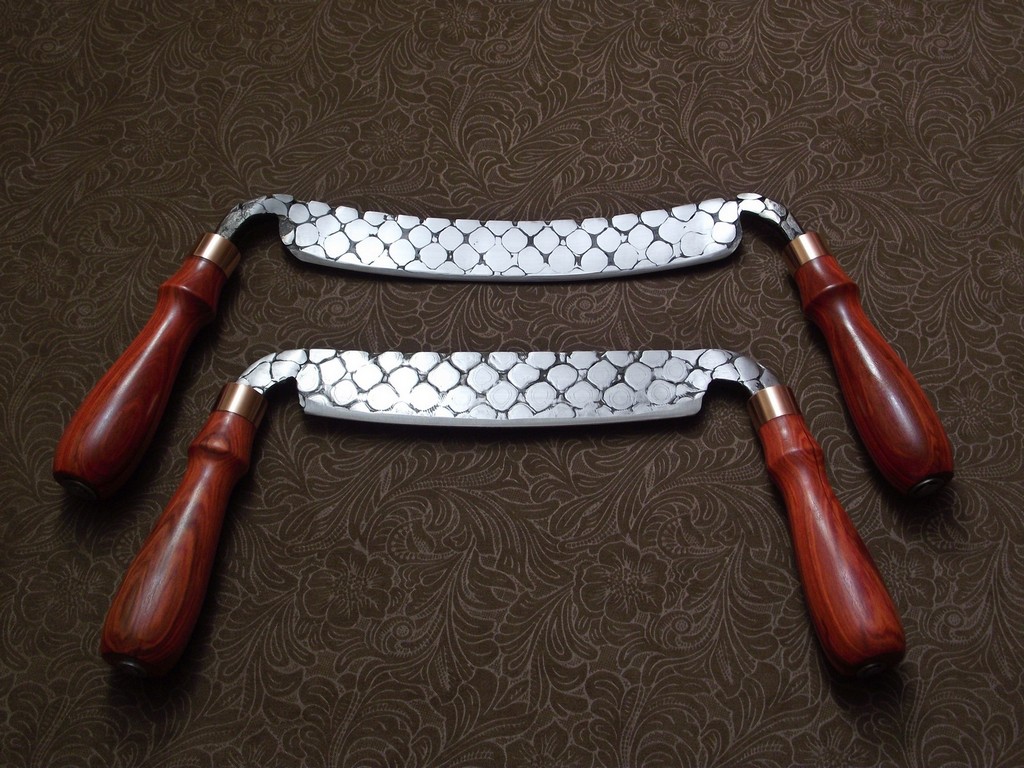
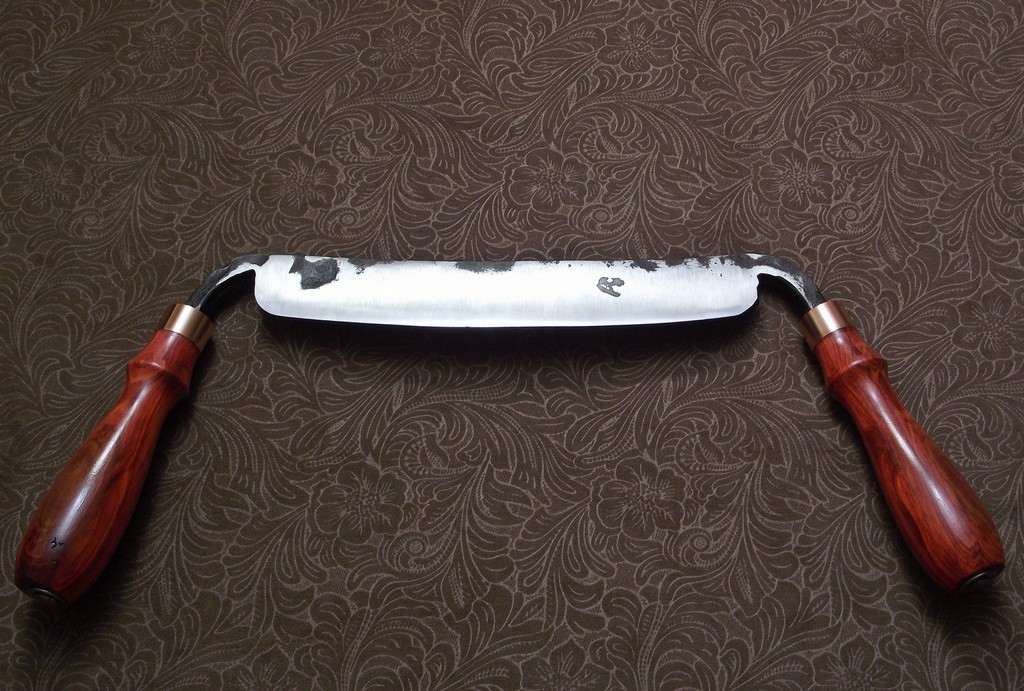
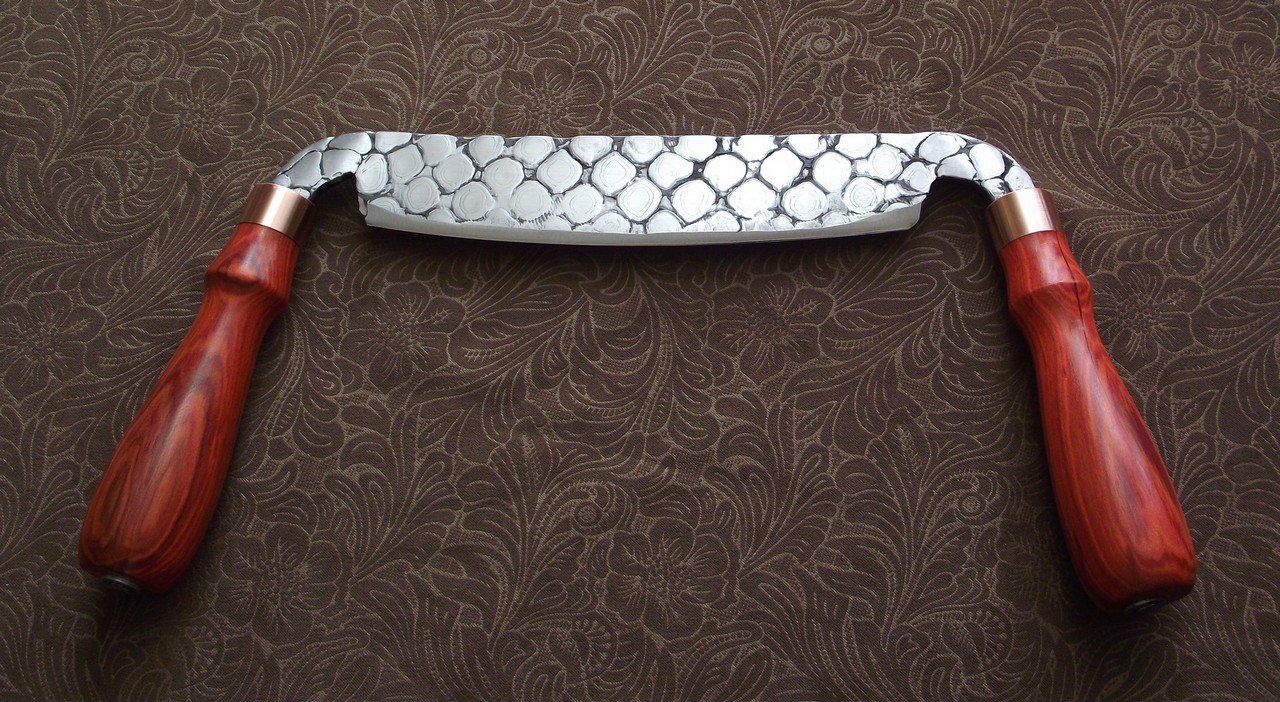
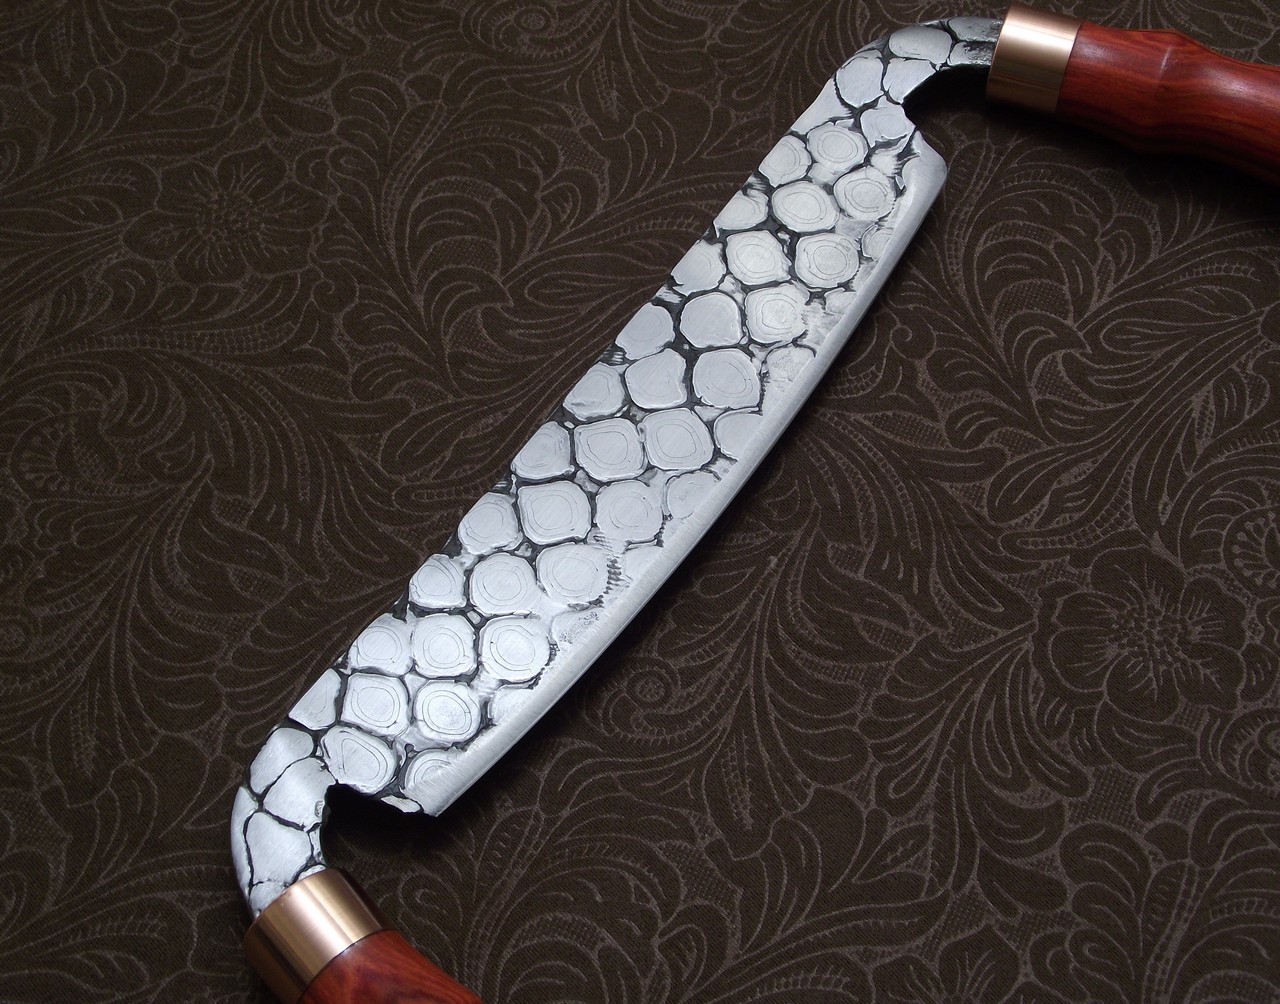
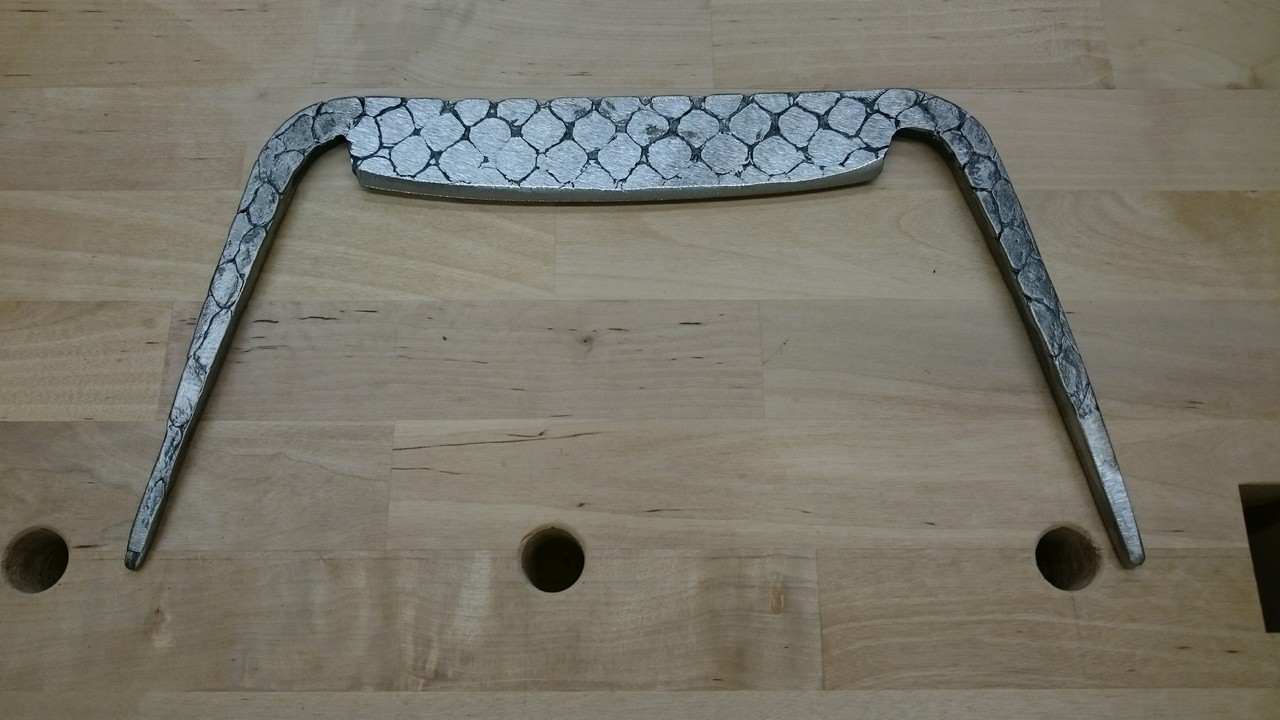
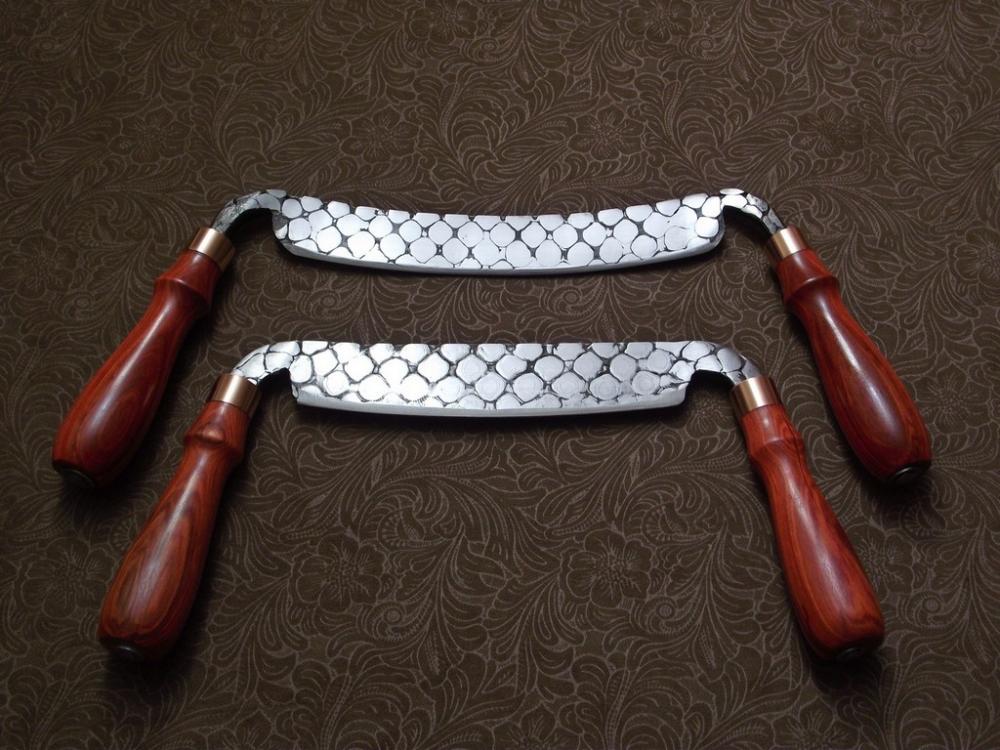
Twin Dragonscale Drawknives
bobasaurus replied to bobasaurus's topic in Chisels, Gouges, Scissors, etc
Thanks everyone. I'm making a display/holder for my drawknives now to mount on my french cleat wall in the shop. -
Twin Dragonscale Drawknives
bobasaurus replied to bobasaurus's topic in Chisels, Gouges, Scissors, etc
Why did this get moved? This is a finished project by a member, so doesn't it belong in member projects? -
Twin Dragonscale Drawknives
bobasaurus replied to bobasaurus's topic in Chisels, Gouges, Scissors, etc
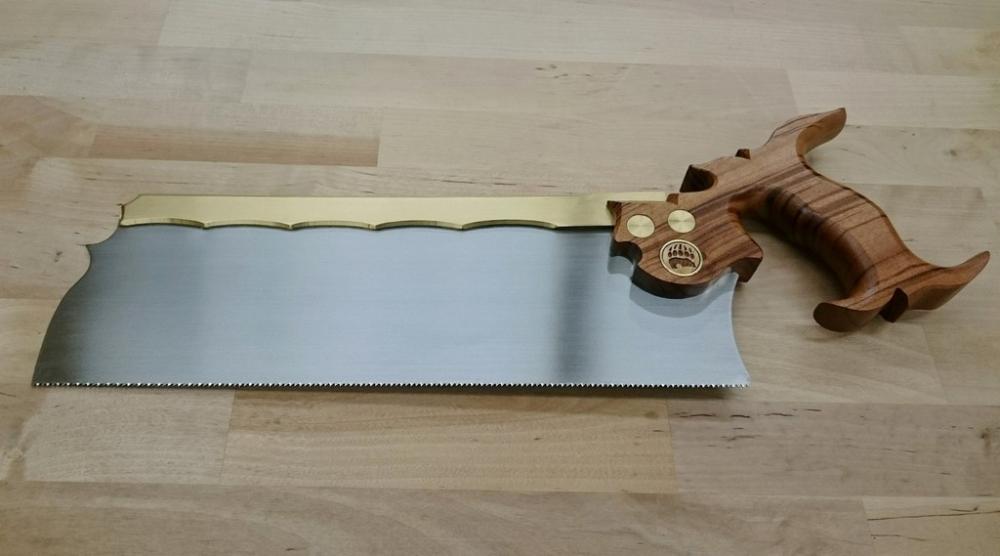
Thanks Frosty. The hand saw is so pretty it's hard to use in case I scratch it. I'll have to come up with a good project for it soon. It's made for cutting tenons in medium sized boards. -
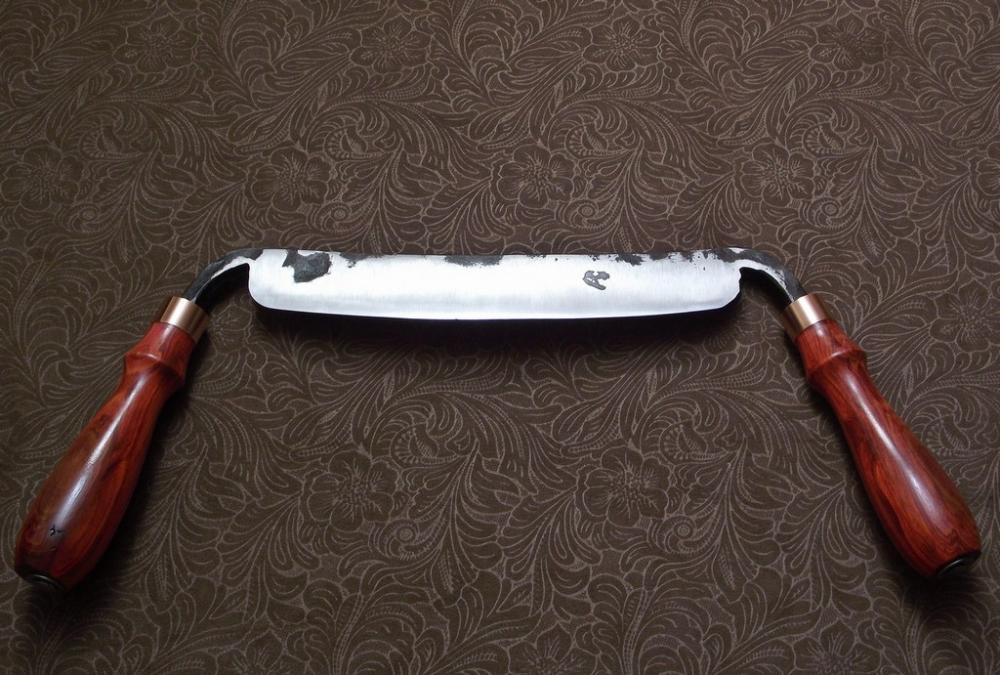
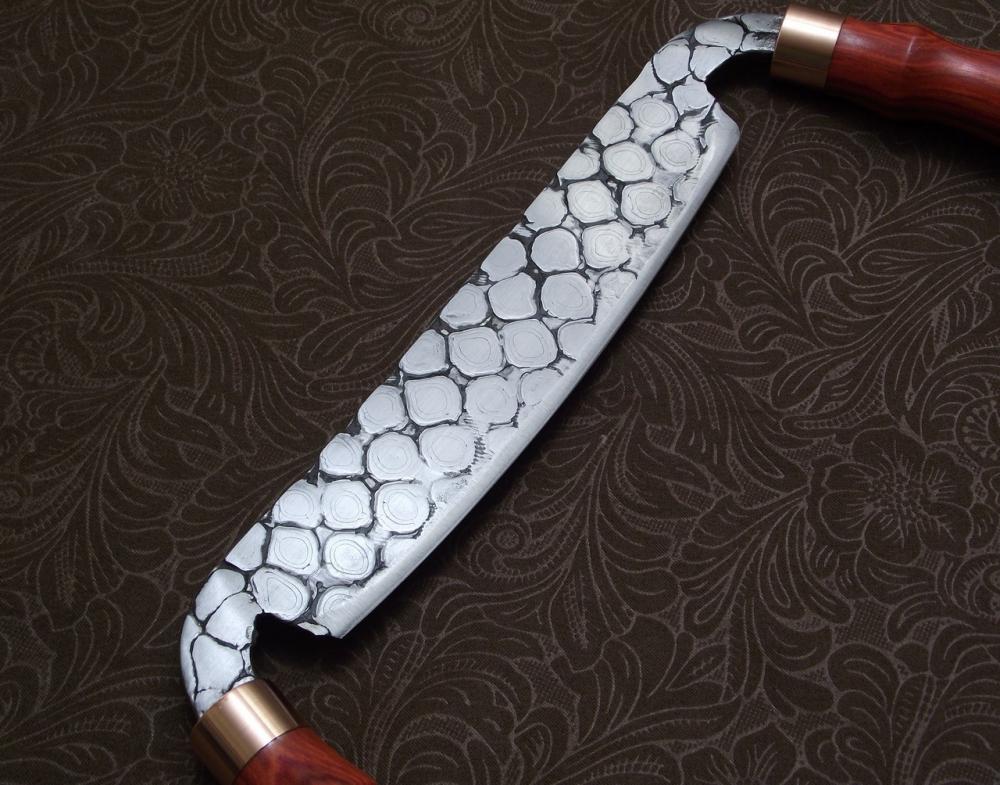
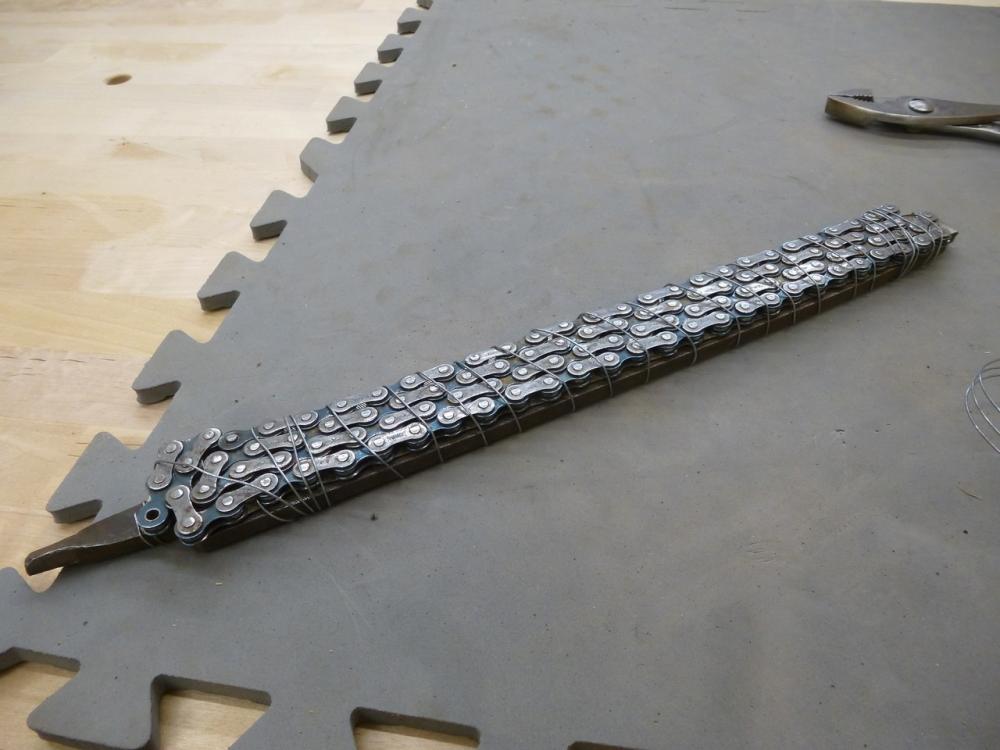
I finished a second chain damascus drawknife. It has a 1080 steel backer with redheart and copper handles. I traded the bigger one to a friend (Brian of BearKat Wood) who made me an incredible woodworking hand saw in exchange.
-
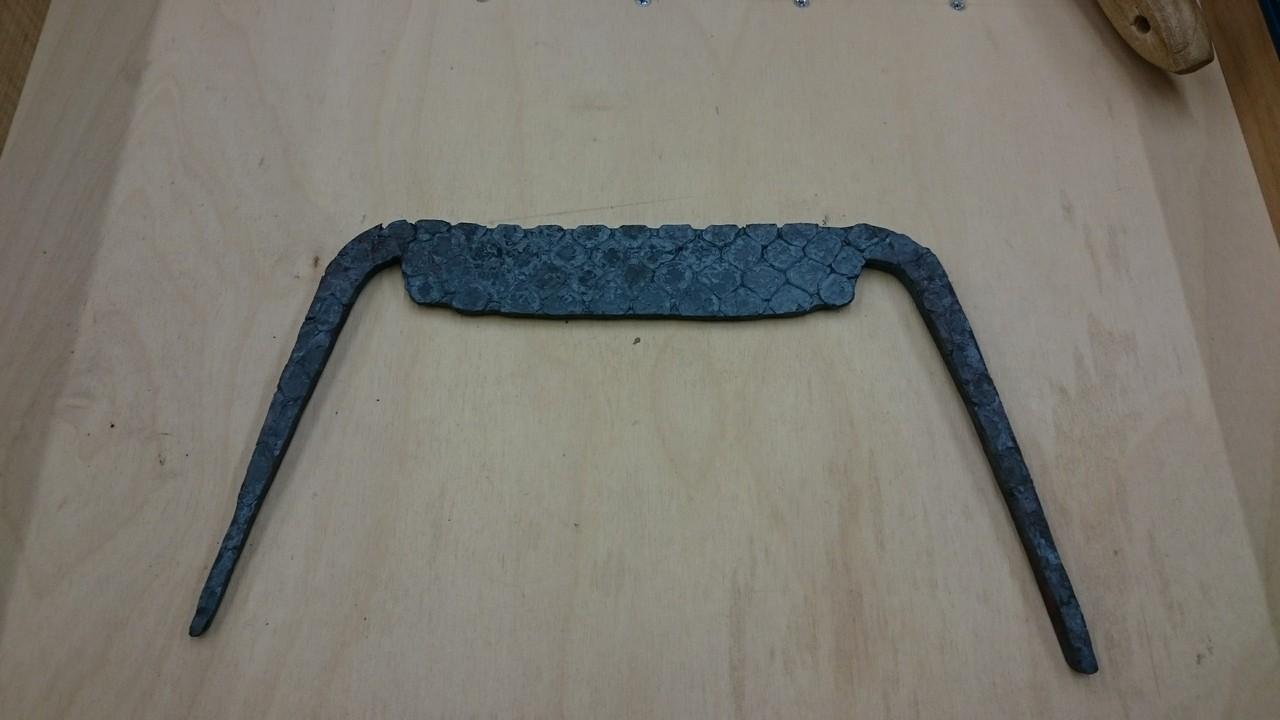
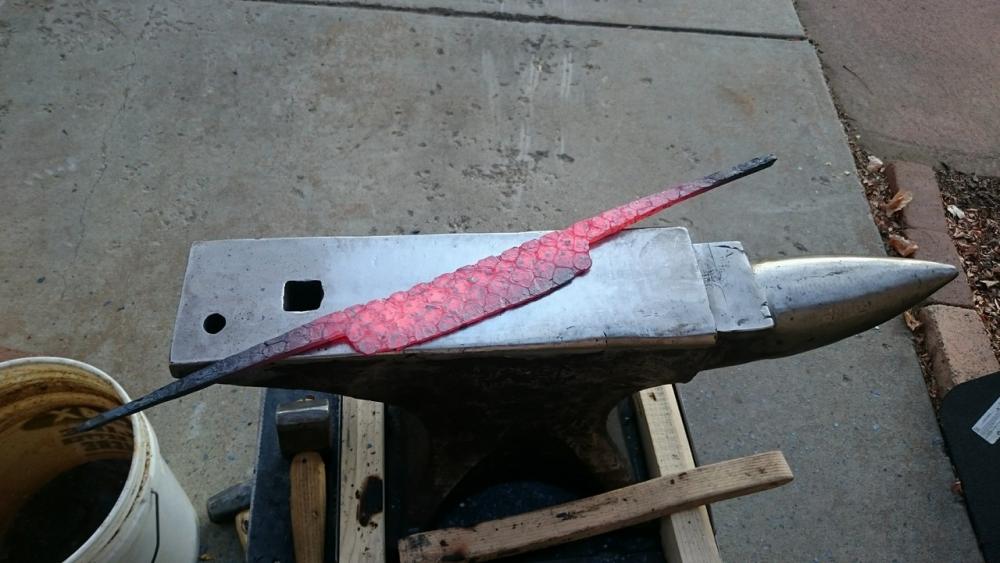
chain damascus drawknife in progress
bobasaurus replied to bobasaurus's topic in Chisels, Gouges, Scissors, etc
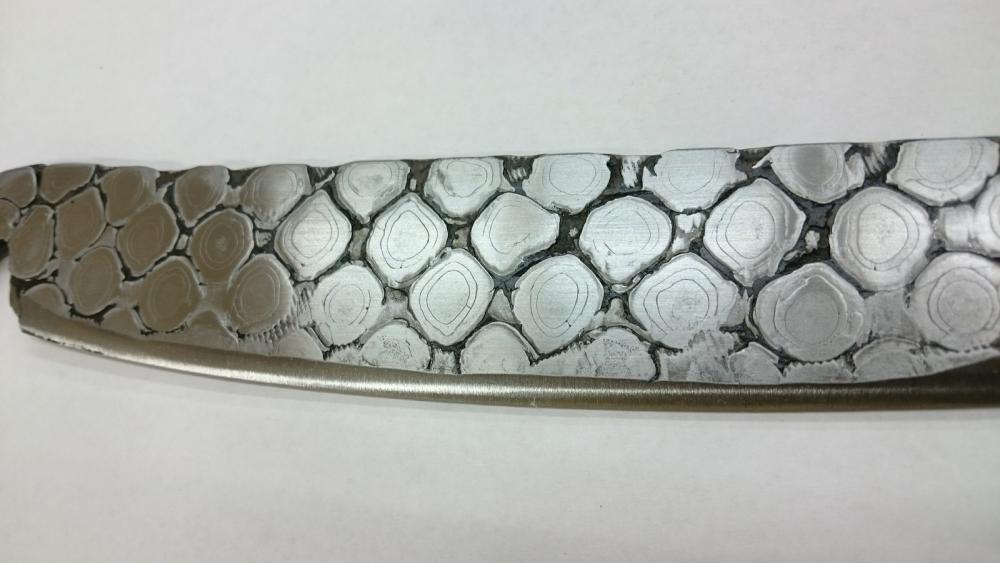
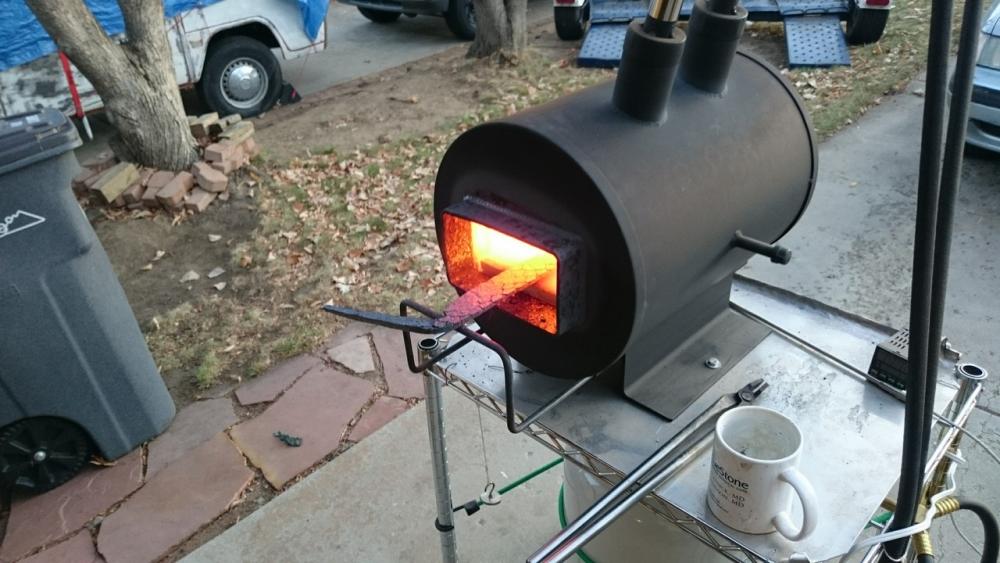
Thanks. The chain is only on the bevel face. The flat back (and thus the cutting edge) is an old file, so it's likely a water-hardening high carbon steel. But I was scared to water quench it, especially with the chain attached. So I preheated my oil a little for a slightly better quench. I heated the whole drawknife up until it wouldn't stick to a magnet, then quenched in the preheated oil. It passed the file test well after that, so I tempered it at about 425 deg F in the kitchen oven, then drew a softer temper on the tangs using the opening of the forge. -
chain damascus drawknife in progress
bobasaurus replied to bobasaurus's topic in Chisels, Gouges, Scissors, etc
Thanks. Fortunately I have one more chain and some 1080 stock that will make another good drawknife for myself. But I kind of like the recycled old file with the teeth still visible. Might have to find some more. -
chain damascus drawknife in progress
bobasaurus replied to bobasaurus's topic in Chisels, Gouges, Scissors, etc
And it's done! I attached the finished pics below, too.


-
chain damascus drawknife in progress
bobasaurus replied to bobasaurus's topic in Chisels, Gouges, Scissors, etc
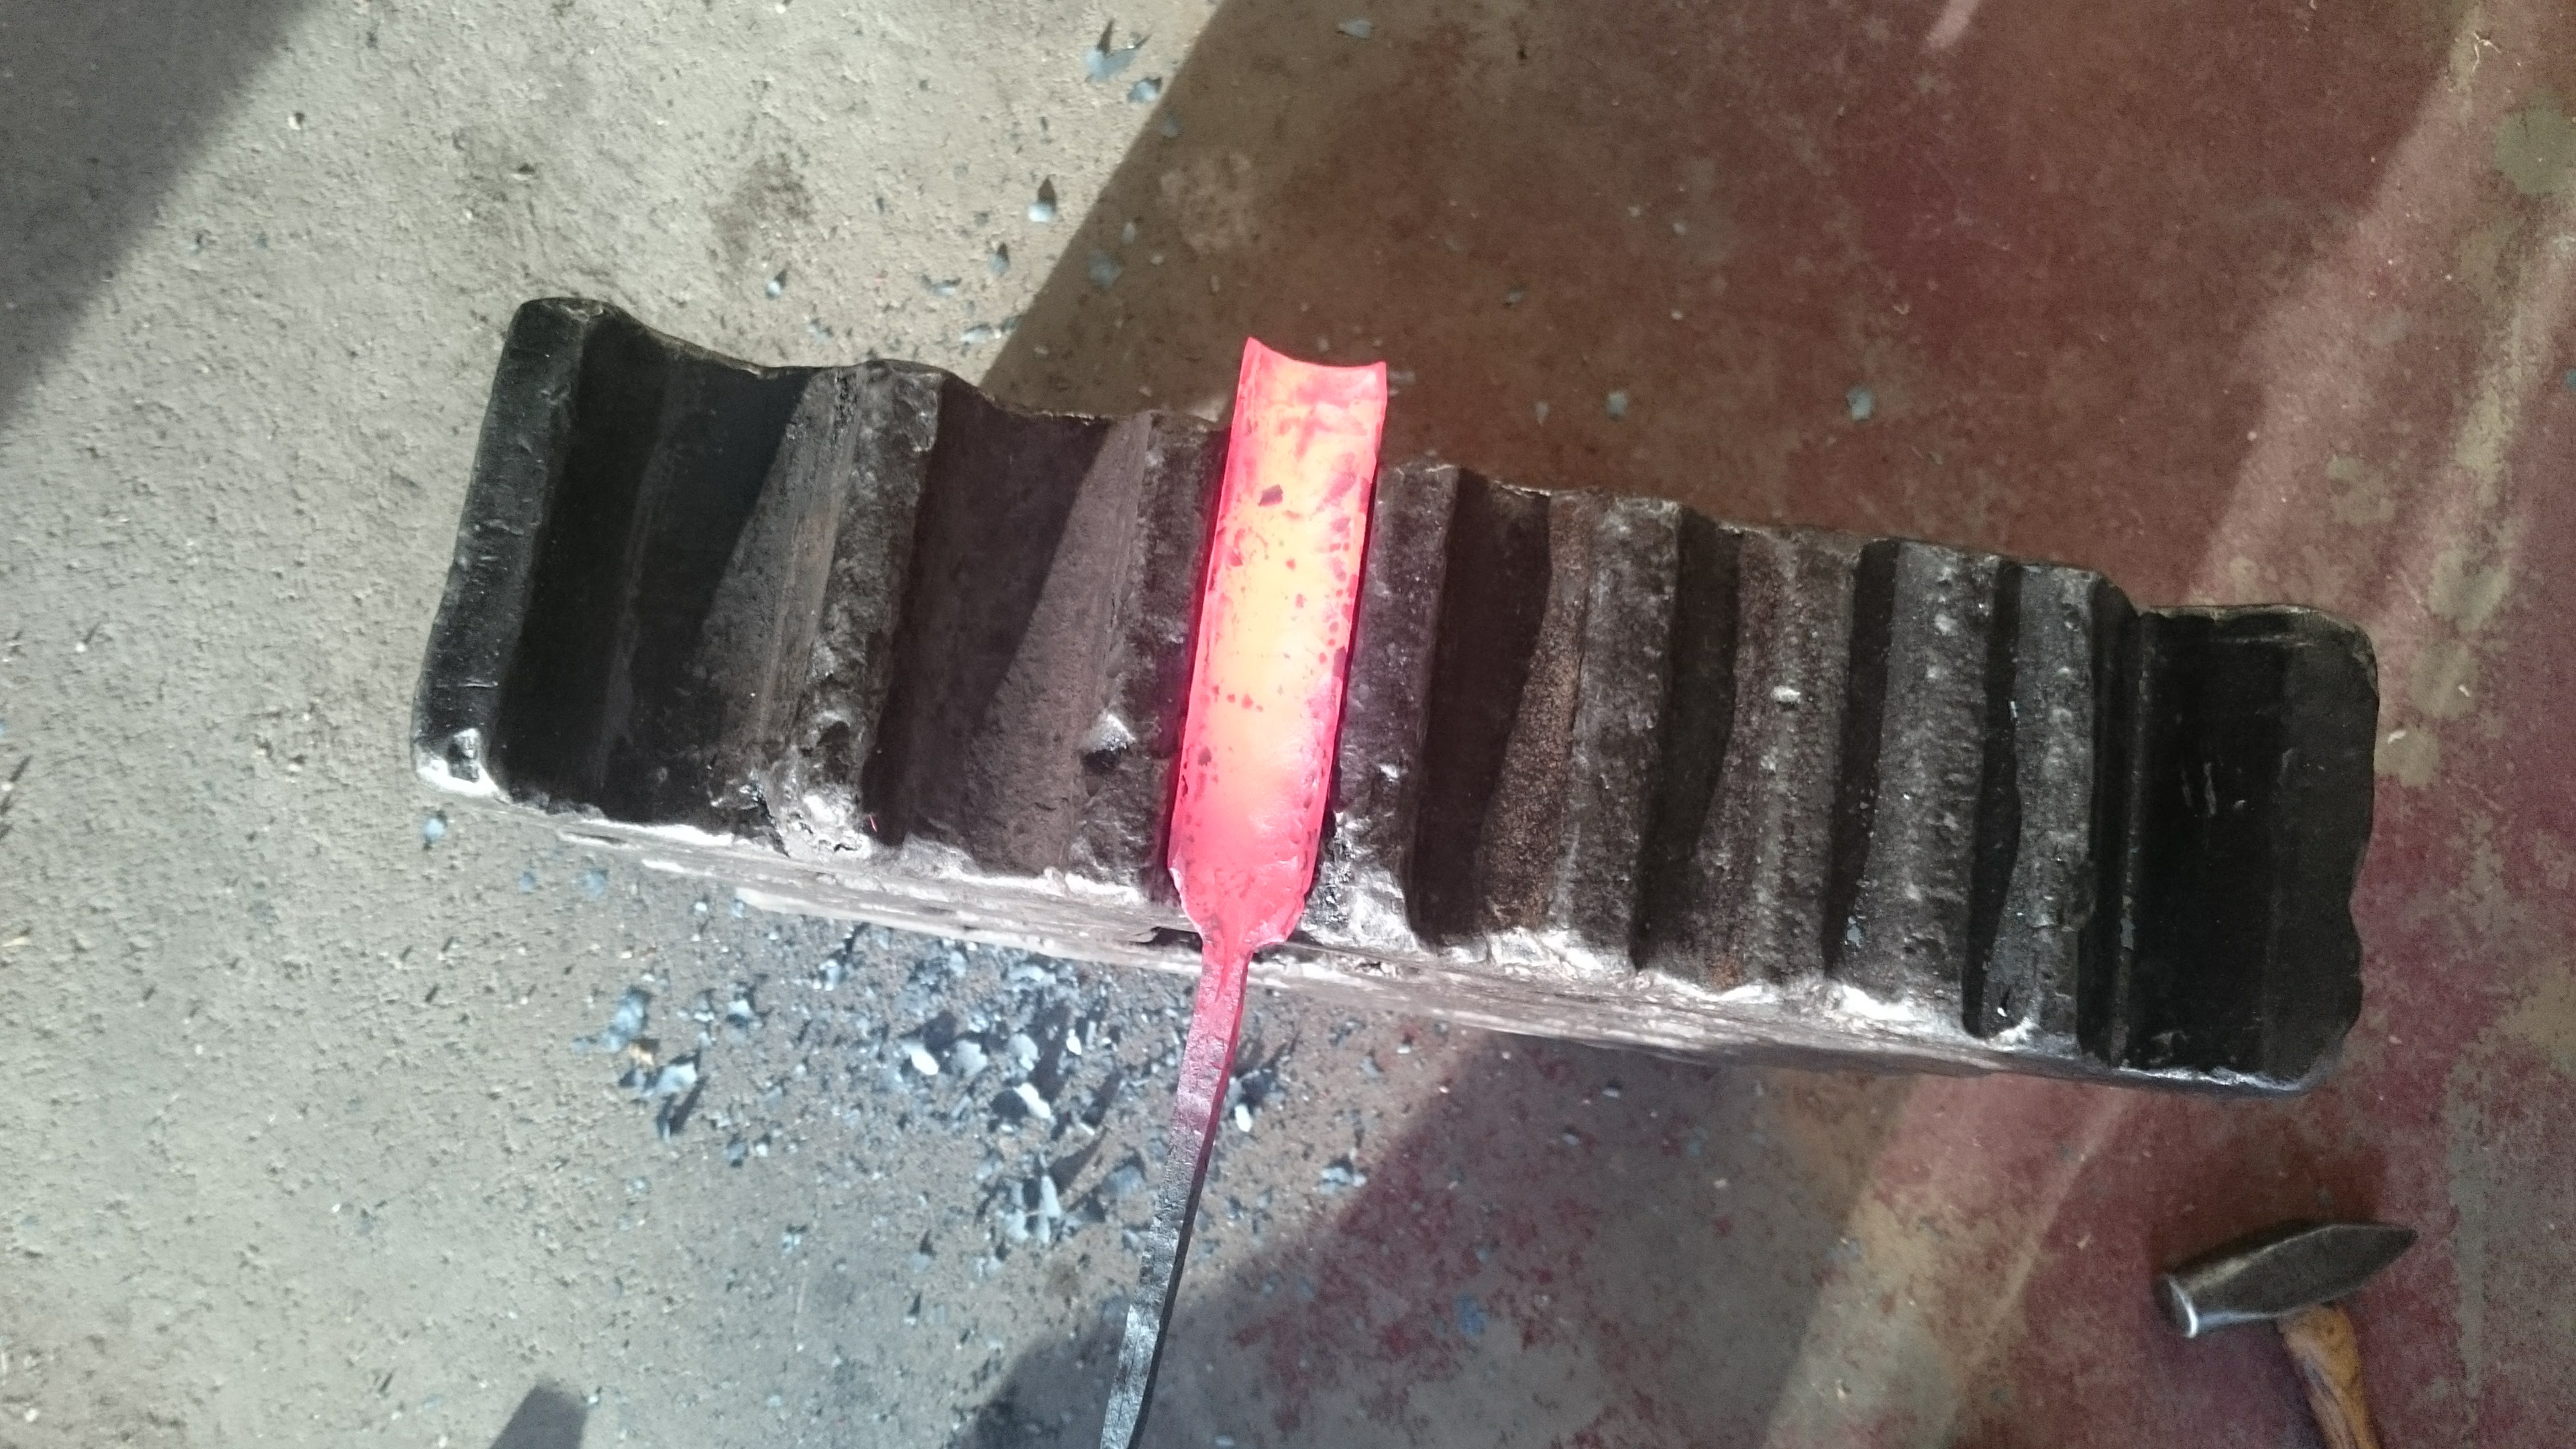
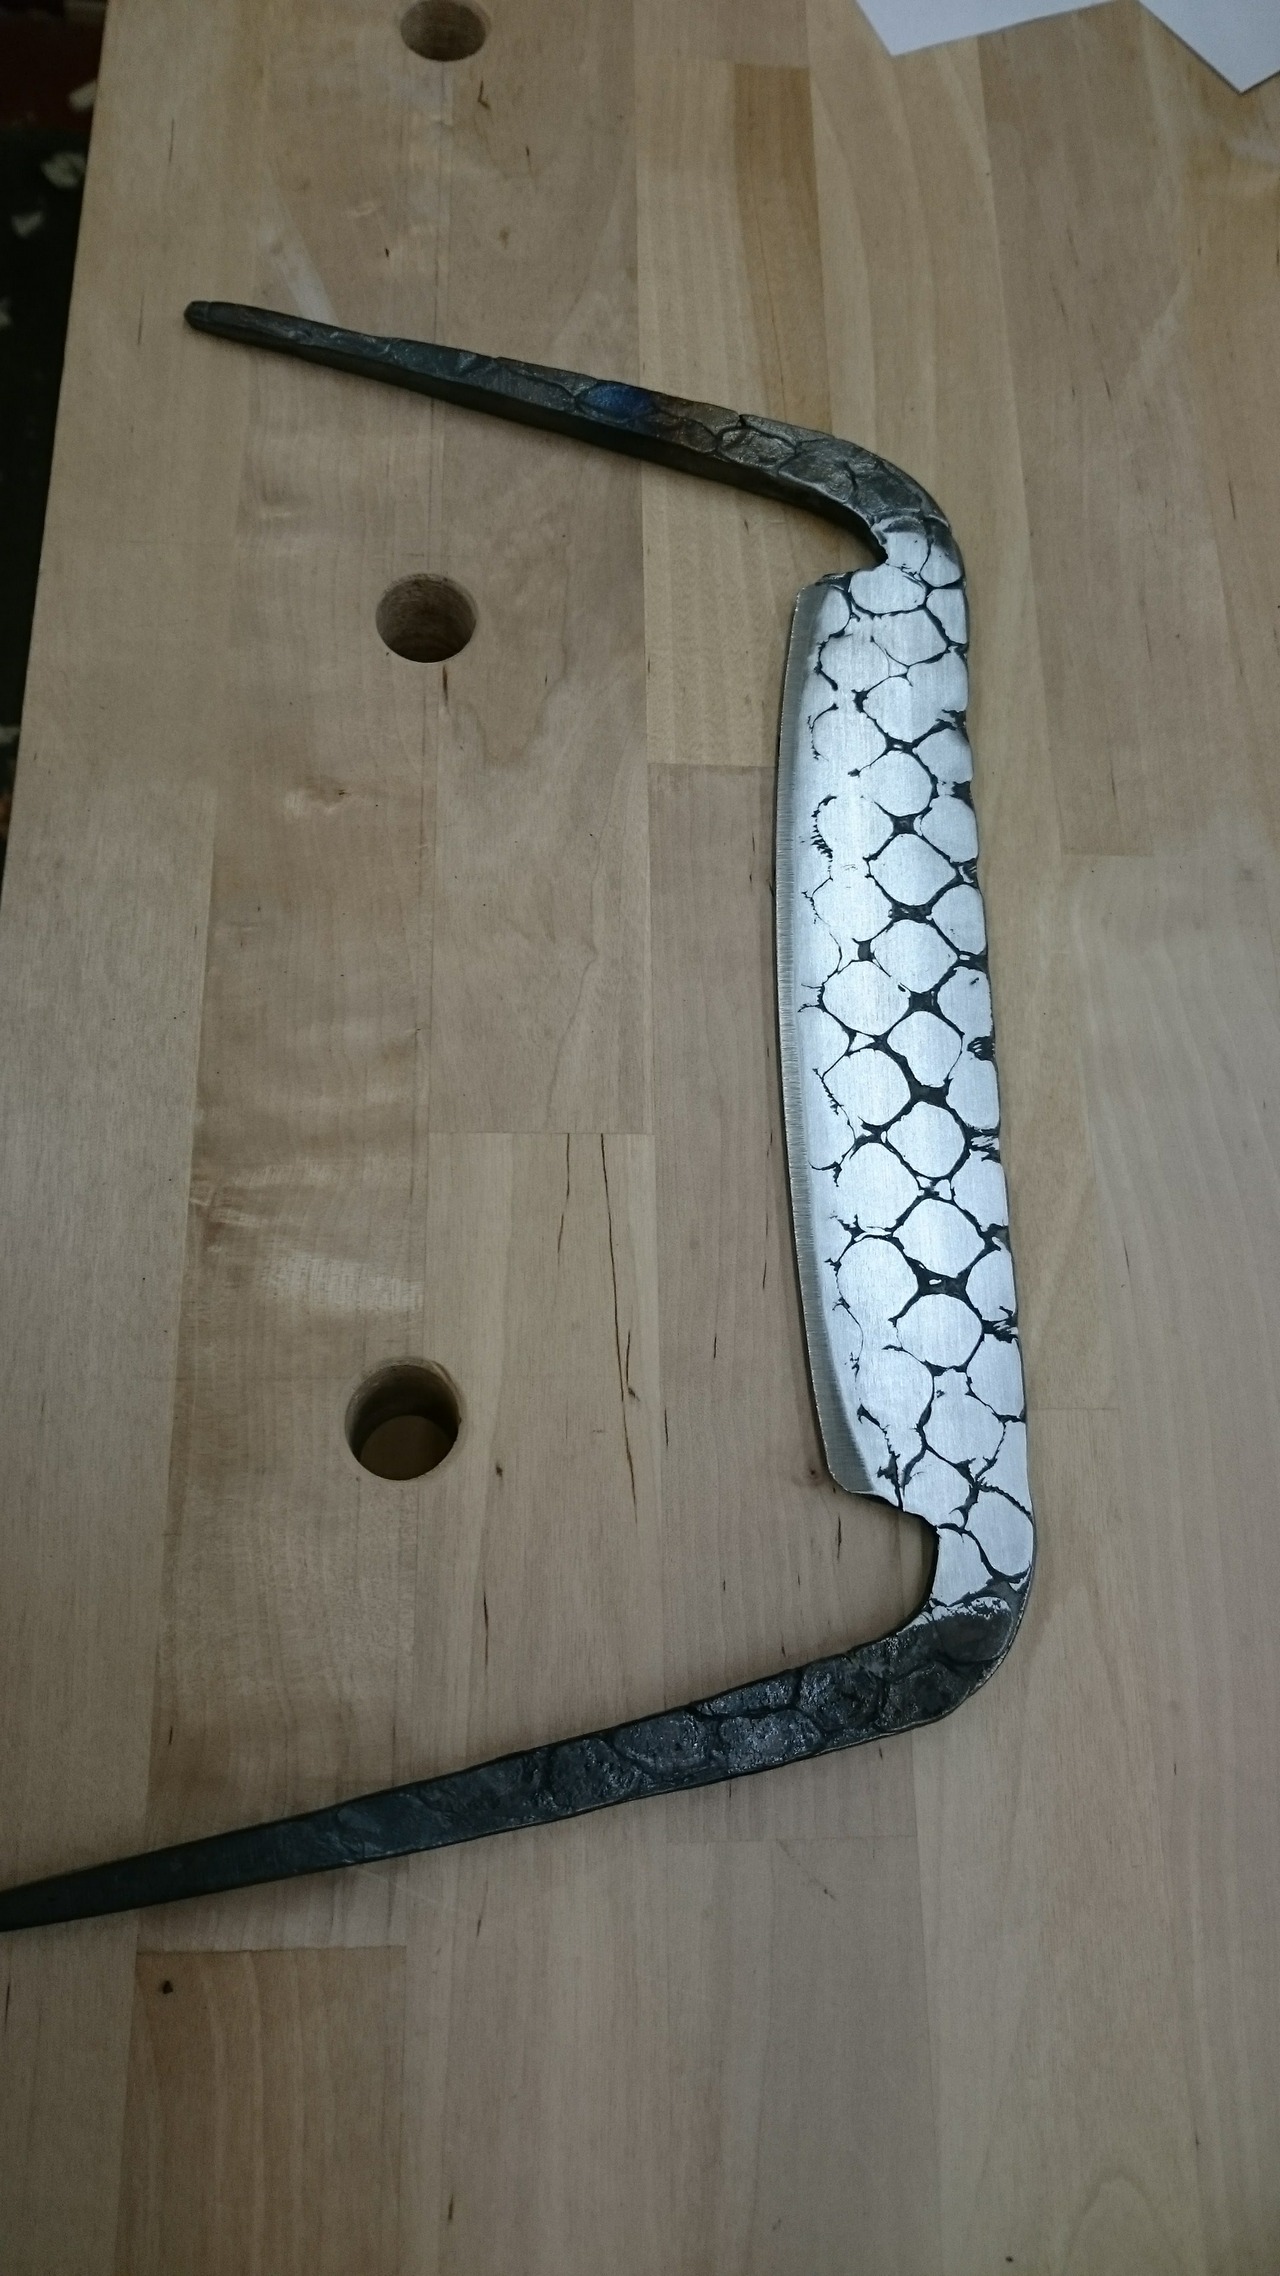
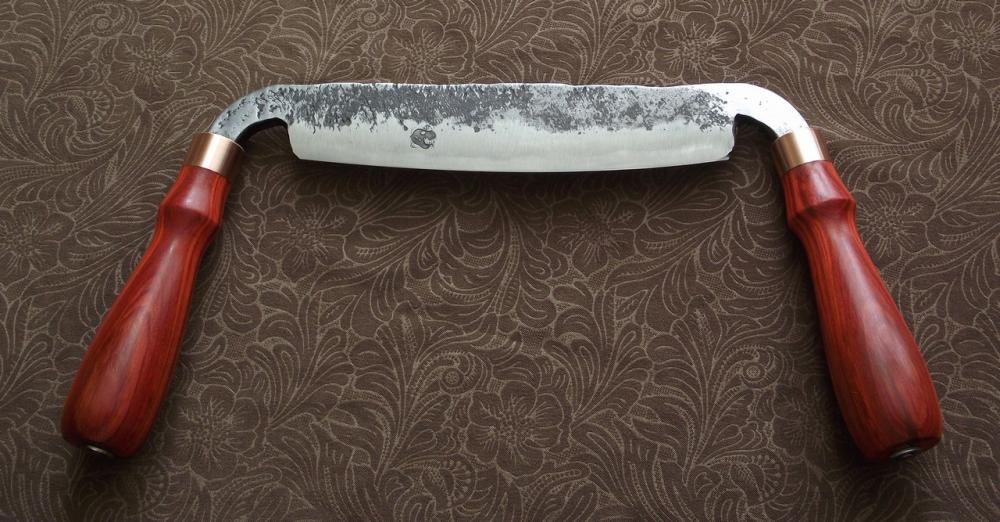
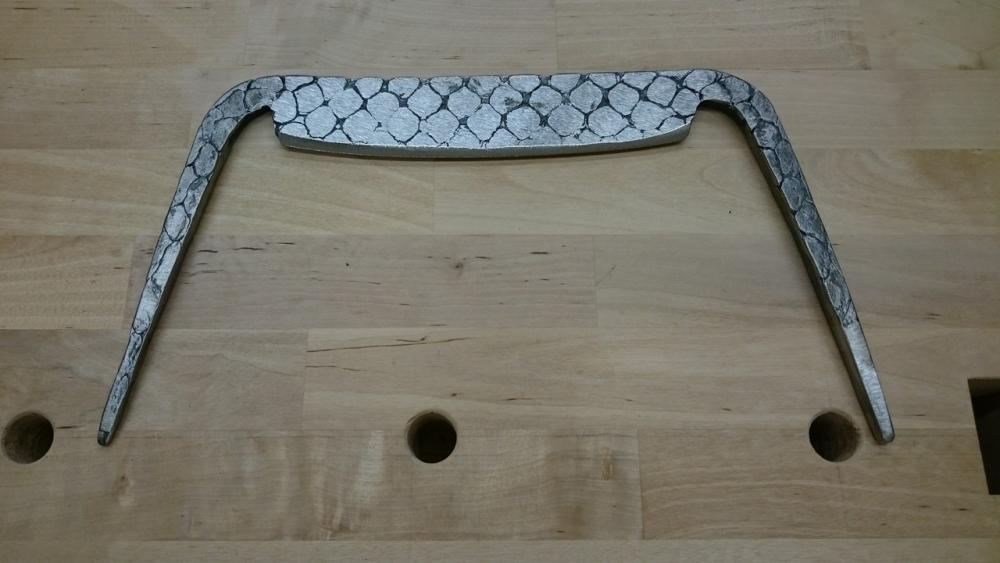
I finished the chain damascus drawknife I've been working on. Forged from a bicycle chain and an old file. Redheart handles with copper ferrules. I managed to crack one of them when inserting the tang, dang it. Filled with CA glue and sawdust, then sanded back... it looks decent, but obviously there. Still, I'm very happy with how this came out. I'm trading it with a buddy who is making me a fancy custom hand saw. It'll be hard to let it go, might have to make another for myself.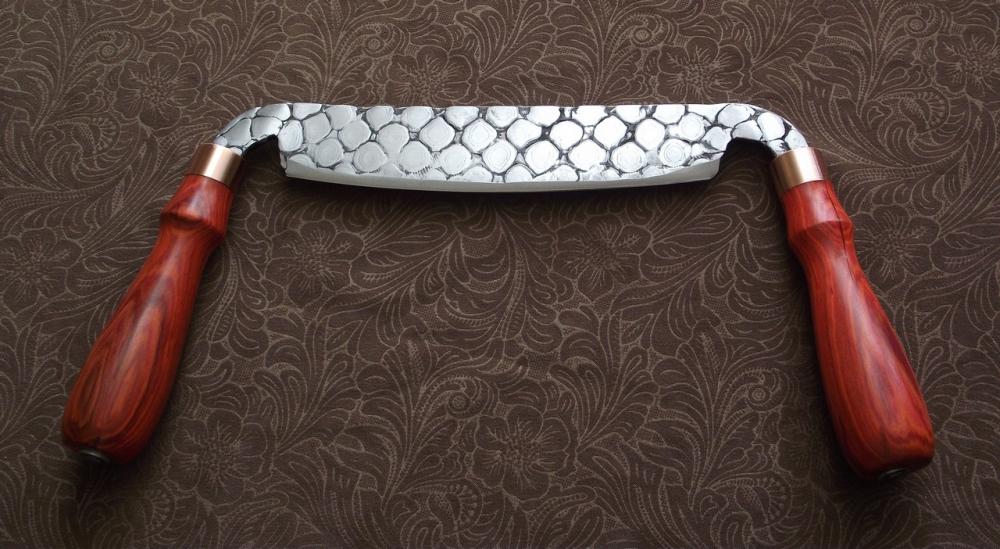


-
chain damascus drawknife in progress
bobasaurus replied to bobasaurus's topic in Chisels, Gouges, Scissors, etc
Thanks. I used lots of mule team borax. Here it is after heat treatment and polishing, before and after the etch.