

boisdarc
-
Posts
75 -
Joined
-
Last visited
Content Type
Profiles
Forums
Articles
Gallery
Downloads
Events
Everything posted by boisdarc
-
They really do not have structural integrity apart from when they are glued down to a concrete floor. I was thinking maybe multiple layers with two part epoxy in-between, that could be shaped and contoured kind of like micarta.
-
I looked today, they are Pvt tiles, vinyl. Less than 15 years old, so probably not asbestos. Thanks.
-
Not for sure where to post this, so here it is. Has anyone ever stacked and glued up pieces of flooring tiles to make handle material? I know it's kind of far out, but I saw some green, blue, and gray tiles the other day and brought some home. I haven't glued any up yet, but I cut a few into scale sized pieces. They do kind of have a chalky residue when you cut them. Any experience? This may be a fruitless endeavour. I'll post the success or failure. Thanks.
-
I understand that "more mature" blacksmiths have already used their fair share of junkyard or mystery steel, and when they tell younger smiths, "don't use soandso steel, just spend the money on "x" steel" . They are really saying" hey youngster, I've been there and done that and wasted a lot of my time doing it in the process". It doesn't always come acrossed that way. I personally think that you have to read between the lines of what is being said(typed). However, I also think that men should be held accountable for their speech, especially old men because they should know better-having lived longer than young men. Me personally, I consider my self middle aged, being in my forty's. In a internet environment, civility can often be neglected due to " I'll never see that dude in my life" thinking. Not so much on this forum. But on many others that I read, but am not a member of.
-
Wow, another great knife. So far, everything you've posted has been great. Thank you.
-
Knife makers in whom you look up to or strive to mimic
boisdarc replied to Johnnyreb338's topic in Knife Making
I watch all of Walter sorrels video on ytube, and I really like island blacksmith stuff. -
Coal at local Tractor Supply
boisdarc replied to Technician.Austin's topic in Solid Fuels: Coal, Coke, Charcoal, Wood, etc
I've used the nut sized for a few heats now, and so far I'm not in love with it. What tractor supply's idea of what is nut sized and my idea of what is nut sized are two different things. (Blushing on my end). Some of the "nut" coal is about the size of a small fist. I don't have enough experience managing regular bituminous coal, much less this stuff. As said above it is thirsty for the air. If you are hand cranking, you are a cranking Muldoon for sure. It has been hard for me to figure out when to start adding in more of the new coal. Perhaps I need to buy some of the rice coal for blending in, and just get to forging more. Thanks to you folks for adding to this thread with guidance. -
Looks like it would fit the hand very well.
-
To all those smiths who told me railroad spikes were useless
boisdarc replied to Forging Carver's topic in Knife Making
I get it, I really do. I wish that spikes were a higher carbon content. They are plentiful, and the price is right. I really enjoy watching Chandler he is funny. And not every endeavour is a success, so there is a certain amount of reality to his videos. I honestly ALSO think that many larger than life historical figures used knives or weapons/tools of a lesser metallurgical quality than railroad spikes. Obviously with some exceptions like high quality wootz steel or similar MAGIC steels. But, spikes can make sub-industry standard knives that are still serviceable to a degree. I'm not a metallurgist or a knife guru. But I'm willing to bet most of the folks here have tried their hands at making spike knives and now have that experience to draw upon to say, "spike knives are never going to be great knives in this day of modern super steels". One of my next projects will be spike tongs. Sorry for being a bit wordy there. -
Thanks Thomas that is a great idea, I had never thought of coming up with a touchmark. Or placing a plug in the hole that is a great idea.
-
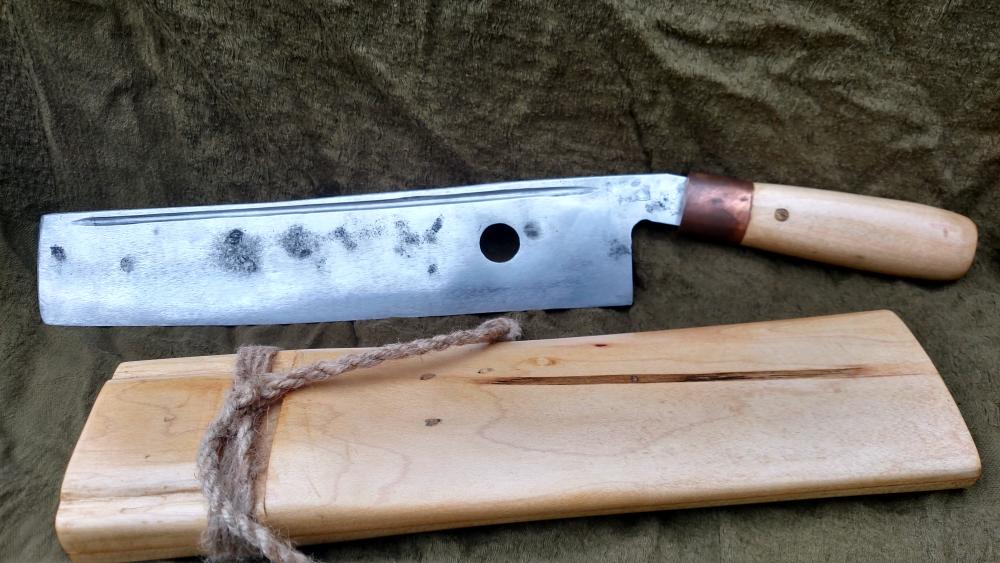
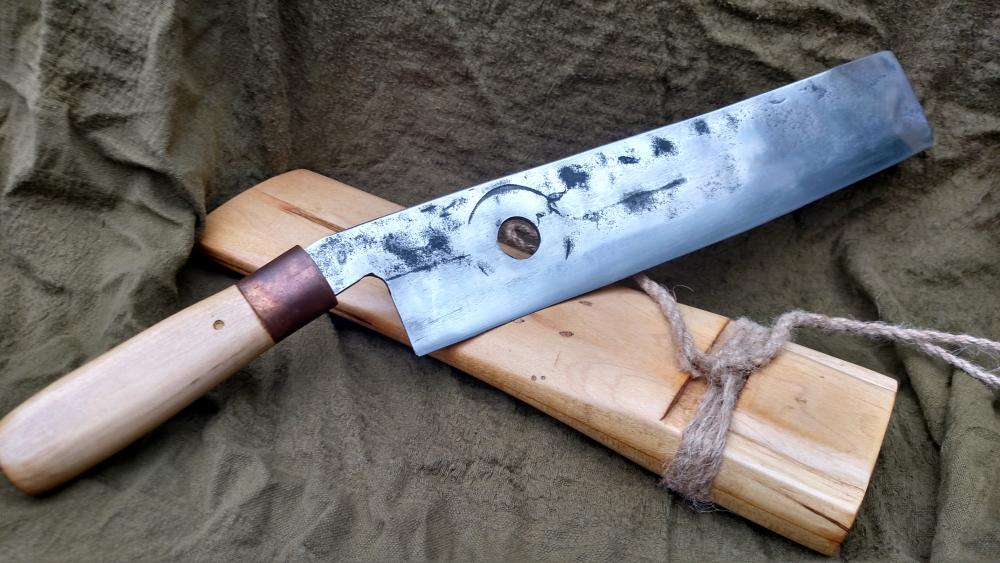
The handle and the sheath are hard rock maple. I didn't really have any experience with that wood, but it turned out to be a fairly easy wood to work with. There is kind of a back story with the wood. My friend grew up in a large town/small city. And as any one who grew up in a like environment, about high school age, hung out on weekend nights at the local dairy queen after sports games and cruising around town chasing girls. Forward a lot of years, and another good friend whom had grown up in the same town remodeled the restaurant, and ended up with some of the wood from the place. He had given me the maple because he thought I might use it for whatever at the time, and several years later I used it for this project. So, it is a little piece of my buddy's high school years. The handle is one piece, glued together with a one inch piece of copper tubing that I pinched together to get it a little oval shaped. The handle comes off by driving out a pin that is made from hedge, which is probably my favorite wood. The grain of the hedge is lined up to give the most strength to the wood in a lateral direction. Honestly is this any better of a method of putting on a handle, I really don't know, but it is what I did. I hope you like it, and I really hope my friend likes and uses it. I don't know if it will qualify as an heirloom tool(probably not but you never know), it is sharp but not stupid sharp. It is straight,and I think it is a hard edge and a softer backbone. I started to etch it with some boiled down vinegar and lemon juice, but honestly got a little scary and I pulled it out and washed it with baking soda/water, then dried and oiled it. It just didn't feel right. Any comments-even negative ones are welcome. I have really enjoyed this site and thank you very much to the people that are kind enough to take time helping newer members.
-
Another mower blade chopper. Formerly a john deere mower blade. First heat steel was flattened out. Grinder cut to basic shape, then next heat handle tang was bent. The blade has a bevel on one side only, the right side if you are holding the blade by the handle. It was made for my good friend Josh whom is right handed, and as I understand it the purpose is to leave a cleaner cut in wood with the detritus being cut off to the right side. Much like a carving or carpenters axe.( feel free to correct me if this is wrong). This was my first attempt at a few new things, differential heat treating, and putting in a fuller. The fuller was ground in with a 4 1/2" angle grinder, and a rigged up jig to hold the blade. Honestly, the claying didn't go so well. I used furnace cement(one kind is as good as the other right? NOT) the kind I bought was premixed, and a bit like thick mortar. If you're going to try this, I suggest you do actual good research and do it with the right stuff. SO, this super thick stuff I watered down until it was super thin for the first coat. After that dried, I mixed up some more working in more until it was much thicker-think peanut butter, and applied it to the rear of the blade using a paint mixing stick. I even used an artistic approach thinking "man, this hamon business is going to look super fly". (let me interject here, that I had been watching a bunch of Walter Sorrel and Island Blacksmith videos-whom both make it look soooo easy). Recently I had been given some coal from a fellow(not a blacksmith I might add) who informed me that "this stuff ought to burn great, and woo woo woo", nice fellow and all, but some junky coal. I always start my fire with kindling then add coal in and I've either got the knack for starting coal on fire, or I've been really lucky. After kicking in the air and getting some good fire, "hey now is the time to bring this blade up to heat", so in goes the blade. I start noticing that the fire just doesn't look right. The fire looks like its gluey or sticking together or lava-just not right. So, out comes the blade. Then I started picking out the fire in chunks and dropping them into water-I don't know if it was mineral or what, but not good burning medium. In taking out the blade the clayed section toward the back of the blade started to come off in a few spots. I cleaned out the forge and started over again with charcoal-which was kind of a new thing too. I reclayed the blade with some (kind of) thinned down furnace cement(again the same stuff so it would match). However, and there always is one, during the temper, the blade developed a pretty good bend. I think it was caused by the wonky clay job. I quenched in rain water, no salt, no dishwash soap, just water. No ping no fractures. Sorry, I'm a computer lame and don't know how to post more than one pic per post. I went ahead and checked the blade, the file skated on the blade side and bit slightly on the back side. I was ok with that. No heat treat after that. I hid however have to straighten out the blade somehow, so with a map/pro torch and a lot of patience I straightened the blade. I kept the heat on the backbone and as far away from the edge as I could. It is a lawn mower blade and thick and tall so ...I double checked and the edge didn't seem to be any softer. I cleaned it up on the belt grinder(a 4x36, not a 2x72) with regular dunking in water. I have a real fear of jacking something up with the heat from the belt sander, and it is probably unfounded since my belt sander is fairly slow. I used the bare-hand method, and never let the steel get hot enough that I couldn't comfortably handle it with a bare hand.
-
Wow, that looks great, handle is great, and leather work is awesome.
-
used lawn mower blades
boisdarc replied to monkeyboy's topic in Knife making Class General Class Discussion
I posted mine in Hawks axes and spears. I used saline/dish soap quench. -
That is too pretty, you should butcher wedding cake with it. Very nice polish.
-
Jhcc were you just by chance a 13b?
-
Watched and enjoyed them all.
-
Like it.
-
Question for thoes who use coal.
boisdarc replied to barndor's topic in Solid Fuels: Coal, Coke, Charcoal, Wood, etc
Another possibility, could be to dress up in a clown suit while you're blacksmithing. I mean, " hey, who in their right mind would approach a guy in a clown suit pounding on hot metal with a hammer." Of course I'm just kidding, I now like the smell of burning coal-maybe it's affecting my brain. -
J.M. I've read that article twice now. Thanks for that information. I have read about and watched ytube videos on spark testing. Although I haven't sacrificed any of my files for testing. I self diagnosed as a file-ophile, and the condition will not allow me to beat those files up. This new(to me) info on break test is going to have to become part of my arsenal. Thanks again.
-
I honestly joined this site with only an interest in blades, but I am considerably more interested in making other more blacksmith-ish stuff. Like tools, and I made a sherperds hook for my wife out of a light truck coil spring. (Had to justify the hobby and all). So even though your primary interest is Ferraris. You may want to drive a pinto or two when you find out how much fun they are, and good luck forging.
-
Thanks. I appreciate your input. J.M. do you think I should do a oil quench from now on, or just keep experimenting with the brine/soap quench?
-
Thanks folks, I appreciate the time you took to answer. I will give the chalking another try.
-
Thank you.
-
I have a file question for you guys. How do you keep your files from getting clogged ? When draw filing or regular filing, I get small flakes that stick in the file that scratch my material. My grand father used to put chalk in his files, I've tried it with no better luck. I keep my files clean with a soft brass brush, no rust. Any suggestions would be appreciated.thanks.


