MotoMike
-
Posts
554 -
Joined
-
Last visited
Content Type
Profiles
Forums
Articles
Gallery
Downloads
Events
Everything posted by MotoMike
-
Tim Thanks very much for this thoughtful response that addresses my questions in a very thorough and understandable way. You are exactly right about the complexities becoming more obvious as I peel away the layers. But I am a nerd at heart and I am, so far, enjoying every aspect of it as I find a new riddle around every corner. I of course know that CO is a product of combustion no matter how efficient and will be safety conscious. probably one of my favorite sayings is more true here than anywhere else I've applied it. "I know enough to be dangerous" Thanks again Mike
-
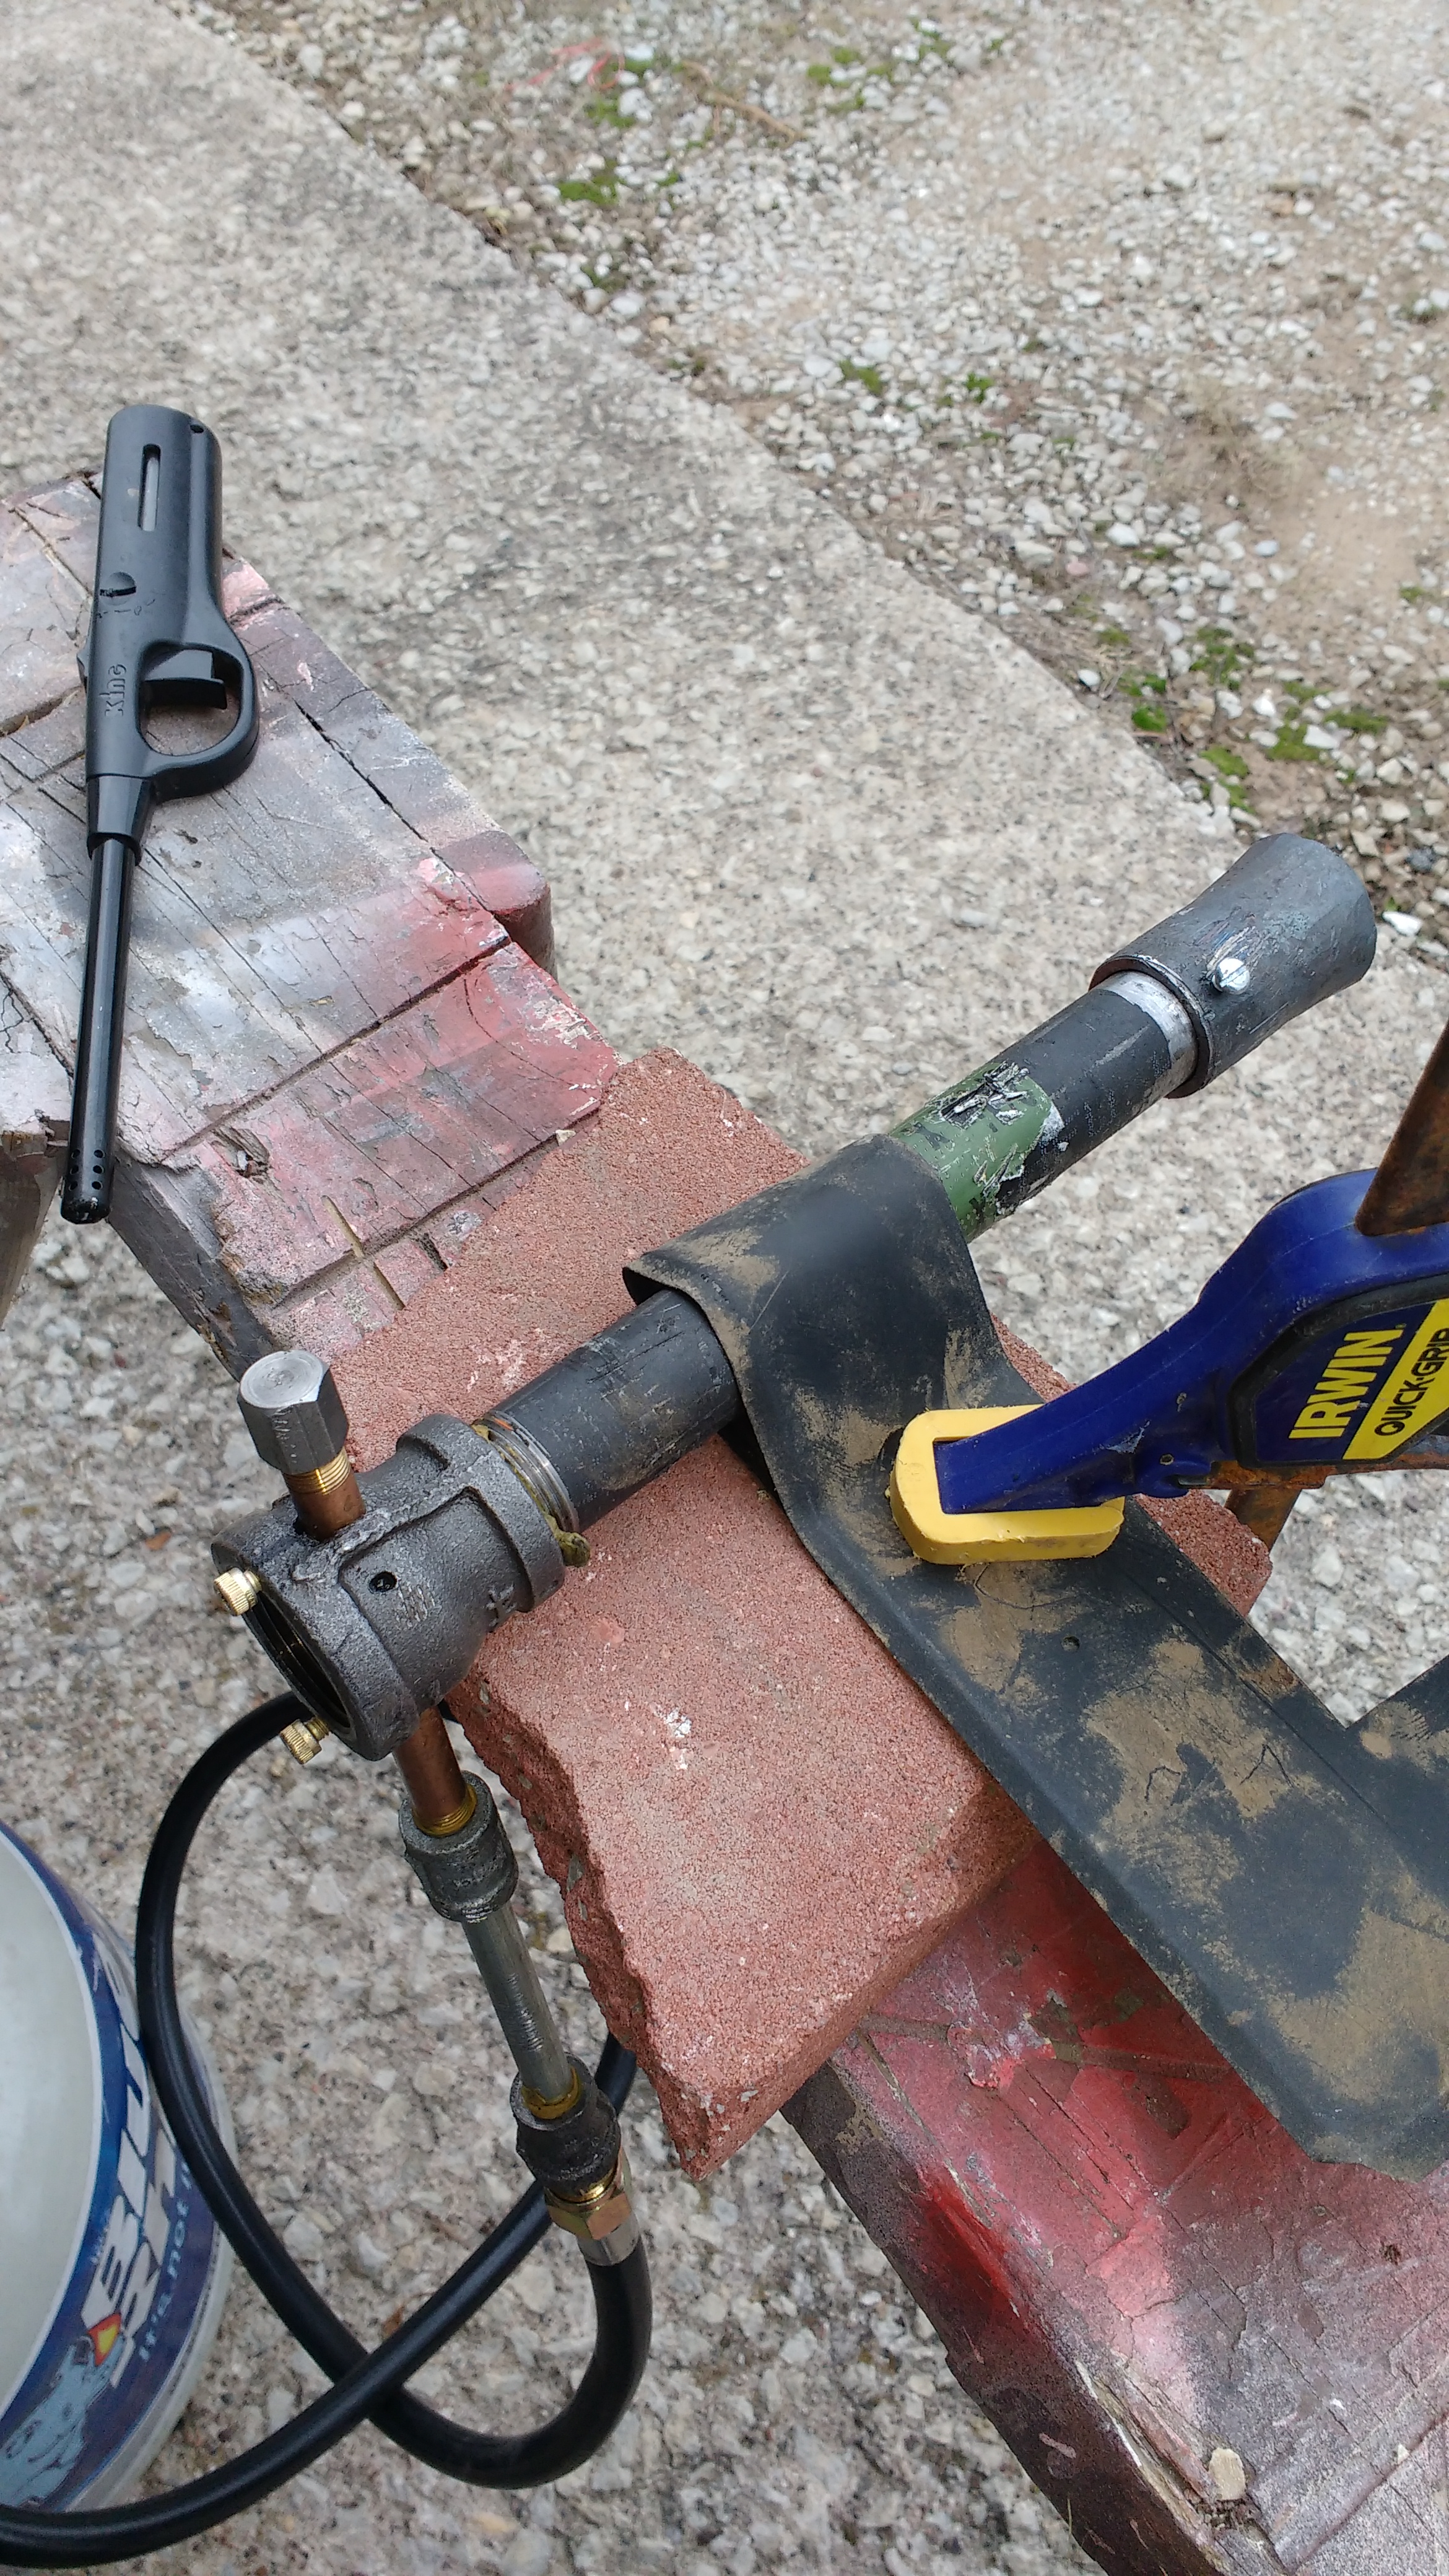
Jaja Let me qualify my status. I don't know much yet and have built this by standing on the shoulders of giants. I chose that Reil burner because it was the simplest that I could find that had a track record for being functional. I believe burner design has made several improvements since this one was on the street. In the second pic the nipple in the intake bell is brass, the next coupler and next nipple are galvanized. that is where I planned on putting the pressure gauge when I initially started but did not yet have a tee or pressure gauge. I wanted brass where it would be close to the heat owed to the dangers of heating galvanized pipe too high. Some have said that the jet nipple is not close enough to the flame to be concerned about galvanized but I erred on the side of caution. All that plumbing after the brass nipple was chosen mostly to move the hose away from the hot areas. ultimately the elbow in the last pics was to move the hose down and to give it a more natural bend. Mike
-
I used two adapters, 1/8npt female to 1/4 female and a 1/4 npt male to 3/8 male flare. there are other ways, but that is what the local had. https://www.amazon.com/Anderson-Metals-Brass-Fitting-Half-Union/dp/B003RW4IWE/ref=sr_1_1?ie=UTF8&qid=1511975717&sr=8-1&keywords=1%2F4%2Bto%2B3%2F8%2Bflare&th=1 https://www.amazon.com/Anvil-8700133856-Malleable-Fitting-Coupling/dp/B0058DI28Q/ref=sr_1_10?s=industrial&ie=UTF8&qid=1511975935&sr=1-10&keywords=1%2F4%2Bnpt%2Bto%2B1%2F8%2Bnpt%2Bfemale%2Breducer&th=1
-
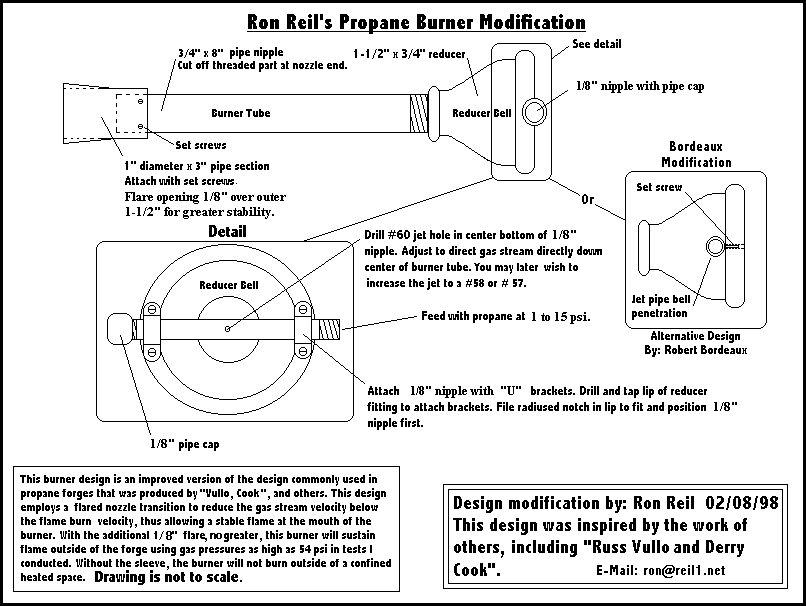
I built this burner. It seems to work quite well, though at the moment, mounted in my forge it is rich, so I'm still working on it. I did the bourdeux modification. I understand there are also modifications where you install a mig tip for the jet. I did not do that. built it just as shown. I think I have $20 in the burner and another $20 in the hose and regulator. I have a thread in gas forges "Another Newbie" showing my progress to date where in the experts have been providing me some valuable input.
-
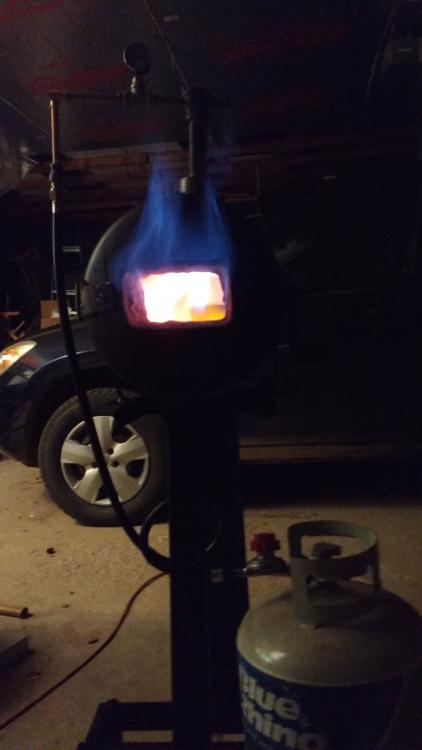
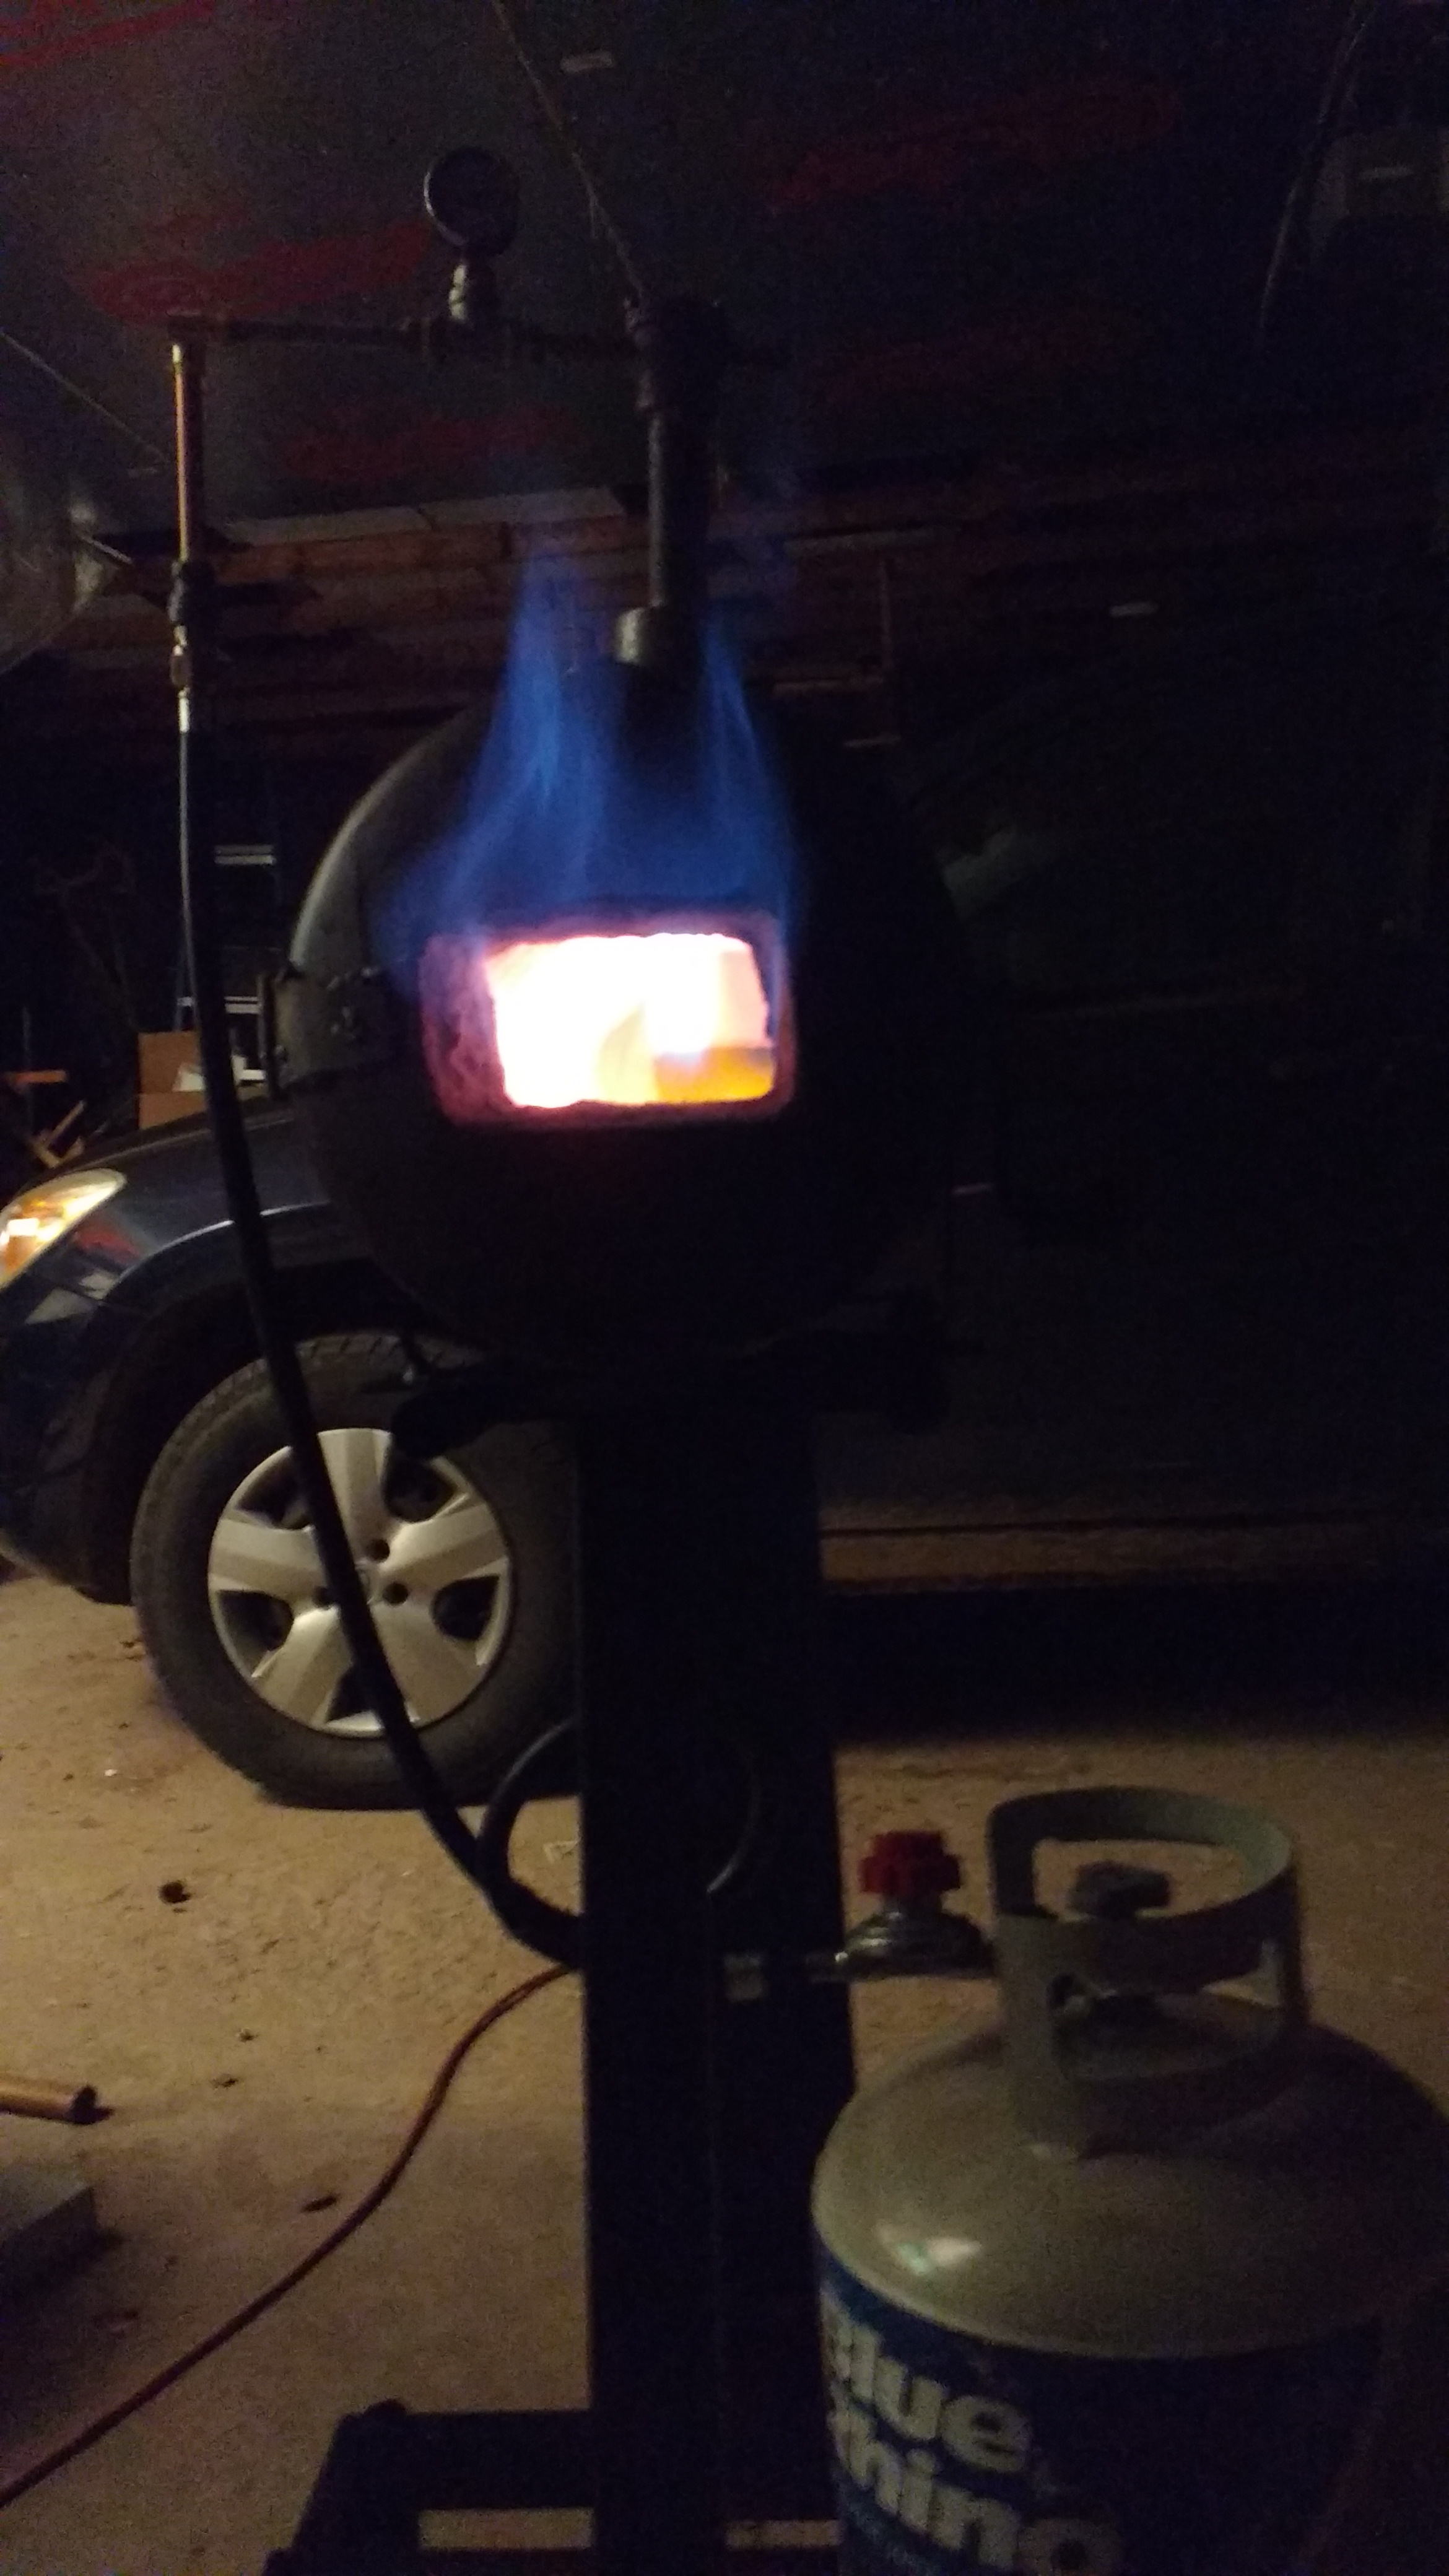
thanks to all who've responded. I have found some reading on the topic. Does this sound right? The large blue flame outside the forge is fuel burning once it exits the forge where it did not find enough air to burn and to no good purpose. Besides wasting fuel it is increasing my co problem. I will tackle that reducing flame problem and get it. I initially intend to do small things to improve my skills. leaf, bottle openers, hooks, punches and such. eventually I'd like to make hammers and hatchets. Maybe knives some day. Should I shoot for a slightly reducing flame with those immediate and future goals in mind? If changing to a smaller jet reduces or solves my reducing flame problem, would I expect the heat in the forge to drop off?
-
thanks for those recommendations. I have two co detectors in the house. the garage is not attached. a CO detector is on the way for the garage. I'll pick up a couple brass nipples and see if I can get the smaller bits locally on the way home today. and give that a try.
-
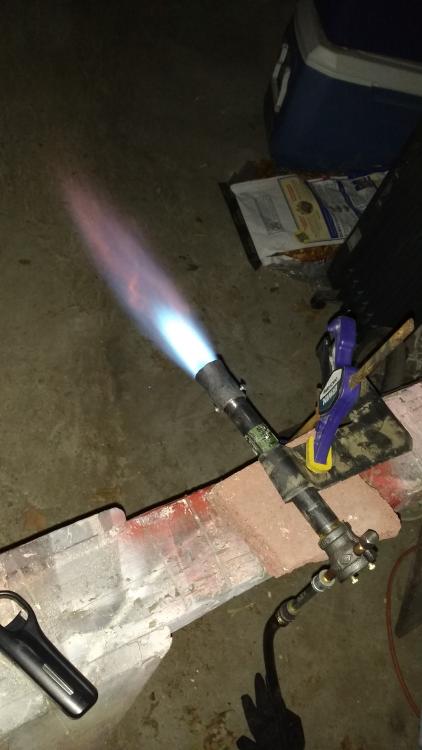
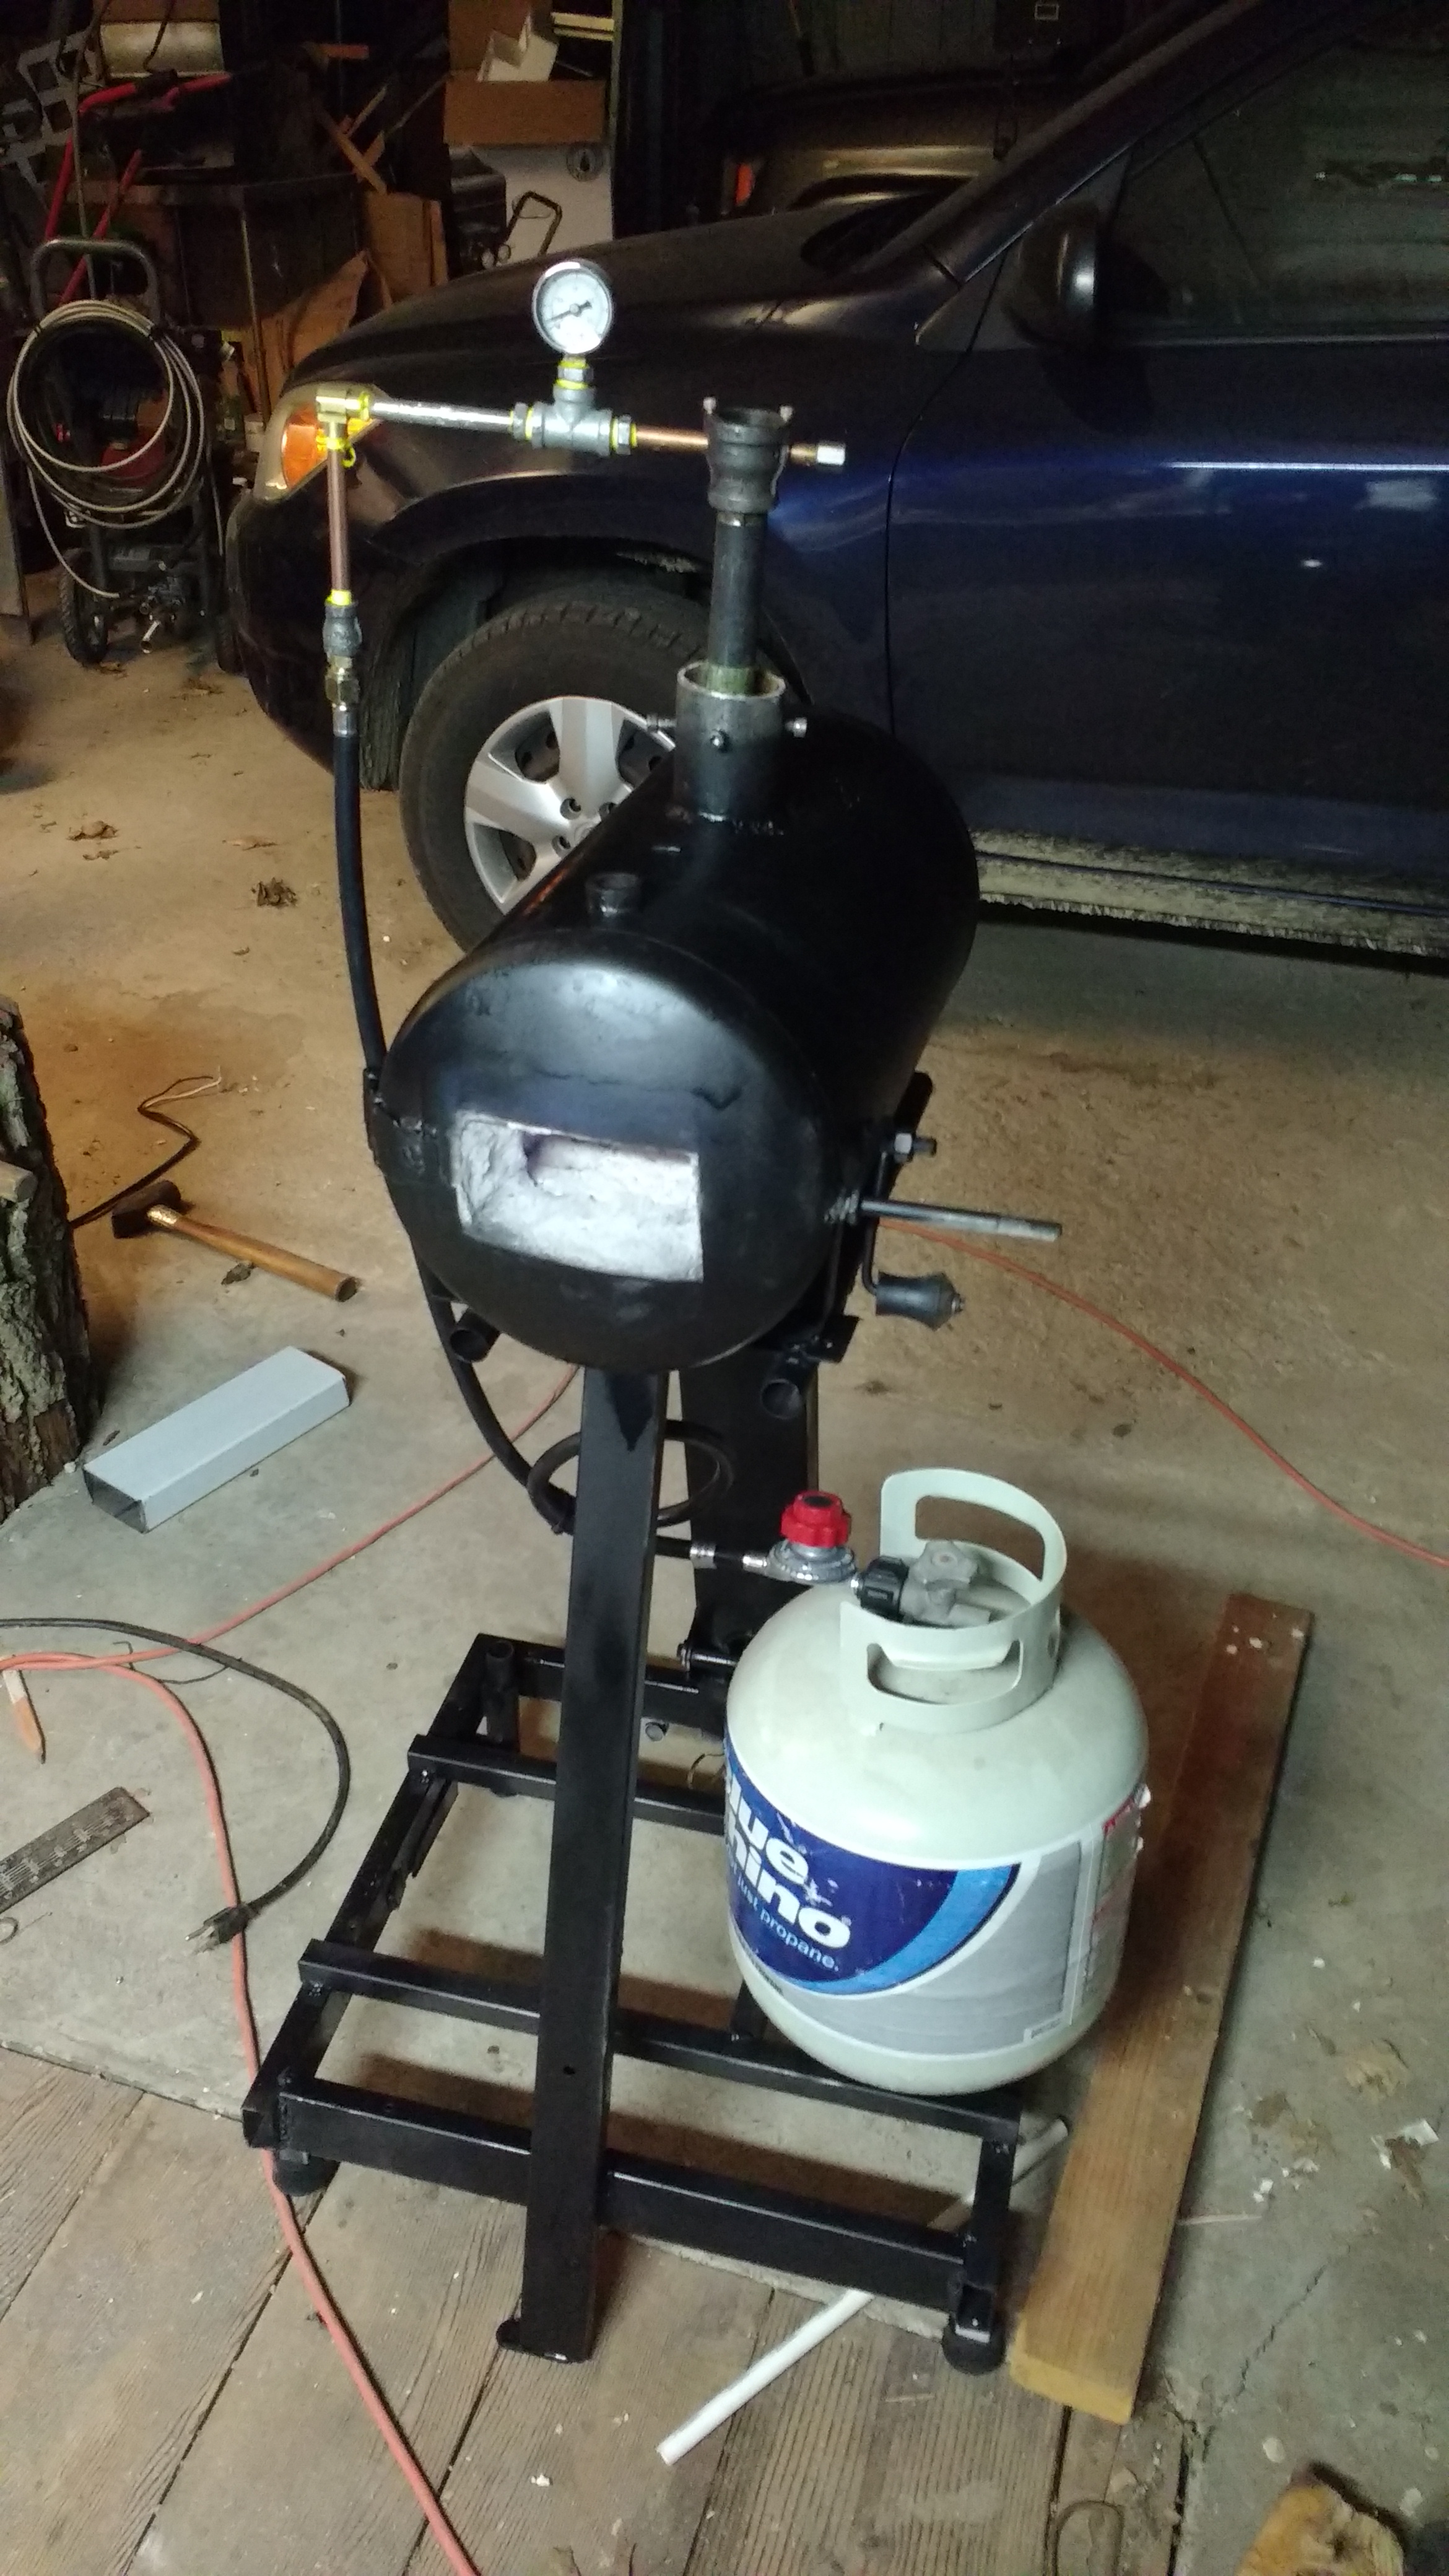
Thanks for those inputs. Well the garage is pretty leaky as it pertains to air. open gables and open to the attic on one side. might consider a co detector in there just to see. I am not sure if there wasn't a slight breeze hitting the back mouse hole during that pic with the blue flames. I built a Reil burner with the Bordeux (sp?) modification. the plan I followed called for a 60,58 or 57 jet size. since I had only a 57 that is the one I used. Maybe I'll try and drill out a 60 size nipple and try that for the jet. I forged the OD flare to about 1.3 inches. mouse holes total about 22 square inches.
-
Thomas, yeah, I got sloppy with that Plistix wash at the end. I did brush it all off before I painted it Mikey, thanks for those comments. I intend use it in an open garage door, but I am interested in what you suggest to improve it. can you direct me to a link that would discuss what you are talking about. I've searched and found lots of good information, but not specifically what you mean by reducing flame. That image with the blue flame is running at only about 3 psi. I know that there is always room for improvement and I'm all ears. I still intend to fashion porches for front and rear.
-
My forge nears completion

-

smiths /associations near Savanna Illinois
MotoMike replied to MotoMike's topic in Events, Hammer ins, Where to meet
I found an instructor holding classes North of Freeport IL. Invited me up for an evening and let me mingle with the students. sort of independent word for the more experienced and attention to the newer smiths where needed. It was a great group and a fun evening. Held in an old barn, and I guess winter makes it hard to work in there, so they are almost done for the season. Will see if I can get in next spring. There are two coal forges and two gas forges. Today I went to the Pioneer village in Scott County park Iowa. the historic Smithy was in operation with a good group of friendly and informative smiths there. I picked their brains and had some great fellowship for about an hour and a half. Bob Tuftee was said to be on the site, but I did not find him. thanks to Randy, Lou, Nate and Scruffy. -
fired the Plistix today

-
smiths /associations near Savanna Illinois
MotoMike replied to MotoMike's topic in Events, Hammer ins, Where to meet
Thanks guys. I was searching on this site. I will check those you mention. M -
Just getting started and looking for smiths or groups in my area. Savanna IL right on the Mississippi River in North West Illinois. Looked at the site to try to find but not having luck.. Mike
-
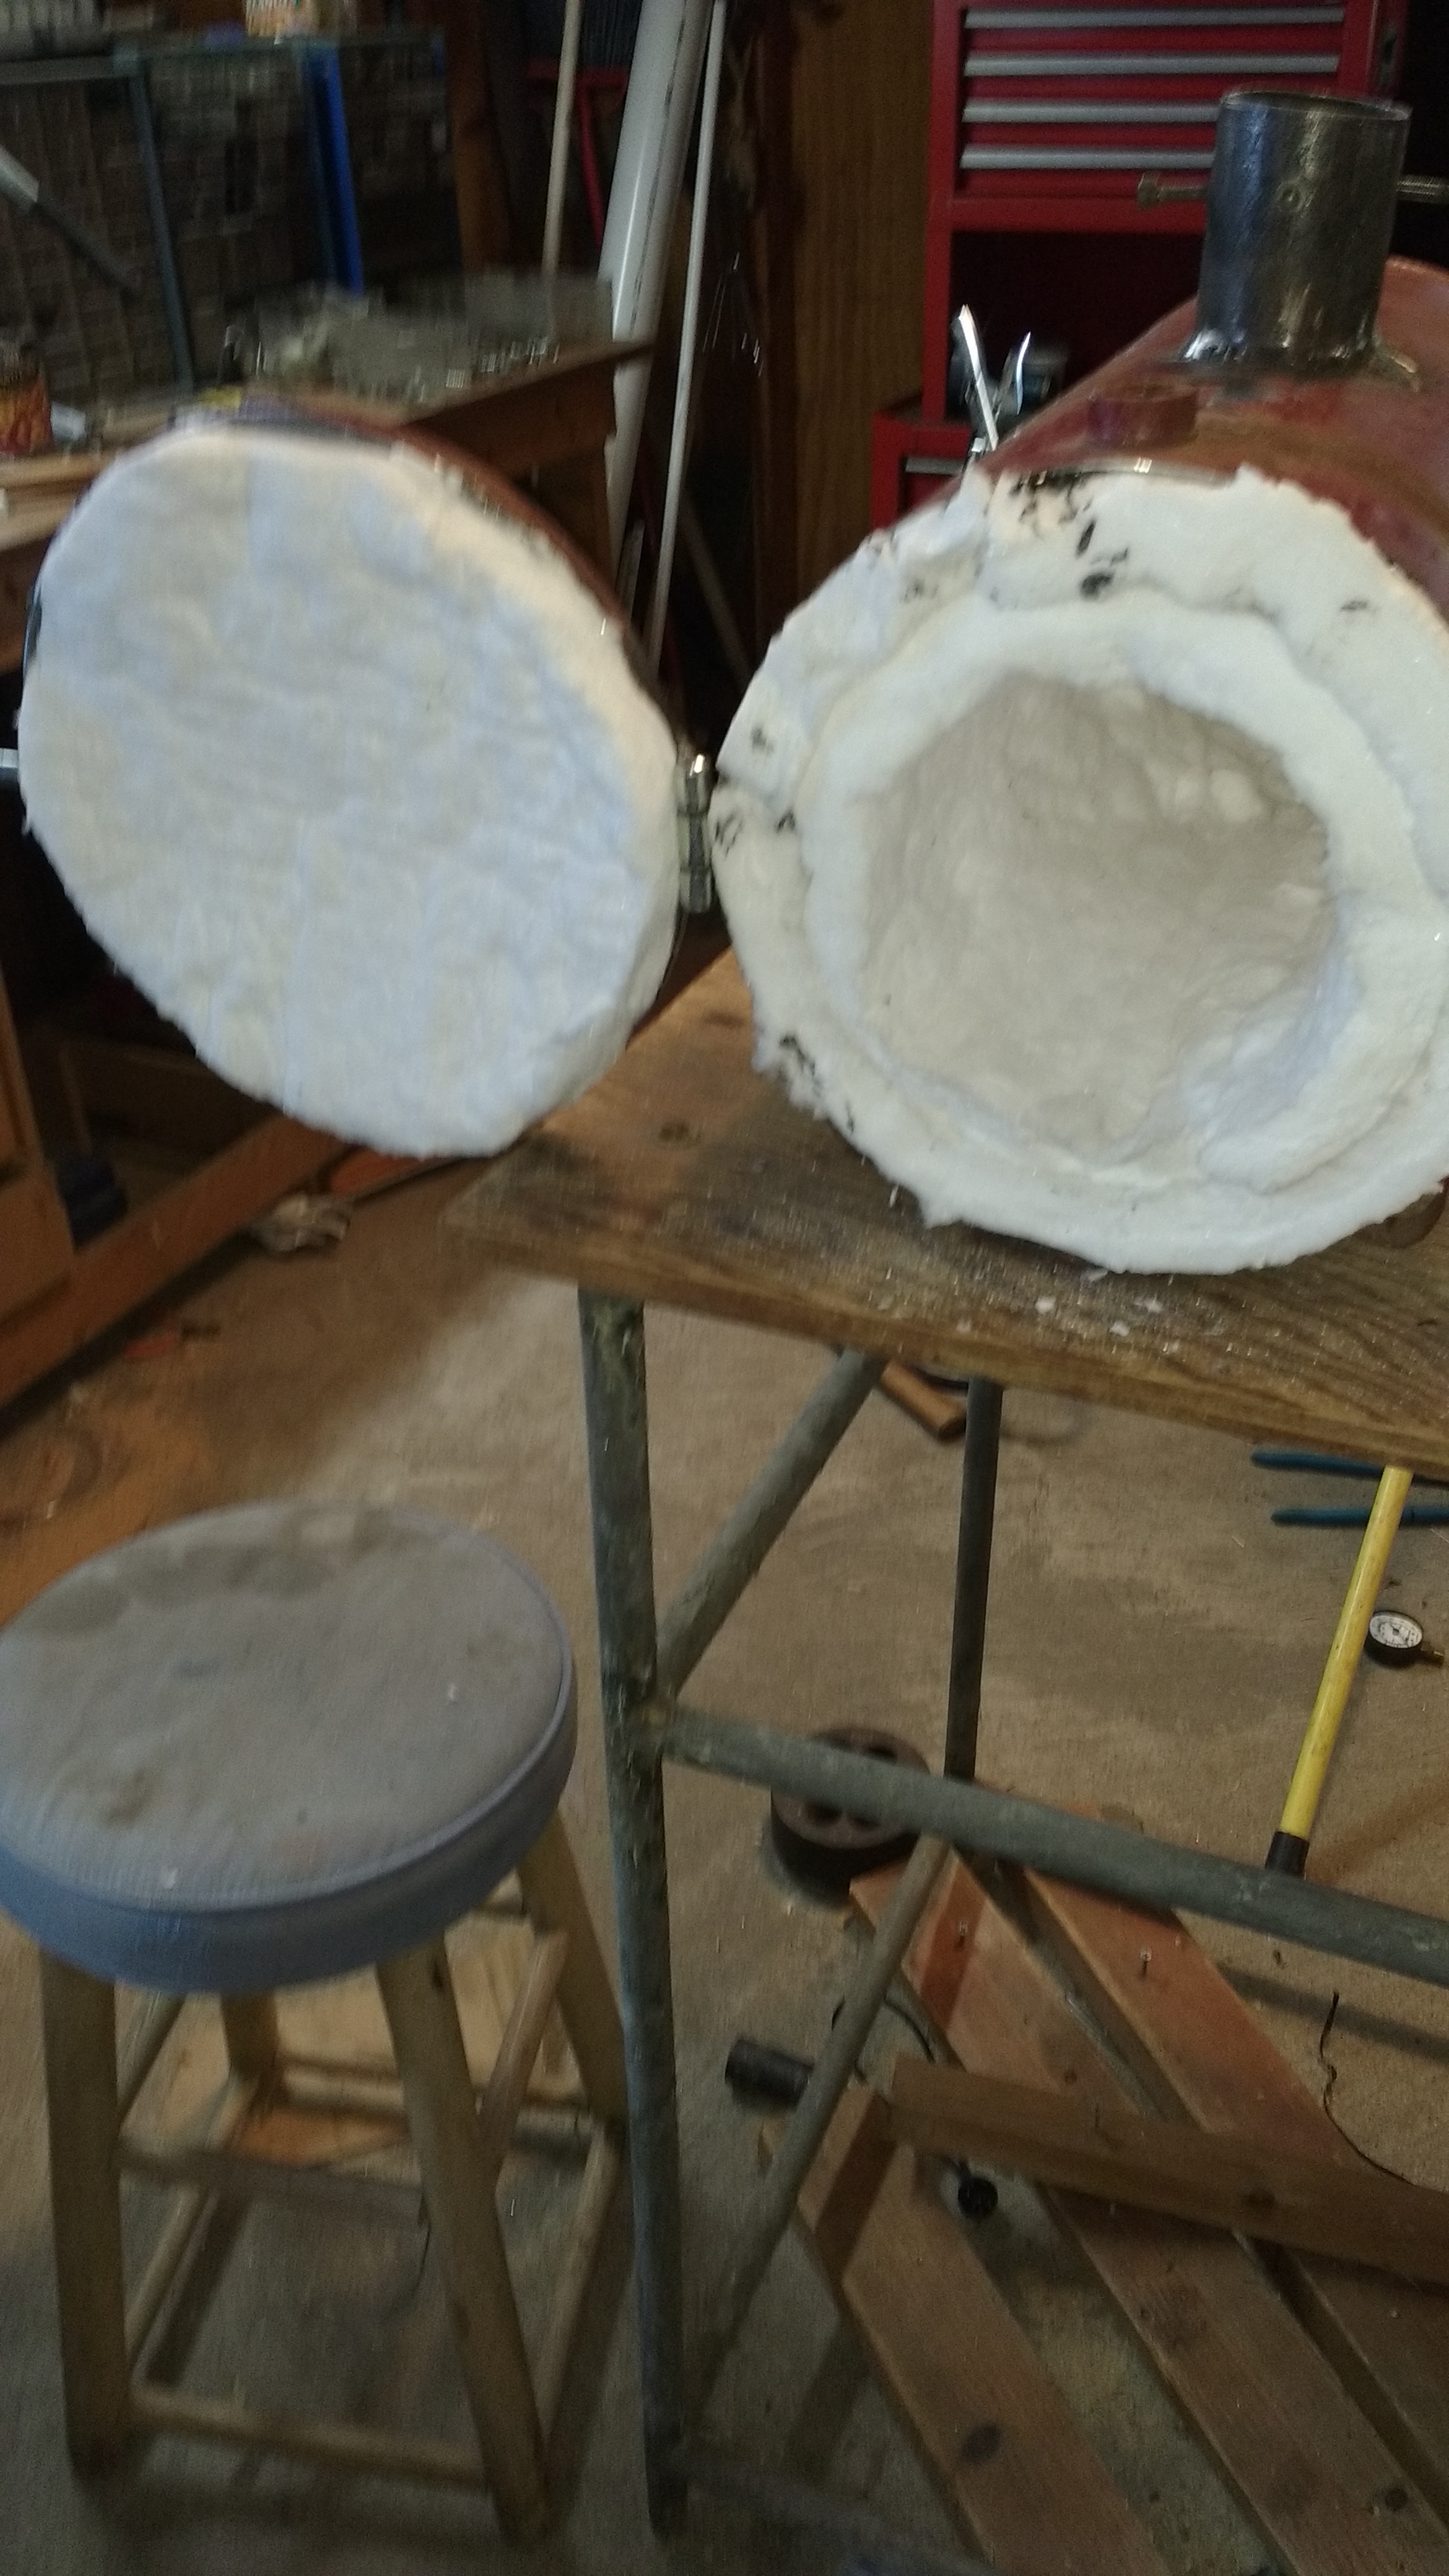
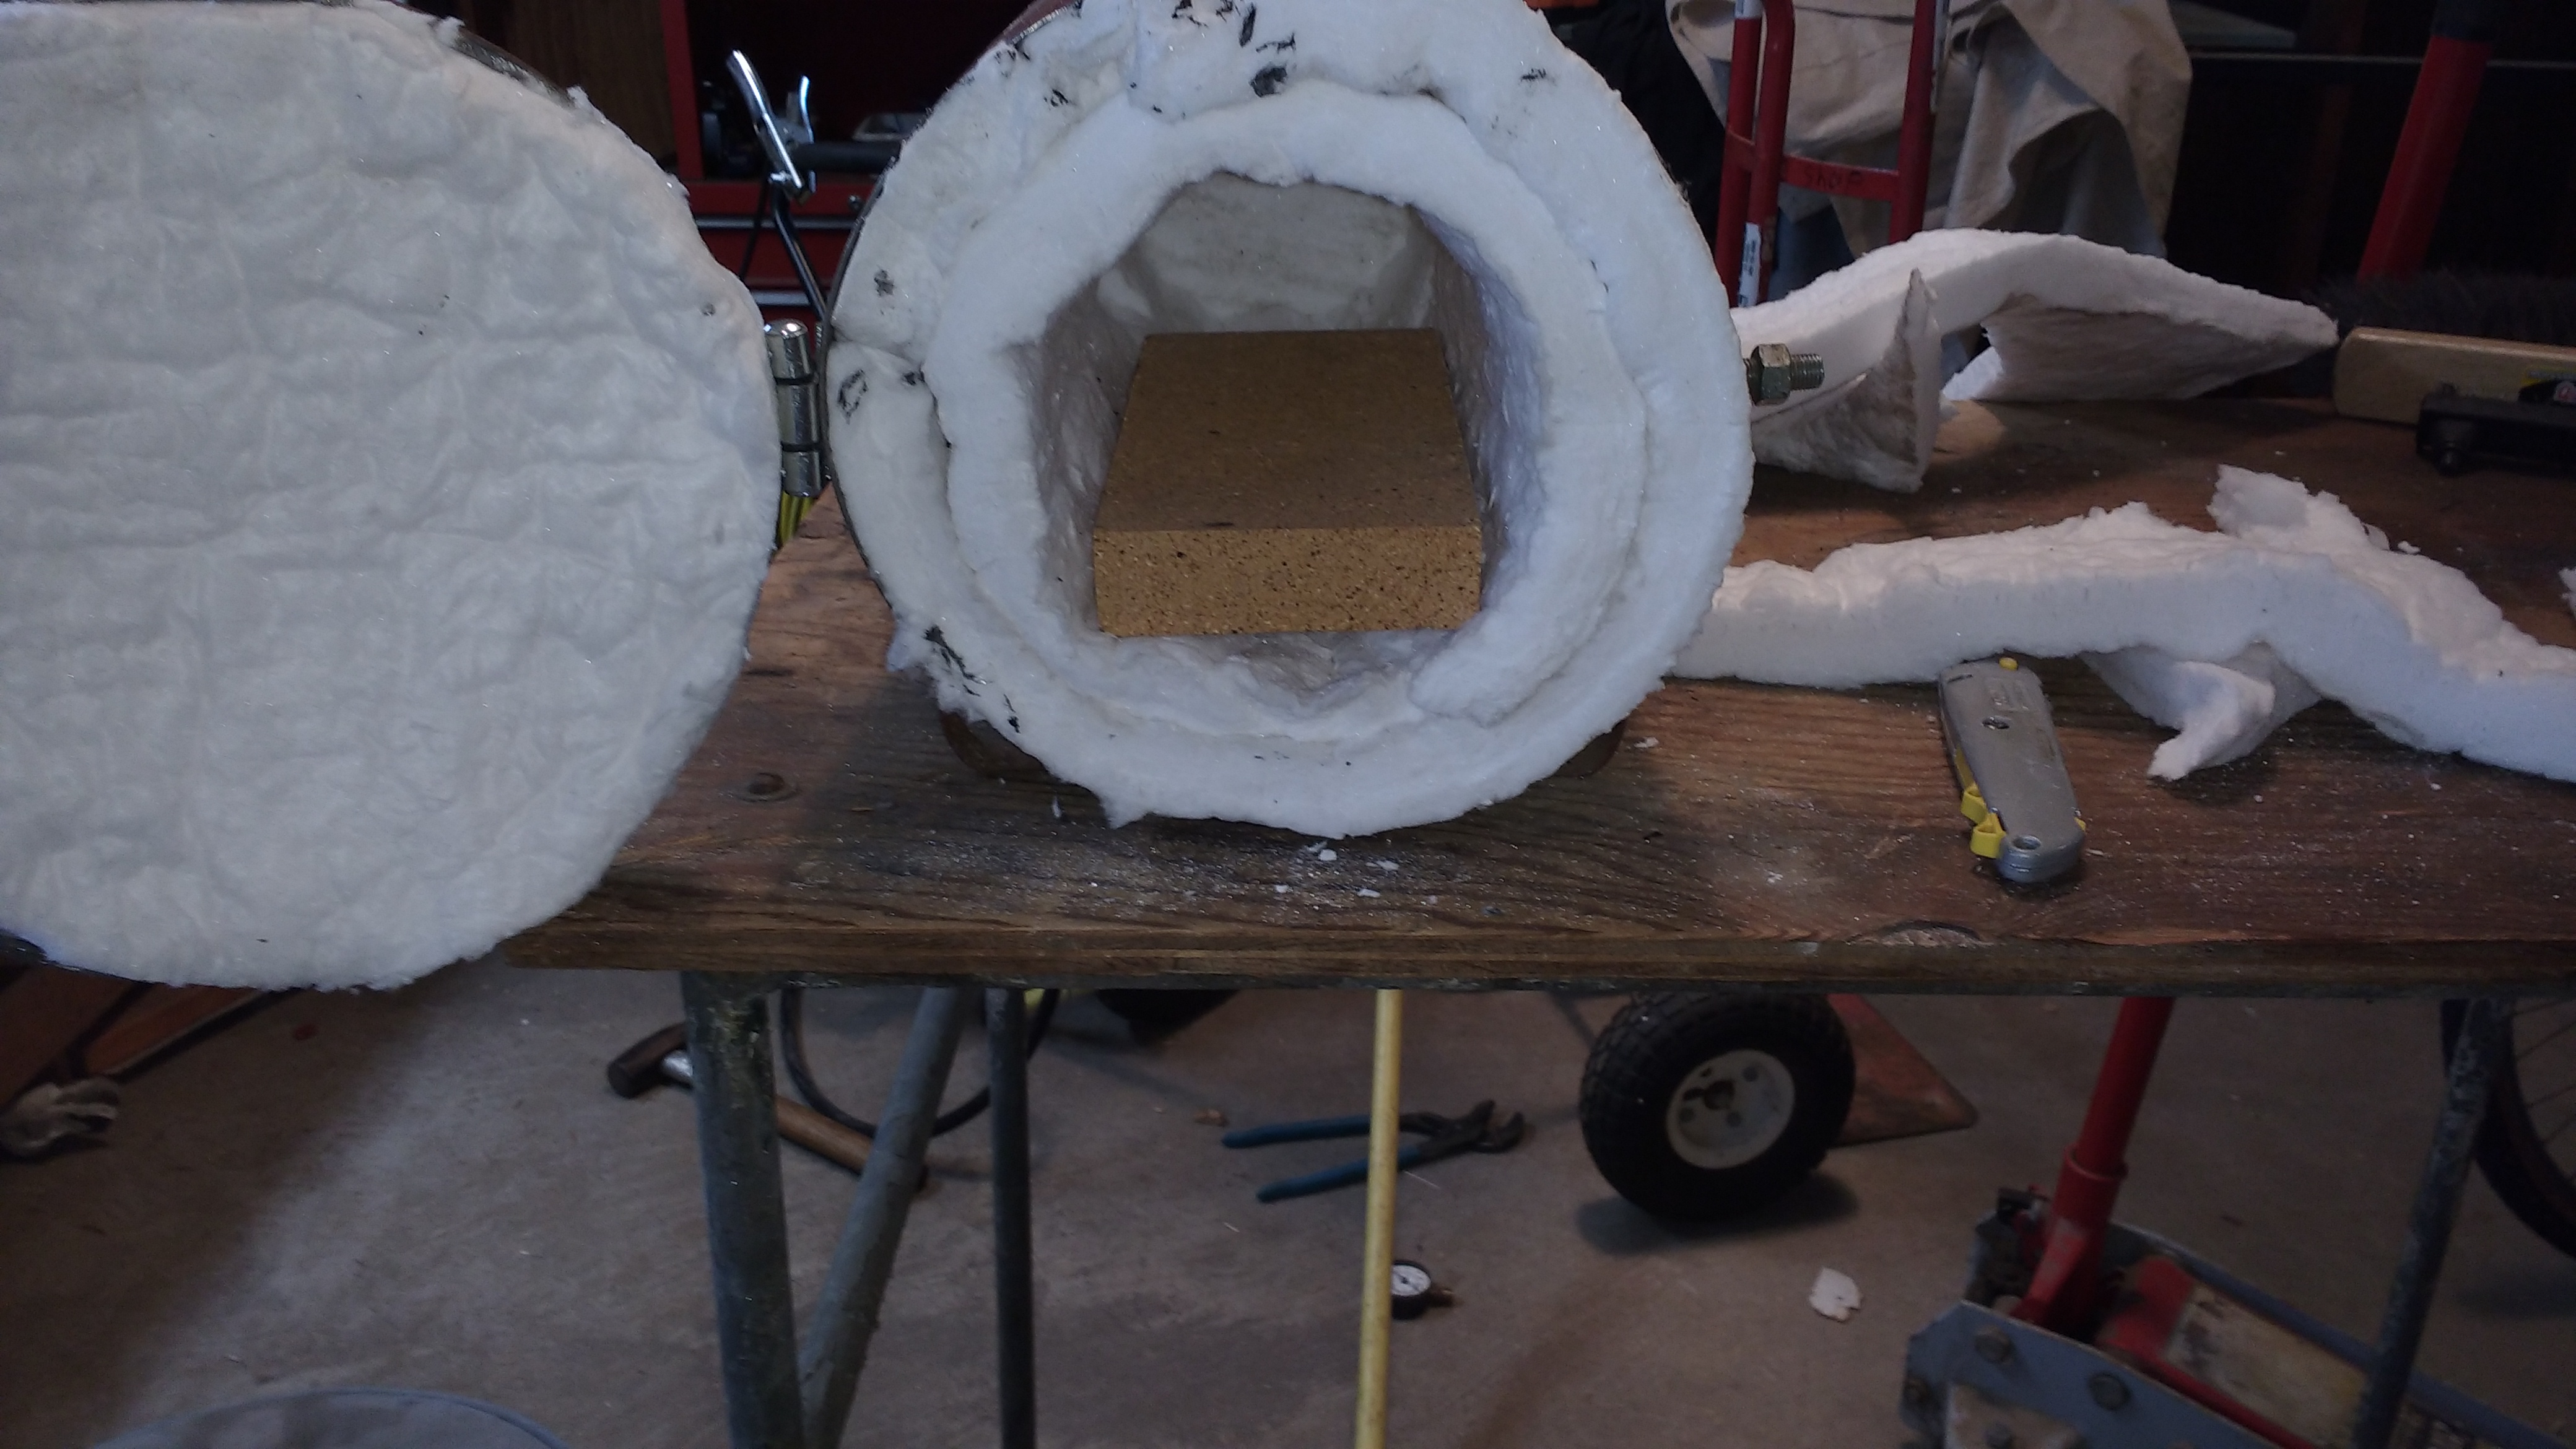
I have set the rigidizer and have one coat of satinite on the blanket. I don't think, given the quantity of satinite I have, even with the second coat that I'll reach a quarter inch thickness. I have a pint of plistix coming from Wayne. Should I get and apply more satinite till I reach the 1/4 inch, or will I be ok?
-
Ezra I appreciate your passion. I too am a newbie and in the process of a build, seen here in a different thread. good luck
-
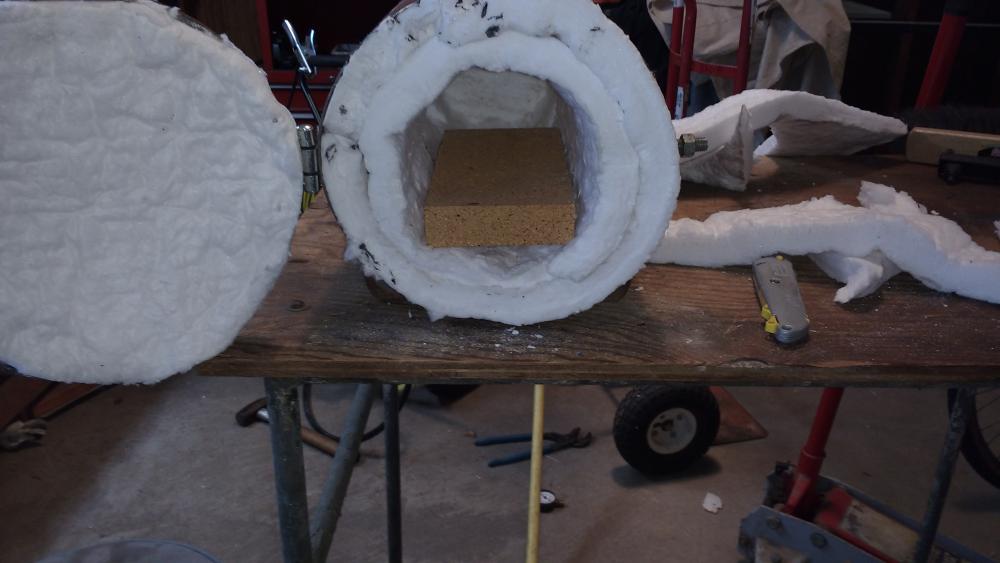
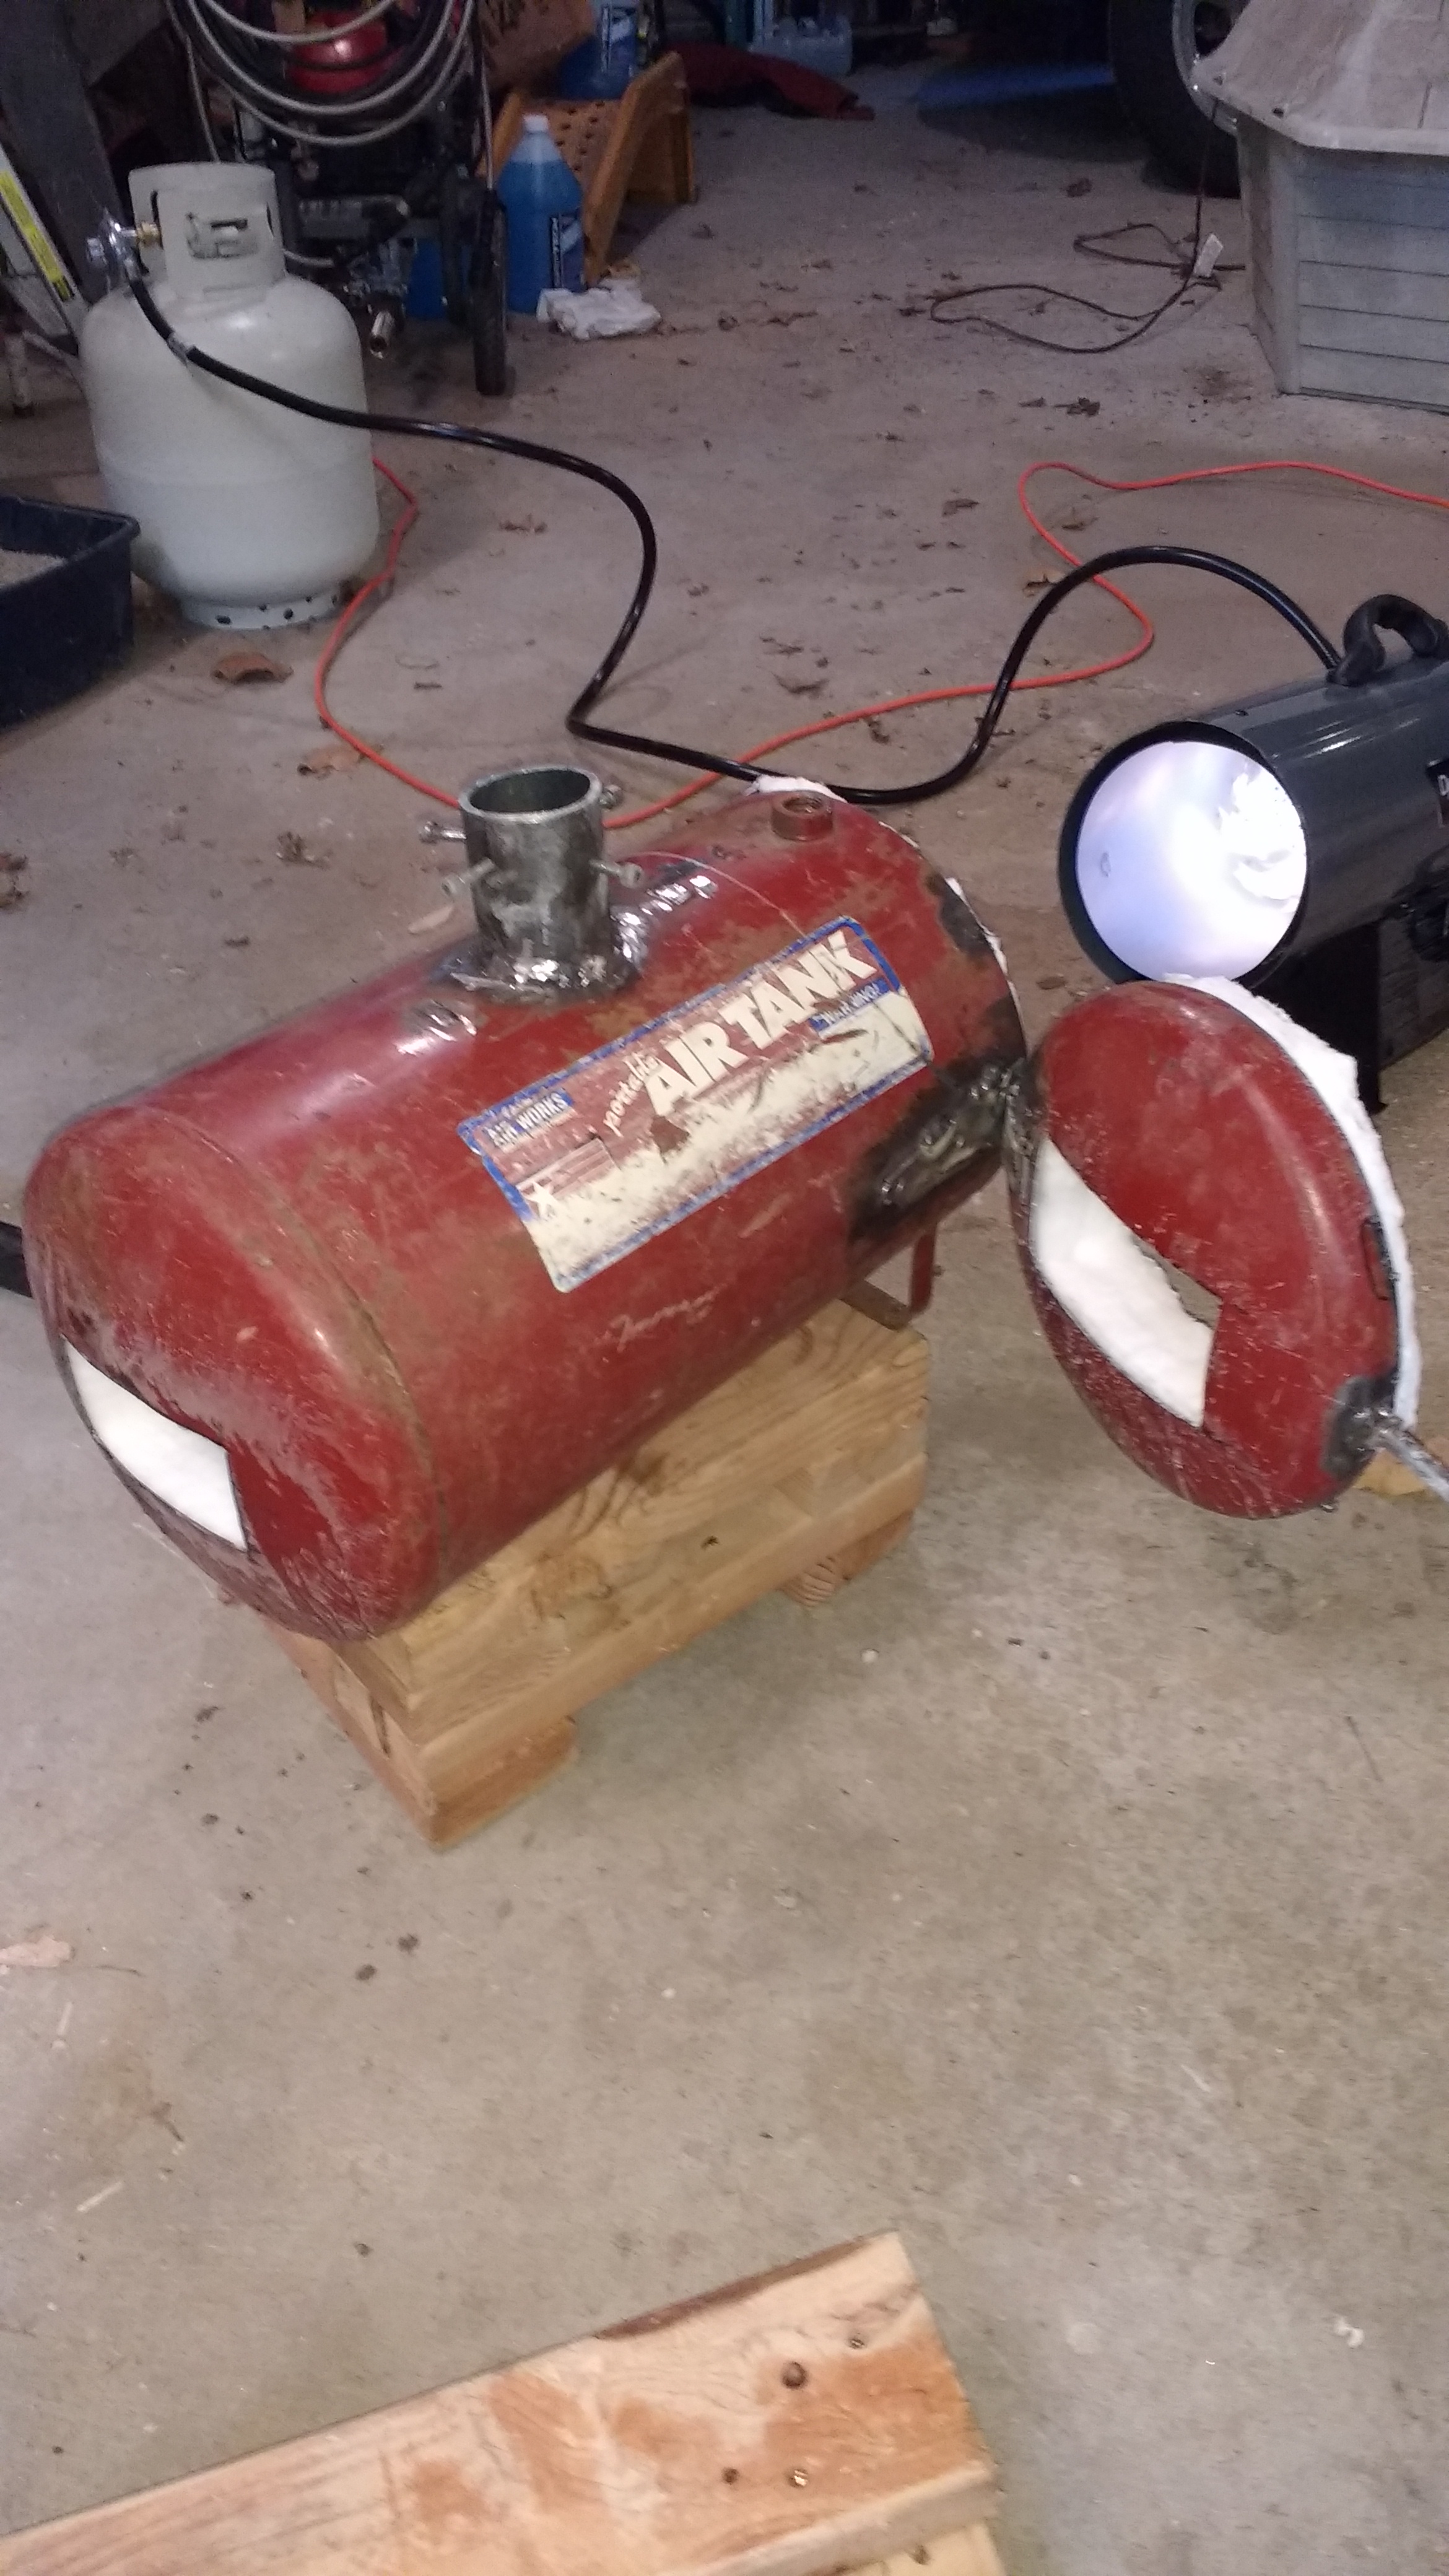
Thanks very much for all the help. 2 layers of 1 inch 8pound Kaowool. rigidizer was no problem. lightly wetted with water spray before hand then put the rigidizer in a spray bottle. turns out the viscosity issue was not issue at all. in the plastic bottle when I shook it, it seemed thick, but once opened it didn't seem much more viscous than water. It sprayed fine. got a nice even saturation on the wool shaking frequently. then dried it for a while in front of my garage heater. when I'm confident it is dry, I'll fire it to vitrify. Satinite next and waiting for my order of Plistix from Wayne. wish me luck.

-
thanks very much
-
I have Nalco 1144 colloidal silica for my rigidizer. my concern is that it is a bit viscous to use a spray bottle to apply. does anyone know if it can be diluted slightly with water? MSDS seems to say everything that can be said but that. even it's effect on a water flea. thanks in advance. Mike
-
thanks guys. I'm on it.
-
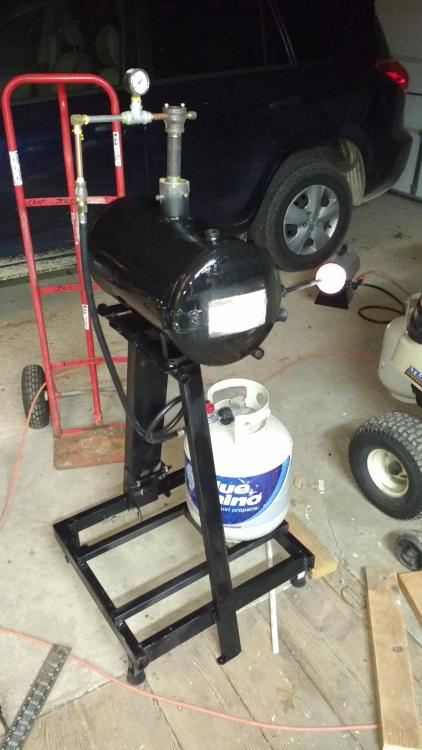
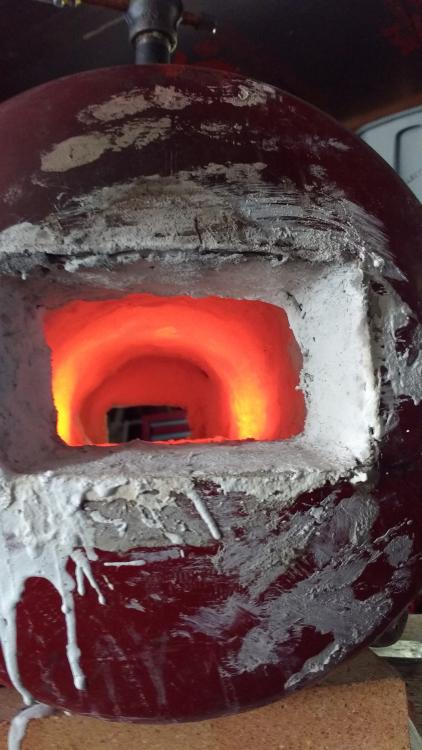
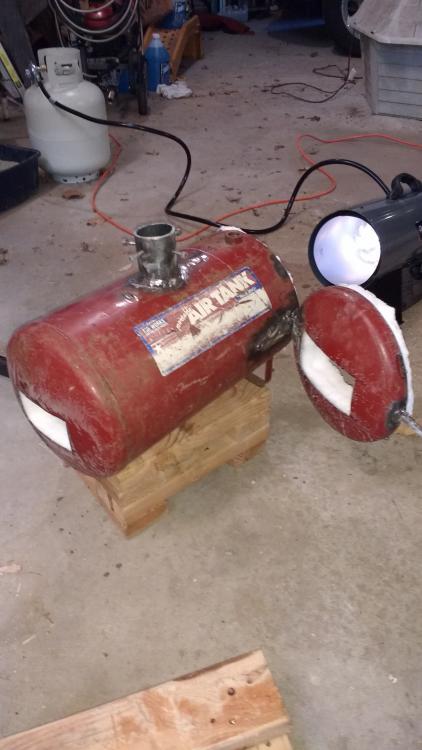
Hi Everyone. I know it has been a while since I posted my family anvil. Finally started moving towards a forge. Here is my progess so far. It is a 3/4 inch burner of the Reil design. will I have enough burner for this forge? My thoughts were to adjust the interior with Koawool to about 300 cu inches, split brick floor, rigidizer, then satinite. thought about the ITC 100 but the price of admission has me thinking I'll try it without first. Probably put a hinge and latch on the cap for future maintenance. Plan on putting porches on both ends to set bricks on to adjust the opening. Any thoughts or recommendations are appreciated. Mike Mike
.thumb.jpg.11363dd9f8ce49f880126f5f22e50543.jpg)

-
That is a very handsome hammer. have you used it yet?
-
family heirloom Arm and Hammer
MotoMike replied to MotoMike's topic in Anvils, Swage Blocks, and Mandrels
regarding Grandpa Brandt. It is not clear why, but he got out of the blacksmith business and tried his hand at farming. Not really making it there, he got employed by an insulation company blowing this new fangled insulation into houses. Apparently he acquired some lung affliction owed to no safety precautions at the time and suffered an early demise. Another uncle, now 77 recalls Grandpa Brandt was a good natured fellow. He recalls at one time the kids in the neighborhood attended a one room school house. During the day a big snow storm hit and the kids did not look forward to the 3 mile walk home in a foot of snow. As school was to get out, Grandpa Brand showed up in a horse drawn bobsled that he had filled with loose hay. 5 or 6 kids piled in and he took them home. seems information on him is pretty thin. Mike -
I am sure I'm late to the gate on this, but found a source for pdf books on smithing that are directly downloadable. Not to handy on the search features so could not tell if these were here already. http://www.survivorlibrary.com/?page_id=1389 Mike
-
family heirloom Arm and Hammer
MotoMike replied to MotoMike's topic in Anvils, Swage Blocks, and Mandrels
Thanks all Thomas You are correct. big hammer marks evident under the tail and even a bit under the horn. Ethan. I've gone out and looked at it and don't perceive a downward bend. I'll lay a rule on the face hanging over the horn and see if my eyeball is telling me the truth. To me it seems beautifully proportioned and sort of a riddle. How could such a big hunk of iron, so obviously heavy, look like it could fly? Sculpture really. I don't know what I'd have had to pay for it if I'd been been looking to buy, but to get her for free makes me happy as pie.


.jpg.98bd51f55fc24ae8c7f1567311885be0.jpg)