
teenylittlemetalguy
-
Posts
1,081 -
Joined
-
Last visited
Content Type
Profiles
Forums
Articles
Gallery
Downloads
Events
Everything posted by teenylittlemetalguy
-
Realistically anything that gets enough heat is fair game. people have been known to use about anything for heat from corn to diesel. Hard bricks take forever to heat up and some used in fire places are not high quality and at forging temps have a bit shorter life. but as a temporary solution I would use it. Good luck and have fun forging!
-
Just got an unusual request from a friend
teenylittlemetalguy replied to BIGGUNDOCTOR's topic in Copper Alloys
sorry to hear it. I like the idea of cast, as that would feel very solid. Maybe then you could machine the outside for a nice crisp finish? they would be able to have a name engraved on something like that if they wanted. -
Sorry, I wasn't being clear. I meant what are you charging customers? I do plan on making several sets extra for my camping trips
-
what do you normally charge? if you don't mind telling. I camp in a VERY windy location every year.
-
Anealing steel with little carbon
teenylittlemetalguy replied to Timothy Miller's topic in Heat Treating, general discussion
Where on earth did you source it from? sounds like it would be fun to work with. -
That is super sucky, sorry to hear it. must be quite the hoodlums that could pack that off.
-
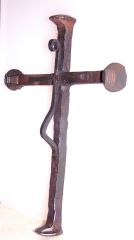 Really classy style. how was it welding spikes? I have made many knives but not welded any yet.
 -
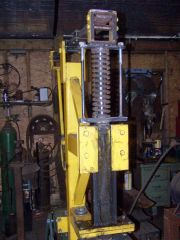 Harley, did you buy plans for the rest of the machine somewhere or is it your own design? I have seen them before but assumed that they where not worthwhile. sounds like you like yours.
 -
So how well does it work? I like the idea a lot.
-
Mike, I must admit I wouldn't begin to have a use for those, but I still like them a lot! especially the second set. one question , what is RFD?
-
1840s Flatter Dug Up
teenylittlemetalguy replied to CurlyGeorge's topic in Tools, general discussion
Neat! thanks for sharing. I wonder if a family member used it or if someone just lost it while they were there doing some work. -
Water-powered helve hammer
teenylittlemetalguy replied to Stormcrow's topic in Power Hammers, Treadle Hammers, Olivers
I don't know either but thanks for sharing. neat hammer. -
How to Forge Weld Cable into Damascus
teenylittlemetalguy replied to kraythe's topic in Blacksmithing, General Discussion
Thanks for the post. I wanted to add that I typically buy the cable new and have had very good luck not untwisting it to get flux inside. just twist tigher and flux the exterior. I believe old cable probably does need it. I usually cut off 8 inches and weld on a rebar handle, as if you need to take a break while welding a 4 ft piece it is very hard to pick up a weld where you left off and you will get a bad spot in your work. Would love to see pictures of your finished rigging cable welded up. also what do you patina with after an etch? -
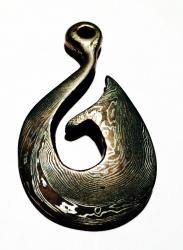
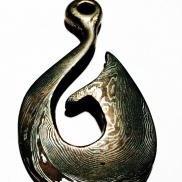
FE-wood- sorry, the second picture was just the straight Shibuichi, no pattern in it. It was what I used for the coppery colored parts in the first picture. What kind of press are you getting going? I have been thinking about getting a little hand crank roller mill just for mokume. I often use my hydraulic press but just for the initial weld, then off to the hammer and anvil. I know I would have much less waste if I had a litle roller. Bentiron- If I were you I would try, my guess is the solder will drastically reduce the melting point. But a little batch would probably tell you. All I made was a couple grams worth for this experiment.
-
Made a batch of Shibuichi this morning. (25% silver 75% copper.) Then proceded to use it and some silver make my first batch of Mokume that didnt use coins. happy with the result! :D
-
Another option is to build one. you can make about any shape and with a homemade burner you can save a lot of money to spend on a nice anvil. I have a tiny one using two insulating bricks and weld in it all the time. Also a large one with 4 burners and a back door. made from an old propane tank. you could forge entire flagpoles in it if you wanted. Frosty has a burner design that is cheap to build. I bult many and they cost less than $15.00 a piece and burn super hot.
-
Outstanding, both are very distinctive. The low layer count almost looks like skulls. B)
-
the only trick to making them is to make sure all the holes are exactly the same length apart. Any difference and they will bind.
-
File Axe Head
teenylittlemetalguy replied to beslagsmed's topic in Axes, Hatchets, Hawks, Choppers, etc
Really nice! :) -
Hammering Iron... didn't know I'd love it so much.
teenylittlemetalguy replied to Kansasjase's topic in Introduce Yourself
isn't it a blast? I had the exact same feelings when I started. I love how it gives you a real network of guys. I recently had a reason to travel abroad and made good friends over blacksmithing while on the road. -
I love the detail, and the bowl is really awesome. you must have welded it solid and then forged the depression? Now did you end up keeping it or was it a gift for someone lucky?
-
 Super cool! B)
 -
Well, I do a couple things that come together to cause an illusion. First off is decide where the center line is, then scotchbrite in differenet directions so you cause a line, that acts like shading. Then the second is the translucent paint, which really helps fool the eye. third is the naturally occuring place where the sharks color stops at about that same midway line, but not exactly. blending over the midway line a tiny bit with some overspray helps to make it look natural.(if you masked it off it would be obvious that it was flat). Fourth the clear coat(several layers) helps with depth. I do wish I could have done this in blue as the translucent spray paint would have really looked natural.
-
thanks guys. I really like the weathervane idea! it must weigh in somewhere around 60 lbs, the brackets in the back are made for 3/8 in lags to hit studs, so it should be firm on the wall. Despite how it looks in the picture it is flat, any curve you see is an illusion from the grinding and paint. I thought about throwing some depth in and then using my english wheel, but 1/8 is just too thick for that so I settled on flat. As for teeth, I didn't want to make it menacing as I have a suspicion it will end up on her dining room wall.
-
The only forging done was a couple mounting brackets on the back side, but I had to show this gift for my sister in law. Who is a big fan of sharks and anything purple. Thus, the purple Mako shark. Made from a scrap electrical panelboard. it it 1/8" thick by 7'5"