DanielC
-
Posts
664 -
Joined
-
Last visited
Content Type
Profiles
Forums
Articles
Gallery
Downloads
Events
Everything posted by DanielC
-
Well I think it is obvious to them and to us who the bigger site is. I feel making a thread was unnecessary to the whole making a statement when the forum numbers speak for themselves. Modesty my fellow smiths!
-
 Wouldn't it be too short for the ore to pass through a sizeable reduction zone? I am still learning a lot about smelting, but the Evenstad hearth came to mind when I saw it. Heh is this where the convo ends? This was posted the other day in one of my smelting circles (Its in Italian. Use google translate): http://pierluigimontalbano.blogspot.it/2013/06/archeologia-scoperta-una-fucina.html Looks very similar! This was posted as well, looking for complete photos. Looks strikingly familiar!
 -
4140 Cracked when hardening
DanielC replied to Ancientsword's topic in Heat Treating, general discussion
When quenching 4140 hammer heads in 130F warm oil, I always have to vigorously agitate to get it to harden. Just holding it there usually doesn't harden for me. I imagine in a more extreme way your route considering the size. -
Another Smelt. No pics, just awesome video.
DanielC replied to DanielC's topic in Smelting, Melting, Foundry, and Casting
Pics from this evening. First pic shows the muck bar from yesterday, and the other half. The other half I refined tonight into a muck bar, and then folded into a merchant bar. Its all I had time for. A good weld nonetheless. -
Another Smelt. No pics, just awesome video.
DanielC replied to DanielC's topic in Smelting, Melting, Foundry, and Casting
Haha, well since you said it windancer. My first muck bar made from a small chunk. Haven't decided on how many folds. Will at least go 2-3 refined wrought. Maybe more. -
Show me your New Year's blacksmithing resolutions 2013
DanielC replied to Nobody Special's topic in Everything Else
-Make a Wakizashi with my bloom material. -Finish a rounding hammer. -Sell a half dozen blades -Run my own smelter -
'?do=embed' frameborder='0' data-embedContent>> Made from essentially dirt. Iron Ore. As raw as it gets.
-
Another Smelt. No pics, just awesome video.
DanielC replied to DanielC's topic in Smelting, Melting, Foundry, and Casting
That it is. Ive been to two smelts and one crucible run now and I am hooked. -
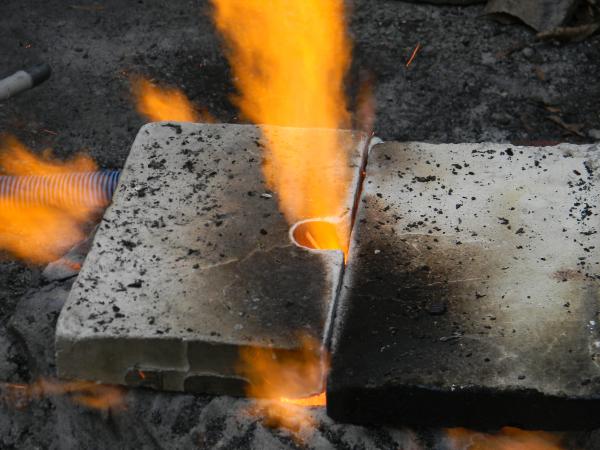
This is another smelt at Mark Green's. Explaining how to clean the slag from the bottom of the bloom, and opening the birthing chamber to extract the bloom without tearing down the furnace. Then another video of the actual birthing of the bloom, the bloom compaction, and then cutting it into workable pieces. Really addictive to watch and actually participate in. Can't wait to start mine! Be sure to set it to 720p.
-
Making Crucible Steel at Mark's.
DanielC replied to DanielC's topic in Smelting, Melting, Foundry, and Casting
The spark test, the puck, and the glass on top. Photos and extraction done by Mark. -
Making Crucible Steel at Mark's.
DanielC replied to DanielC's topic in Smelting, Melting, Foundry, and Casting
-
Making Crucible Steel at Mark's.
DanielC replied to DanielC's topic in Smelting, Melting, Foundry, and Casting
-
https://plus.google.com/u/0/photos/105819761974816279493/albums/5959950248156513553


-
I am 27 years old. I grew up in a house of self learners. The big one in the family was my oldest brother. He's 37 now. He is a self taught computer engineer for Wachovia bank. No degree, no seminars, nothing but programming books and an IBM. He was 16 when he interned at a software business and fixed a problem over night that the companies engineers spent weeks trying to fix and failed. That landed him a job there, and was the springboard for what he does now. Leads teams of programmers to do what they do to keep the bank going internally. When i was 11, i was interested in computers (not so much now). I asked him if he would teach me to build a website (this is late 90's). He told me to search html tutorials. So i did. That action changed the way i go about things forever. From there i learned how to really mine the internet and books for information. That same year and age i wanted to and did build a half dozen computers from scratch and devoured as much as i could. Its also the same age i picked up reading books out of sheer enjoyment. I have been smithing a year now, and try to search first and ask second. So far it has been a success. I also agree that youth these days are rather lazy. Need to be spoonfed. Sad really.
-
Stabilizing handle material.
DanielC replied to Backwoods Blacksmith's topic in Finish and Polish for Knives
It's actually a Methacrylate Acrylic resin, just named cactus juice. Special stuff, otherwise known as Resinol 90c made by Loctite. And with some sanding just to see what it did (All I'd do from there is use a buffer to make it really shine) the pictures found below. Btw, these have NOT been wet down with water or oil. Was the redwood burl stabilized in a normal vacuum chamber, or was it put under extreme pressures? As far as I know, redwood requires 4000psi in the stuff to work since the pores are so incredibly tight, or dense, or whatever those little buggers do. This is of course what I have read and not based on actual trial and error performed by me. I do however have some redwood burl, and an additional chamber I have made that can take extreme psi. I might see how much weight is increased by just the regular vacuum and go from there. I built an additional pressure chamber for Walnut, since it will not stabilize under simple vacuum. I keep it under 150-200psi submerged in cactus juice after a vacuum treatment before I cure the resin. Gained 54% in weight with my walnut doing that, a shear success. Without the addition of positive pressure, I was gaining something like 5% in weight, indicating that it was not penetrating the wood. My pressure chamber can easily withstand 4000psi. It's just the danger of setting up a hydraulic system to get it to 4000psi that is the problem. Sorry for the paragraph of chatter. I just wanted to mention it. Also, thanks for the reply. Tremendous respect for your work. -
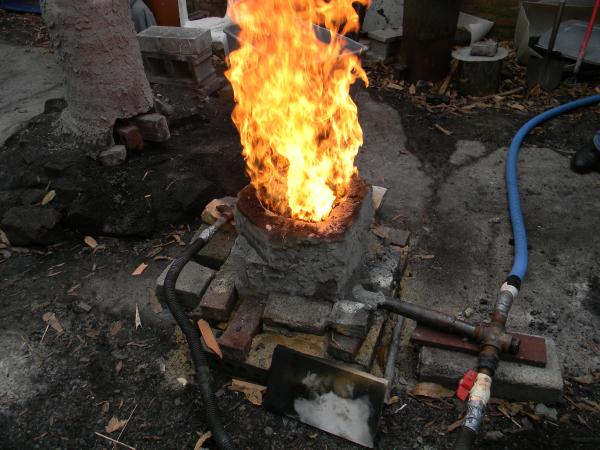
Best way to explain is with pictures. You can adjust the amount of air leaving through the ball valve. There is no restriction on your air supply. This is a common method used in iron smelting furnaces if you look at the various pictures of people running them on the web. There is no reason this cannot be employed in a forge.
-
Yea China tends to put crap in their metals. Their brass for example has been known to contain lead in the past. We had to use USA only brass in some of our hospital jobs. Check a plumbing supply house. A mom and pop one would be best.
-
Try using a ball valve with a Tee. Hair dryer on one side of the tee with the ball valve on the exact opposite side open about 90% of the way. The remainder side of the Tee goes to your forge.
-
Thanks Tony. 300mm seems low for the length from heel to horn. Maybe a typo?
-
Could you list the dimensions of the 370# Peter Wright? Length from heel to horn. Length and width of top plate. Length and width of base. Height of anvil. Size of hardie and pritchel hole. Thanks.
-
EDIT: Nevermind. I dont want to go there. Nice looking anvil.
-
What are the dimension of the Anvil? Face LxW Height of anvil Base LxW Length from horn to heel Size of Hardie Hole and Pritchel
-
First smelt I participated in.
DanielC replied to DanielC's topic in Smelting, Melting, Foundry, and Casting
Well this was honestly Mark Green's smelt. I was just lucky enough to get in touch with him and be able to participate and learn. I've got a good chunk to play around with. I'm torn between Orishigane or just using as Iron for a jacket lamination. I've got top and bottom fullurs to draw it out once its consolidated into a bar with the aid of a striker. From there maybe a small knife and a few bodkins for my brother who was also there assisting. -
-
Acquired some spalted maple logs today. Score!
DanielC replied to DanielC's topic in Everything Else
Thank you for a lead on an ID. Heres a few pics showing a scrap piece. Found a mill that can cut my wood into slabs. Edit: Upon further searching now for ambrosia maple, i think that is what i have and not spalted and not any less beautiful.