
Dillon Sculpture
-
Posts
1,578 -
Joined
-
Last visited
Content Type
Profiles
Forums
Articles
Gallery
Downloads
Events
Everything posted by Dillon Sculpture
-
Show me your Bottle Openers!
Dillon Sculpture replied to Arbalist's topic in Blacksmithing, General Discussion
U need 1 :D -
I have four! One is hand held :blink:
-
so you want to build a peacock
Dillon Sculpture replied to scrapartoz's topic in Metal Sculpture & Carvings
Another great piece Andrew, I especially like the incorporation of the glass. -
Show me your Bottle Openers!
Dillon Sculpture replied to Arbalist's topic in Blacksmithing, General Discussion
Great work, keep em coming -
Buying a Bradley
Dillon Sculpture replied to Andrew.V's topic in Power Hammers, Treadle Hammers, Olivers
Patrick, when you figure it out post some pictures of the 500!!!! -
Buying a Bradley
Dillon Sculpture replied to Andrew.V's topic in Power Hammers, Treadle Hammers, Olivers
Somebody killed that one... All the major parts are gone or destroyed. Better luck next time :( -
You have any pics Bruce? Sounds like an interesting tool to have.
-
Thanks again, not much modern materials but punching the holes could probably date back even further than the 20th century. I could have thrown a laser cutting and maybe some plasma welding?
-
A master of expression in iron... http://www.claudiobottero.com/oggetti-sculture
-
hammer valving open discussion
Dillon Sculpture replied to iron woodrow's topic in Power Hammers, Treadle Hammers, Olivers
Your correct in both descriptions of the sword and Ken's hammer. Grant fed his hammer a small secondary air line to increase control and have that control close at "hand". Good stuff... -
KZ150 Power Hammer
Dillon Sculpture replied to Daniel.85's topic in Power Hammers, Treadle Hammers, Olivers
Finally get a look at the valve, kinda looks off the self modified but I'm not sure <_< Great hammer, congratulations! -
Thanks all, The holes were punched under my iron worker, filed and then I hammered the edges. Here is a process shot showing some of the elements. 3/4" angle smashed to 60 degrees, the half oval was plug welded then the panels were riveted. The top hat was also pined to the very top, as well the sides of the hat were riveted. The glass is held in by small copper tabs that were also riveted. Very tedious work for my big hands, just to focus my eyes on these small parts was a challenge :wacko:
-
hammer valving open discussion
Dillon Sculpture replied to iron woodrow's topic in Power Hammers, Treadle Hammers, Olivers
John, the pivot for the sword has a nut on the end which I simply used a wench to add a second lever much like Grants handle. What this does is take the sword out of use and allows for positioning the motion valve directly. At a high level of throttle I can mash the ram down without cycling, kinda helpful for a full power one hit. Wood, I couldn't embed the video but it is Grants little steam hammer video on youtube. These modification are very inventive and imo are the best I've seen for control and power. -
Iron, 11-1/2" tall 7" across, mostly riveted, seeded glass with brass hardware, electrified.
-
What type of power hammer do you use?
Dillon Sculpture replied to EWCTool's topic in Power Hammers, Treadle Hammers, Olivers
250 Murray, 500 Bradley, 200 Chambersburg, 800 Niles Bement Pond, Mildly seeking for a 2000 H frame B) -
hammer valving open discussion
Dillon Sculpture replied to iron woodrow's topic in Power Hammers, Treadle Hammers, Olivers
I'd like to offer up this one for discussion, Grants modifications allowed control for a single operator. I have fiddled with the link between the sword and the motion valve basically creating a bypass. This allows for increased throttle without cycling which was not as apparent in this video but could be capitalized on in a air hammer with the steam hammer valving. It is a bit different than my 200 Chambersburg set up that has the foot control linked to the sword/motion valve, which at a certain point of throttle it will start to cycle. Grant also has a secondary air line that allows more control of the throttle, both are great engineering features that are worth pointing out. -
Some better pics, I didn't win the compitition but it will get built someday, I'll just add it to the list!
-
Great piece, I look forward to the next build. Thanks for sharing!
-
hammer valving open discussion
Dillon Sculpture replied to iron woodrow's topic in Power Hammers, Treadle Hammers, Olivers
Thanks for the thanks Woody :D Thats a great pic of a early Massey, any idea the year or specs? Retrofitting your hammer would be more work than its worth, I think the valving is just to dissimilar from utility to self contained, not only would you have to build the piston but all the valving. Just get some AIR! John thanks for the diagram, thats some crazy looking valve for sure. My hammers have a much shorter and simpler motion valve but you have to consider the utility is also directly tied to the ram through the sword. Could you include the description of #17-22? Not sure how the "art" smiths get blamed for dangerous equipment but I'll take it! AND like it! -
Great piece Mac! Good to see you cranking out the work, keep it up. You may need to come up and forge out some more chunks B)
-
Anyone forge a one piece anvil?
Dillon Sculpture replied to Dillon Sculpture's topic in Anvils, Swage Blocks, and Mandrels
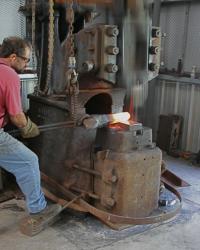
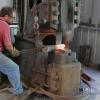
My friend Bill Brown stopped by yesterday so we had enough hands to give it a go. Started with a 2" block 8" square. Used a 1-1/4" to fuller the top bottom and sides under the Niles. The bottom fuller gave us problems when we went to the sides the feet wanted to fold in. We got it close enough for me to pull out the horn and heel then it went back under the Niles to lay the top flat. Way to many heats and clean up but not bad for my first. I will have to develop better tooling and technique if I'm going to forge the 3 heat 30 lb. anvil I want to. This one is nicely proportioned at 2-1/2" wide 5" tall and 12-1/2" long and 18 lbs. Not sure what that is in stones? I may go back in and split the feet outward and pop some holes to nail it down. -
Steam Hammers
Dillon Sculpture replied to Dillon Sculpture's topic in Power Hammers, Treadle Hammers, Olivers
Those are two of my favorite hammer pics Phil, the photography is amazing! I too am disappointed that Matt's hammer won't make this thread... Forging an anvil with Bill Brown. -
Dynamic Details, share yours.
Dillon Sculpture replied to nuge's topic in Blacksmithing, General Discussion
Deformation and connections... -
I've forged a few small ones under my Bradley 250 using Clifton Ralph method and tooling from his video. My idea is one that will fit within my die size of 6"x12" or slightly bigger, 30lb. billet starting as 6" square 3"+ thick. Double horn with feet possibly a tongue...
-
Pillow blocks tend to break, babbitt would handle the load...