Alwayslearning
-
Posts
18 -
Joined
-
Last visited
Content Type
Profiles
Forums
Articles
Gallery
Downloads
Events
Everything posted by Alwayslearning
-
Good ideas all! And Frosty, where do you get waterglass these days? (Just wanted to hear other options other than feebay, or glamazon)
-
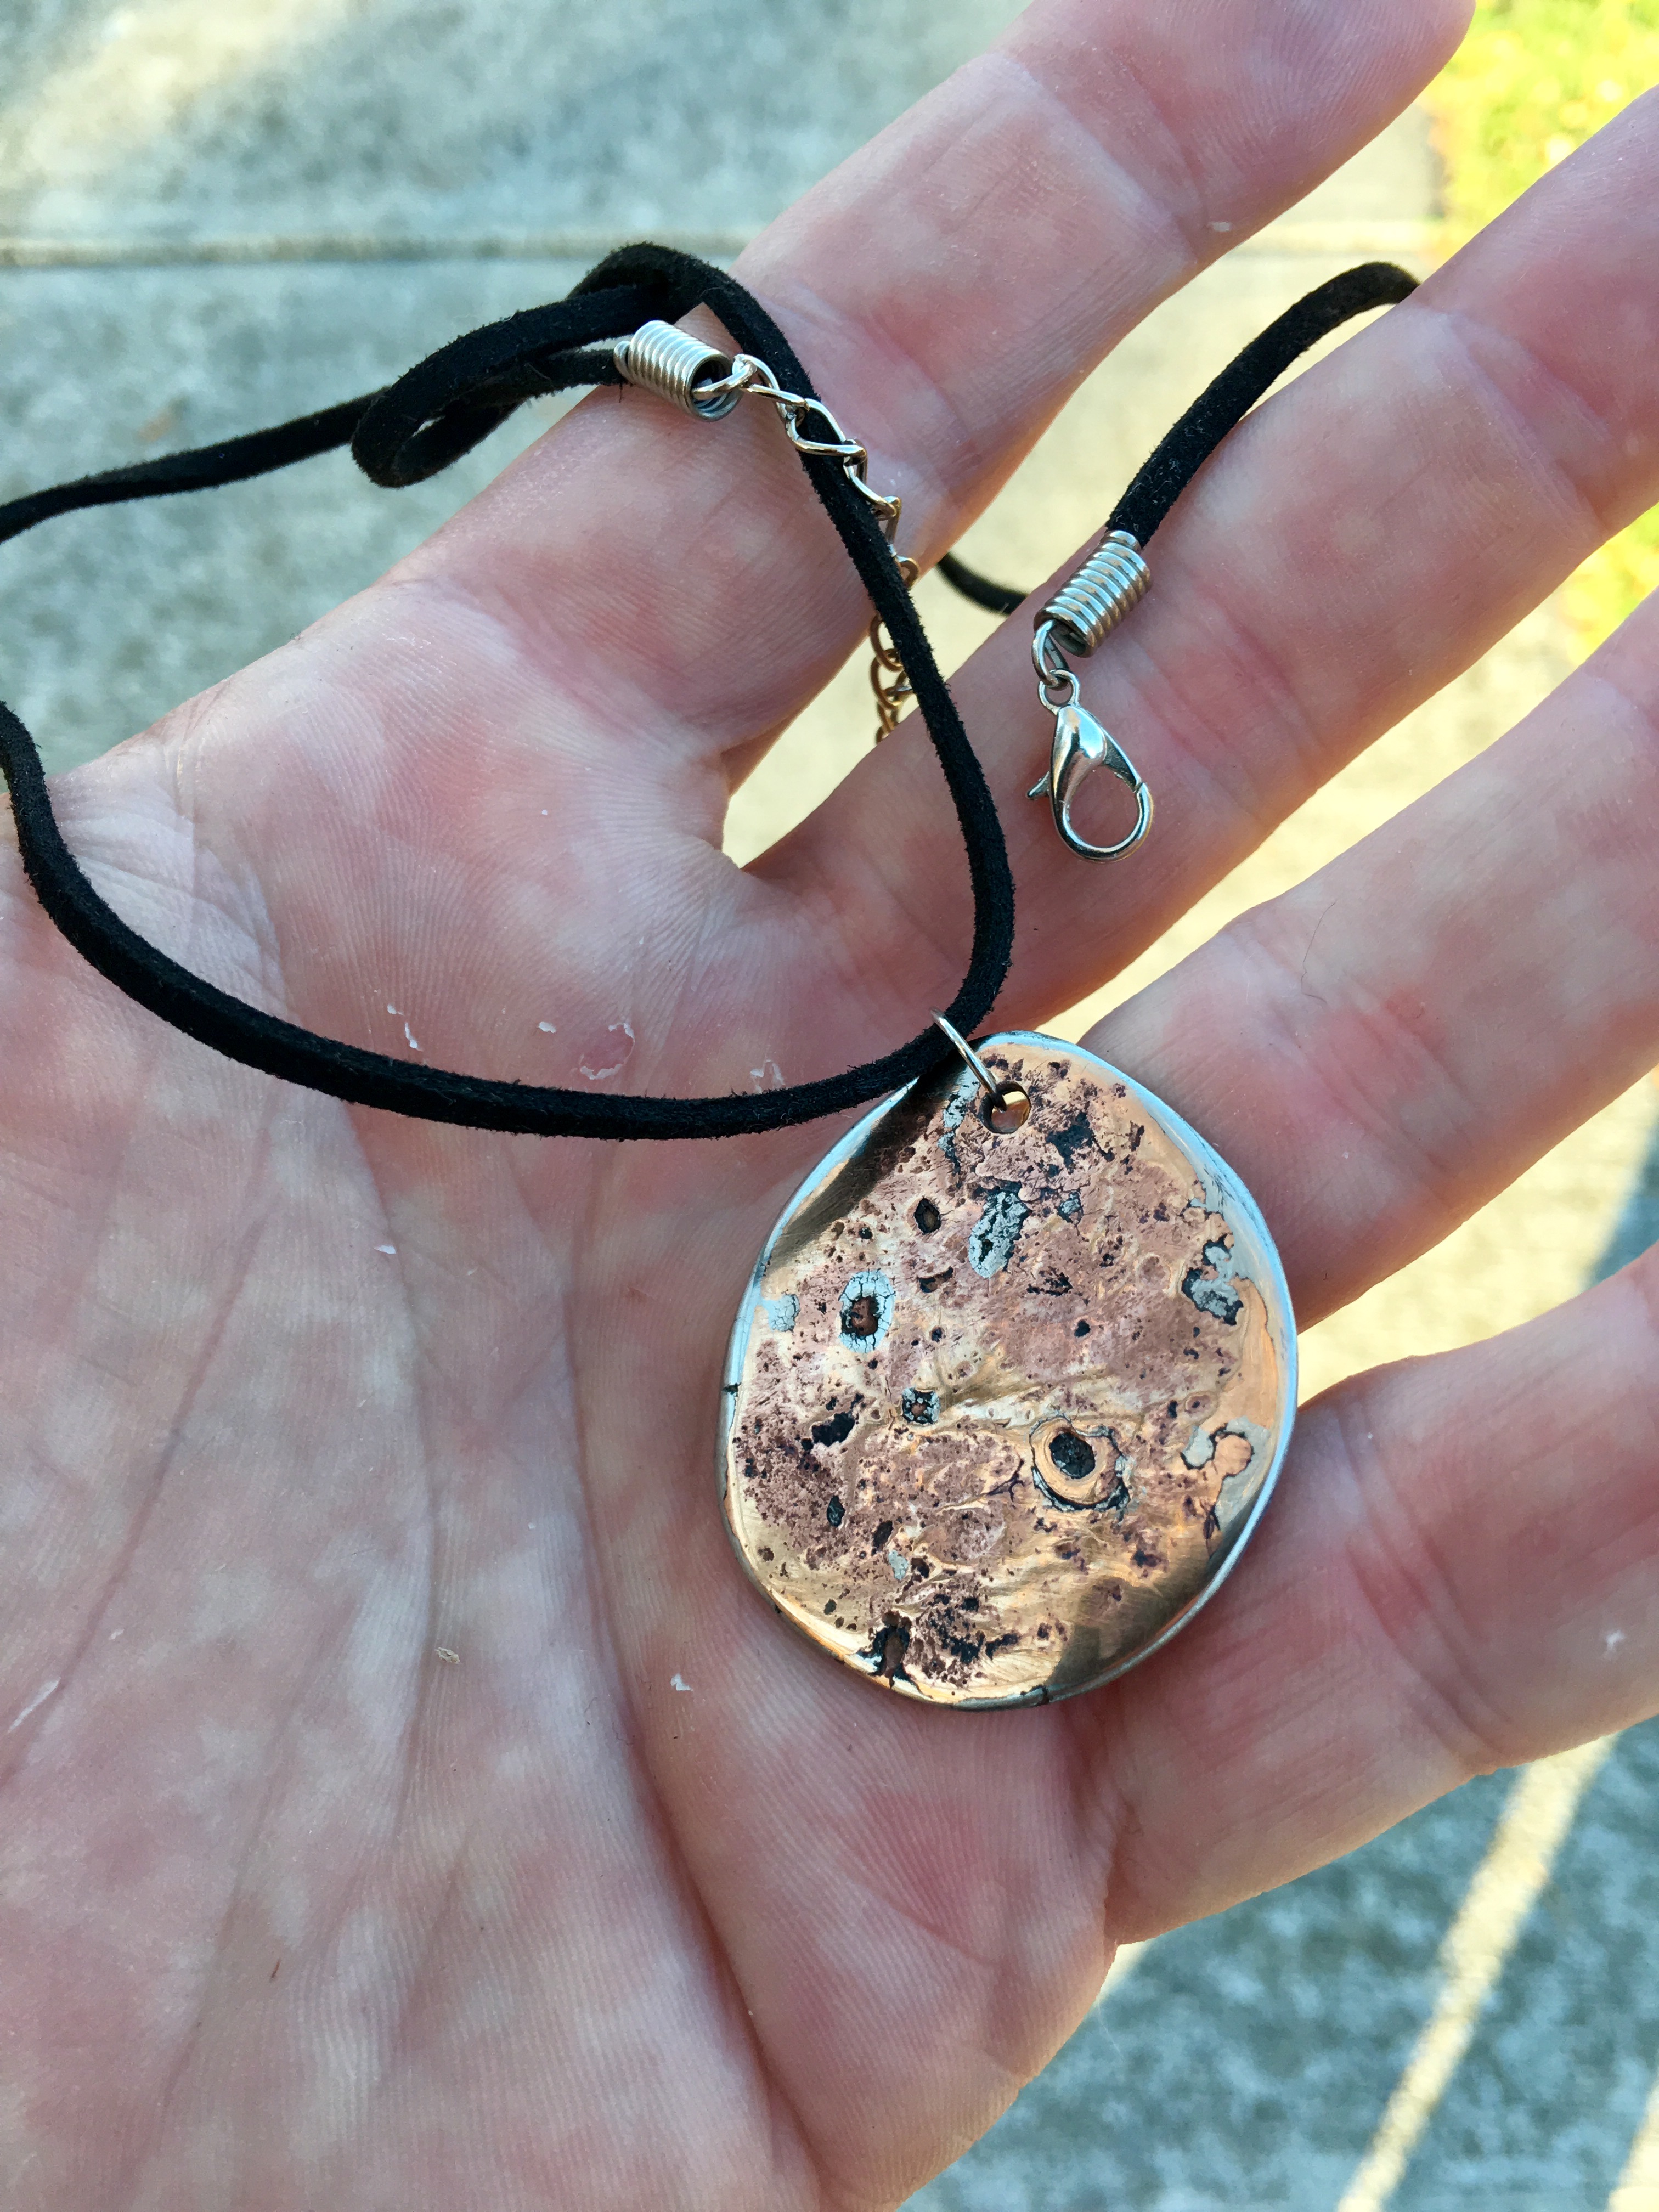
My first* coin mokume gane..(*success)
Alwayslearning replied to Alwayslearning's topic in Mokume Gane
Agreed - good advice. I have recently gotten a old kickpress that needs tooling, might see if I could (temporarily) modify it to act like a "Hugh McDonald"-style rolling mill. Was hoping to find a nice used jewelry rolling mill, but hadn't found one locally (Vermont) cheaply. -
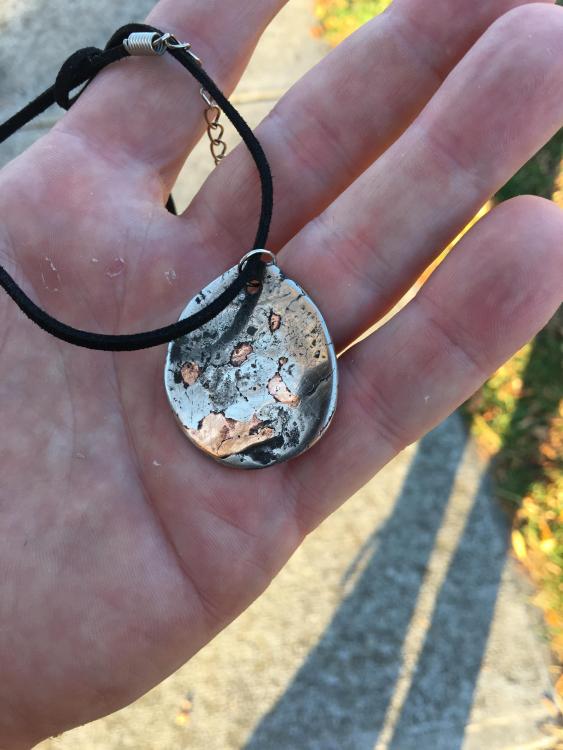
After a fashion, I squished some hot change together and made this for my wife.. Next up, will start on making actual patterning between metals, but was happy with my initial results.

-
Very cool. You said you stopped using coins, any particular source or supplier you are using for metals now? I had been using coins and scrap, but am thinking using clean, flat sheet would be more time-efficient. You can pm me so I don't derail your thread. Nice work!
-
achieving specific colors in Mokume?
Alwayslearning replied to Athen R Dailey's topic in Mokume Gane
And another example of color change by heat, this time as produced by a caveman (me).. In my little experiments you will note the impression made by a pre '82 Canadian nickel (pure nickel) delaminating from the copper (a pre '82 U.S.A penny), also the very faint "LIBERTY" in the flattened quarter. Colors are from firescale on the respective metals. The black can be more pronounced, but I wanted to polish and see how it changed as I did. The scale is relatively hard to polish off, say compared to soot, but I wouldn't consider it "durable". A ca finish or clear epoxy would make it a lot more resistant, but this is just my newbie-armchair-theorizing.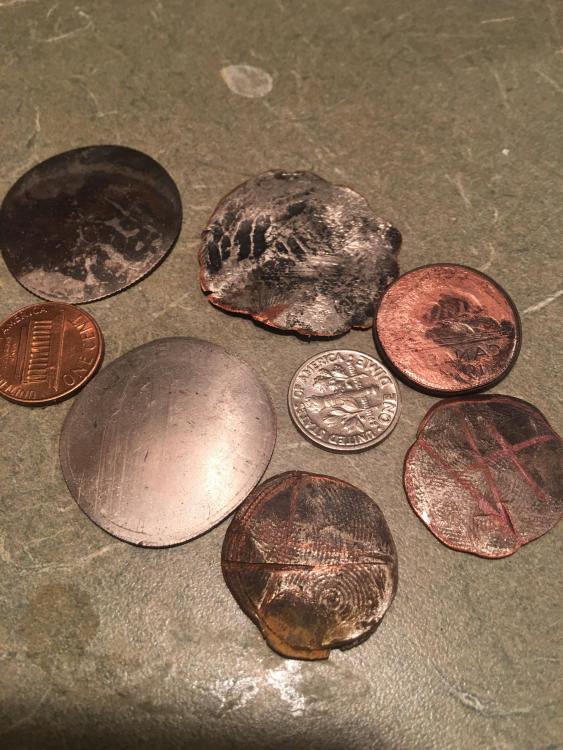
-
Still working on this experiment.. got some swaged cable from online, and started forge welding a piece to "figure it out". After I get that together, I'll try the kasenit to see what it does to contrast and colors.. Had to put it on the back burner though, as with my limited free time I had been working on a birthday gift for the wife. Pre '82 Canadian nickels, and some American dimes.


-
I am just miffed that your wife found one that fast at a price that you could use it for decoration! Ah, but one more anvil IS better.. than one LESS anvil.. Congratulations!
-
Will do! "Baby steps" so I actually have some confidence-building success (+ needed skill building), and don't go on a high flying tangent with attending catastrophic failure. Though, as you can probably tell, this doesn't always stop me!
-
Aessinus, thanks for the offer! if you decide you want to part with it, I live in Vermont, in a town called Colchester. If you pm me I'll give you the full address. If kasenit works for "color", might push me to go absolutely silly and make a nitrogen chamber for nitriding! Must remind myself..baby steps, baby steps..
-
Guess I'll have to buy some case hardening compound and give it a go when I get a chance! Here is my first attempt at forge welding.. No case hardening has been done, nor much of an etch, just a half hour in ferric chloride. I see (apart from the obvious defects) a bit of pattern there! http://www.iforgeiron.com/gallery/image/39525-pattern-welded-cable-blade-001/ Oh Frosty, I want to see the result if you ever heat up your powders in a can and beat it into something!
-
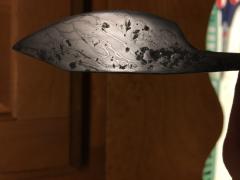 My first forge welding experiment: a small blade. Metal salvaged from discarded hank of ancient wire cable from the local lake. Spark tested well, and seems to hold a good edge!
© Merrick_Hard 2016
-
 My first forge welding experiment: a small blade. Metal salvaged from discarded hank of ancient wire cable from the local lake. Spark tested well, and seems to hold a good edge!
© Merrick_Hard 2016
-
Wasn't going to use the case hardening process to harden the steel per se, but just to make the dark colors darker in the resulting billet. So the hardening doesn't need to be even, nor will I be unwinding it to do so. Just to up the contrast between the shades of steel -my thought was case hardening before forging might make the individual strand boundaries stand out more -that is, if I'm able to keep it below burning temperature! Will do some more quench tests to be sure it is high enough carbon. A cool looking knife is nice, but a cool looking knife that can hold a keen edge is more important to me.
-
To clarify: took a sample of the cable, heated above Curie temperature, and quenched in water. Oh, and no "sparklers" - took individual strands of wire rope (approximately 2mm in diameter), heated with propane torch until just a few degrees above Curie temperature, and quenched in water.
-
So.. I salvaged some 2" thick steel cable from the local lake. Very rusty, but hardenable (quenched and was brittle and crumbly after).. Tried electrolytic rust removal, then vinegar bath, got a lot of rust off, but not all. Have it sprayed with oil to keep flash rust from happening before I get to it with naval jelly and a wire wheel. Question is this: would case hardening this chunk of cable (-before- I forge it into a billet), cause a higher contrast in the colors seen after an etch, or am I just opening another can of worms and making it harder to forge? Another wrinkle, I'd like to add a pure nickel guitar string wrapped counter to the direction of the cable twist, more pain than it is worth?
-
First forge: will this do? Am I getting the math right?
Alwayslearning replied to Alwayslearning's topic in Gas Forges
Thank you Glenn, Frosty, and Wayne -for your helpful replies! will probably go with an old propane tank, I've carefully "decommissioned" a few for previous musical projects ("Hank drum"), so I'll probably give that a go after checking Wayne's plan as well. Onward and Upward! -
It has been a long time and a few head injuries since I had to do geometry, so please, be kind.. I just want to order my supplies and not find out I screwed up my calculations! i was given a stainless steel fire extinguisher from a commercial kitchen for use as a forge body. The base of the cylinder is 7" diameter, and the height is 20" (20.5" if you count the threaded part at the tapered end where trigger and output were formerly attached). if I wanted to line this tube with two inches of inswool, some rigidizer, and some ITC 100, how much inswool would I need to buy? I'd be buying from High Temp Tools, and they sell in lineal feet. From an online cylinder calculator, I got 440 sq. inches for lateral area of the cylinder, so about 3 sq. feet for the first layer. Subtracting 1" from the original radius gives me 2.5" for radius of cylinder with 1" of inswool, so plugging THAT into the cylinder calculator gives me 2.1825 sq. feet for the second layer of inswool, right? That makes my total just over 5 square feet of inswool to line my cylinder. I notice (now) that I didn't include both ENDS of the cylinder's area. Ugh. I'd love this to be a versatile and efficient forge (of course!) but I understand that this shell might be limiting after a while. I want to start with making some tooling and bladed items, but would eventually like to do some small decorative work (not making a wrought fence gate). I also have some SS chimney that is a little larger in diameter and about 23" long. Another thing, I've got a bunch of soft kiln bricks, so that is yet another option. Oh, and a Frosty T burner almost finished. Should I make this a vertical or horizontal forge to be most versatile? With a 3" diameter hole to put stock in (after it is all lined), has this already become a "silly forge I should not make"? i realize similar individual questions like these have been posed and answered on this forum, but you as you can see, all the questions together kind of tangle/link the variables into the mess I am having trouble with. I get thinking too much and I don't get to hit hot metal! As always, thank you for your kind and thoughtful tutelage.