

GobblerForge
-
Posts
229 -
Joined
-
Last visited
Content Type
Profiles
Forums
Articles
Gallery
Downloads
Events
Everything posted by GobblerForge
-
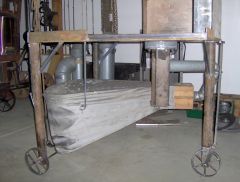 The bellows and fire pot/ash dump configuration
 -
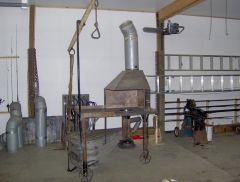
 My portable forge for demos heavy wheels makes it very stable
 -
 New lightweight potable with bellows
 -
Fred. You have to have at least one friend wirth a pond, rowboat and a sence of humor. Unless someone has a real use for it, sneak it down to the dock some night and tie the boat or canoe to it. Thats the stuff stories are made of. Gobbler
-
Just bringing this back up to remind everyone there's only three weeks to go. Hopefully I'll have my T shirts and truck magnets back from the printers before I leave. Gobbler
-
I could see a Stair Protector at the top of the stairs. Looks like a bad thing to land on at the bottom. That WILL leave a mark. Gobbler
-
Home made power hammer.
GobblerForge replied to GobblerForge's topic in Power Hammers, Treadle Hammers, Olivers
Since most newer digital cameras shoot movies as well, could someone post a 5 second video of the tire hammer in motion? I am definitely considering building one of these. I will keep coming back as questions arise. I'm here a couple times a week while having my morning coffee anyway. Maybe I will start a progressive thread on it so everyone can watch it being built. Naw, that would just show everyone how slow I really am. Gobbler -
Well, Quad State is only a month away now. How many of you are planning to attend? This is my biggest event of the year. We might want to have a barley pop toast saturday night after the show. I'll start it off with "I'll be there". That's one. Gobbler. aka- Brad Weber
-
Home made power hammer.
GobblerForge replied to GobblerForge's topic in Power Hammers, Treadle Hammers, Olivers
Never heard or saw a "tire" hammer. Can you tell me more? That looks very interesting. Gobbler -
Home made power hammer.
GobblerForge replied to GobblerForge's topic in Power Hammers, Treadle Hammers, Olivers
Cool hammer. Gobbler -
Over the years I have seen some wonderfully ingenious designs on home made power hammers. How many of you have built them? Do you still use them? Do you have pics? Do you have tips as to improvments? Gobbler
-
I would also recomend looking into the Boy Scouts of America. Find your local troop and ask for a registration form to become a merit badge counselor. This will get you registered with a troop or council. You must have some sort of interest that you could help teach the boys. Everyone does. Then while teaching others you can learn from others as well. The Boy Scout manual, which I have a collection of dating back to 1934, is great reading. I have the armed forces survival manual and some of the chapters are almost word for word with the BSA manual. High adventure troops can get even more advanced in survival and self sufficient techniques. Others here have made some great suggestins as well. The first step has been taken. You asked. Now, walk on. Gobbler
-
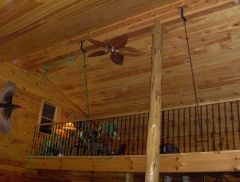 Loft railing with tension rods to support loft
 -
Fair enough. Gobbler
-
I'm at a bit of a loss here. Are you trying to clean items you have forged? If so, then you need to consider your forging techniques. I mean no disrespect here, but I have seen this before. The culprit is that pesky wire brush hiding on us. Going back to basics tells us that brushings after we bring the iron from the fire removes scale and dirt and rust. The metal is already hot. A few seconds with the brush may save you hours with the tumbler. On finer work I brush after heating AND after working. Only a few strokes does it. If wax finishing, then wax after the last brushing. Otherwise, let cool and put on your finish of choice. Good luck. Gobbler
-
So be it. Gobbler
-
Another way to mount an anvil you may consider.I use two pieces of chain just long enough to wrap around under the horn and heal ends with the ends of the chains just long enough to come together and almost to the stump. Then lag them down. As you snug them up, wiggle the anvil to get it evenly snug. I take this a step further and mark the outline of the base and route the stump about a half inch deep so the anvil is locked in. Losen one lag and remove the other and the anvil is free. Also, Hay Buddens after about 1913 were made with the whole top half being cast steel. This makes them ring like a bell. To dampen it, try wrapping a piece of chain twice aroung the waist and tighten with a nut and bolt. When folks ask about the chain, I just tell them it's a realy mean anvil and this is how I keep it under control. Good luck. Gobbler
-
Cool anvil. It could be as old as you say by the shape. It is in remarkably good shape. I would recomend never trying to "improve" it. Use it with kindness and it will perform well. As a note to help you with dating it, Mouse Hole, an English anvil maker, started puting pritchel holes in theirs about 1820. Not saying this a Mouse Hole, but it gives a time line as to when impovements were happening in the anvil industry. Gobbler
-
Plywood works perfect for bellows construction. Remember, you get what you pay for. Buy plywood with the best lamination and grade for your project. Right now, building material has skyrocketed. But for some reason, cabinet grade plywood hasn't rissen in comparison. As for Woody's coment on authenticity, I would agree that it is important to learn traditional in all aspects of your blacksmithing art. After all, you are learning an ancient craft. But we also must remember that they were not stupid back then either. If they had access to things like plywood, torches, power drills, electricity, running water, birth control and deoderant, they would have used it. I used 3/4" plywood for my bellows back in 91 and noggahide for the wrap. Still don't know how many noggas had to die to make that thing, but it works great still. Gobbler
-
I like using joinery. Mortice and tennon are ornimental as well very strong. Tips would be to use good shoulders on the tennon and extend the tennon one and a half times it's thickness. This gives good material for riveting it back. Same goes for rivets. Collars work well when applied hot so as to shrink tight. They work well for covering welds too. Tips would be to cut the collar total circumference + one and a half the thichness of the collar material. Chamfer both ends of the collar so they overlap. This gives a little fudge factor that a butt end doesn't. Any thing else? Gobbler
-
I can only tell you what I was tought. Start with making chain links. It's a good basic project and the ones that work, you can use for tong reign clamps. Start with six to eight inches of 1/4 to 3/8 round. Heat and bend into a U and scarf the ends on the edge of the anvil. Bend the scarfs over each other and get the welding area shaped together. Now heat to a bright orange and brush the weld area continuously as it cools until the scale stops forming. Bright red. Now the steel is clean and ready for flux. For most steels and wrought iron, 20 mule team borax will work fine for flux. Before the steel cools any more, sprinkle flux liberaly over the whole weld area. The flux melts and coats the steel but does not burn off until a temp. above your goal. This helps keep oxygen from touching the steel and forming scale that can't be welded through. Return to the fire and slowly heat until the wet glassy sheen can be seen. I like to heat my links on end with the weld down so the heat is blown through the scarf, heating both halves evenly. At weld temp. your work time is limited to only a few hammer strokes so work quickly. Bring to the anvil and strike. The flux and debris should be squished ot sealing the weld. I like to do a little shaping then do a second weld to be sure. To test your weld, clamp the link in the vice at the bottom cold. Put a bar through the link and twist 90 degrees. If the weld was poor it will open up. I have a friend that works at Timken Research. He tested one of my links from 3/8 round mild. It streach tested to over 7000 lbs. until it tore open. Gobbler
-
What the............
-
If drainage is good, dirt is best for me. Kept flat, it is easy on the feet. Dropping tongs, tools or hot steel on concrete or bick is harder on them. Cut offs that hit the floor will cool harmlessly on dirt. Concrete and brick can spall and pop under hot steel. Drop a rivet in gravel and try to find it. You can dig a small hole in a dry dirt floor to bury hot steel for anealing. Oddly enough, smiths of old did use oak and buckeye on occasion for flooring. These two woods are less prone to igniting under a hot cutoff that falls to the floor. They will smoke and hiss and singe, but are less likely to actually burst to flames. Concrete in other parts of the shop is great for working over but around the anvil, DIRT. Gobbler
-
I've had a litle experience with a cannon machined out of steel that was bored for a golf ball. With a resonable charge, the golf ball will go a mile or more. Be carefull. This aint no toy. It will kill. As for the brass, I would say no. Yes they made brass cannon. But many cannoneer died learning. Gobbler
-
Where to start. The eye is squared, as Thomas said, to keep the head aligned during use. The eye is tapered so it stays tight during use and the helve (handle) can be removed to sharpen. This is because the edge is ground on the inside. The curve is to allow the arc of swing to bring the bit to the work more flat. Your basic adze is called a foot adze. The cuved lips on the sides make it a shipwright's adze. And if it is half pipe shaped it is a gutter adze. If you get a handle, you can make a rectangular drift to match the shape. Take a piece of 1 1/2" square stock, split and drift the eye first. Then fuller and draw the rest. They are not horrably complicated but can be some work. Gobbler