GobblerForge
Members
-
Joined
-
Last visited
Everything posted by GobblerForge
-
Welcome aboard. Your sheet metal advice could be helpful to others as well. If your moving metal, we want to hear about it. Gobbler
-
Crisco. Just like a cast iron skillet. Gobbler
-
I may be able to help some here. I did demos for the scouts for ten years as a registered Scout Master. Yes you can do demos and on a certified basis. Meaning your demo can be used for advancement, on the boys part, at their need. Perhaps a scout can get a credit towards his social merit badges by visiting a public display. Or another get information on history or rural frontier skills for campfire cooking. And on and on. The all get something out of it. As to what is up to them and their needs or interests at the time. "Be Prepared" is the Scout Moto, so "Be Prepared" to allow hands on if required. Some extra eye glasses for anyone inside "The Rope". And always two deep leadership, which means there is always another adult there. This is required for advancement. After all, the Scouts are always looking for volunteers. Go strait to the council. They should have staff who's only purpose is to help you do your thing so the boys can do their thing. I made brands for the council for one of the camperalls. My irons were used by over 1300 scouts, in one weekend, to brand a leather banner with the letters "KLONDEZVUES 98". The name of that camp-out. 10 irons in 9 fires as proof of completion at 9 stations to complete IIRC. I have also demoed as an invite by other councils. Blacksmithing has everything it takes to keep boys interested. Fire, noise, hot steel, hammers, steam, color and if you complete the package, history. You will get more than you give with the scouts. At least I always did. As for the Blacksmithing merit badge. It was discontinued in ,I believe, 1951. Although the scouts can still do the requirements to complete it, they can not receive the badge towards advancement. I had several scouts that did the requirements. It is challenging for a beginner. This should be done in a shop somewhere and not at a camp-out. There is a lot to it for even a few scouts at a time in a couple of weekends. Camp-outs and demos should be kept short and sweet. Projects that start and finish in small time slots give a good average exposure to all the scouts. I had heard a rumor about the reactivation a few years a go as more history and art, but I don't think it did. Check into it and let us know. Anything I can do to help. Gobbler
-
Very good. I would agree that life can be a cool ride.
-
Stu. Are you Japaneese by birth, or are you there visiting, or what? Your English is great. I suspect you to be visiting. Gobbler
-
Here's one I built. The hood is stainless and the firepot is an old rivetter's forge. I add four feet of pipe and an elbow at the top. I've used it in strong wind and it worked fine. http://www.iforgeiron.com/gallery/showphoto.php/photo/1019/cat/500/ppuser/225 Gobbler
-
Ooouuuhhhh, my brain. Gobbler
-
That's some good info on the spare tire. I sat and thought for a while, and you know, I've been driving trucks for so long , I've never owned anything with one of those little tires in it. The wife has had two, I think, but I never gave them a good looking at. What a sheltered life I lead. Gobbler
-
Dale. You say that, as for solid tires, "They are recommended". By whom? Are you refering to the car industry? Or are you privy to some information on tire hammers that needs to be shared? If this is the case, then it would be helpfull if you can list the source of your information as well. Thanks. Gobbler
-
Hey wait. I think I saw the horn for this on an earlier reply.
-
Nice, Dodge. Are both dies flat? I used your pictures, as with others, for working on mine. Thanks. Gobbler
-
Way to go, Dale. These things are a hoot. I'm coming to the conclusion that there is no wrong way to build these things. Every idea I've seen so far has worked. 75 lbs. is a lot of hammer too. Also, what is the tolerances of your hammer and guide. Keep us posted Gobbler
-
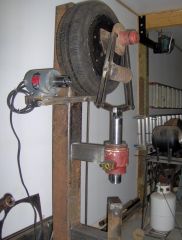
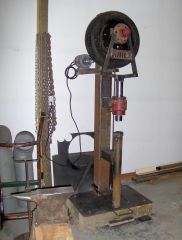
Glad to see there is interest in this. Mr. Brown. Ask all the questions you want. I'm happy to help. I just said I could move it with a dolly. When I did move it, I just rocked it and moved it. 400 was a guess, it might be closer to 300 for all I know. It isn't heavy. The offset is 2". I found that most 25 lb. hammers were 2" or so. I found one at 1 3/4" last month. I found bigger hammers had bigger offsets but my hammer is in the 25 lb. range so I went with 2". Yes I did use a hydraulic cylinder. The housing got cut down to 9" long. The hammer is 16" of the rod. It is set right now that at bottom dead center, the hammer is less than an inch to the anvil. The beauty of this design is that the hammer floats. As you go faster, the hammer goes further and harder and can and will hit the anvil. And hard too. I wrote earlier that I worked a billet that was 1/4" thick and 2" wide. I could rotate it from flat to edge and it adjusted fine. I feel I can work wider stock, but 2" is what I HAVE worked. Steve. Thanks for the info on the lead. I had heard about counterbalances but did not put one on. That is on the "might do" list. It doesn't seem unhappy without it. As for the tooling, yes there is a lot out there. I figure it will come when it's needed. You are correct on the wood under the hammer. I made a bed out of 6x6 timbers. It is much friendlier on the concrete too. Gobbler
-
Wow. Sir? Don't I feel .................uh..........old. No wait, I am. Sorry. I went away for a little bit, but I'm back now. I would have to ball park about 400 pounds. I had thought about weighing the parts befor I started. But then I got busy before I remembered it. As for the lead, my guess would be that they build a box style hammer and pour lead into it to give it the wieght they desire. This would explain some of the photos that I had when I started building. I'm prety certain that I could move this by myself with a dolly if I realy had to. There isn't that much to it. Gobbler
-
Thanks Henry. Actually I was thinking of a piece of inner tube or radiator hose or fire hose. Whatever I find that can slide over the spring. No I don't feel there is enough preasure on the spring to be a danger. Actually the guard in my mind will be half plate steel on the bottom that has two pins out the bottom that slide into two pipes. The top being a shatter resistant lexan. This way I can SEE the arms and spring. I actually like to stop the hammer just before it reaches the top. I like to watch things while I work to make sure things are OK. I figure the small plate at the bottom will make a fine chalk board in front of me. I like to make notes. As far as maint., I do a lube and look regularly with most things anyway. I am into P.M. Gobbler
-
Candid. You read my mind. Actually a guard is on the list of improvements. I was also thinking about an explosion blanket over the spring. The arms are relatively easy to cover, though I realy don't think there is much there to go wrong.I am always open to suggestions in any direction. Oddly, the only thing to adjust could be the air preasure. I am of the mind that firm is better than soft. But heck, we're writing the book as we go, aren't we? Hmmm. So lets see. 26 lb. hammer, 76" cercumfrance on tire, 4" stroke and 2.75" diamiter on motor drive pully. Soooooo 76-4=72 72-26=46. 46-2.75=43.25. Yup. 43.25 lbs should be about right for my hammer. Ap Man. Yes I am delighted. I am just fortunate that all my guess work worked the first time. I would get started if you realy want to do it. With a little scrounging talent you can have one too. I have about 50 bucks in this thing thanks to alot of help from friends. Gobbler
-
Hmmm I always only had 2 kinds of steel. Thems that work and thems that don't. Gobbler
-
Well, I put another afternoon on the hammer yesterday. Weather is going to turn bad for the next handfull of days and my forge has to be used outside. I don't have the pipe in the garage yet. Well I needed to get the other billet made and this looked like my best shot for a week to get started. Had everything going by 12:30 pm. By 3:30 pm I was shutting down. I had finnished the billet. I was hoping to just get started. The hammer saved me a day and many sweaty hammer blows.. Awsome. The parts are getting used to each other and it is much smoother. The jumping is better with the new setup too. Had to make no adjustments to the shims the whole time. I found I could do a weld and draw in two heats now. What a wonderfull tool. Who ever thought this one up, was on thier A game that day. Gobbler
-
untill a minute ago I didn't know there WERE left and right shoes. Gobbler
-
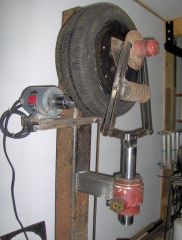
Easy. I am thinking the tire will last the life of the hammer. Actualy the brake will wear before the drive pully. But good lord, it has no weight to it. It was designed to carry 1/4th of a car. Time will tell. No on the top die. The hammer is all one piece. At this years Quad State, I had plenty of time to talk to Kim Thomas. I have known and liked Kim for a long time. Kim says he uses flat dies for most of his work and almost never changes the top. And Kim is one of those folks who's judgment I value and trust. So making the top one piece simplified a lot. Chris. I like the adjustable idea on the horisontal arms. And they are easy to replace if I get the urge. The design alowed me to work a billet yesterday that varied from 1/4" thick to 2" wide. It had no problem going from the flat to the edge with equal force. After a while I didn't have to slow it down to rotate the stock either. Just get used to the wide open rythem and go. Gobbler
-
Which flat bar do you refer to. The flat bar for the bottom die was 3/4" x 3" x 3 1/2". now times two. I'm building up until I find the right spacing before I make a better die. The flat bar bracing the main post is 1/2" x 2". The flat bar for the vertical arms is about 1/4" x 1 1/4". The horizontal arms are about 1/2" x 1 1/2" with knuckles on the ends. What else? Make your questions as specific as you can, to get as specific an answer as I can give. We'll all get better at this. Heck, I don't even know the proper names for the parts I built. Gobbler
-
Well that was exciting. Had a fun day in the garage today. Started by taking the new forge outside and gave it a first firing. I posted about it a short while ago. The forge worked well. The issues I had, I blame on the coal. I got some real trash last year and I just about out of it. Thank Goodness. A suggestion to anyone. If you can, get a tester bucket or two to try a new load of coal or get a return policy. A year of misery. Anyhow, we have the forge going, and I have two billets of five layers started for two knives from a month ago. This will make a good tester project to try the hammer. I did the welding by hand and used the hammer for drawing. Start simple, right? Well last night we did a test run and it was smooth. We just used a couple shims to give it four corner contact to the floor.. Worked like a charm. That was last night. Today? New rules. Things were going good to start. But I found that the way I put mt foot on it, I was slowly pushing it away. Well let me tell ya, it doesn't take a lot of space to get this thing jumping. Add a little air to a corner and it starts towards the wall, then gets more air and so on. So I tapconned some 1" by 2" oak to the floor around the for sides. Now It can't move sideways. Found the happy spot for the shims and then used a finish nail to pin them in. Seems to have fixed the problem. We'll be watching that. Made some radius to the hammer edges front and back. It was too sharp. I may take some more off as time goes by. Oh, did I mention I majored in T&E at S.T.U? I added another 3/4" plate to the first to build up the bottom die to 1 1/2" tall. I'll be trying different heights of bottom dies. Looking for the perfect space between hammer at bottom rest and bottom die. Right now, 1" looks good. The hammer has loosened up nicely. I removed the innermost seal on the bottom guide. It offered too much resistance for me. The outer seal is still in and does a pretty good job of retaining the grease. There is a 1/2" wide by 2" tall air space between the top and bottom guides. There was a port for a hydraulic line on the side. Perfect place for a grease fitting. Bingo, self lubricating. The hammer shows no signs of wear, on the sides or the face. The bottom die is soft steel plate but shows no signs of wear either. As long as the metal in between is hot and soft, wear should be slow. Well it's working together. Days end produced one damascus billet for a knife and a working hammer with a lot less bugs. Not bad. Probably won't be back on it till next week now. Gotta load for an October-fest tomorrow for this weekend. Ah, tis the life of a Blacksmith, I lead. Gobbler http://www.iforgeiron.com/gallery/showphoto.php/photo/1386/cat/500 http://www.iforgeiron.com/gallery/showphoto.php/photo/1387/cat/500 http://www.iforgeiron.com/gallery/showphoto.php/photo/1385/cat/500
-
-
-