

petersenj20
-
Posts
125 -
Joined
-
Last visited
Content Type
Profiles
Forums
Articles
Gallery
Downloads
Events
Everything posted by petersenj20
-
BACKYARDMETALCASTING has a forum. Lots of info there.
-
casting brass or copper
petersenj20 replied to TechnicusJoe's topic in Smelting, Melting, Foundry, and Casting
Technique aside and back to the casting question...You can melt brass or copper on wood. I use wood in my furnace. No need to convert to charcoal first. I have a piece of pipe with a plate welded to the bottom and works fine. A brass hammer is a fine project. A hinged piece of pipe would make a good mold. A babbitt shop I worked at briefly made from babbitt to persuade casings on the vertical lathe. -
We got dogwoods blooming. Fishing is upon us. Hillbilly is a perfectly acceptable term if you know what it means. Some picture of a xxxx holding an old truck up while another changes a tire is just funny.
-
Looks like you got a lot more than us. We got about 2 inches here but none stuck to the road. It is the most we have had after living here 8 years. I had to decimate the kids and neighbor kids at snowball. They know I play rough. They learned that the last time we had an inch yet they still come back. I'm just continuing the lessons my dad taught.
-
I love this style. These are like blacksmith knife or Brute De Forge I think. I always liked that title and I can just picture a blacksmith whipping one out in defense.
-
I hope I learned from my mistakes and this drawknife lasts longer than the broken one. I decided to use the broken draw to make this scorp so it wouldn't go to waste. I quenched in oil this time. After they came from the oven they are bright blue. Kind of neat to actually see it after all my reading.
-
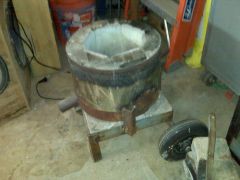
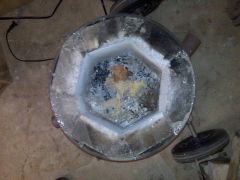
Not trying to hijack here or anything, but I made a cheap version today. I had the Reil burner and had to fill the propane tank. I used insulating firebrick, and it gets hot. I can actually join the club instead of using my Al furnace. I made a scorp from my broken drawknife and made another drawknife. They're in the oven now so will post pics later. Just wanted to share.
-
I have never really been interested in knifes but the tools I want to make fall under a need for a small forge and this just fits the bill. I can't believe how expensive they are though. I actually have everything to make one (all-be-it less fancy). Looks like I need to stop typing and start working.
-
For what its worth, I have decided to make the big piece of this knife into a scorp for carving spoons. Find the silver lining. I hope there are no more cracks.
-
Thanks for the help folks. I will quench in oil next time. I won't be playing with any chemicals other than that though. Do I quench after the oven draw or just let air cool?
-
I have dealt with Larkin Refractory a bit. Jim Wunch is the owner and very helpful. Very nice guy and he will ship anyhere. The last time I was there I bought 2 cases of insulating firebrick, 48 sq foot roll of 8-1 inch Kaowool, and a 55lb bag of Vermiculite castable for $120. I don't know what shipping will run you though. He also threw in a leftover half bucket of mortar for the firebrick and a sample of ceramic fiberboard for free. Like I said- nice guy.
-
I forged this some time ago from a nicholson file and finally decided my need of the tool meant I should put some handles on it. I tried to get all the teeth marks out. This was done following the BP0387 blueprint except that I water quenched. I didn't heat the tanges when I heated to orange. I then kept in the oven at 450 for an hour and a half and left it to cool. I didn't know if I should quench for that step. I was gently tapping the handles on and it broke. What did I do wrong? There is a distinct color difference in the cross sections so don't know if it had a crack or what. Here are the pics. I need to make another one so help is appreciated.
-
I'm a big fan of skinners. I don't know why, I don't skin. This looks cool. Make sure and post final pictures.
-
Pour babbit bearings today
petersenj20 replied to jclow's topic in Blacksmithing, General Discussion
Nice pictures. You have to give a write up. What does this rod attach to? It looks like you poured the shaft in place. I don't see how you did the bearing caps though. Did you pour them separate or fully assembled? Also no pictures of how you contained the babbitt at the ends. My short stint at the babbitt factory we used ceramic fiberglass rope (looks like you did too) sandwiched by drop ceiling panels. Yes the cheap kind bought at BORG. I got to see some big pours in 1000 pound bearing caps. We didn't have the shaft to make things "easy". We had to pour big and then cut to specs. You should see the monster vertical lathe these guys used. I had a hard enough time bolting a pillow block in the lathe and these guys bolted and zeroed a 5 foot diameter, half bearing in a lathe that cut off a 1/32" at a time. Coolest job I ever had. I wish I had pictures. -
I have the metal one. I can't place where I got it though.
-
Frosty, that picture is cool. Thanks for sharing. Wish I could get my old lady to take part. (Not really)
-
Check this page out. Doesn't get much cheaper than adobe recipe. http://64.176.180.203/washtubforge.htm Quick and simple is 1 part fireclay, 1 part sand and 5-10% water. Some people use Perlite and fireplace cement like rutland, both at Ace hardware, but is a bit spendy for the cement.
-
Welcome from another Georgian.
-
Never used stick because I think it requires DC reverse polarity. Not stick welding but there are several products on the market that work well for brazing cast aluminum. They generally have a melting point around 900
-
-
-
-
When I was in the Air Force we had a 35 lb sledge. We used it to persuade crates to fit onto aircraft pallets. Swung gently like a pendulum moved a lot of weight. We always joked with it but I could not imagine using it the typical way.
-
That certainly works if you have a lathe. I just thread a nut down to the cut point, clamp in a vice and cut with a hacksaw. Sometimes put another nut on the other side of the saw blade for stability. Once cut through remove the first nut to "chase" the threads.
-
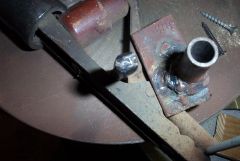
I replied in another Touchmark post but not here. Go figure. S'funny already more than a year ago. here is my "Die" and the resulting punch. I used an inferior die material, and I don't actually have a forge. I was out of acetylene and used my Reil burner in open air. I didn't really get above a pale orange. I punched the design in the angle with a chisel and welded the tube around it to help keep the punch straight. The first one I tried had an upsetting effect and more or less folded over. I did whack the spit out of it though. IW is for Ironwood Workshop. I fancy myself a woodworker and metal fabricator. One day when I am better prepared I will attempt again. In the meantime a small chisel will make the mark. It is rather simple. I think its in the shop somewhere.