
knots
-
Posts
734 -
Joined
-
Last visited
Content Type
Profiles
Forums
Articles
Gallery
Downloads
Events
Everything posted by knots
-
I like the Idea of finding local blacksmiths. Look at www.abana.org you should be able to access a list of affiliated blacksmith groups. Hopefully there will be one close to your location. If that fails do a web search for blacksmith groups in your state. If you can find a group to join you will see what others have done and meet some fine folks in the process.
-

Garage Floor vs Treadle Hammer?
knots replied to kraythe's topic in Power Hammers, Treadle Hammers, Olivers
My comments are limited to "Smaller Power Hammers" and treadle hammers. Your machine is out of my league. Hope the bolts hold. -
Garage Floor vs Treadle Hammer?
knots replied to kraythe's topic in Power Hammers, Treadle Hammers, Olivers
I hope that I am not beating a dead horse here but I think that there is an important distinction between power hammers and treadle hammer construction that needs to be considered when talking about the supporting floor structure. Most of the smaller power hammers used by smiths are constructed with the sow block cast integral with the hammer frame. Consequently they have a large foot print over which the force of the ram blows are distributed. Most treadle hammers are built with the anvil pedestal without rigid attachment to the rest of the treadle hammer frame . I don't remember ever seeing a treadle hammer design with a full foot print base plate. For this reason I think that Kraythe's concern is valid. In most cases the power hammer example seems not to apply directly. After all, the strength of a treadle hammer blow power depends on the velocity and weight of the ram, and is delivered indirectly to the floor below through a relatively lightly constructed pedestal and small base plate. A treadle hammer with a 35 to 40 pound head can deliver a powerful blow. Seems logical to me that caution is is a very good idea. The ply wood base would probably do the job but a supplemental steel plate would be in the way less of a trip hazard. Now there are some smaller power hammers which have a Floating Sow Block. As it happens my hammer is one of those. I would venture a guess that a four inch thick concrete slab foundation, under my machine, would have been pulverized in short order . I cast a 12" thick, heavily reinforced concrete inertia block to support my machine. The power hammer and inertia block sit on my brick shop floor. All very solid. -
Garage Floor vs Treadle Hammer?
knots replied to kraythe's topic in Power Hammers, Treadle Hammers, Olivers
My shop has a brick paver floor. After using my treadle hammer for a week or so the bricks below started to be driven into the ground. Most treadle hammers have a smallish plate below the anvil pedestal. Mine had a 7" x 10" plate and it took no time for the brick floor to be packed down . I solved the problem by placing a larger 3/8" x12" x 22" plate below the original plate. For your concrete floor my 7" x 10" plate would probably have been enough if the floor is properly reinforced, however It may not be. Think of it this way. Say your treadle ram is 40 pounds - If you had a steel plate on your concrete floor and you were hammering that plate with a 40 pound sledge hammer , how big would the plate need to be to distribute the impact load being imposed your floor to avoid cracks. If you are really worried about the floor cracking use a bigger plate below the anvil pedestal. You could build the hammer with a standard size plate but space it up a half inch to accommodate a supplemental plate below. -
OK, I now have my 7 1/4", 48 tooth Bosch Steel cutting blade # CB748ST. The Blade packaging says that the blade will cut " up to 25HRC" . What is the typical expectation for HRC of hot rolled steel plate ? There are no hints how to judge when the feed rate is correct. Generally I would expect that a forward pressure that would allow the saw to maintain blade speed without laboring would give the correct cutting speed. Comments ?
-
Hmmm. I have a couple of old battery drill chargers . Wonder if one would work as a DC power supply for electrolytic rust removal.
-
I have ball valves on my forge furnaces. They are either on or off. The way to control gas volume is with your regulator. For a given orifice size increasing the pressure increases the flow, and decreasing the pressure reduces the flow. Using an adjustable regulator with a blown forge furnace and controlling the air volume you should be able to tune the burn to a fine degree. Now with atmospheric burners I still use the regulator but the fuel gas orifice must be carefully sized to the forge furnace volume, and to induce air flow through the burner. I used a smaller orifice and higher pressures for my atmospheric burner to increase gas discharge velocity.
-
A while back I had a conversation with a water system engineer . While talking about corrosion he asked me what blacksmiths use to treat/kill corrosion. My standard response was phosphoric acid. He said that for water supply systems citric acid is used exclusively. This makes sense for the food or water supply infrastructure. But what about other day to day applications in a black smith shop ? Any body ever try citric acid for rust treatment ? I walked into a paint store the other day and requested citric acid based rust treatment. They never heard of it.
-
SDS drill as a trip hammer
knots replied to Whittler Kev's topic in Power Hammers, Treadle Hammers, Olivers
fciron - What specific tasks do you use your modified pneumatic tools for . The smith I referenced used his on hot iron (forging temperature) to fork or split the ends of bars or cut notches in plate. I got this information second hand so don't know what his chisel looked like. Maybe a reverse arc cutting edge to keep the chisel from sliding off. -
Nice forge. Simple is good. I have two pipe forges that I built using Kaowool liners. I solved the curved forge furnace floor problem by lining it with heavily groged fire clay refractory patch. This material is a mixture of fire clay and ground up fire brick. Since the floor is an arc of a circle Flat materials such as tiles or brick just will not fit if the Kaowool is wrapped all around. What I did was, using a piece of plywood as a base, I nailed 3/4" thick scrap strips down to make a form 3/4" deep. Then I pressed and rolled the wet fire clay / grog mix into the form and let it dry to leather hard. Then carefully transfered it into the Furnace. The leather hard fire clay will conform to the arc of the floor. Let dry. I mean, really dry then fire up the forge. The heat of the forge will fire the new floor in place. Depending on the quality of the clay/grog mix it could be very flux resistant. I bought min material at an estate sale so don't really know what was in if, but when mixed it took on a deep grey color. That is a hint that it probably has some graphite mixed into the recipe. My floors have held up much better than the insulating fire brick I used in my little small project forge furnace which has a fabricated sheet metal shell. You gage arrangement is interesting. Always wondered what happened to the tank pressure as the fuel level goes down or the ambient temperature changes.
-
SDS drill as a trip hammer
knots replied to Whittler Kev's topic in Power Hammers, Treadle Hammers, Olivers
I have several of these rotary hammer drills lying around from my past life in the construction industry. Spent a few hours driving one. From my experience I would guess that it would not be particularly successful. However If you have an old dead bit not much to loose by trying. My guess is that It would run to fast to have much control, and that these machines kind of dink rather than really hit it a good solid blow. I bet a good ole hammer on the anvil would move the metal a lot more efficiently. If I were to try using this kind of tool at all it might be for texturing the steel. Now a pneumatic hammer would be a better choice but I still believe that it would not be a good match for forging. One possible use for a pneumatic tool would be chisel work. I know of at least one smith that uses a pneumatic chisel to split iron. The big problem with even strong pneumatic tools is that their stroke speed makes them hard to control. -
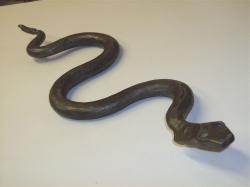
 Straight peen hammer used for drawing out iron work piece over base of horn. Forging efficiency gained from working metal from two sides simultaneously.
 -
I am really glad to see someone else has found a useful source of material. Although I never considered making knives they make great emergency scratch awls, small chisels for weld spatter removal, small punches/nail sets, and my wife's favorite an auto clock setting tool that lives in each of our automobiles. Neat Knife and scabbard. Google : "Tremont Cut Nails" , They are the only source of 20d cut masonry nails that I have found. Bound to be others.
-
-
The blade is ordered. Any advice on feed rates or other helpful hints. I routinely cut small heavy stuff in my wet and band saws but not plate that is to big to fit into one of my machines. This is a first for me and I really do appreciate the information and support.
-
OK - That is the ticket. Amazon - Hmm, that should be easy.
-
I have a piece of 1/2" thick steel plate that I want to make a welding table out of. 2 sides are mill cut the other 2 sides are torch cut. I want to build a welding table using this plate as a top. What is the best way to cut this plate to size using limited small shop resources ? Has any one ever tried to cut 1/2" steel pate with a power hand saw and abrasive blade ? I have a good strong old industrial power hand saw. I should be able to jig it up and make a reasonably straight, square/clean cut with that se up. However have no Idea what to expect time wise. The only other option that I can think of using my available resources would be to set it in edge and grind then file the edge true. I want to avoid this option if possible. This piece of steel will require about 60" of edge preparation. It will supplement a nice piece of 1" thick steel which is drilled and tapped at 4" OC both ways for fastening jigs and fixtures in place.
-
If you get your new place how about a porch.
-
I have a Gorton 1-22 Master Mill with mechanical quill power feed. My manual covers only the electrical version of the power feed. Does any one have the manual text and exploded parts view and parts list for this quill power feed system ? I need a copy and have checked all of the internet sources that I can find. If you don't have this document but have suggestions of other forums that may have manuals stored in their archives I am open to suggested sources. Thanx
-
Try Trow and Holden air tools. These are professional grade air tools used for carving stone. For a given size different strokes are available. I would think that the shorter stroke would be used for chasing. I never have used mine for chasing but it I believe that they would serve well for that application. They have three sizes. The smaller size would perform very delicate work. I have seen the smaller size T&H tools used for cleaning up fossils with tooling essentially like dental tools. The larger sizes should be more than needed. I have used mine for stone and wood carving. These tools are not cheap but performance is strong and control smooth. Each size tool has a performance power range by varying air pressure. www/trowanmdholden.com
-
The weld damage does not go through the plate. Actually on this Fisher the plate extends over the cast iron body a fraction of an inch. Since the anvil was virtually new when damaged, the edge still had the crisp factory edge. I plan to grind the edge of the plate down to the face of the cast iron and then with a typical graduated radius most of that damage will be gone. There are one or two areas that I might have to touch up. But then again if it is not to bad I may just live with it. This is a case of less being more. The grove back by the Hardy hole is a different matter. Although the anvil could be used as is, I just cant stand to look at the abused area. If I am to use this anvil that damage must be repaired. But as I said the cut is narrow, shallow, and relatively short. The areas requiring repair are not extensive and should be easily repaired after preheating. Handling a 300 lb anvil at 400 Deg temperature is Not something this old guy looks forward to but it must be done.
-
Thanks for the references Grant.
-
I have what was a really nice clean Fisher before someone used it as a cutting torch table. The damage is limited to two areas. There is a narrow 3' long cut back near the hardy hole. There is damage along about one third of the length of one anvil edge. In the past I have made repairs to two anvils by welding after preheating to the mid 200's Deg F. This was about 20 years ago. At the time I had no way to accurately measure temperature so I heated them until water danced on the anvil face heated a while longer then welded. The repairs were successful. Now I will use temp-sticks unless there are other suggestions.. This is such a nice anvil that I want to avoid heating above 400 Deg. I would prefer to weld at the lowest possible preheat temperature to avoid annealing problems. The only marks on the anvil is the eagle medallion and the number 30 on one foot.. I believe it to be a 300 pound anvil. I know that there must be posts on this subject on this forum but have been unable to find only one which does not discuss preheating. Are there others ?
-
Will these jacks function in any position ?
-
One method preparing an anvil stump. The following outlines the process of how I have prepared anvil stumps to provide flat parallel faces at each end of the stump. Tools needed: Router with 3/4" router bit. Carpenter's Level Shims (wedge/shingle type) Level work surface ( a floor ) Dry Wall Screws and screwdriver 1 x 2 wood furring strip scraps Section of tree trunk (Stump) For the sake of clarity I will use: " 1 x 2 Way to mean the 1 x 2"s screwed to the stump. (a level surface on which the router rails slide) " 1 x 2" Rail to mean the 1 x 2's screwed to the routed base First shim and wedgie the tree "Stump" base, at the floor, until the Stump sides are plumb. Place enough shims and wedges to make sure the stump will stay in place while working to true up the first end surface. Use dry wall screws to secure the shims and wedges to each other . A piece of plywood on the floor helps secure things if available. Prepare the stump Way 1 x 2's : Shim one 1 x 2 Way level on the top, high side of the "Stump". Fasten with dry-wall screws. Shim and level the second 1 x 2 Way level and in plane with the first 1 x 2 Way. In other words the second 1 x 2 Way must be level along it's length AND level with the first 1 x 2 Way. When level in both directions fasten with dry-wall screws. Double check that all is still level after fastening, adjust as necessary. Prepare the router by screwing two 1 x 2' Ways to the router base. Place the 1 x 2's as far apart as possible while maintaining good stable contact. with the router base. Make the 1 x 2 Rails long enough on one or both sides of the bit centerline so that when the router bit touches one of the 1 x 2 Ways, the 1 x 2 Rails overlap the 1 x 2 Ways on the opposite side of the stump by a good margin. NOTE 1: You can cut from both sides. Note 2: I used the two board arrangement so I could see the router bit and clear the cuttings. Rout the stump surface away between the Way 1 x 2's. by stages if necessary. Set the final router cut depth slightly below the lowest part of the top of the stump. Once the center part of the stump is leveled remove the 1 x 2 Ways and screw them to the leveled stump surface (you may have to stack another on top). Re-set the router bit cut depth to match the depth of the newly leveled surface and rout away the remaining wood (ears). You will now have a flat level surface on one end of the Stump. Turn the Stump over to place the flat end on the floor. Repeat the routing process on the other end. When finished you should now have an Anvil stump which has the top and bottom parallel and flat. Suggestions: The best routing procedure that I found was to pivot one 1 x 2 Rail off a 1 x 2 Way while sweeping the router in arcs. Seems like I used a dry-wall screw in a slightly oversized hole as a pivot . Sort of a third hand. Friction between the rails and ways cam be difficult to manage if you don't mechanically pivot one end or have a second person to assist. Maybe strips of wax paper would help reduce the friction . Set it all up and take a light cut to get the feel of how this works before making serious cuts . You really need both hands on the router to control the cut. Avoid climb cuts especially when taking deep cuts .