
knots
-
Posts
734 -
Joined
-
Last visited
Content Type
Profiles
Forums
Articles
Gallery
Downloads
Events
Everything posted by knots
-
Questions about hammer dies
knots replied to Fe-Wood's topic in Power Hammers, Treadle Hammers, Olivers
FE, I bought the hammer around 1994-95 and bought a new set of flat dies while at the next ABANA conference . I fabricated the drawing and flat dies immediately and started using them. It is not like I am banging away 8 hours a day every day but it has been a long time since I started using them with no failures. The bottom holder die should last a lifetime. The inserts are so easily made that the benefit of quick change should over ride any concern about wear. However my original drawing and flat dies are still is service. The drawing die is the one pictured. The system that Bob S has posted does the same thing that my system does. For my fuller dies I use a base plate like Bob's and weld on what ever fuller shape I want. The bottom plates are easily fabricated I use a steel jig to accurately drill the holes. With Bob's system the holder dies would need to be longer to maintain die size. The bottom holder die is easily fabricated from a standard commercial flat die using only a drill press. Believe it or not I once machined the dovetails into a couple of blocks of steel, on my radial arm saw, to make dies for an old 25 pound Moluch that I had. I cut those blocks out of an old shear blade ( a giant one, but that is another story). My flat and drawing dies for this system are made from that steel and heat treated in my shop. No one system serves all needs . However for smiths, like us , working alone, who have one power hammer, and do a variety of projects using moderately sized stock, a system like this makes sense. I could see how the pins might be threaded into the die block. Any thing that works - don't knock it. Just happens that I did mine another way. -
Questions about hammer dies
knots replied to Fe-Wood's topic in Power Hammers, Treadle Hammers, Olivers
I use a hole locator jig to drill holes into the bottom of the die or as sometimes applies the die mounting plate. Each of the two holes are countersunk to provide relief around the die pins. The holes are sized for die pins to provide a drive fit. After the pins driven home they are welded, using the countersink as relief for a secure weld. The welds are ground flush with the die bottom. The socket head screws, at each end of the die holder body, tighten against the die pins after they are inserted into the die holder body. -
Questions about hammer dies
knots replied to Fe-Wood's topic in Power Hammers, Treadle Hammers, Olivers
The pins are secured by the socket head machine screws at each end of the die holder body. I have never had a problem with them coming loose. The die holder bodies are modified commercial flat dies. -
Questions about hammer dies
knots replied to Fe-Wood's topic in Power Hammers, Treadle Hammers, Olivers
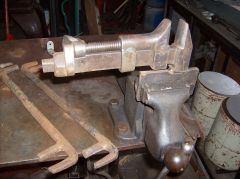
There are quick change alternatives. I didn't like the bulky bolt on box system so I designed and fabricated the quick change die system shown below. The beauty of the system is that you can change the dies rapidly. In addition to flat and drawing dies, I have fabricated a number of fuller dies ( not shown). Although my Hammer is relatively small ( Tup 53 pounds) the system may be ( ? ) scaleable upwards for larger hammers. The die inserts are so easily fabricated that experimentation is practical for small projects. -
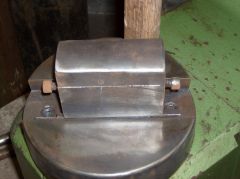 Quick change power hammer dies for my air hammer. I designed and fabricated these hammer dies to accommodate my need to be able to rapidly interchange forging dies . They also will hold an infinite variety of standard and custom fuller dies. These dies are easy to change and have proven durable for my hammer and applications.
 -
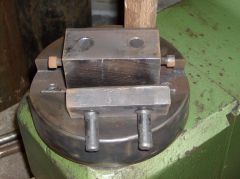 My system of quick change power hammer dies for my Kuhn KO. 53 pound Tup air hammer.
 -
If weight and portability is the goal, why not try a refined version of Glenn's 55 side blast forge ? For years now I have used propane exclusively but now am considering building a small portable side blast coal/coke forge to play with. Seems like the 55 forge concept is just to simple and easy to pass up. The use of a stainless steel pan would be a natural first upgrade.
-
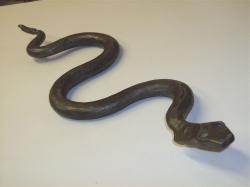
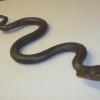
Adjustable bending fork fabricated from a derelict monkey wrench. The adjustable feature is very handy when bending forged tapered work pieces, such as snakes and other organic forms. I have two sizes. The on shown is for larger work.
-
 Adjustable bending fork fabricated from a derelict monkey wrench
 -
Oil quenching container
knots replied to infinityblacksmithing's topic in Heat Treating, general discussion
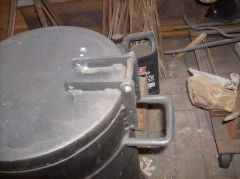
OK Here are the pictures of my Oil Quench Tank which is fabricated from a 40 pound propane tank. -
I am currently using vacuum pump oil. Used mainly for hardening my own tooling. I have not experienced any flash back, seems to work well for what I am doing. One possible free source for those of us who live out where tractors are common would be tractor hydraulic oil. I probably have 10 gallons it sitting around waiting for a second useful life, Mine always comes out clean.
-
Oil quenching container
knots replied to infinityblacksmithing's topic in Heat Treating, general discussion
I have up loaded pictures of my Quench Tank, which was fabricated from a propane cylinder, to my Gallery file . Please note that since the propane cylinders base is small I welded a old iron wheel on to provide a stable base for the tank. I am unable to down load these pictures from the Gallery to this Forum ( my old Mack will not support multiple windows) so visit my Gallery for a view if you like. -
 Tank hinge fabricated from light bar
 -
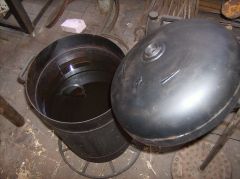 Domed Lid swings down into open tank to achieve air tight seal.
 -
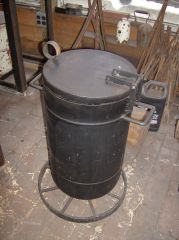 Quench tank fabricated from propane tank
 -
Oil quenching container
knots replied to infinityblacksmithing's topic in Heat Treating, general discussion
I made mine out of a forty pound propane tank. I prepared the tank for cutting by filling it with water. I let if stand for several days before draining then cut off the top dome. Weld a metal disk to the open end of the removed dome ( the disk till be the finished top of the tank lid so make it from a gage heavy enough to weld the hinge assembly to). Set the lid, dome down, into the open top of the cylinder. Fit and weld simple hinge brackets from light bar stock to the top and tank side. Weld a handle to the top and handles to the sides for opening and moving the tank container around. Set the hinges so that the domed top will flop down and seal the tank container. This arrangement provides a tight seal to prevent, or smother, flash fires. I also made a catch tray for the tank from a loop of bar stock with expanded metal bottom so that I can just throw things in and close the lid. The catch tray is fitted with a long handle so that the tray can be pulled up out of the oil. I will try to post pictures later today. -
I once had one for demo's. The portability is a real advantage. When you prepare the fire clay liner mix add a little portland cement in with the clay before wetting. Mix as dry as possible tamp in place to form. When drying, it will likely crack, so cut it into two or three sections while wet. If you want, embed a bit of chicken wire for added strength to accommodate moving it around.
-
Nice design beautifully executed. I expect that they would support my 215 pound butt rather nicely as built. :)
-
I got a big (but not huge) Fisher
knots replied to JGRAFF's topic in Anvils, Swage Blocks, and Mandrels
The depression is a curiosity. I have never seen a fisher with a casting fault that pronounced. It is kind of hard to really see the nature of the depression. Looks like the depression may be fractured. Are there cracks extending around and under the deeper edges of the depression ? If so maybe some misguided individual used it for target practice. Any way you you look at it, the anvil should serve you well. The table and horn look to be in really good condition. I just put a Fisher 300 pounder in service. Fishers are solid citizens. At 250 pounds yours should take heavy forging without moving around a lot. My 248 pound Brooks just sits there while forging. I think you will like the effect of the extra 100 lbs. Happy forging. -
Expert help on anvil purchase
knots replied to caotropheus's topic in TPAAAT - Applied Anvil Acquisition Technique
I am in general agreement with the advice given in the previous responses to your inquiry . However let me explain why. It is assumed that the anvil shown an iron casting. These castings generally tend toward being very Brittle and therefore can be expected to have a short useful life. Because the material from which they are cast is brittle hammer blows can send shards of metal flying. This is a dangerous characteristic of these objects. Out of curiosity several years ago I found and purchased a cast iron anvil for the purpose of testing it to see if their performance was as bad as their reputation. I paid 50 US dollars for it so there was no impediment to doing what ever I wanted to it to satisfy my curiosity. My main goal was to see if heat treatment could make the casting less brittle (and this one was very hard and brittle). Well, much to my wife's displeasure it fit nicely into her oven. I set the temperature at 450 degrees and soaked the object for 5 hours at that temperature. The results were, My wife said would not talk to me fro a couple of weeks, and the anvil brittleness was unchanged. From that experiment I concluded that cast iron anvils do indeed deserve their bad reputation. As for the promised period of tranquil silence, it didn't work out that way so I resold the anvil, with full disclosure of course. -
I use the glue only when the fissures start to bleed and are painful. Otherwise I do use sand paper and a sharp knife to carve the really thick dead stuff off. Corn huskers lotion is what I have been using to soften the skin. I think I will give the bag balm a try. Southern States should have it.
-
Randy and dsk119 have highlighted an important limitation of the Aramid fiber gloves. Welding with Aramid fiber gloves is a misapplication. Don't wear Kevlar or other Aramid fiber gloves for welding or for other applications where protection from high temperatures a is needed. Aramid fibers have no melting point. Rather than melting they "decompose" at 752 degrees fahrenheit . From Randy's experience I think you can likely read "decompose" as VAPORIZE. One interesting observation is that these fibers have not been used in any welding glove that I have researched on line. This is a good example to follow. The following reference features the a description of the chemical structure and manufacture process of Aramid fibers. Some pretty nasty stuff is used to produce these fibers. http://www.bbc.co.uk/dna/h2g2/A791291 Having considered all of this, I still believe that there are useful applications for gloves made of this material where abrasion and cut resistance are needed and contact temperatures do not exceed recommended limits. For unlined gloves the recommended applications appear to set the use at or near room temperature. My experience has been with a Kevlar shell over two layers of cotton liner. The highest recommended temperature for any Aramid fiber glove, that I have found, is 450 degrees F. Those were triple lined with cotton jersey fabric. I use these gloves as a safety net . That is - I do not pick up or handle any thing that i know is hot. As the work piece heats up, at the first indication of heat through the glove, I cool the work piece, and let it dry with the residual heat in the work piece. For forging I use only the left hand glove . Also I Do Not use them when welding. I learned very quickly that sparks will easily burn through them . I basically use them only where ever I would feel comfortable using cotton. As with any glove when forging you must keep the glove dry or run the risk that you will pick up something hot and steam clean your hand. For me this sets the practical limit of their use. The advantages of Kevlar are that it is a good insulator, It has good good heat resistance at moderate temperatures, it has good wear resistance, and the gloves made from the Aramid fibers are not as bulky as other gloves. Since the lined gloves are well insulated I also use them for shoveling snow.
-
Every winter about this time my fingers develop deep cracks. Since I can't seem to avoid them I have resorted to stabilizing these cracks/fissures with Super Glue. It doesn't take much just a drop or at most two drops. There is no need to try to close the cracks, just having the glue in there will stabilize then and allow healing to set in. The label says that some are allergic to this glue . Before using it you might need to test a small area.
-
Thank you all for your spirited responses. I consider all to be valid . By now you may have realized that the reason that I opened this question is that I am somewhat ambivalent about welding to this specific anvil. I like BIGGUNDOCTOR's idea of strapping the anvil down when moving it. Only I would use a ratchet strap as a hold down. Southshoresmith "s three thumbnail's pretty much cover the usual hold down methods plus the rather cool third example with the curved clip. I currently use the spikes just to keep the anvil from shifting. For larger anvils I find that is all that is needed except for the moving issue. However there is a way to weld a clip to an anvil without causing overt damage. That is - weld the clip to the bottom of the anvil with just enough projecting from the anvil base for the lag screw hole. This would require that the stump be rabbited to receive the clip so that the anvil would rest firmly on the stump. My view is that most times less is more. So I will give the strap a try, it should work. I am also giving the curved clip a close look even though I have a prejudice against clips . Now chains are another matter. Chains remind me of Marley's Ghost. No chained anvils here !
-
Sweany, that is an interesting looking anvil . Do you have any of it's history. Kinda reminds me of a ships anvil. Your stand looks sturdy but I had a couple of timbers that I glued and bolted together. Mine is a fairly big anvil and I would normally just drive a few pins around it to beep it from moving o the stump. The only reason that I need to fasten it to the base is to facilitate moving it around the shop.