

Feukair
-
Posts
460 -
Joined
-
Last visited
Content Type
Profiles
Forums
Articles
Gallery
Downloads
Events
Everything posted by Feukair
-
Hey all. I've annealed and shortened the sashimi knive i tried to make which cracked when i quenched. The one here. I really only want about 1/8" of the edge of this blade to get hard. So i was thinking of using a torch to heat only the edge, then quenching only the edge in water. I was thinking of coating the whole blade with a thin wash of clay, just enough to keep it from oxydizing at all. Does anyone think I may have sucess this way? Or might this cause the heated edge to split upon hardening? Please keep in mind that this is a sashimi knife the will not get used very often, and only put to careful use cutting fish flesh. So I'm not interested in going for maximum toughness. I'm not worried about leaving the spine very soft or in it's annealed state. Thanks for any advice.
-
Some images of projects completed
Feukair replied to AdrianWood's topic in Metal Sculpture & Carvings
Incredible work Adrian. I like he one called regenerare. I'm still working on making some knives successfully. I'll be posting some pics in the blade forum. -
Awsome appman...
-
I like how you left the rough forged steel on the side.
-
Very clean work!
-
Thanks for the comments guys. If the sen were shaped like the one in that link i posted I would probably harden the whole thing then draw a temper on the tangs using a blow torch until the metal turned blue about 1/2 to 3/4" into the body of the sen. Like the way the tempering color on the tang of a new file looks...
-
Hi Dodge, I'm pretty sure this one cracked because it was too hot in the area of the crack when i quenched. Another of my knives which i got, far along in the process of polishing, also showed a small hairline crack. At that time i remembered that the same thing occured in that area of that blade, a brighter color than the rest of the blade during the quench. So I'm even more frustrated with myself on this one that i let myself get impatient and did the same thing again. I was making this knife for a friend, and now he'll have to wait longer for his blade... I did what i believe is called annealing... After forging i brought the whole knife up past critical temp (magnet test) and plunged it in a large bucket of ashes and left it until cool enough to handle, which takes quite a few hours. I did not do what i understand to be normalizing. I was reading some on that this am. I believe normalizing is bring the piece up past critical then letting it air cool. The reading I found this am recommended normalizing 3 times (as you say) and then annealing once. (by the definitions above) I've always annealed my blades after forging, i also anneal my metal (W1 drill rod) before working with it. I'm going to take your advice and start normalizing 3 times and annealing. As you say, i don't know if W1 requires it. I'm no metallurgist but it seems to be a common recommendation in the bladesmith world so i suspect it would do less harm than good for any of the steels guys like you and me would use. Thanks again guys.
-
I only check the temp by testing with a magnet over and over until it goes just past non-magnetic. In this case the forward part of the blade came up to temp quick, then i went back in to get the part near the handle up to temp, which was pretty difficult because of my setup, and by the time i got the base up to temp the part about 3" from the tip got even hotter, i could tell it was hotter because it was brighter color. But like i said, i got impatient cuz it was getting late in the night and i quenched it anyway. I've been collecting parts and various plans to build a electronically controlled propane forge/oven to use to heat the blades to critical temp. I also don't have a very good setup for doing this. When i built my firepot i made it basically square, like a traditional pot, and that has turned out to not be a good design at all for knife making. Even if i meticulously work the blade in and out of the firepot the middle is always hotter than the tip or the base.
-
I'm terrified of getting my single hammer power hammer all tuned and working good when i get it put together. I cant imagine getting 4 hammers all working in tandem.
-
What a great little hammer.
-
I'm collecting parts for a tire hammer. That's one thing i'm worried about is where i'll find material for the dies. Looks like you found some nice ones.
-
Well guys I tried to harden and heat treat this blade yesterday and it developed a severe crack about 3" from the tip during the quench. Heating blades for quenching is something I need much much much more experience at. (im still very new at all of this). I have developed some good patience while forging but I'm not there yet with the heating before quenching. I thought i had the front portion of the blade a little to hot but it was late in the day and i got impatient and quenched it anyway. This is something i definitely need to work harder on. I've also collected almost all the parts i need to build a gas oven for heating the blades to critical temp with real control. I think i may wait until i build that before i quench another one. Well, next weekend i'll start hammerin' out another one of these babies... ;-)
-
Yeah, very nice, does look just like snake skin...
-
Here's the one i made for myself by modifying a file. Sen Draw Knife
-
Look here. It's a draw knife for metal basically. I have one that I use a little from time to time, i need to get more practice with it as it does take a little finesse to get it working good. When its working good though it removes material much faster than filing. Thomas was basically telling me that i could make one of these with a slightly convex shape and use it to create a slightly concave shape on the back of my sashimi knife...
-
You know lots of times its the simple ideas that escape you... I have sen already but i just didn't consider making one for that purpose. Thanks for the idea Thomas!
-
Yep, once i slowed down, worked both sides of the bevels equally, and kept the steel "thick", i had much better success. For a long time i was making the blades too thin, this makes it harder to hammer in a bevel, also harder to polish in a straight bevel with the polishing stones.
-
Hi Steve, I bought W1 because it was an inexpensive source of tool steel for me. I have made only a few knives with it so far. Mostly i'm interested in making japanese style blades which is a probably one of the more difficult styles to be successful at, double bevel along only one side, slight bevel along the back, differential hardening, the steel flexing during the quenching, enormous stress built up in the steel... etc... alot of trial and error and reading and cracks in your knives... But i'm in love with that style of blade and that's what i want to learn to do. This sashimi project I took up real quick because it's actually an easy shape to forge. And i was hungering for a project that i could make start to finish in a short time. It's only beveled on one side, totally flat on the other side, so after your all done forging you can heat the whole thing up to an orange heat, then flatten it completely on the anvil or other large flat surface, and you have a very straight blade. Japanese style is not so easy because the cross section of the blade (at least the style i want to learn) is kind of a squished diamond shape so there's no "flat" on the blade that you can align against a true surface, you just have to take the twists out with tools... Truly a sashimi knife is supposed to have a light convex shape on the back of the blade, that and being beveled on one side with no secondary bevel, contributes to the sharpness of the sashimi style blades. Mine will not have the convexion, i don't have tools to make that so my will be as close to flat a possible.
-
I did take my time and forge it very straight this time. When hammering the bevel along the sharp edge the blade curved away from the beveled edge slightly. (between pic 7 and 8) The point was about 1/4" higher than i wanted it (if held with the sharp edge down). I did not want to hammer along the top edge to adjust the point back down because i did not want the spine any thinner, so i used a grinder to adjust the point back down by grinding some stock away along the forward part of the spine, a section about 1/4" at the tip to about 1/16" about halfway back the blade. The cutting edge was also cleaned up a little and the inside corner where the tang meets the blade. After that one more heat was done to flatten the blade and remove any twisting. Then to the hand files. Time consuming though, someday i hope to have a belt grinder. The rest of the shape, the tang, and the flatness was forged in. It's still very difficult for me and i don't work fast, i have little experience. One thing i have become comfortable doing is forging 3/4" drill rod in to a flat bar that is nearly the same thickness and width all the way down. Only because all my knifes start out as a 3/4" bar :-)
-
Thanks for the comments! More progress tonight... filing...
-
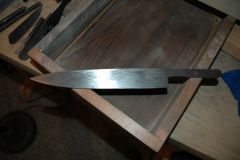
From the album: Sashimi Knife
-
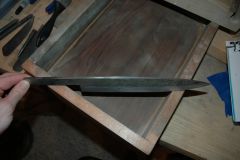
From the album: Sashimi Knife
-
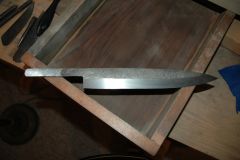
From the album: Sashimi Knife
-
This is W1 drill rod. Yeah, we found a piece of scrap square bar that just fits in the hardy hole. I saved the bar and cut off a few inches to weld onto the bottom of any hardy tool i wanna make.
-
Thanks for the comments. So far I've just been practicing hammering techniques, hardening techniques, and trying lots of different polishing techniques. I've yet to actually complete a knife or make a handle for one. I've got very little time to spend on this, and if i cant find a way to make the steel look a way I'm satisfied with I don't see the point in spending time making handles. However a friend of mine said he was interested in buying a sashimi knife, so i said hey, i could make you one of those, and here i am. I'm only planning on putting a simple handle of a wooden dowel with the sides planed to an hexagon shape, so i will not have to spend alot of time on the handle. Plus, having someone patiently waiting for what i'm making motivates me to finish it... I hope to make it look like this when i'm done.