

Feukair
-
Posts
460 -
Joined
-
Last visited
Content Type
Profiles
Forums
Articles
Gallery
Downloads
Events
Everything posted by Feukair
-
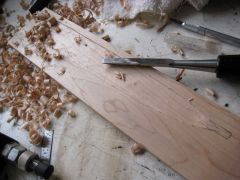
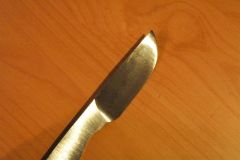
From the album: Sashimi Knife
-
Well I finally finished this sashimi knife I'm making for a friend. Now that I have my belt grinder built I've been able to put it to use actually finishing some of the half worked projects I've had laying around. So the first blade I made in this thread actually cracked, this is the 2nd attempt which survived a more simple heat treating, but it's for the same knife so I'll call it the same project. I still have to stamp my touch mark on it... Anyways, here it is... handle and scabbard are maple, black collar on the handle is buffalo horn, and the pin to lock it in the scabbard is ebony. This turned out so good now I have to make one for myself...
-
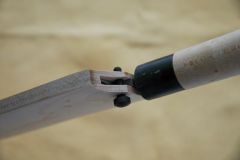
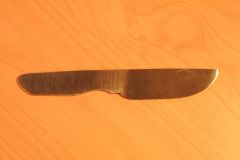
From the album: Sashimi Knife
-
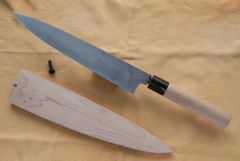
From the album: Sashimi Knife
-

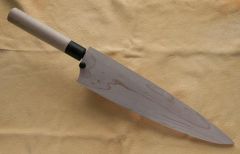
From the album: Sashimi Knife
-
From the album: Sashimi Knife
-
I really like the shape of that one.
-
Hey all. No new motor yet, harbor freight doesnt carry that one in the stores. However i did pick up some fenner drives link belt and wow does it eliminate the vibration problem i was having. I knew it was supposed to help with vibration but i didnt know it would make such a difference. In the first video i posted above it appears that my grinder is runnin pretty smoothly, but i later learned that my motor is not heavy enough to keep the belt tight, so i put a spring under it to pull it down. Since then i've had some bad vibration in the grinder. The link belt eliminated it. I posted a video here.
-
The process you performed was annealing which would have softened normal carbon steel of those dimensions to where you couldnt have broken it, it would have just bent. So i would guess its some kind of air hardening steel which i don't think is the kind normally used to make knives. However it you want to make a fillet knife, which is usually thin and flexible then that steel is already the shape you need almost. Maybe you could just grind it to shape (if you have any left that you havent heated) keeping it cool while you grind. No reason to re-heat-treat.
-
Hey all, I'm thinking of picking up one of these motors to use on my grinder. 2hp to replace my 1/2hp. However this one is 3600 rpm where my existing is 1700 (a speed i like) so this new one would be twice as fast basically. I can reduce the speed back to ~1700 by putting a pulley on the motor that is half the size of the one on my grinder drive wheel correct? Right now both my pulleys are the same size. Any other advice on this motor anyone can offer? Remember i'm just a hobbyist user, few hours a week, so even though this is a cheap motor is should last me for a while.
-
Looks like in the pics some people might be making use of caster wheels like this one on their home made grinders. How are those working out? Do they vibrate or are they out of round? Did you have to have a hole to mount bearings machined thru the middle or did you just use an appropriate sized bolt for an axle? Looks like the one in that link has bearings in it already, although not really the appropriate kind. Anyways, didn't mean to hijack your thread sqeezplay. I built a DIY grinder also, video here and more info in this other thread. Some pics in my gallery here. A pdf scan of the plans i drew up so you can see dimensions here. (don't trust the parts list on the left of that pdf, that was just notes i scribbled for my trip to the hw store, you should figure out the parts you need as you go along, most of which depend on what other parts you scrounge up) I based my design on some designs I found on the net (links in that thread) but you can basically rig up anything that works, just make sure you have some mechanism for adjusting a tracking wheel and don't go too cheap on wheels or you risk causing vibrations from un-balanced or out of round wheels.
-
Hey! Nice cheap and simple setup...
-
Very nice piece. I love the way the tips of your blades dip slightly. Whenever i see a blade that does that I think "like Rich Hale's blades".
-
These pictures in the gallery are from december 2006, they are probably within the first 5 to 8 pieces of anything that i forged. The edge of this knife was ground on a bench grinder but you can see all the hammer dings. And in this picture (which is hard to make out cuz it's blurry) you can see there wasnt a very clean surface on these. Just keep at it, develop habits, you will get better.
-
I will tell you a few of the lessons i've learned the hard way, and been taught in the few classes I've taken, and the little forge time I've had since I got into this. First a couple basic things, just as a starting point to help you forge a clean smooth surface: You should have a hammer with a almost flat face, slightly convex, very slightly, with the edes of the hammer face nicely rounded over and the whole hammer face, all the way around the corners of the face, polished very smooth. The face of the hammer I like has about 1.5 inches of surface area and is round. The height of the anvil should be so that when you stand naturally (the way you naturally stand when you are swinging the hammer at the metal) and swing the hammer when the hammer reaches the point at which it would strike the metal the hammer face is flat with the surface of the anvil face. If the anvil is to low you have to drop the hammer lower or adjust your grip to prevent the farther edge of the hammer from hitting more. If the anvil is too high then the same goes for the closer edge of the hammer face, it will want hit first. Clean the scale off the piece and the anvil surface as you work. You can do this either with a wire brush (the way I used to do it) or by keeping your anvil wet by dipping your hammer in water as you work (the way i do it now). When the face of the anvil and hammer are wet and you strike the orange steel there is a little steam explosion (sometimes it's a pretty loud pop, especially when the steel is hottest) that blasts the scale off the metal. When I first started doing it this way it was difficult because I would make the anvil wet, the work the metal on it, sometimes forgetting to make it wet, or sometimes for getting to get more water on the hammer as i was hammering. But eventually I got it into a rhythm where it's now natural. I wet the anvil while i'm heating the piece, take the piece out give it a few beats on the wet anvil, by then the piece has cooled to a dull orange and the anvil surface where the metal has been has dried, quickly splash some more water on the anvil with the hammer and a few more beats does more shaping and blasts of any remaining scale, then the piece goes back in the forge and while it's in use the hammer to splash some more water on the anvil. Any scale that you allow to remain on the surface of the piece or anvil face you will just drive into the metal with the hammer during the next beating. When you wet the anvil with the wet hammer you can just smear it around a little to push the scale chips off the part of the anvil surface where you work. Some smiths use the brush method some use the water, I don't want to debate what's better, I think you just have to pick one and keep doing it until it becomes habit, until then it seems awkward and might actually make you feel even less like your ever gonna get any better at it, but you will. I use water simply because i'm most fascinated by the japanese style of smithing and that's what lots of them do. I also use a japanese hammer, both because my instructor recommended one, and for the same reason as the water :-) (which is no real reason) The metal really has to still be somewhat orange in order to be able to use water to blast off the scale, this also happens to be the temperature that you should be putting the metal back into the forge to reheat it, if you are still hammering it (making big changes in it's shape) while its a dull red and going black then you are not forging properly. So if you use the last bit of time in orange color to splash some water back on the anvil give a few beats on both sides to clean off the scale and do a little more shaping, then go right back into the forge this actually helps you to keep the metal up to proper forging temperature. If you keep pounding the metal after the anvil has dried and the metal has gone dull red then you are probably smashing scale into the surface of your piece making pits that you will have to grind out. Ok, so about hamming a bevel... Of course it's practice practice practice. Make steady even wings. Keep doing things until they become habit. When you are forging the bevel you must hold the hammer at an angle and the piece at an angle to the surface of the anvil with these angles matching. Take a second to make sure you are in position with the piece angle and the hammer angle before you start making rhythmic swings of the hammer. Remember as you are hitting the upper surface of the piece with the hammer the anvil is hitting the bottom surface of the piece, so both surfaces must be making contact at the same angle. For me this is something that took a while to become habit and it happened in two parts. The first part that happened (not on purpose) was that I developed a habit of keeping the hammer face striking at the desired angle constantly. I would often get lazy about or forget about keeping the piece at an angle as well so i would wind up with the bottom of the piece flat and a bevel only on the top (honestly i still do this once in a while). But, once I realized that I had developed a habit of keeping the hammer at the proper angle then i was able to spend more focus on keeping the piece a the desired angle while hammering until that also became habit (like i said i still forget once in a while, not quite there on that yet...) Alright I don't just say practice for the sake of the old practice makes perfect saying, (i'm sure that wasnt the advice you were looking for) but because practice develops habits, and there's just too much going on between the hammer, the piece, the anvil, the angles, the scaling, etc... to keep it all straight without some parts of it happening naturally (habitually). I couldn't keep this up if i wasn't seeing some improvement in my work as I do this. And I think it wasn't until some of the proper procedures and techniques became habits that i really started getting noticeably better to myself. Practice also develops hammer control, when you first get into this the hammer bounces all over the place, the piece bounces all over the place, you cant hit the same place twice, it's a mess. But keep your eyes locked onto exactly where you want the hammer to hit and sooner than you'd expect you will be moving the piece to that spot and hitting the hammer with that spot almost every time, then soon every time. The simple act of hitting the spot you want to hit i think was one of the quickest habits to develop. So for making a sharp hammered in bevel... It's ok to still move the metal (a very little) when it's a dull red color (someone will squash me for saying that because it doesnt apply to all kinds of metal, but i pretty much work in plain carbon or simple steels so it applies to my pieces). Once you've got an area of the metal almost where you want it in shape, maybe the bevel is there but still has a few ups and downs in it or isnt very defined, you can linger in the red color a little longer and do some hammering to finish the bevel assuming you've cleaned the scale off the piece while it still had a dull orange (dont hammer red metal with scale on it). When the metal is a dull red it moves less under each hammer blow, it also does not form the crusty kind of scale that causes pitting. When the metal is a dull red you can really get a nice definition to a bevel if you have those other habits going. Plan what you are going to do when you take the piece out of the forge each time. Set it on the anvil, set the angle of the piece, set the angle of the hammer, then start hammering. Do this each and every time, things will become habit sooner than you think. Sometimes just daydreaming in your head through the steps you will take helps, similar to that last minute run through of information you go over in your head before you actually read the first question of a test. I dont mean to preach like i'm an expert, i'm still a newbie, but this information i think is a good summary of what i think about that when I try to collect what I've learned in the last two years with regards to hammering. I think i've been at this for about 2 years, with an average of 6 hours of hammer time per week, and it hasn't all been knife hammering, so not much if you think about it. I typically forge every saturday, but sometime 3 weeks goes by without a chance to forge, then sometimes i'll do it twice in a week. There's also countless other hours of reading and research. Hope this helps, sorry for the length, i actually think it has helped me to lay out my thoughts on these processes. Wow, i just previewed this post, really, really, sorry for the length...
-
Thanks for the comments guys, i've attached the scales to the blade and done a little sanding. Should have it finished up this weekend and another picture. This will officially be the first knife i've finished with a handle on it. ;-) That W1 leaf knife i made was actually my first "finished" knife, only cuz it didn't need a handle. I've got a few others that are still in need of some work and handles. Handles being a part which I've barely put any time into practicing making yet.
-
Yessir, I hope to have time this weekend to work on it. Thanks for the comment.
-
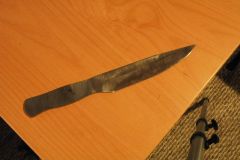
Here's a skinner i'm working on made from an old nicholson file. I was able to take some time off during the the tk holiday so i spent extra time at the forge... This one was also fully hammered to shape but I forgot to get a picture of the rough forging before I took it to the grinder :-( Oh well, I shouldnt have left it sitting next to the grinder I guess. It has a cool hamon going on from being heated only along the edge during hardening. More pics after more polishing.
-
From the album: Feukair's Knives
-
From the album: Feukair's Knives
-
Here's an updated pic after some work on the grinder.
-
From the album: Feukair's Knives
-
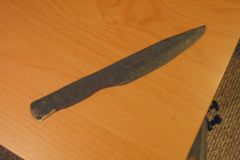
This is a practice piece. Again, working on the hammering technique, this one completely formed with the hammer including the bevel. (except where I cut off the rod I had welded on for a handle) It is made from an old nicholson file. I've already finished it up with my new grinder. I'll get more pics up tomorrow.
-

From the album: Feukair's Knives
-
From the album: Feukair's Knives