

Feukair
-
Posts
460 -
Joined
-
Last visited
Content Type
Profiles
Forums
Articles
Gallery
Downloads
Events
Everything posted by Feukair
-
Very nice job. What do you use for flux? Lt
-
That depends on what youve done to it already. I used a 250 grit waterstone after quenching. But prior to the quench i used a hand file to shape the blade so it was already pretty well shaped. Either way is should hurt it to use 400 if thats what you have, then try a rougher grit if you need more cutting power. Send pics soon! I cant wait to see it.
-
Some of the stones I got from woodcraft Fast Cutting Japanese Water Stones And some from the japan woodworker The Japan Woodworker Catalog (click on the links under bench stones on the left) Right now I'm mostly using synthetic stones, i have a couple natural ones but not the very expensive kind. Woodcraft has enough to get you going, you can pick up combo stones of varying grits. Like if you pick up the 250/1000, a 800/4000, and 1000/6000 then you have 6 grits to work through. Then over at japan woodworker I picked up some other stones to fill the gaps in those grits like a 500grit and a 1500grit. The softer grits will wear away fast (250 extremely fast if your using it to roughly shape a newly quenched blade) and the 800 wears pretty quickly as does the 1000. The 4000 and 6000 wear slowly. So when the softer sides of the combo stones have worn away then i will go pick up the softer grit stones in single form which are about 1 - 1-1/4" thick and should last longer and I'll have the hinger grit stones left over. Water stones are expensive though. I havent really found anywhere that I would consider a "great deal" usually prices are all very similar no matter where you go. You might find one a few dollars cheaper but then the shipping will be more expensive. Once in a while you can find them on ebay but they usually go for about the same price as new, maybe like 15% cheaper but then ebay shippers usually over charge on shipping so it's a wash. Lt
-
I think that pirates being pirates would use whatever swords/knives they could find. So theres not any particular "pirate sword".
-
Cool, i was wondering about that, i thought you had to go in the quench horizontally for the best effect with this kind of sword/knife.
-
Didnt the guy who helped you with yours use an upright quench tank and submerge the blade tip first up to the hilt? I think i remember you posting a pic showing the upright quench tanks... Lt
-
Thanks man. Here's the video of the quenching. Check out how the blade goes in the water with an upwards bend but when it comes out it has a downwards bend until it cools and bends upwards again. Quenching video Lt
-
Quenching of a clay coated wakisashi blade forged from 3/4" W1 drill rod stock.
-
More pics... 5 - after a 3-4 minute hot vinegar etch to show the hamon better. 5 - after a 3-4 minute hot vinegar etch to show the hamon better (closeup).
-
Well, I annealed this blade and forged a bit more of an upwards curve in it this time. Re-filed and clay coated and hardened and i'm much happier with the results. Here are some pictures of this 2nd attempt. I've only polished it with the first stone, 250 grit, but then did a quick hot vinegar etch to get a good look at the hamon. I like the way this one turned out. I'll post more pics of polishing on the higher grit stones when i get to them. I've also got a video of the quenching of this blade that i have to capture and edit and post so that's coming too. The hamon did go a little higher in the middle of the blade than i wanted, not sure if i put the clay on higher or thinner there or if the water got under the clay during the quench. It's still a keeper though... 1 - The forged blade filed to shape. 2 - Clay coating. Clay was applied, then a wire wrap, then a thinner layer of clay to cover the wire. 3 - After the quench. 4 - first polish with 250grit stone (closeup) hamon slightly showing.
-
Very nice, ive been thinking of making some similar for our kitchen.
-
Hi RainsFire, good to hear you finally got a hamon. After the first once over with sandpaper you can put the blade in some hot vinegar for about 5 minutes to make the hamon appear. That will make it easier to photograph as well. I use tin foil to make a shallow dish the length of the blade, heat up a small amount of white vinegar (enough to cover the blade) in the microwave for 2 minutes, then pour it over the blade. You can actually watch the softer steel in the blade darken before your eyes, the harder steal stays a lighter color. Take it out, rinse it with hot water and wipe it dry with paper towel and photograph.
-
Great work, very interesting handle. I bet thats comfortable to hold.
-
Great dagger. Someday i'd like to make some double edged blades but for now i have a hard enough time getting the bevel on one side to look the way i want.
-
Awsome knife!
-
Nice first knife dogvet!
-
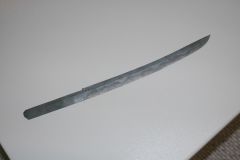
 5 - after a 3-4 minute hot vinegar etch to show the hamon better (closeup).
 -
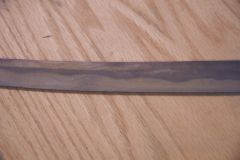
 5 - after a 3-4 minute hot vinegar etch to show the hamon better.
 -
 4 - first polish with 250grit stone (closeup) hamon slightly showing.
 -
 4 - first polish with 250grit stone.
 -
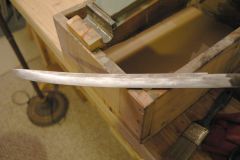
 3 - After the quench.
 -
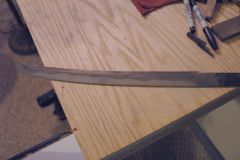
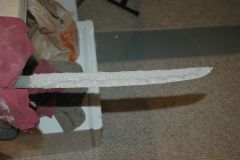
 1 - The forged blade filed to shape.
 -
 2 - Clay coating. Clay was applied, then a wire wrap, then a thinner layer of clay to cover the wire.
 -
Thanks for the info. I do have a 1000 grit stone that i skipped this time. I"m still trying to figure out which ones to use. I also have other higher grit stones, like 3000 and up that i could have used instead of the paper but I like the paper because it conforms to the shape of he blade and helps take out streaks left by the stones. I think you are right though, i need more grits and i need to go higher.
-
Thx. I've got enough of this W1 drill rod to make almost 10 more blades this size.
