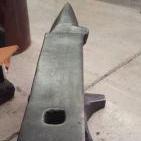
January 31, 20179 yr Back in May of 2016 Alec Steele posted a video to his Youtube channel. That video was about him giving all of his online classes to young smiths (Under 18) that applied For FREE. This was to give back to the blacksmithing community. From about my 2nd month blacksmithing, I wanted to make my own tools. It was what blacksmithing was to me, Taking what you have, and can get, and making what you need: being self sufficient. It also included was his How to start Blacksmithing and Intermediate classes as well. I could use the First one of sure. I couldn't afford classes, Or to buy the online class. So this was going to be HUGE in my blacksmithing journey. So I applied for the scholarship. I was very fortunate to have been picked for the scholarship. So here is my journey through the tool making process. Just last week I finished my striking anvil. So tool making has begun. If you want see someone do this better than me then go check out Littleblacksmith's thread, as he goes through the same class. https://www.iforgeiron.com/topic/48959-the-evolution-of-tool-making/ Here is my first top tool. The hammer Eye punch with just a hand hammer!
February 2, 20179 yr That's an excellent start! Don't worry about making it perfect, ounce you make the other tools you can make a nicer one. The only criticism I might have would be to make the taper on the handle a little more graceful, or enlarge the eye. Other than that, it looks good! cant wait to see your process! Littleblacksmith
February 2, 20179 yr Author On 1/30/2017 at 10:32 PM, VaughnT said: Good job! On 1/31/2017 at 9:07 AM, stockmaker said: Thanks for sharing, nice hammer. 16 hours ago, littleblacksmith said: That's an excellent start! Don't worry about making it perfect, ounce you make the other tools you can make a nicer one. The only criticism I might have would be to make the taper on the handle a little more graceful, or enlarge the eye. Other than that, it looks good! cant wait to see your process! Littleblacksmith Thanks guys! LB: Yeah, One of my favorite blacksmithing sayings is, if you want it perfect make it perfect. I will admit, I didn't put any real work into that handle, It was a broken sledge hammer handle that I was re-handling a hammer with, But I finished the punch and handled it right away. I get more coal on saturday, So then I will finish my hammer tongs, and tools making will proceed! I'm getting very excited at this point!
February 2, 20179 yr Well done! Keep us in the loop please, we've had the honor of watching a number of beginners turn into high end blacksmiths with a back log of customers wanting their work. Frosty The Lucky.
February 2, 20179 yr 2 hours ago, EJRailRoadTrack said: One of my favorite blacksmithing sayings is, if you want it perfect make it perfect. Yep! In the words of Brian Brazeal " if you want it perfect, make it perfect!". I couldn't see the geometry on the end of the punch, but just make sure that that is correct, because that is an important part of the tool. I would even say that it is one of the most important parts of the punch to get correct. Littleblacksmith
February 2, 20179 yr Author 2 hours ago, Frosty said: Well done! Keep us in the loop please, we've had the honor of watching a number of beginners turn into high end blacksmiths with a back log of customers wanting their work. Frosty The Lucky. Thank you Frosty! I sure will! I know, It's kinda fun to think that Alec, Ethan Harty, Brian, Lyle, Joey, Arron Cergol, And many others have started on this forum. I hope to make a few bucks blacksmithing, but I don't to rush in, because I still want to enjoy it. 1 minute ago, littleblacksmith said: Yep! In the words of Brian Brazeal " if you want it perfect, make it perfect!". I couldn't see the geometry on the end of the punch, but just make sure that that is correct, because that is an important part of the tool. I would even say that it is one of the most important parts of the punch to get correct. Littleblacksmith I'm pretty sure the geometry is correct. However, the punch is somewhere between 8-12 degrees off from the eye, Which is something I didn't see until it was too late. We'll see though!
February 3, 20179 yr 4 hours ago, EJRailRoadTrack said: I didn't put any real work into that handle, It was a broken sledge hammer handle that I was re-handling a hammer with... Take that handle to the wire wheel on your bench grinder and give it a thorough going over to even out the surface and remove any polyurethane coating that might be on it. Then paint the bare wood with some boiled linseed oil that's been thinned down a lot with paint thinner or mineral spirits. This will allow the oil to soak into the wood real easy and makes for a fast-drying finish that looks incredibly good with forged iron tools. All of my tools get the thinned BLO treatment, and they look like tools you'd expect in a smith's shop!
February 21, 20179 yr Author At last! I make it back to this topic. I've finished the cupping tool, the bottom fuller, and the hammer tongs! I wasn't happy with the cupping tool, Before trying to lip the tool It was not fully flat, So I had flatten it back down then re-lip it. But, it should work! On 2/2/2017 at 6:18 PM, VaughnT said: Take that handle to the wire wheel on your bench grinder and give it a thorough going over to even out the surface and remove any polyurethane coating that might be on it. Then paint the bare wood with some boiled linseed oil that's been thinned down a lot with paint thinner or mineral spirits. This will allow the oil to soak into the wood real easy and makes for a fast-drying finish that looks incredibly good with forged iron tools. All of my tools get the thinned BLO treatment, and they look like tools you'd expect in a smith's shop! The handle had been hit a rasp fairly heavily. I like to just put a bit of oil, of any kind my handles, I char some of my handles too, I think it gives a nice look and feel.
April 15, 20179 yr Author Top fuller and hot cut hardy done! Forged the top fuller a few weeks back. And my older brother came a struck for a hot cut hardy on tuesday, Just a couple more tools and I'll be forging hammers!
April 15, 20179 yr All that bending over makes my back hurt just looking at the pictures----is that striking anvil at the correct height for the users of it?
April 15, 20179 yr Author 23 minutes ago, ThomasPowers said: All that bending over makes my back hurt just looking at the pictures----is that striking anvil at the correct height for the users of it? If you stand at the same height as the striking anvil it's about perfect, for me anyway. But it's buried in the gravel, so therefore it's a bit short. I'm contemplating a small concrete slab for it, to get it up higher and to make it more stable.
April 17, 20179 yr Good job EJ. Just make sure the top fuller is the same radius as the bottom fuller. its not too big of a deal because you will be rotating what ever you are fullering and will even it out, but... One nice thing about using spring steel for the hammer eye tongs is that you can make the reins thin and light with them still being strong. Don't be afraid next time to make them thinner. Do you have a flatter or large set hammer? if so I would recommend going over the fuller and hot cut with it, you'd be surprised how much it improves it. Also putting a hot coat of oil helps prevent rust and makes it look nicer. Nice handle, a lot better than the first one! When putting in the fullers on the Hot cut, if they are off, don't feel like you cant adjust it. on the first few passes with the fuller you can even have your striker give lighter blows until you have the troughs set straight, then he can give full hits. Especially with fullers comparted to a top hot cut or a butcher, you can move it over and straighten out easily without it bein easily noticed in the end. All the suggestions above are about aesthetics or preferences, so good job! and, these are the first tools, so they will be ugly. once you have these tools made you can go back and replace the older tools with nicer ones. Littleblacksmith
Join the conversation
You can post now and register later. If you have an account, sign in now to post with your account.