November 24, 201312 yr Here is the start of the Peacock project . On looking more carefully at peacock photos I was amazed to learn that the beautiful fan shaped feathers with 'eyes'; are not the tail feathers but are mounted on the back and are supported at the rear by dull grey tail feathers that prop up the fan . The wings are also tucked under and rear of the fan . This is not what I had believed so i must change my plan to make it anatomically accurate. So if it looks wrong or silly to you guys check out some photos of the real thing ( a view from the rear ) and you might be surprised how oddly they are put together. The glass discs were made by my wife . there will be more glass in the neck /chest area in 1 and a half inch rings . not sure how that will work out yet
November 24, 201312 yr Author What do they taste like Thomas? Here is more of the Peacock " fan'' . The U shaped connecting struts are to "float"the eyes in the fan when viewed from the front. cheers
November 24, 201312 yr More like duck than chicken! Making renaissance cooking tools for someone researching renaissance cooking can result in some very nice meals. (The Opera of Bartolomeo Scappi, 1570, has nice woodcuts of cooking equipment in it)
November 24, 201312 yr Looks like it is coming along nicely, always wanted to do a peacock, my plan was to use the temper colours for the eyes on the feathers.
November 24, 201312 yr andrew your right! i guess i presumed the entire tail was eyes, and the wings infront, and it does appear more like this when the tail is down, but if you think about it no eyes are visible from the back when the tail is up... just the dull brown ones.. i have some smaller shoes stashed which i might use on mine but ive not decided yet, and i have never thought of using a pipe cut into sections for rings! thats ridiculously obvious, and something i would do in cooking or perhaps with cardboard but ive never done that with metal! well done!! that will be SO useful :) thankyou ! i will thoroughly enjoy your photo step by step thing for the peacock, i particularly like your approach, which is unique to your style, of using the best shaped part from the outset, rather than fiddling and altering to much after youve made your selection.the glass is going to look wonderful!
November 25, 201312 yr Author Thank you Thomas Dean . well I will have to take your word for it as there ane not many Peacocks for sale as meat in OZ . (Not any wild ones I know about) Thomas Powers , yes I would have thought a bit more "gamey" in flavour ( i guess everyone has different taste experience. Can you post me a link to some Renaissance Recipes as you have me interested . (ive heard of peacock tongues or was it pheasant? ) Toolish ........I have seen the tempered colours done as you describe on a sheet metal Peacock . it looked fantastic . the most beautiful effect on the peened metal. Beth my "style" of using the right shaped part from the start has a simple origin : I am LAZY and it means less work . cant wait to see your wall peacock posted. ( I might steal some ideas off you ) cheers a.
November 25, 201312 yr lazy if you like - but using your very good eye that gathers all the interesting descriptive details together :) will def post my peacock when i do it !
November 25, 201312 yr ANother gret WIP - I'll be watching as it comes together. I wish more would do the same and share pics of their work. Thanks! A question, was the fan a large ring with a section removed and then inverted and welded? Was the ring formed or found?
November 25, 201312 yr My question would be if the "feathers" will be light strap stock welded at the base and allowed to move back and forth supporting the free floating eyes?
November 25, 201312 yr Author Hi Eddie and Thomas P The ring was a complete blacksmith forged rim off an old horse drawn wagon wheel . I cut out a section and inverted it . Im not sure how i will do the feathers that accompany the now floating eyes , as too much stuff may ruin the effect i am after , though it needs something to indicate the rest of the feathers . i might go a little abstract or minimal with the rest of the feathers. not sure yet .it will come to me in my sleep.
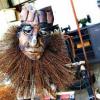
December 2, 201312 yr Author Some more progress:: this junk will become head and neck I want the Peacock to display smug vanity / narcissism . so I connect the head by a bolt into a welded nut . then when i rotate the curvature of the neck to the desired"attitude" i can then make fine adjustment to the turn of the head independent of the necks position The feet are next . They must be strong enough to hold the weight of the entire sculpture . On the underside of each foot I will weld a nut . This will enable me to later screw in a spike that is hidden from the viewer The 1" box connecting the feet at the top will be the primary assembly, onto which all sub components will slip into /onto Next a verticle housing is attached to the mainframe . Into this housing the 1" post that is attached to the Peacock 'fan' will slip. The fan is balanced (and quite stable ) resting only on the feet on the dirt floor Next the neck and belly attach via ' slip on rails' to mainframe Detail of slip in and / or slip over box mounting system. There is much more to do . The fan has much more "beautification " to be done including the "T "feathers and "eye lashes" . The wings and tail feathers represent some interesting engineering problems to solve . There is also the addittion of glass on the chest and rise in the back cheers a
December 2, 201312 yr excellent! his attitude is brilliant - vacant and gorgeous and displaying his wares ! :) his head is great - i like how wide his feet are set too. the photos are really fun to watch !
December 2, 201312 yr another pleasurable posts you have given to us to admire. This one is no less (of any quality) than any others presented. Please continue to amaze us. Carry on
December 4, 201312 yr Author Thank you Beth and David for the encouragement . More pics in a week . cheers a
December 7, 201312 yr Author More junk to make the fan more attractive. These include railway sleeper split pins , flail mower T blades , drill bits , vintage telephone insulators and mounts as well as the worn out spring steel brushes off a rotary road sweeper. When the glass discs are added to the"ëyes" these decorations will become less sgnifigant.
December 14, 201312 yr beautiful! love the scraps youve used, the steel brushes look magic - and the glass is really wonderful. i love him!
December 17, 201312 yr Author thank you Dick, I will start on the back and chest area this weekend also some color on top of the head.(dont know if that will work) some more pics in a week cheers.andrew
December 29, 201312 yr Author here is some progress . there will be glass discs in the smaller rings . also some glass eyes and on the comb on top of the head. chers.a
Join the conversation
You can post now and register later. If you have an account, sign in now to post with your account.