billp Posted July 27, 2009 Share Posted July 27, 2009 (edited) OK I know there have been several of you who have already given advice on how to build a hood if you don't mind could please repeat that advice again. I do have plans from Dick Nietfeld that where put up at sometime. (Thanks Dick for putting that information up.) So if you don't mind please I need advice on building a hood. My forge is 24" square with a small side of about 1" going round all 4 sides. What I'm thinking about is something of a hood that goes over about 2/3's of the top with only the back and 1/2 of the sides coming down from the hood being solid. I'm also looking into using stove pipe sheets that are not connected yet to make a pipe and can be flatten out. It can be shaped and molded into what ever shape at much less cost as flat sheet metal sheets. At this time the forge is portable with wheels on the back side as for now I have to work out side. But, at some point I want to put it in a shop and attach to pipe. So all I need on the hood is to have a start for the pipe to attach to when the time comes. Which my plan is to have the start of a smith going by winter. As even though I am in the south we do have some cold xxx weather here and would prefer to be inside. So any advice, plans, what ever I would appreciate it. In a day or 2 I'll have a plan put together but would really like the advice of you more experienced people on the sight. I'll try and put up a pic of my forge if I can. Thanks for all the help. BP Edited July 27, 2009 by billp To re-do a bad starting line I apologize if any offence given I'm just not a good writer. Quote Link to comment Share on other sites More sharing options...
urnesBeast Posted July 27, 2009 Share Posted July 27, 2009 I just don't have the time to go through all the past threads to find them. Not a good way to start a conversation on-line... That being said, is that galvanized metal at the rim of your firepot? If so DO NOT fire it up.http://www.iforgeiron.com/forum/f35/zinc-cadmium-hydrogen-fluoride-other-toxic-compounds-8515/ I don't know much about making a hood. Quote Link to comment Share on other sites More sharing options...
thecelticforge Posted July 27, 2009 Share Posted July 27, 2009 I recommend a side draft, I just made one and I love it!The Blacksmith Ironworker and Farrier by Aldren A. Watson has some excellent examples to help you out. :) Quote Link to comment Share on other sites More sharing options...
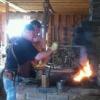
billp Posted July 27, 2009 Author Share Posted July 27, 2009 No, urnesBeast the sides and the fire pot are made from 3/8 diamond plate. I have used it a number of times first with charcoal now with coal and it works really well. Only change is I might have made it a bit deeper as it's only about 2" deep. But like I said it works well, how long may be another question. But no, there is no galvanized metal any where on the forge the pic may not be the best as well, but can make and post a better one if needed. But thanks for your concern, also I went back and re-did my opening remark you were correct. I have thought of a side draft celticforger just want to weigh out all my options but thanks for the suggestion will check it out. Thanks again BP Quote Link to comment Share on other sites More sharing options...
Neal L Posted July 28, 2009 Share Posted July 28, 2009 I made a side draft hood using the plans on this website. Steel s-draft drawing It really works great.....not too difficult to fabricate. Quote Link to comment Share on other sites More sharing options...
Hill Posted July 28, 2009 Share Posted July 28, 2009 (edited) Bill, The size of the chimney pipe used is directly related to the opening of the hood. The formula is basically sq. inches of opening you plan on having next to the fire, then 6% of that opening suggests what size flue pipe you need. (Sq. inches of opening X 6% = size of chimney or flue pipe. ) So, if you're wanting an opening of 12" x 16" in the hood, 192 sq. inches x the 6% gives you 11.52"....if 12" pipe is available, fine...if not, then adjust the sq. inches of your opening to get an approx. of the size pipe/flue you'll need. It's not dead on, but close enough that you go with whatever size of chimney pipe or flue that's available and the few points won't matter too much as long as you get the heighth above the roof-line. I use this formula almost on a daily basis for work and it works well, draws well. A little adjusting is sometimes required, but nothing that's not a simple task...usually adjusting the height of the chimney will fix it. This rough formula is used to optimize the draw of wood burning stoves and fireplaces so as to keep the gases from condensating back into the nasty tar that lines the inside of chimneys and ends up burning houses down. Insulating factors are considered too, but it's a subject that could be beat to death I guess. Oh, and almost forgot...The sq. inches of the opening only requires the same volume inside the chimney hood to work. Just shape it for the same volume inside and you should be ok. Smoke shelfs arent required for a design like this if you use the basis of sq. inches and volume relating to the size of the chimney/flue pipe. The more volume you add in relation to the size of the opening and flue size, only serves to slow the smoke and hot gases down. If you have the pipe/flue already, just do the inverse math and find the proper sq. inches of the opening. Pretty straightforward, but I hope I didnt gum it all up...please correct me if I have :-) Edited July 28, 2009 by Hill Quote Link to comment Share on other sites More sharing options...
Sweany Posted July 28, 2009 Share Posted July 28, 2009 My solutionBlacksmiths Gallery in the other pic you can see it drafting.:) Quote Link to comment Share on other sites More sharing options...
billp Posted July 29, 2009 Author Share Posted July 29, 2009 Thanks All I do appreciate the input you have all given. I did get up off my lazy bum last night and go through a long list of threads to get a better idea of what might work for me. It seems that most like the side draft style as to an over the head hood. So I think I have settled on trying to build a super sucker side draft. I just need to come up with a way to put it together. I thought of pop rivets but they're aluminum which may melt. Then there are screws, a lot of screws. Then there is welding which in working with sheet metal I have no experience in. It looks like gas welding would work best as arc is way to hot but I have never used gas outside of soldering water pipe. But with a couple of good books I'll give it a shot. If anyone has a better idea please let me know. I seem to learn more by trial and error then any other way. This looks like a problem I don't think even duck tape can fix. BP Quote Link to comment Share on other sites More sharing options...
Sweany Posted July 29, 2009 Share Posted July 29, 2009 i used pop rivets Quote Link to comment Share on other sites More sharing options...
billp Posted July 29, 2009 Author Share Posted July 29, 2009 Thanks Sweany As I have all the equipment and knowledge for this and it works for you then it's got to work for me so that's what I'll stick with. It was my fear they might melt if the hood got too hot but then again as I finely sit down to really think with air flow I can't see it getting that hot. I'm not really up on different metal melting points as I'm not much of a facts and figures kind of guy. I just don't have a head for numbers, but do well at hands on experience. I guess that's something else I need to make myself work on. Thanks again BP Quote Link to comment Share on other sites More sharing options...
Sweany Posted July 29, 2009 Share Posted July 29, 2009 I don't have a head for numbers either. The hood was made the way it was cause that's the pieces I had. The paint has krazed since the pic but it hasn't got hot enough to melt the rivets I read a lot about side drafts on another forum and 10" dia. seemed to be the average, If I plumb the forge through the shop roof, I'd probably use 10" spiral welded ductwork. Quote Link to comment Share on other sites More sharing options...
billp Posted July 29, 2009 Author Share Posted July 29, 2009 Right now my forge is portable as I have to work outside being that my shop has a wood floor. I am working on a plan to build a smity but have to move a storage building first and then buying the materials a little at a time it will be a while till I'm able to work in it. For now the hood is to; #1 prepare for that time when I can work in my smithy and #2 to help move the smoke away fro me as I work. I also hope by next year, after a couple of classes this year, to do a few local festivals to demo and sell a few small items. This too will help direct the smoke away from the people who may be watching me work. I really want to do this more to help promote blacksmithing and a bit of fun then to make money which would be a plus if I do just not naive about the money prospect. I did find some steel rivets at our local Home Depot so I'll use them instead of the aluminum so all should do well or at least my will be at ease on it staying together. Quote Link to comment Share on other sites More sharing options...
welder19 Posted July 29, 2009 Share Posted July 29, 2009 Just use steel rivets or the easiest route is self drilling screws. welder19 Quote Link to comment Share on other sites More sharing options...
Sweany Posted July 30, 2009 Share Posted July 30, 2009 I use my forge outside too, the short hood does help keep the smoke away from the smith. Quote Link to comment Share on other sites More sharing options...
billp Posted July 30, 2009 Author Share Posted July 30, 2009 I"m using the steel rivets and so far it's doing very well. Thanks for your help Sweany. BP Quote Link to comment Share on other sites More sharing options...
bobinbama Posted July 30, 2009 Share Posted July 30, 2009 BP, I have a forge that resembles yours. I made a super sucker hood to fit just inside the angle iron edge and it works great. On yours you might need to let some of it hang over the back to give it the right dimensions. As far as putting it together goes I went to an AC duct work shop and used their Pittsburg Machine to roll the edges and make all of the connections then I used a 12” round duct connector screwed to the top to attach the chimney pipe. For outside use I would just make a 5’ or 6’ square chimney that tapers a little to make the top smaller than the bottom. Good Luck, bob Quote Link to comment Share on other sites More sharing options...
billp Posted July 31, 2009 Author Share Posted July 31, 2009 Thanks Bob I just finished the hood late yesterday and am now working on making a holder on the forge for it. Your right it is going to hang over the edge but I'm making a bracket, shelf, and or holder, how ever best describes it to hold the hood in place but not be attached. As I want to be able to take it on and off to make moving easier. I'm hoping to give it a test Saturday. The only difference from the drawing is I could only get an 8 inch pipe to go on top so I made the fire opening 6 inches, compared to the 12 pipe and 10 inch opening shown in the drawing. I do hope that will work I can always make the opening bigger but the pipe I'm afraid I'm stuck with. Any way will see Saturday and if it does work I'll post pics. BP Quote Link to comment Share on other sites More sharing options...
billp Posted August 11, 2009 Author Share Posted August 11, 2009 I finely got to test my new super sucker hood and after an adjustment it works fine. At first I made the opening 6 in. square but when tested it just did not feel or look like it was big enough. So I ended up cutting it out to 8 in. square and now it works fine. I have posted pictures of how it works at the 2 different sizes. I can truly say if anyone is looking to make a hood that is simple and easy to move or stay put I would recommend the super sucker. Thanks to all who gave me input in my endeavor in building my hood. BP Quote Link to comment Share on other sites More sharing options...
pkrankow Posted August 11, 2009 Share Posted August 11, 2009 Since the forum was down all weekend I read much of the Hofi series of blueprints (numbered 1000+) there is an interesting blueprint for a side draft hood. What you got looks like it is working as well as the pics in the Hofi blueprint. Phil Quote Link to comment Share on other sites More sharing options...
Sweany Posted August 11, 2009 Share Posted August 11, 2009 BillP that looks good, and a shelf to warm coffe pot too. :) Quote Link to comment Share on other sites More sharing options...
billp Posted August 11, 2009 Author Share Posted August 11, 2009 Hay! what can I say, if only I drank coffee, but no problem keeping a pot going for my guest. After all the first thing I was taught to cook or make at 6 or 7 was a pot of coffee for Dad. BP Quote Link to comment Share on other sites More sharing options...
Sweany Posted August 12, 2009 Share Posted August 12, 2009 Tea then! I find the smokey flavor of Lapsang Souchong goes well with the coal smoke. :) Quote Link to comment Share on other sites More sharing options...
pkrankow Posted August 12, 2009 Share Posted August 12, 2009 Call me gross, but Vernors ginger ale is quite tasty when warmed. Phil Quote Link to comment Share on other sites More sharing options...
billp Posted August 13, 2009 Author Share Posted August 13, 2009 GEE !! ?? I'm sorry but hot chocolate is about it for me in a hot drink. Even though I grew up with a father who drank hot coffee, dripping with sweat, with the temps in the 90's to help cool himself off. Oh and he could also go through a couple of pots a day alone. But I never developed at taste for it and we never if ever drank tea. Only when I was in the hospital as a kid was I given hot tea. I don't know which was worse the pain from the operation or the tea the nurse tried to make me drank. Sorry guys not much into different drinks. BP Quote Link to comment Share on other sites More sharing options...
Recommended Posts
Join the conversation
You can post now and register later. If you have an account, sign in now to post with your account.