
TommyVee
2023 Donor
-
Joined
-
Last visited
-
Dolor scientia corpus ingrediens est.
-
Ringo modeled for me with the bird feeder hanger I made today. The feeder that will hang here has a wifi camera built in to capture the little freeloaders as they feast.

-
Gatework is pretty far off in my future.
-
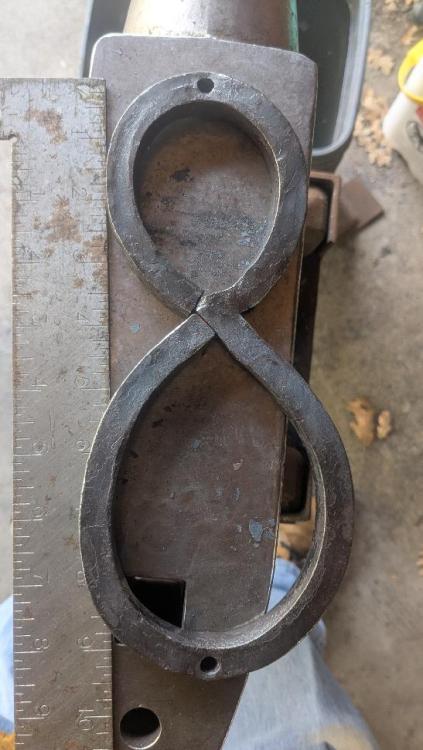
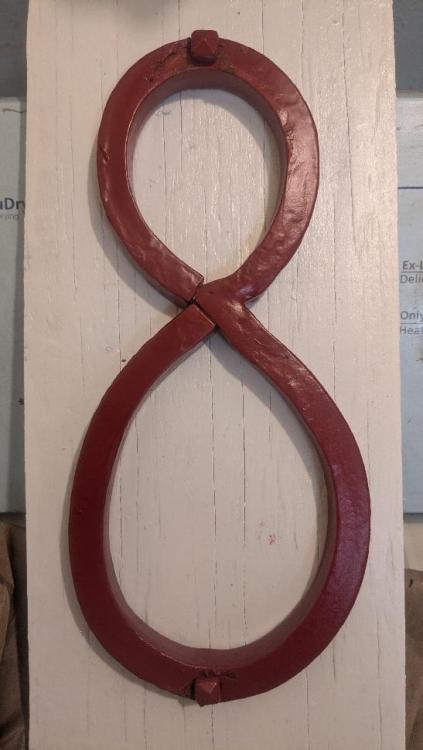
Merry Christmas, all. With FedEx, UPS, and Amazon routinely using drivers unfamiliar with our area, we've been getting a bunch of misdelivered packages. Hoping it's just that the little "8" I have on the gate is just too small to see, I made a bigger one. Painted it red, mounted it on a board painted white, and hung it on the fence today. Maybe they'll see it now.

-
I, too, am inspired by your 2, Gewoon. I've been thinking I need to make a larger "8" for my house, because any time UPS, FedEx, or Amazon send out a new driver they seem not to be able to see the hardware-store 8 on the fence, even though it's painted bright red.
-
When I bought my leg vise that was missing a spring, the instructor who taught my first class on smithing sent me this article about making a replacement spring. I've been using the spring I made this way for about 3 years now and it has stood up just fine. https://www.anvilmag.com/smith/107f2.htm The article says to use some sort of spring steel but specifically says not to harden or temper it. But I was advised that it was perfectly reasonable to use mild steel (just as Thomas Powers advised) and I did.
-
Hmmm. I hadn't seen that he had mentioned that they're already taking preorders. Sorry if it's redundant.
-
FWIW, John Switzer (Black Bear Forge) just released a video about using 1008 steel, and mentioned that Historic Blacksmith Conservancy is working to get a mill run of 1006 steel, and has a web site for pre-orders to get in on that mill run. I don't think I'm permitted to post a link to their pre-order form, but it's easy to find on their web site. It's not going to be inexpensive, but for those who really want to work with such a low-carbon steel it might be a good way to get hold of some.
-
Yeah, there's not much mystery to the rough similarity to JLP's fork. I watched her video before starting it. I also watched Dennis Frechette's video on making a simple fork, and this one's sort of an interpolation between the two.
-
I haven't been doing a ton of forging lately as the weather has been too hot and I've not been dealing well with that. But the state fair is coming up (it starts tomorrow) and I'm a little light on things to sell at NMABA's demo trailer. So I went out to the carport and forged a fork. I've never tried this style before and it took a lot of fiddling, but I think it came out reasonably well and will probably make a good addition to the sale table.

-
I have made left-handed flippers. My sister is a southpaw and I gave her and my brother-in-law a matching set of left and right flippers to use on their barbecue. I guess my flippers won't be useful for campfire cooking, as they are well under 24" long. But they sell like hotcakes at the fair and when not being made from absurdly fat stock, are good, quick demo items.
-
Tried to use the break in the weather (finally cool and rainy instead of hot and sunny) to knock out a few sale items for the state fair that starts next week. Went through my scrap pile and found a length of what I assumed (duh) was 3/8" square that was just long enough to make two steak flippers, which are (to my surprise) one of the hottest selling items at the fair. Forged the handles and felt it was harder than usual to get them made, and when time came to forge down the tips and it took many more hammer blows than I remember ever having to use on a steak flipper, I realized I'd grabbed a scrap of 1/2" square instead of 3/8". Spent a *lot* more effort drawing those down than I had intended, but at least I have a couple more sale items for the fair. They are "beefy" steak flippers, which is appropriate enough, I guess.

-
My wife finally grouted the tile table top for the little 2x2 tile table I made in the shop over the last <mumble> sessions, and I finally got the 3x3 table assembled and treated with paste wax today. The table top still needs grouting, but that's not my department.


-
My go-to response to comments that I look like I'm deep in thought, "what were you thinking about?" is "Just thinkin' I should take some of these fries home for later..."
-
What sort of dies do you use for tenoning? I have had this problem a *LOT* at first, and in my case I was using a butcher tool to isolate the mass for the tenon, but going too deep (i.e. too close to the final dimension) before moving to a drawing die, and also not having sufficient radius on the butcher. This led to serious cold shut problems where the too-narrow and too-sharp starting point at the root wound up having material from the isolated mass driven down into it by the drawing die, and invariably led to cracks at the root. Mark Aspery pointed out exactly the problem I was having in one of his videos. Cleaning up my butcher to have a more dramatic radius, starting with a less-aggressive isolation of mass, and being ultra-attentive to how the drawing die was bringing the isolated mass down to the right size bit by bit really helped. I still do see cold shuts on the verge of forming and have gotten really aggressive about filing them out as soon as I see them. My table project has benefited, as none of the tenons in that project got cracks at the root. Took me a while to find it, but here it is: Doesn't mean what I did wrong is the same as what you've got going on, but perhaps it is.


