Yanni Rockitz
Members
-
Joined
-
Last visited
-
Kool konversation. ;-) Jboothe -- I have an almost identical Trenton anvil -- almost. Mine is 159 lbs, also has a flat bottom (no oval depression, which would indicate USA manufacture) and mine also has the square handling holes at the waist (under the horn and opposite) and in the bottom. Mine has no serial number on the foot, which is different -- your does have one. One of IFI's intrepid members was kind enough to look mine up in Anvils In America and confirmed that the flat bottom and lack of serial number indicate it was one of the earliest Trentons, which were actually made in England and imported to the US, between 1878-1898, which is what M3F has basically explained above, though I think he may be more on target at the later end of that date range, as yours having a serial number on it, combined with no depression on the bottom suggests it may have been among the earliest serialized anvils Trenton made, prior (or just after?) bringing production to the States. I don't know exactly when the serial numbers started... If that was in England, you have a late 1800's English-wrought Trenton. If it was in the US, you'd need to find out exactly when they started putting the depressions into the bottoms. Yours must be somewhere in that intersection in time. 1898 is a solid guesstimate. Here's what I was told about mine, back in 2021: "TWISTEDWILLOW: AinA pg 357 talks about Trenton imports and if I’m understanding it correctly your anvil is a Peter Wright design. The age is 1878-1898 after that everything changed. That same page talks about German imports also, but the German ones do not have the handling hole under the horn. That’s why I think yours is the Peter Wright design. Carl & Sy Wright (distant cousins of Peter Wright) started the company that made Trenton anvils. If you look at the cover of Anvils in America, by Postman, that is a painting of Carl & Sy making an anvil (I forget the name of the 3rd person.)" Love the history. Nice find!
-
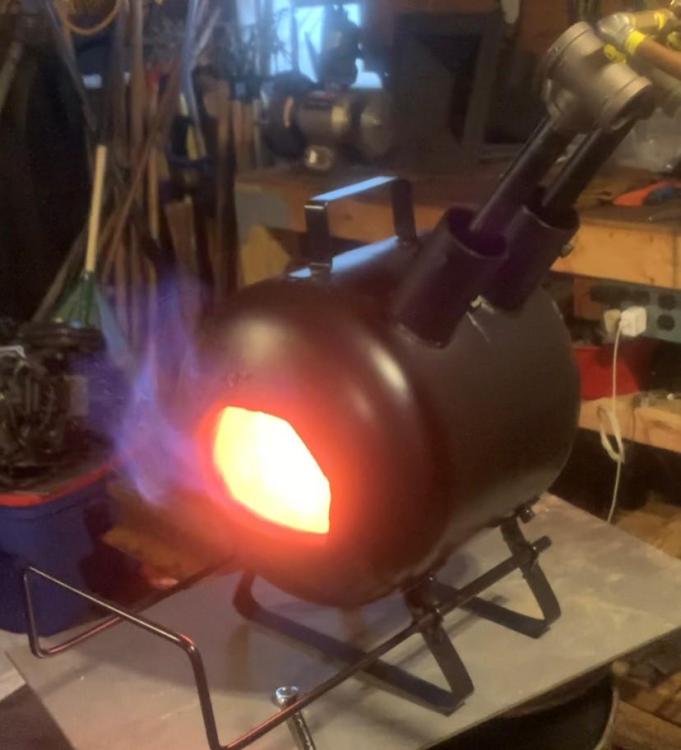
That's a good setup. Yeah, I built a gas forge too -- gotta have one. It sits on top of the coal forge when that's not in use, so the fire's in the same spot. I'm super fire-paranoid, being next to woods, so I have loads of fire suppression gear and only run solid fuels that send hot stuff up chimneys when it's either rainy/wet out or snowy/wet/frozen -- which is half the year, here. I also don't want to smoke out the neighbors when they're outside in the summer, even though they're a good acre away, so the gas forge gets used in fair weather, the coal forge in foul. It's clutch to have both!
-
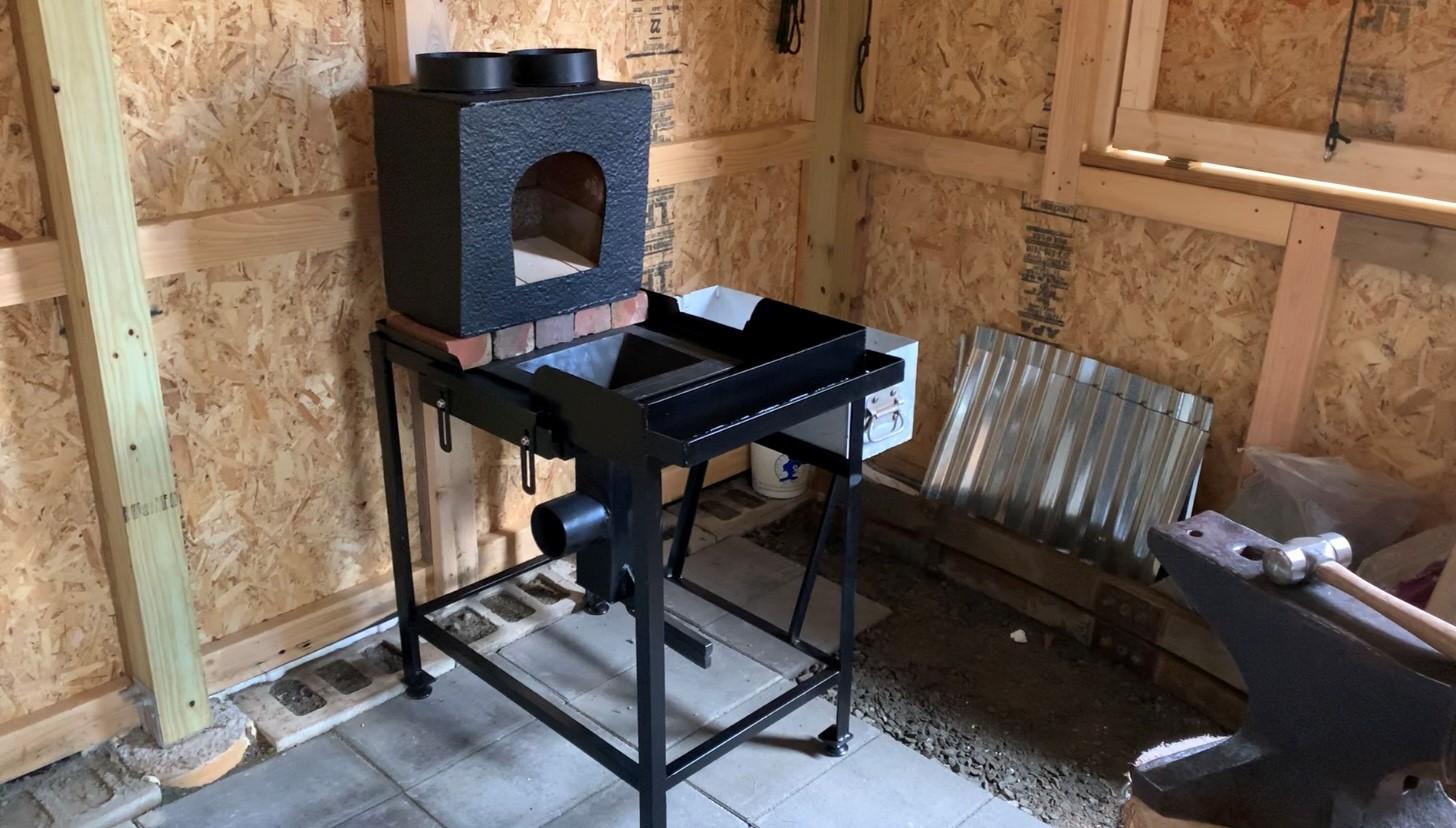
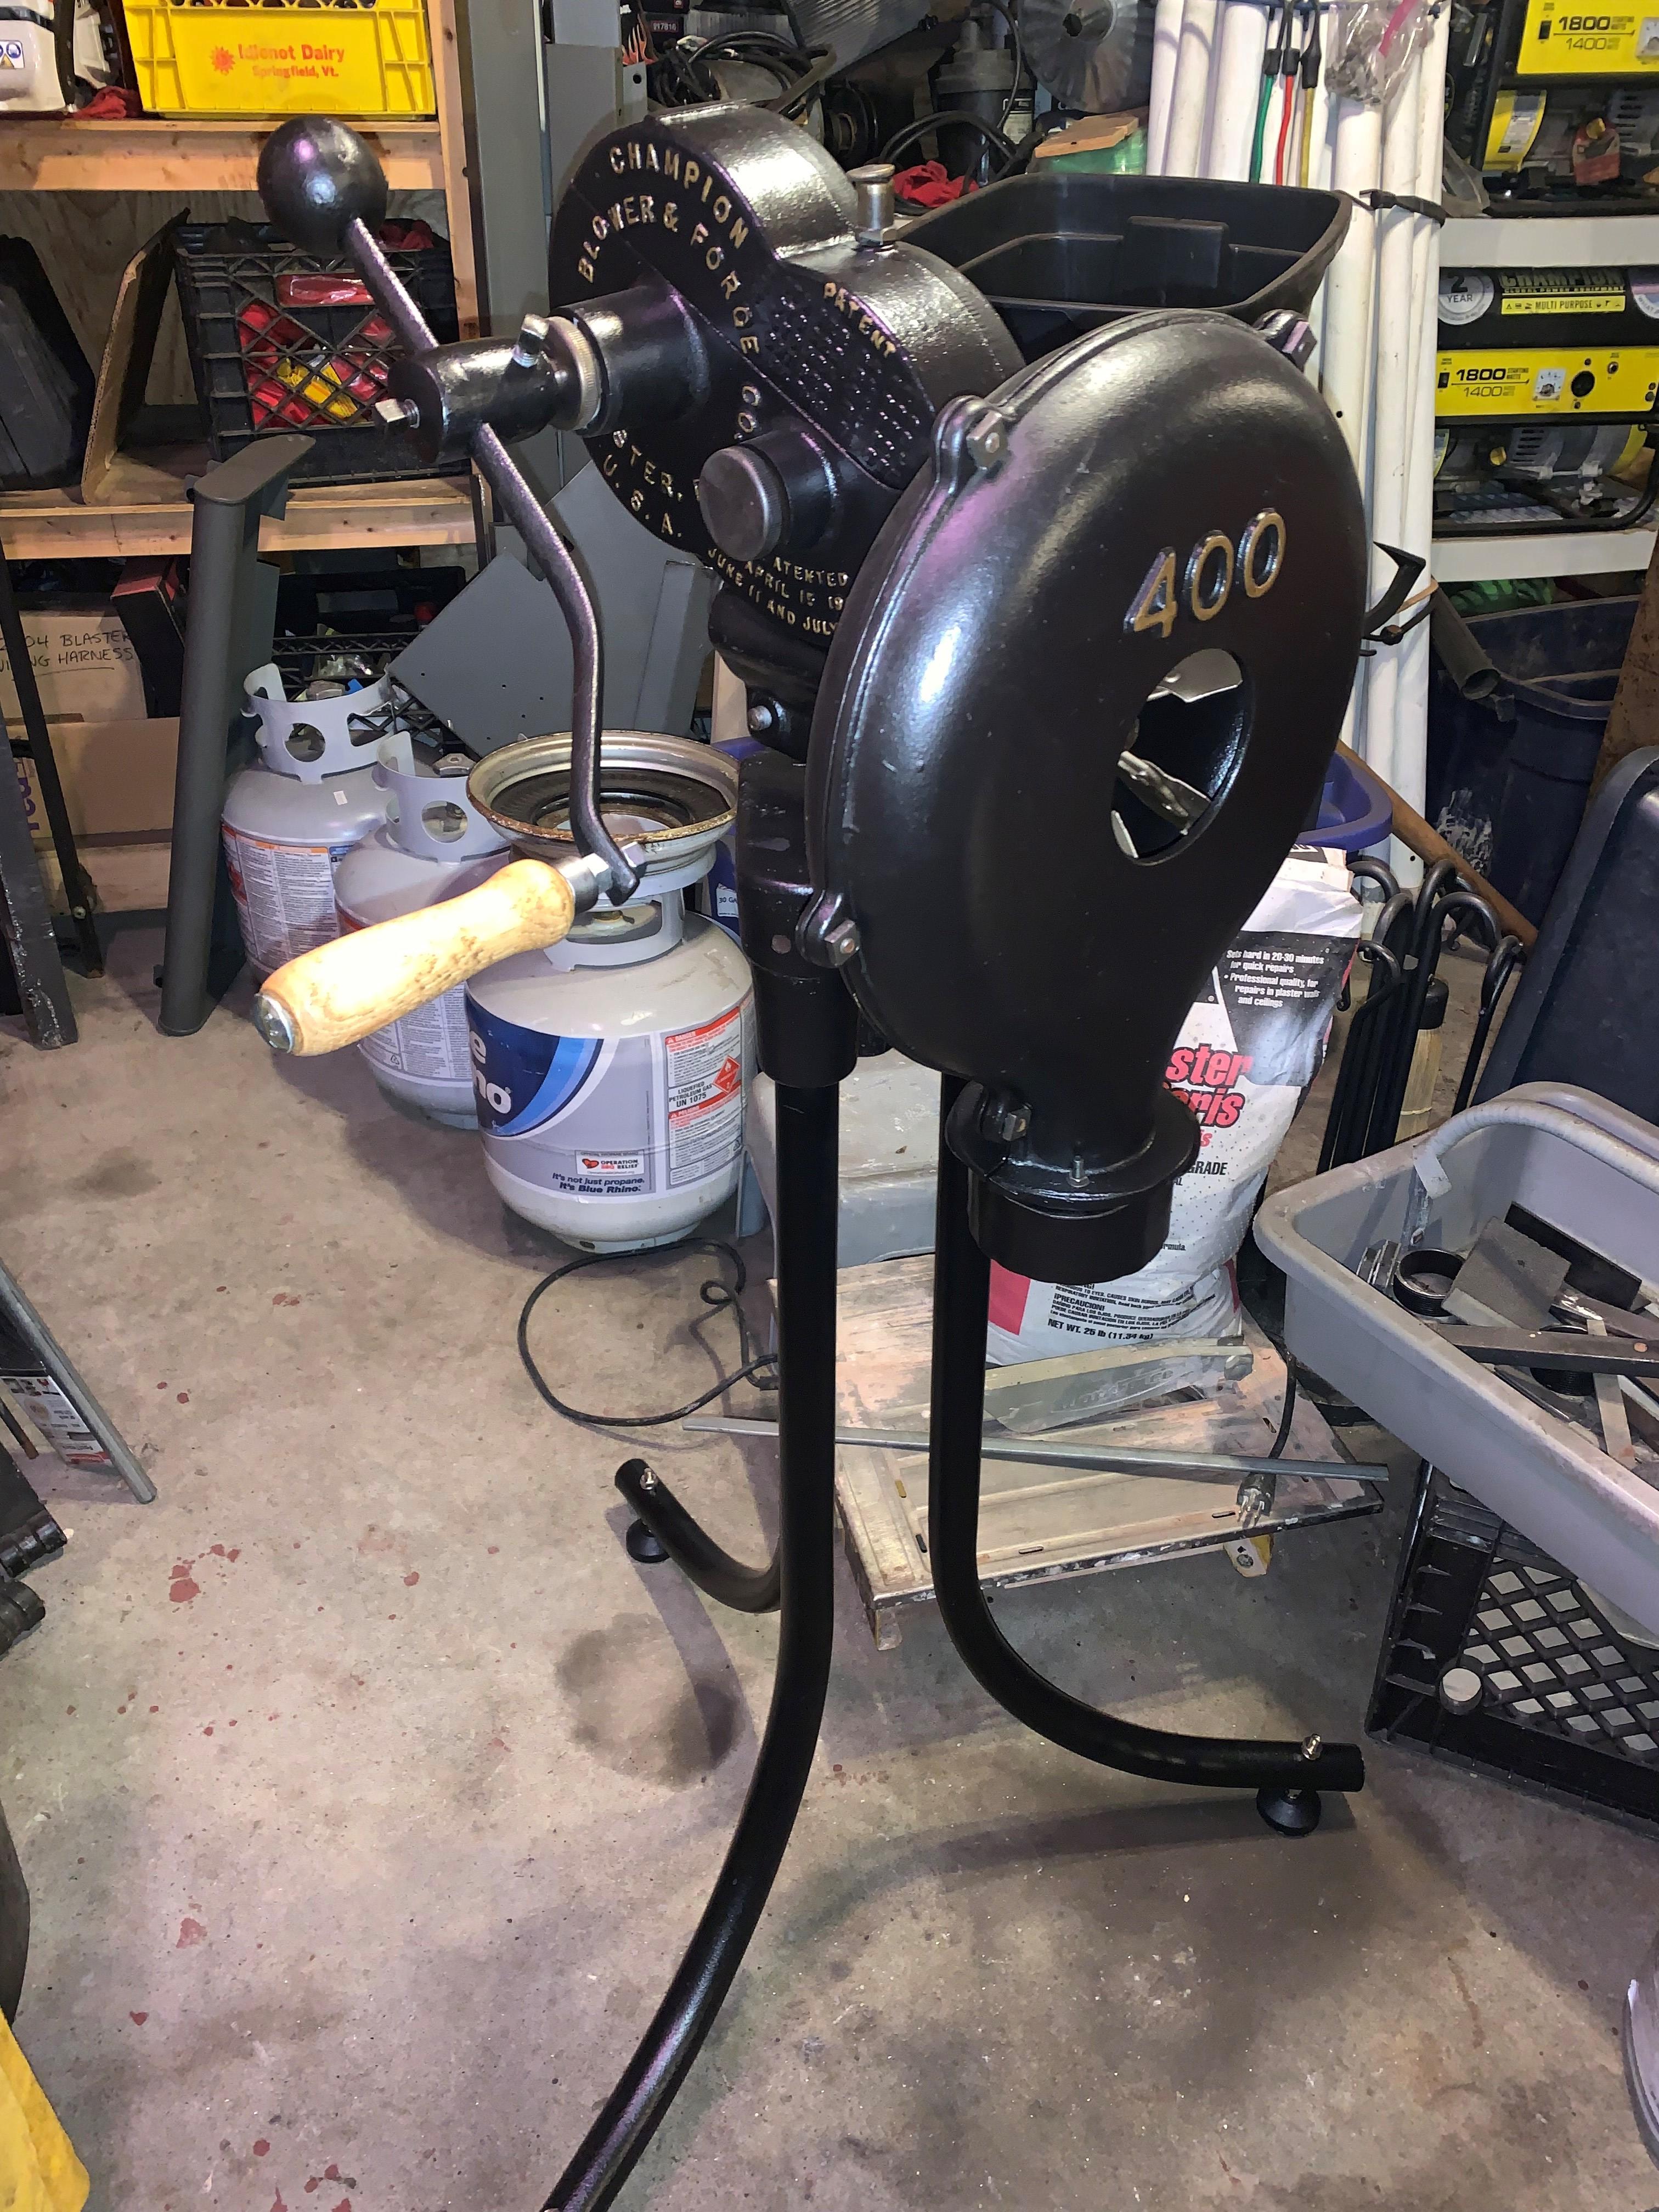
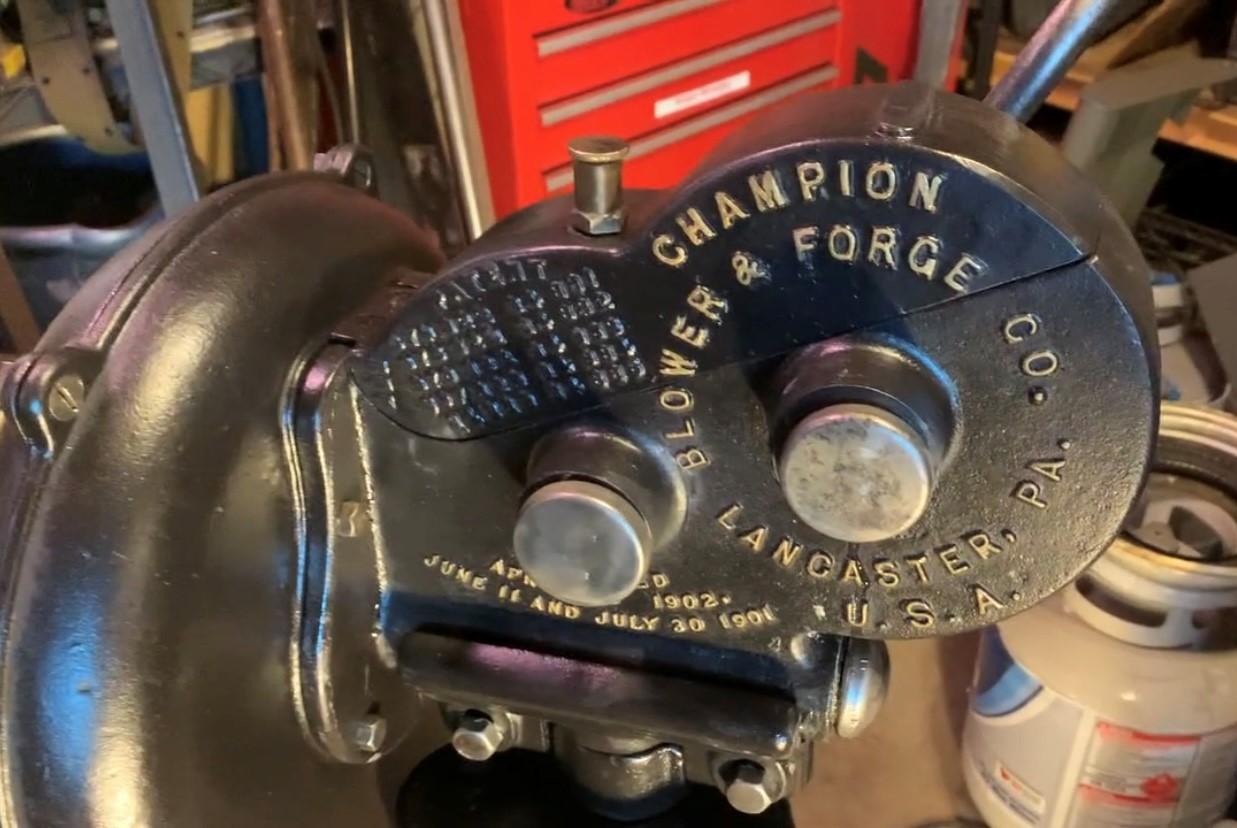
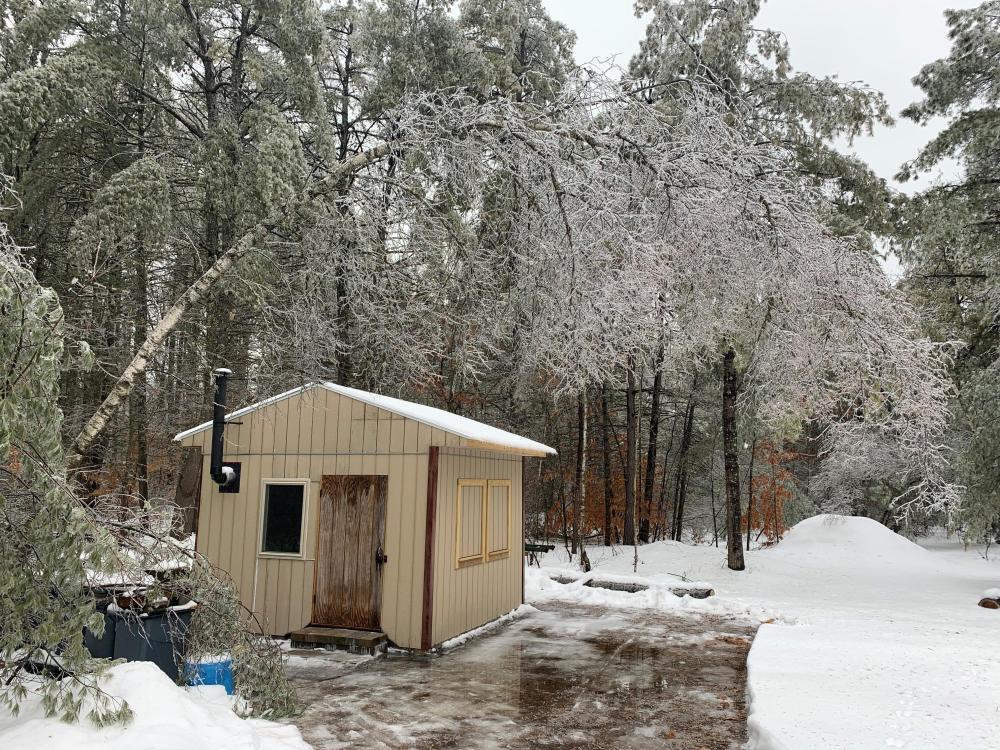
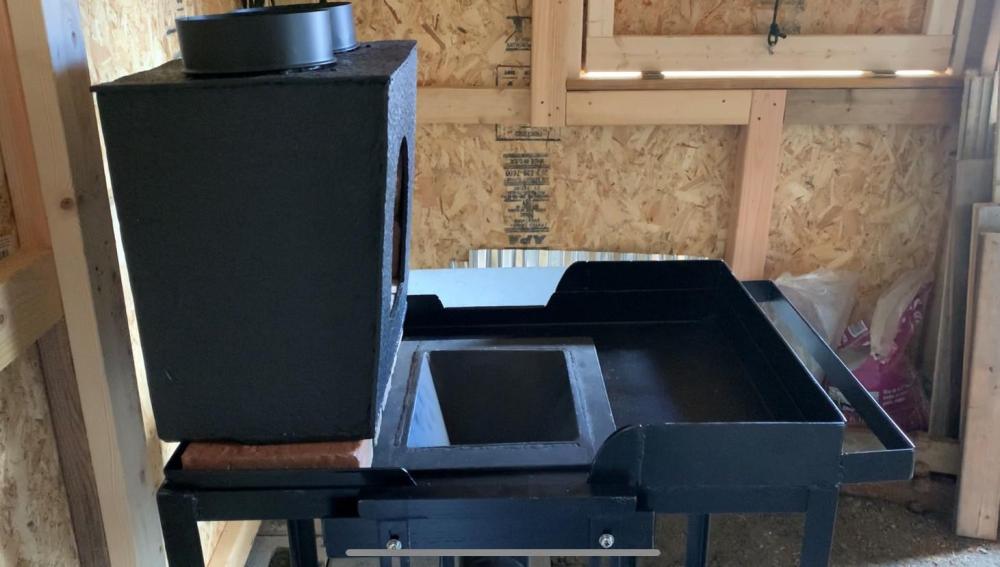
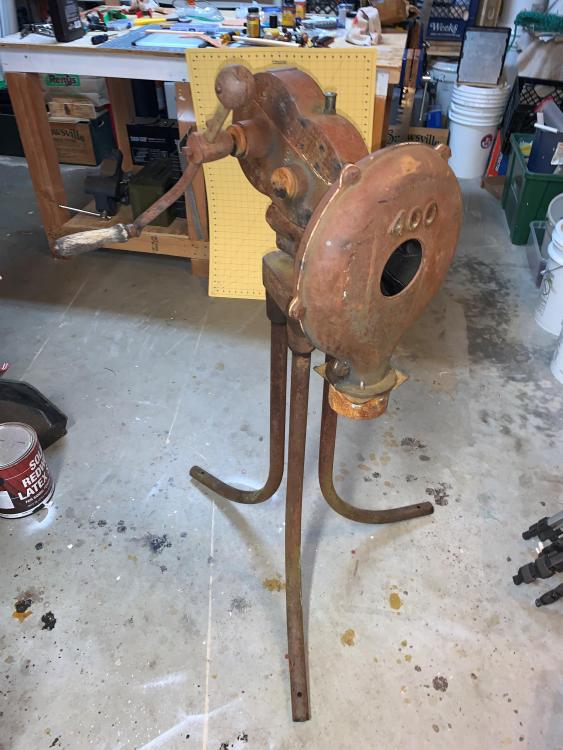
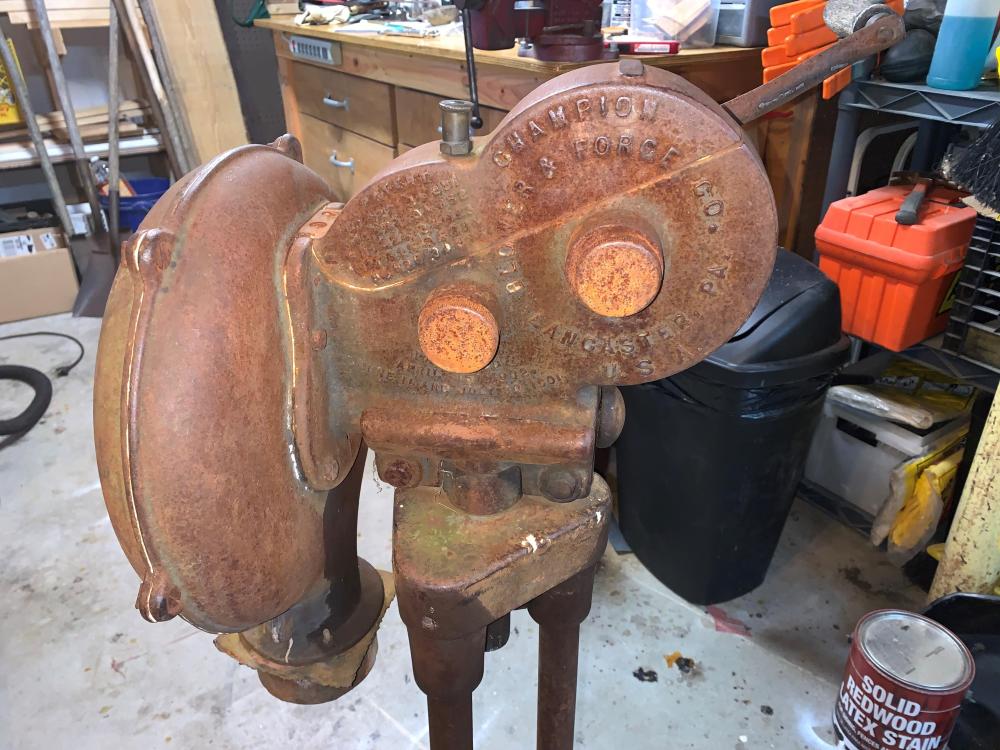
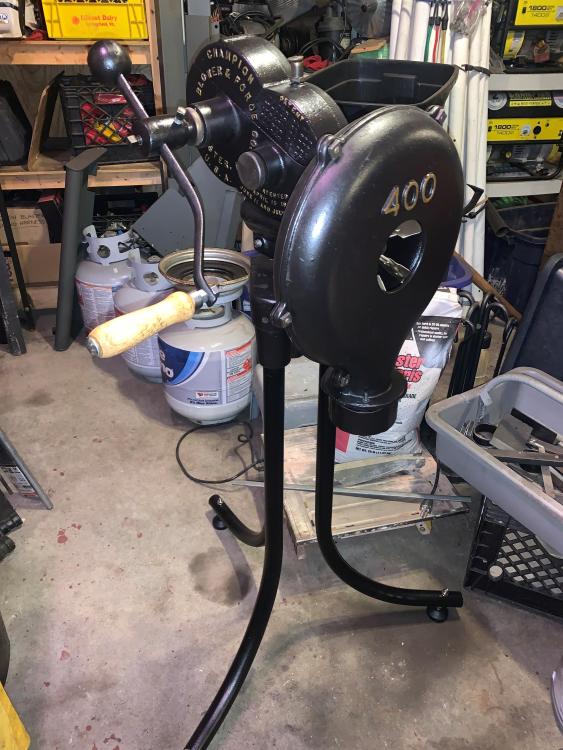
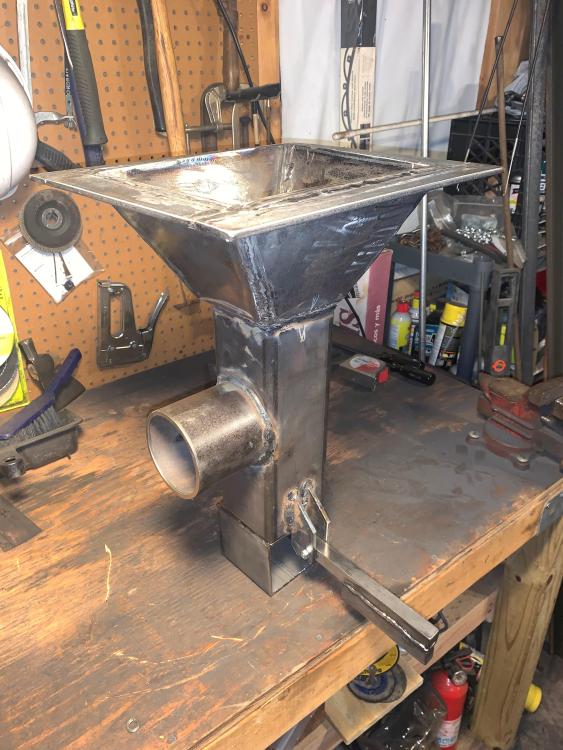
Lol -- The steel trap mind -- rusted shut. I'm stealing that one. Thank you all for the encouragement -- I love this stuff. Yeah, Jen -- it's definitely just the photo -- the whole smithy is just a little 12'x12' hobbit-sized pole barn (glorified shed.) See pic below... (That flu pipe is from the little potbelly stove I have in there for the winter. There are two more sticking up higher off the opposite side now, from the forge.) I had to back up almost to the door to get that photo where you can see the anvil, blower and forge in one shot. I've been slowly building this dream for years... collecting the tools, learning, taking my time, enjoying it. It's finally coming together -- big year. "The fires of Gondor are LIT!" That's my first attempt at a (built from scratch) coal forge, behind the anvil. More pics below... When I'm standing at the forge and pull hot steel out of the fire, it's one step to the right and I'm squared up at the anvil. One step to the right of that (out of frame to the left, in the photo) is the post vise, which is mounted to the corner of the workbench, just proud of the surface, so I have a full 360 swing for twists. It's almost a perfect "blacksmith's triangle"... If I ever build another shop, it'll be WAY bigger and the forge/anvil/vise area will be its own space, more fully ideal. That's a side-draft hood, angled over the firepot. I welded that up out of an old rusty 4'x4' piece of 1/4" plate my brother had. I wanted the flu pipe to be a single 10"-12" pipe, straight up out the roof, but couldn't find any and I stupidly made the roof out of that wobbly galvanized metal roofing, which doesn't work with the typical rigid sheet metal flanges ("collars?") where the chimbly penetrates. I figured I'd be clever and got one of those orange "high heat" silicone collars with the malleable aluminum edging where it meets the roof, so I could squish it around the wobbles in the roofing to match the contours -- and that would've worked -- but then I saw a post about how they catch fire if the chimney gets too hot -- and photos of one in flames, with dire warnings -- yikes. The orange silicone boot is rated for (500F?) -- I forget -- more than you'd usually see on an 'ambient' side-draft setup, 7' above it -- but I couldn't convince myself that it would never reach those temps and the one thing I'm dead set on is ZERO (preventable) fire risk -- so I scrapped that plan. Try to find double-wall stainless flu pipe that's 12" around -- RIDICULOUS money... I already had a bunch of 6" black woodstove pipe and you can accomplish 12" of overall volume by using two 6" pipes, so I rigged it up with dual exhaust. Not 100% ideal, as it loses some draw going up a few feet, then elbowing out a stainless plate in the wall (via proper double-wall pipe sections) and back vertical again the last six feet or so, outside, but I used curved elbows to reduce drag and tall stacks outside and it draws surprisingly well. The key is to keep the total volume of the stack(s) greater than the opening at the firepot -- as I'm sure you all know -- combined with stack height. * Side-draft suction accomplished. * The only pics I have of the forge at the moment are from in-progress building in the garage and installation day before I added the chimney pipes, but these should give you better views of that forge. I welded up the firepot out of 1/2" plate -- 10"x12"x5"deep -- also a 100% 'from scratch' creation. It just sets down into the table and can be removed easily -- weighs a ton. I already wish I made the table bigger, but it's such a small space, I thought I had to downsize everything. It works fine -- I just have to add coal more frequently. I'll be making a bigger table, eventually. The floor was originally all just ~6" of crushed stone on top of endless sand (we sit on 200' of sand, here) but as you can see from the outside photo, there's a long, cold soggy season in late winter when snowmelt soaks the sandy ground and it's really slow to drain because everything's frozen a few feet down. I don't get water in the shop, but the stone floor got all saturated during that 1-2 months and created a bit of a moist atmosphere in there. I don't want things rusting, so I started putting down concrete pavers and it helped tremendously. I have more installed now than the pics show -- buttoned it right up -- dry as toast. All summer and fall, the ground drains beautifully and the paver floor keeps things dry in winter/spring. The exterior is getting a paint job this summer (dark brown) and some home-forged medieval hardware on the door. The blower is a Champion 400 I got from a nice old gentleman blacksmith from MA I 'met' in here. He had an injury and couldn't smith anymore and saw I was looking for a blower, so he messaged me. It had all its parts and turned nicely -- rusty, but functional. I did a full restoration on it over this past winter and now she's a thing of beauty. Stripped down to bare metal, cleaned out, acetone wipe-down, new paint, re-lubed, made a new handle from hickory and 'gilded' the lettering with a gold Sharpie paint pen for some pop. The fan is painted gold too -- hard to see in the pics. Check out the before-and-after shots... I'm FINALLY up and running -- now just making hammer and tong racks, setting up the bench and finishing touches. Time to make the hammers RING!


-
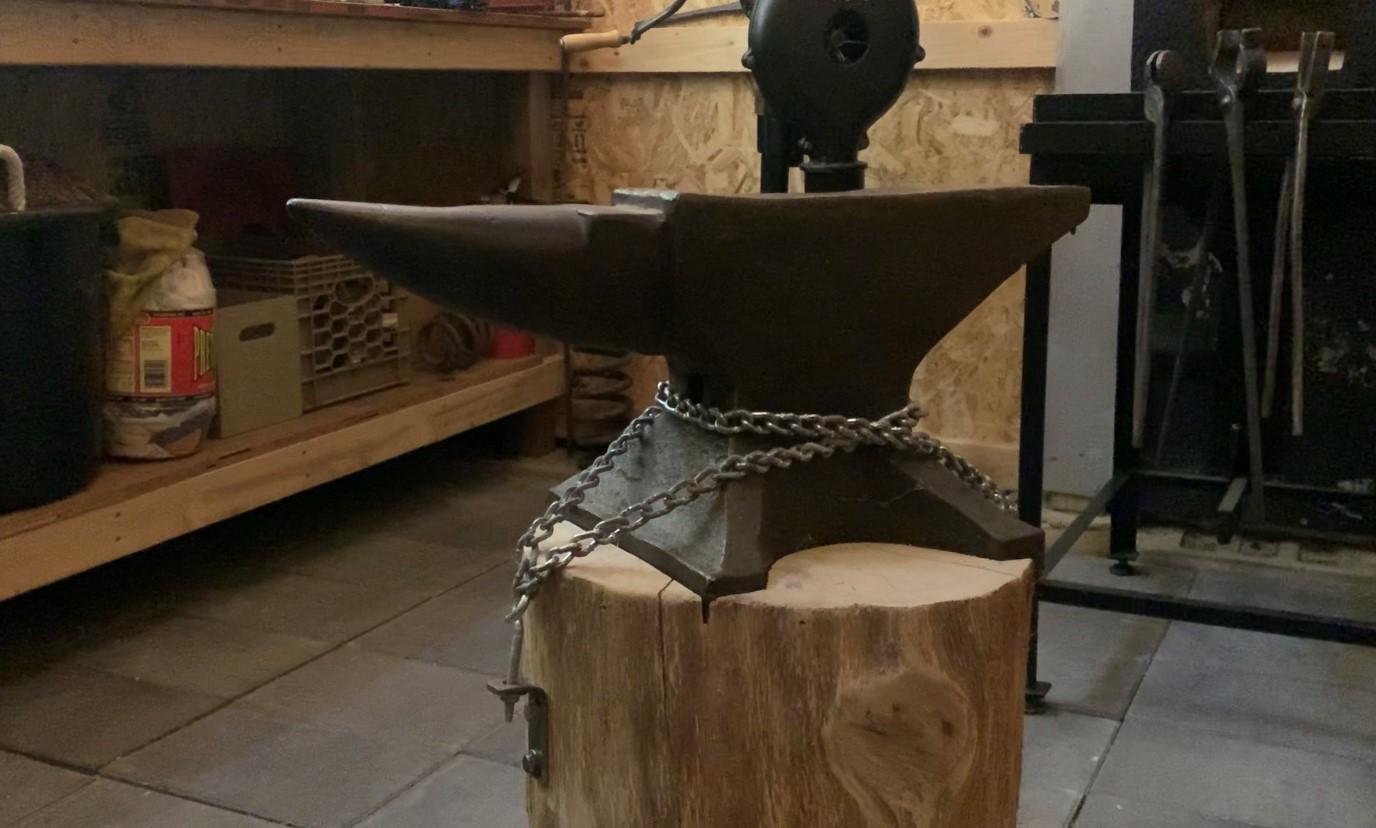
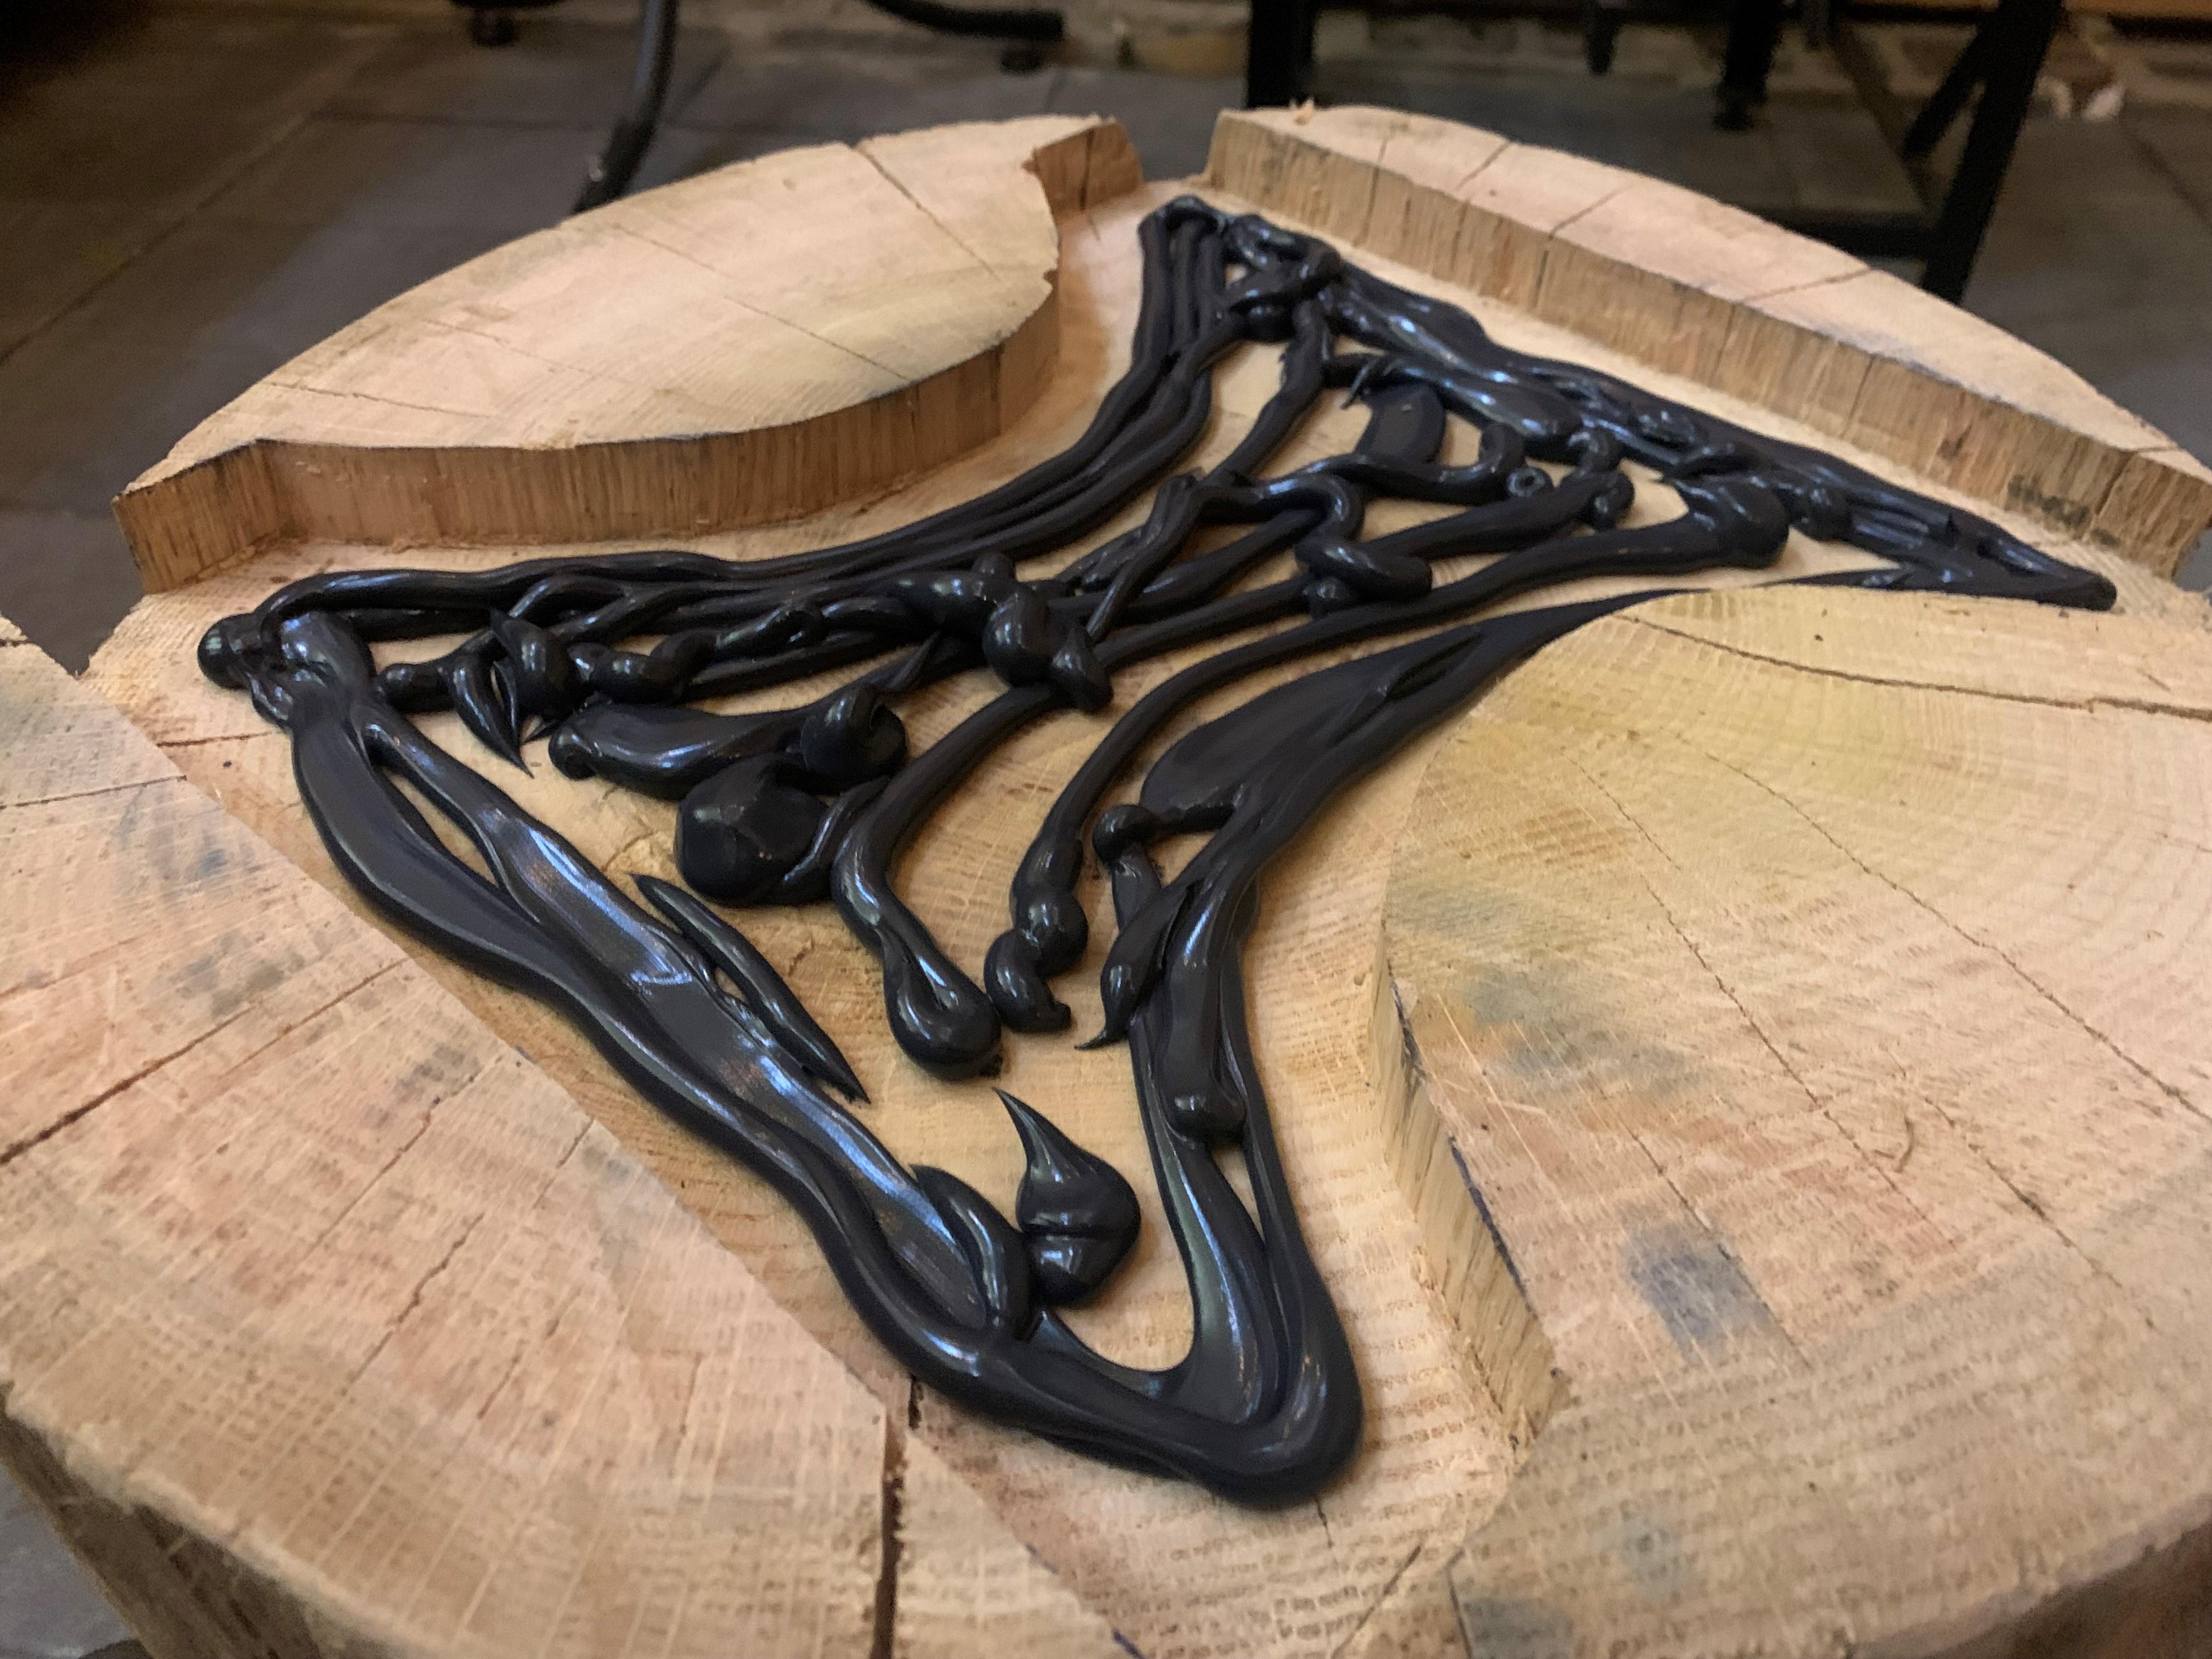
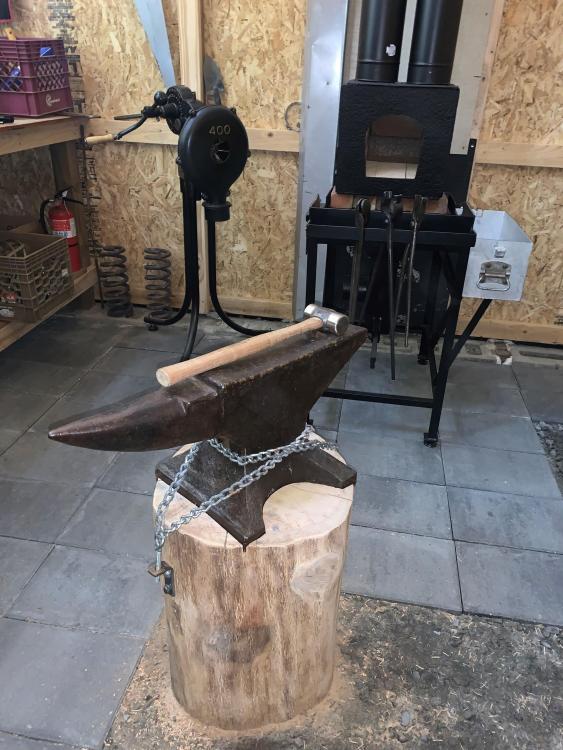
Well, then fellows (and "fellowettes" - shout out to JLP!) -- it appears this long, philosophical exploration of anvil stands and the ever-changing protocols around shop tidiness has lain dormant almost two years and needs a shot in the arm. My shops are all all a roughly organized mess and it works nicely. The 'new' smithy is receiving numerous organizational efforts up front so it hopefully skips over the first few years of evolution to begin at a semi-organized state straight away. There will be many improvements over time, of course... Thus, I present my first contribution to the "anvil stand" gallery -- a work in progress, but I couldn't wait. I built my little smithy (intentionally) on a crushed stone/gravel floor, which happens to have ~200' of rough glacial sand beneath it -- a geological quirk of Southern Maine, inherited when the Greater Wisconsin Ice Sheet melted away at the end of the last ice age. The new anvil base is a solid oak tree trunk about 20" in diameter and ~4' long, from a tree job I did a couple years back. She weighs ~200-250lbs, if I had to guess -- a true gasket-blower to move around on one's own. I dug down a foot further than necessary, compressed the sand on the bottom of the hole with a tamper, then backfilled with successively compressed layers of crushed granite, which compacts down like cement. I then set the oak trunk in there, leveled 'er and backfilled around with more crushed stone/sand/gravel, compressing as I went, making sure I had an extra couple of inches protruding above the top level I wanted to end up at. I cut the top flat with the Stihl and refined the level with a hand plane until the anvil sat level 3/4" higher than 'knuckles height'. I then determined a good alignment for the anvil in relation to the forge and post vise; traced out the foot on the oak; routed out a 3/4" recess for the old girl to set in, getting all nitpicky around the edges with hammer and chisel until the test fit was just right... A healthy application of black sillycone and I set the Trenton in place -- always a satisfying moment. A couple of steel L-brackets bolted to the sides, horn and heel, with chain loops chained to those and wrenched down via eye-bolts and she's SUPER solid, utterly immobile and quiet. It's a quick(ish) method that's rock solid. A light sanding all around and we now have the anvil stand in the photos below. I'm going to do a straight cut down across the the far striker side, to which I'll mount a steel hardy tool holder and a 1"x4" pipe 'receiver' for a swiveling steel brush/tool tray. I'm also going to upgrade to a pair of really nice forged steel hold-downs across the toes, bolted through the base to replace the chains for the clean look and I'm going to add a 4"x1/4" forged steel ring with half its width sticking up around the top to create the tray effect -- because why not. Finally, I'll torch-feather the wood to bring out the grain and treat it with some oil (any recommendations? Boiled Linseed oil?) This oaken base adds loads of mass and will last a very long time, out of the weather. I'll upload "finished" photos when she's all done -- stay tuned... :-)


-
Yesss -- that's it. Mine has the same circular "Solid wrought" stamp, and the same Peter Wright feet and solid base. UK, baby! When you talk to your anvil, you must use a British accent. "Jolly-good, old chap!" ;-)

-
Based on what I was told, a solid base and no serial number means it's one of the early Trentons made in England, back around the turn of the 19th/20th century. Trenton apparently had them made under contract by English manufacturers for a time, back then. The American-made Trentons got serial numbers and all have a cavity in the base. No idea what the "7" on each foot's back toe means. You need someone with a copy of Anvils In America to chime in... (Cool anvil!) I'm guessing those are not original, but might have been added by a previous owner. Maybe it was station #7 is a large shop... You should call it "Lucky Sevens" ;-)
-
Gurus out there -- if I have this wrong, feel free to chime in... There is a simple test procedure for figuring out mystery steels' quenching/hardening types: Quench it in air (let it air cool), then test with a file, if the file skates across the steel without cutting into it, it's hard -- i.e., an air-quench steel. If not, move to water. Quench in water, test with a file -- if it skates, it's a water-quench steel. If not, move to oil. Quench in oil, test with a file -- if it skates, it's an oil-quencher. If none of the above work, you probably have mild steel that won't harden. Use it for mild steel applications. The test procedure above is a quick way to roughly identify mystery steel's hardenability and quenchant 'preference.' Beyond those too-simple steps, it gets into the weeds with exactly which quenchant you'll need for the specific steel (and thickness / cross section) you're quenching -- keep experimenting, or just get the correct data for known steels.
-
That would bug me. You can add 4x4's to it, of course, but I'd want it one solid piece the right height. As a long-time tree worker, my first thought is that you should just contact a local tree company (or two) and ask if they could set aside a good straight-grained oak trunk piece for you sometime (or hickory, or maple or any other large diameter hardwood in your area.) Be friendly, offer to pay, tell the guy what dimensions you're looking for -- offer to go pick it up -- Arborists come into large logs all the time. Anyone who's at all friendly would have a hard time saying no to a guy with that kind of an approach. My brother and I used to give away nice hunks of wood to all kinds of people for various reasons. Burls to wood turners to make bowls from, etc. Life is short -- get the right piece! ;-)
-
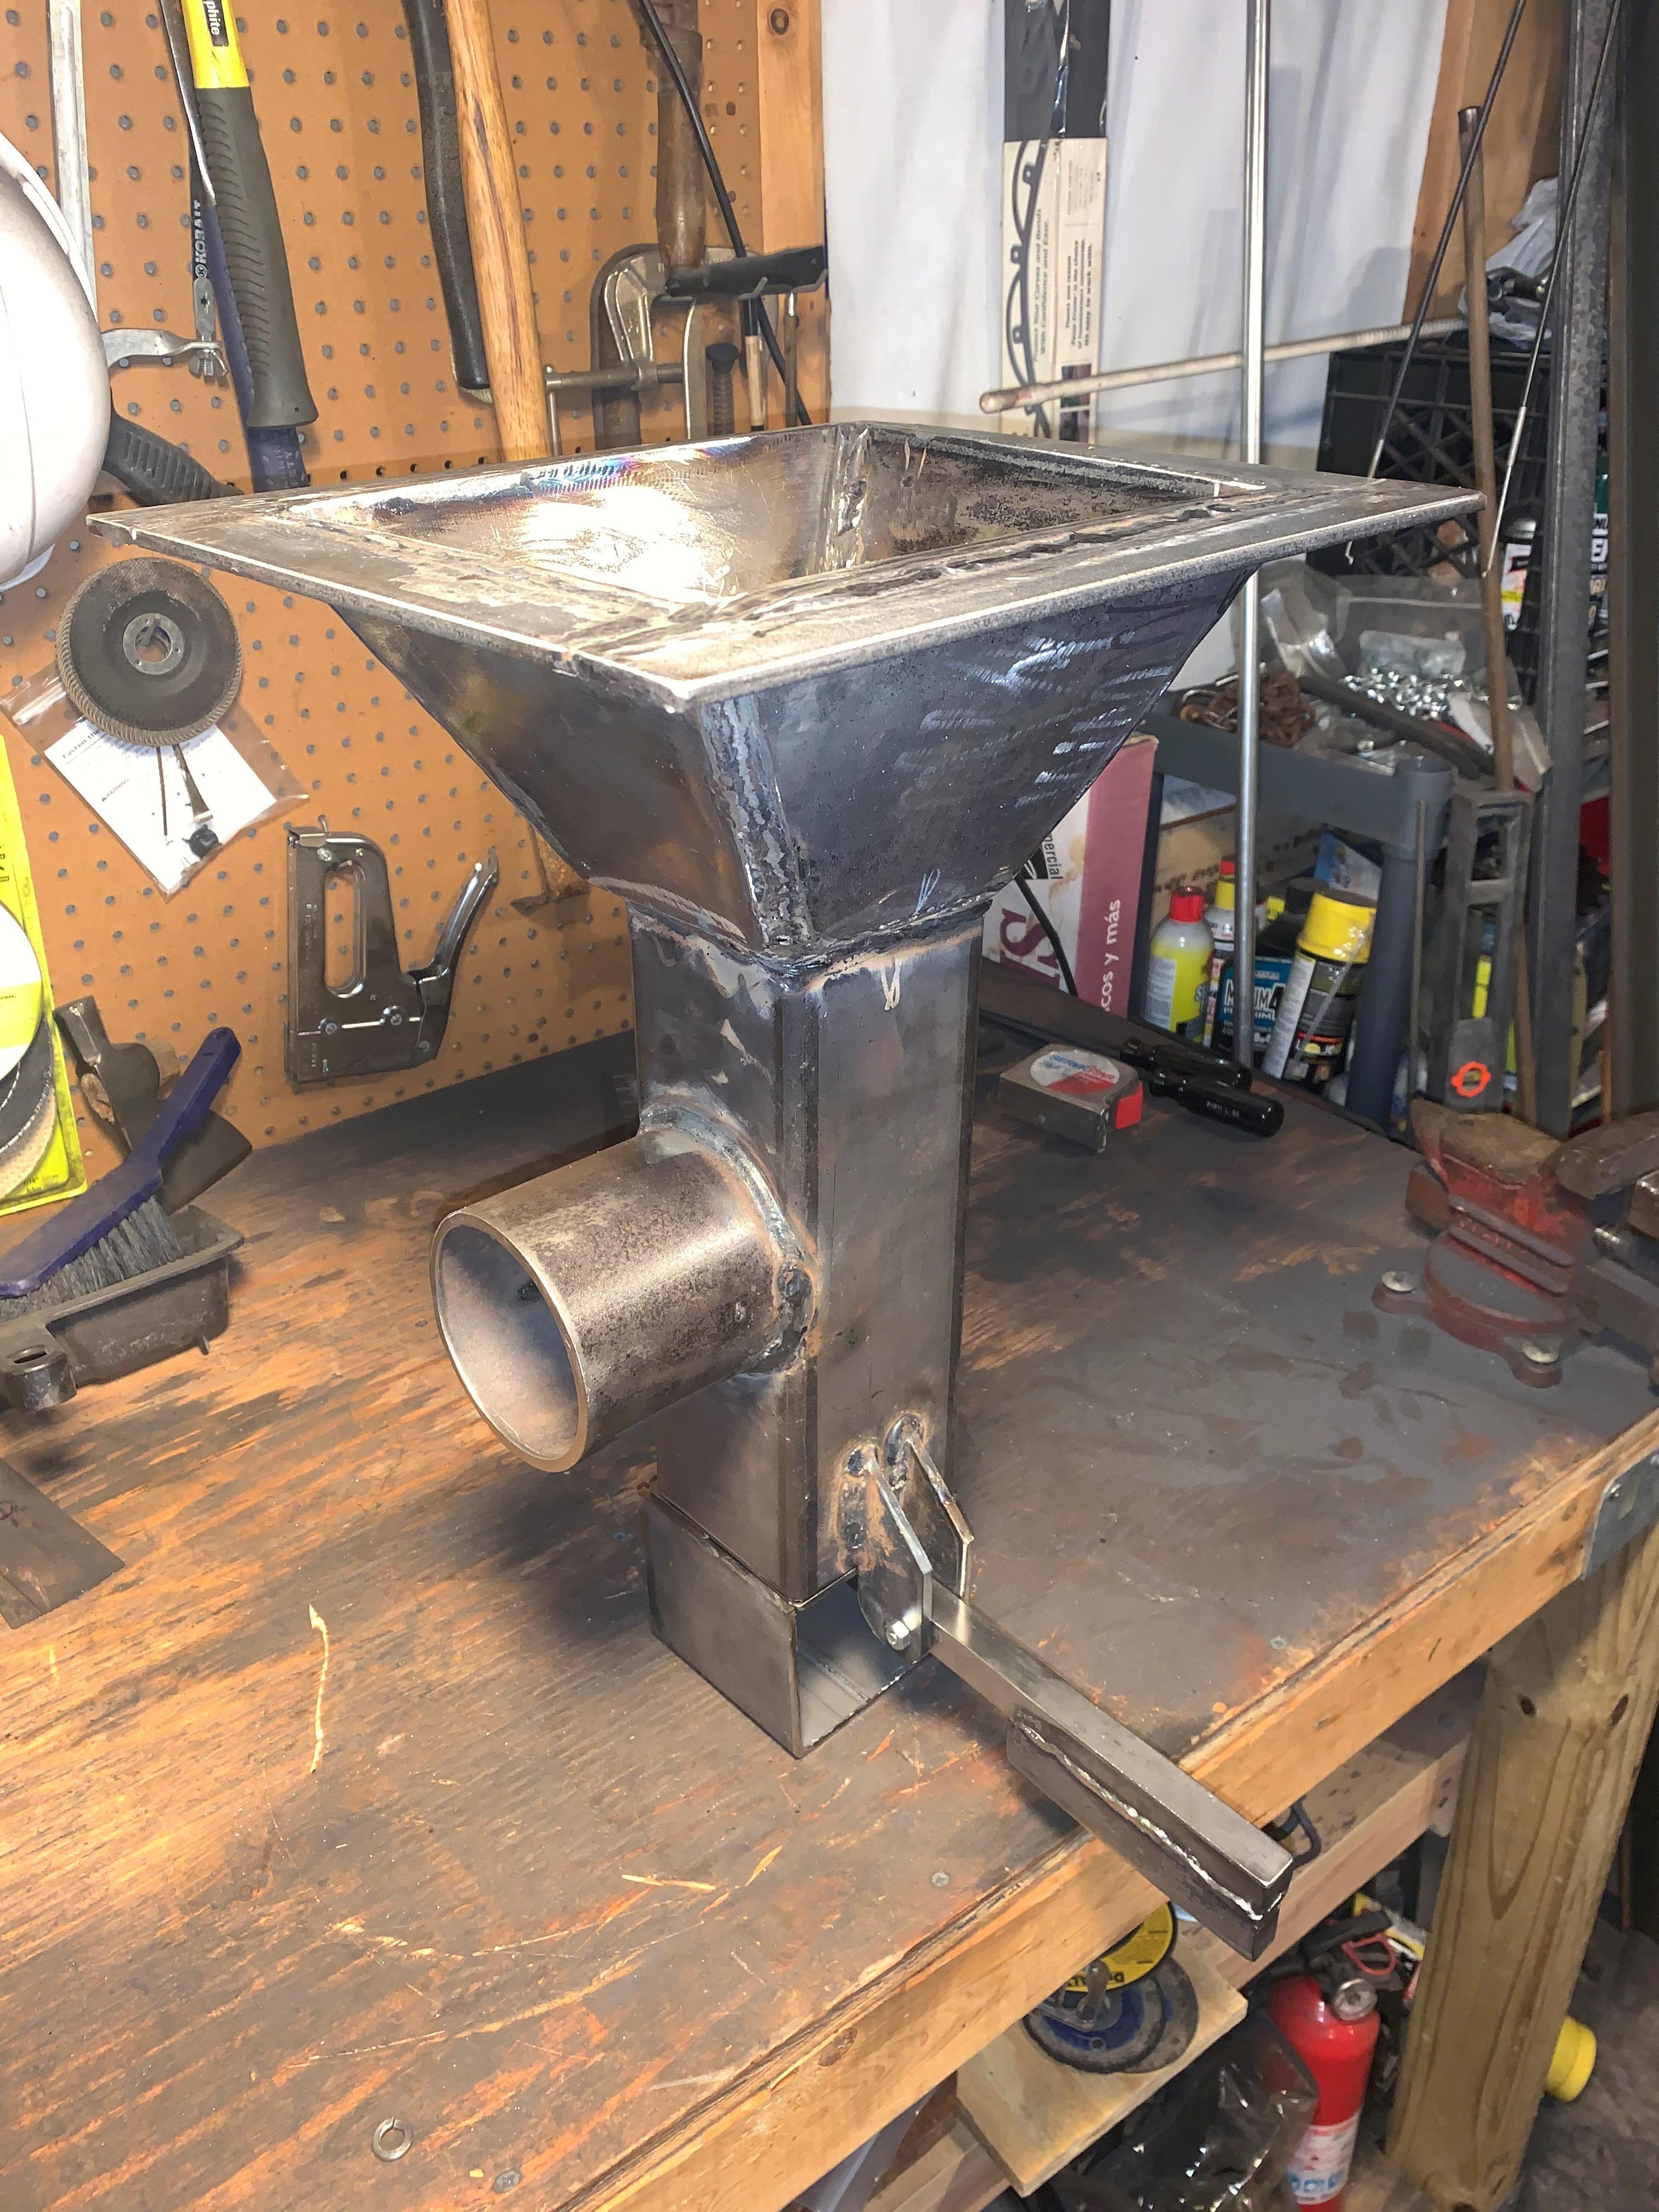
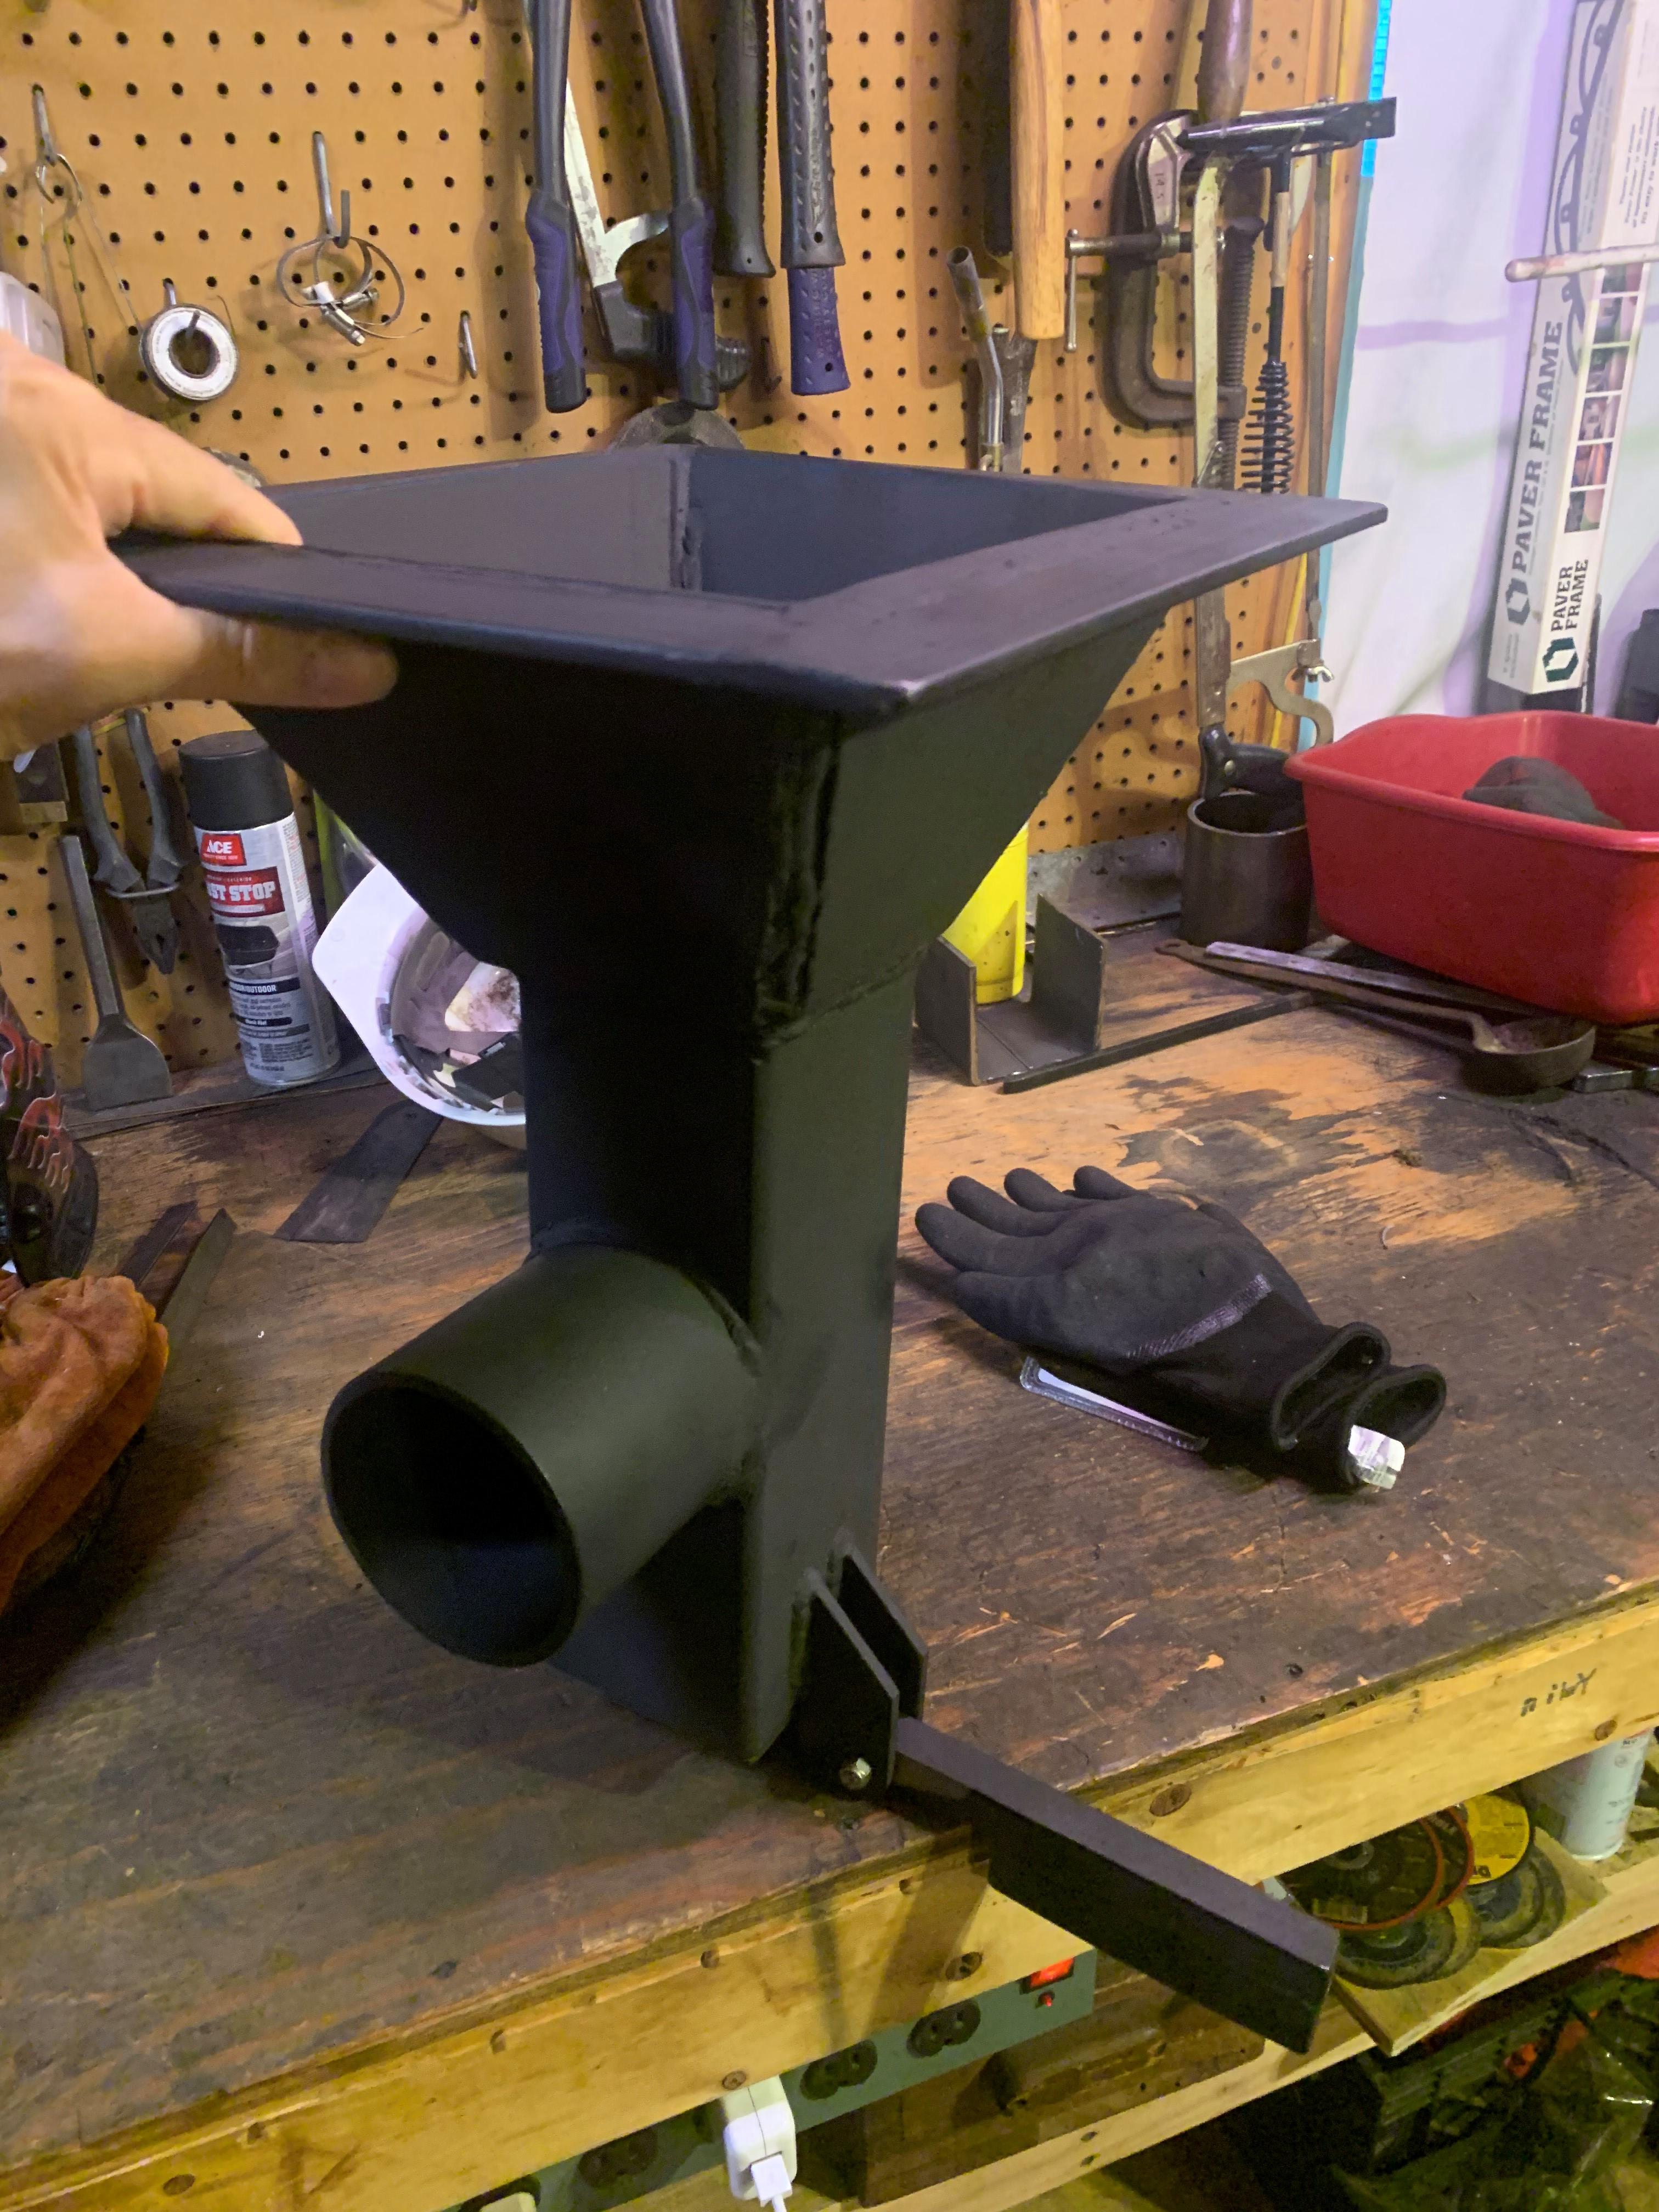
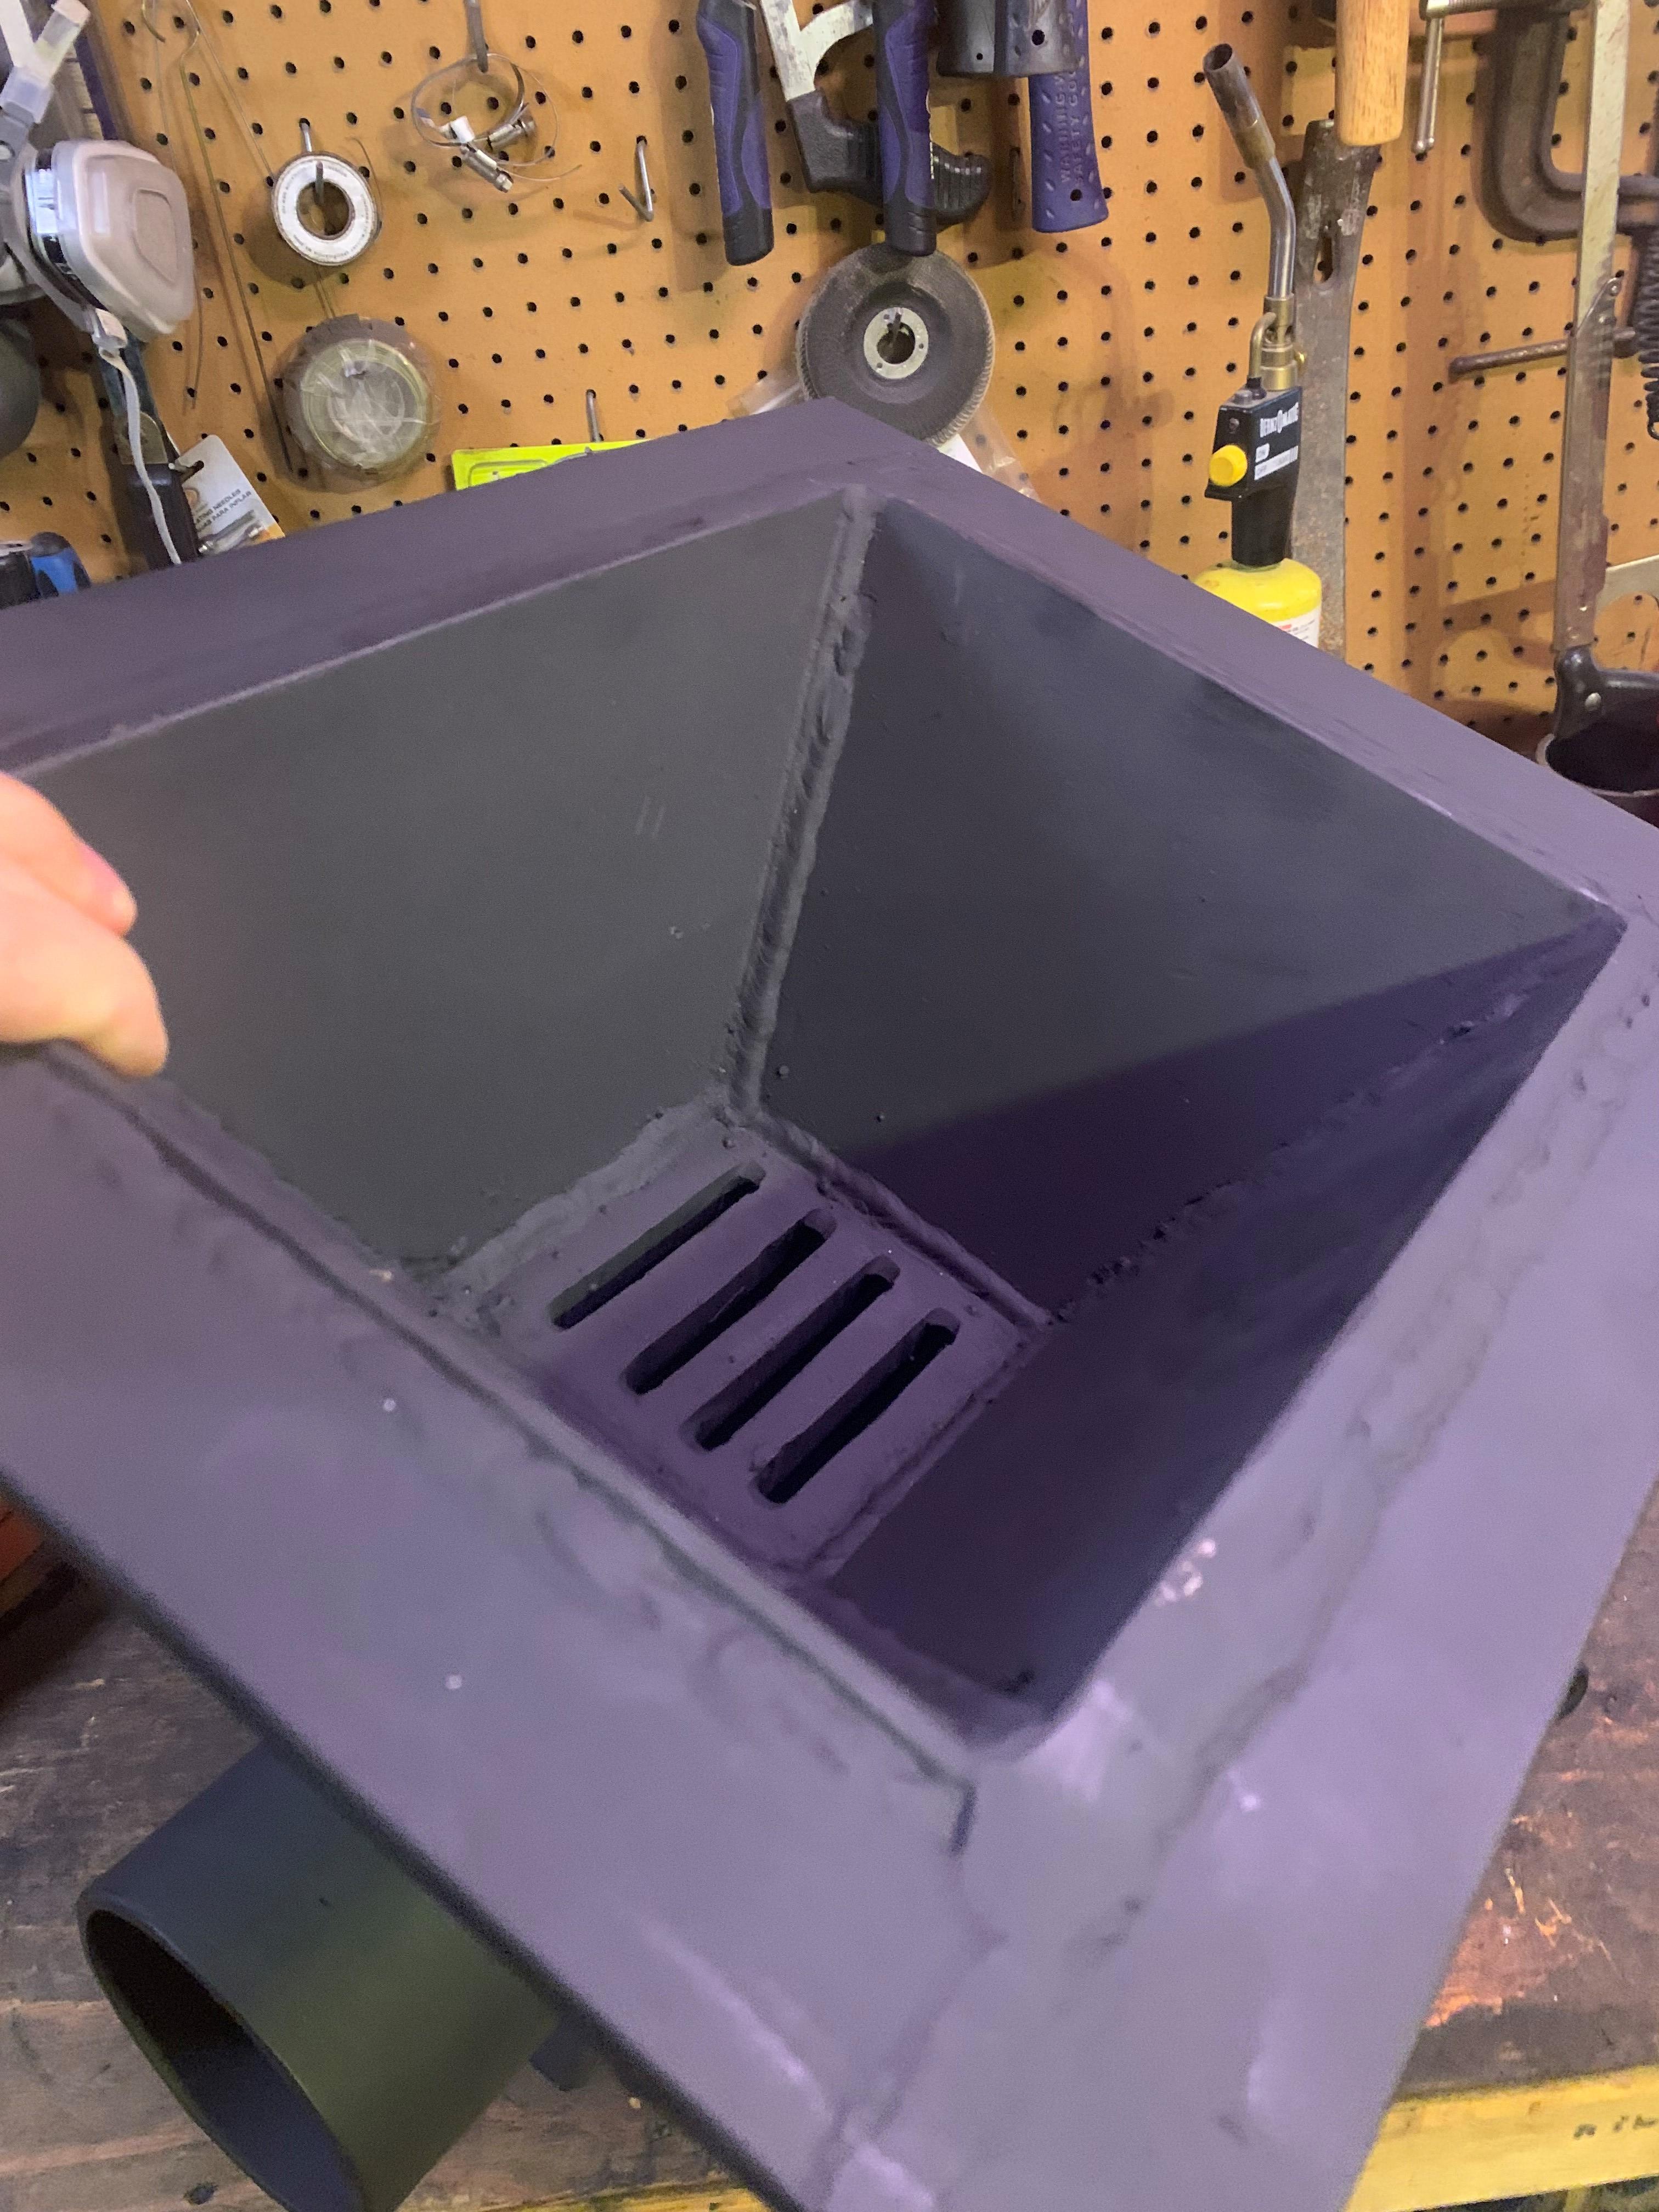
I made my coal forge firepot out of 1/2" plate, 10"x12" and 5" deep -- probably overkill, but that lets me forge big stuff like axes and hammers with a big enough fire and that's why you my eventually just want to make two -- a deep one and a shallow one -- preferably able to pop into and out of the same table, as needed. (Shallow one's next for me -- probably just 8"x10", 3" deep, with some wider flanges around the top to fit the bigger hole in the table -- use that one when I'm heating smaller material -- or just use the propane forge. Options are good! My big Bertha 5" deep firepot runs the risk of wasting some coal just with its size, so I opted for the more coal-conserving "straight grate" at the bottom rather than a clinker breaker, as clinker breakers tend to also drop good coal through, a bit more. With this grate style, you just have to dig the clinker out with a poker, but it's easy to clear with the poker because the vents are straight, as opposed to drilled holes like in shower drains. Curious to hear anyones' experiences with the different sizes of firepots and grates vs clinker breakers. Thickness of plate is a no brainer -- get the thickest stuff you can swing -- it'll last longer. I can't think of any reason you'd need to go thicker then half an inch or ~12 mil...


-
I don't know about you fellaz, but I for one want to hear Frosty sing the Ballad of the Great White Birch Tree. ;-) JHCC -- Not sure what the forum software is, but that link from Glenn to his bucket'o'rocks story works fine for me in the Chrome browser on a Windows PC. Not sure what you're using...? Anachronist -- OUCH -- you stabbed a climbing spur into your other foot?!? I can see how a climber could do that... I hate those things -- you think they're stuck solidly into the tree, you move, they pop out and send a jolt of terror through you. Anyone who has done tree work long enough has some scary stories. I had a branch grab my glove one time and try to drag me into the chipper -- thank GOD for the reverse bar. I've had squirrely come running at me in the middle of full-throttle cuts waaay high up in a tree, run right over my arm, head, etc. - lol. My brother was cutting a huge oak (like four feet around the trunk) that broke in a storm and was resting on its limbs on the lawn, but was still connected where it snapped about twelve feet up the trunk, so many tons of oak were still well above head level. When the limb he cut settled, the ensuing twist broke the trunk section free, whereupon it fell twelve feet to a retaining wall, which made it corkscrew and roll violently, slamming my brother ten feet to one side into the ground and planting a 5" thick branch two feet into the ground, one inch from his face. I thought it killed him for a few horrifying seconds. Three inches difference, he would've been a headless dead man. Ever since then, he doesn't do big, sketchy storm damage like that anymore -- tells the people to call someone with a crane. Needless to say, enough experiences like that and I now make sure the valve is all the way off when I turn off my propane forge. Life's too short to gittin' all 'blow'd up'Definitely — full agreement on that. Nothing but respect! Every tree and every setting provide unique considerations and anyone — including me — who makes sweeping statements about having to always do something this way or that way is inherently suspect, in my opinion. I know a tremendous amount about free work, but I am FAR from the most qualified or knowledgeable person in my area and I have no clue at all about how the really huge timber out west is handled. There are lots of pulleys lowering devices and friction devices that can be greatly beneficial in specific situations, though most of those are for rigging pieces down out of trees. No other industry has ever impressed me so much with its inherent complexity and danger and the sheer number of unqualified people who attempt it at great danger to themselves and everyone around them. I just wanted to point out a few of the most common hazards that vehicle tie-offs, come-alongs and entanglements can present to the untrained. There is always some yahoo who thinks he’s qualified to take down a tree, who doesn’t know enough to look at the way it’s leaning, judge distances to nearby buildings accurately, consider the wind, examine the tree for rot and funguses, etc. — never mind make a proper notch to the correct depth and a proper back cut that will do what is needed to drop it in the desired direction. Full honesty: I almost never wear chaps anymore. Like Frosty said, there is a point where you get good enough that you understand what the saw is going to do and where to stop cutting or reposition yourself while remaining well within your safety parameters. So much of that has to do with body position and it is always a best guess, with dangers lurking in the unknown. His description of the two stemmed tree being a “bouncer“ is a perfect example of the extreme danger a falling tree can create, when it corkscrews or kicks in a direction that is unexpected because of the way it hits the ground, the way branches either bend and bounce back or break unexpectedly, etc. that’s just stuff that people without a great amount of training and experience are never going to know and even the pros get wrong, sometimes. It’s like going hunting in grizzly country… we accept a certain amount of extreme danger as part of the deal, but we are well advised to be extremely cautious. I like that info on the weights of different hardwoods. I’m going to keep that article bookmarked for future reference. Pretty far off the subject of blowers leaking oil, eh? Lol. All good — someone will bring us back around. I like hearing everybody’s experiences.Lol — I found it with a little scrolling, no problem. Great story. I particularly like the part about the photographers — SO true — and the no animals thing is definitely among the golden rules. Now Glenn — I’m a huge fan of all those articles and stories. That said, I’m definitely NOT on board with the blanket, the come-along, or the bucket of rocks thing. I suppose they might(?) serve the purposes described, if all wnt according to plan, but I have never found any need for such additions and I am 100% certain that the bucket and the come-along introduce definite dangers to the crew and the good people of Gotham city. One of the basic safety rules is to remove anything from the impact zone that could shatter and send pieces flying. A plastic bucket full of rocks definitely qualifies as something I would never want anywhere near the line where 3 tons of wood is about to impact the ground. I have seen soft pine tree branches fly 100 feet and smash the neighbors window, so I can only imagine what a rock might do. Goodnight Grannie. If a gust of wind hits your tree at the wrong moment and the pull rope parts with the bucket still attached, with the tree going the wrong way — now an unstoppable force is dragging a bucket full of potentially deadly projectiles across the ground (where the crew is) at high velocity. I’m picturing the bucket either hitting someone like an 80mph wrecking ball, or catching on something and the rocks propelling outward from it like grape shot. Hmm… yeah — I’ll pass. ;-) Having spent hundreds of duty cycles on both ends of tree falling — both at the tree with the saw and out on the tag line — I will say that for us, the thought of a come-along means we need to take more weight off the other side of the tree, or take it down to a point where the lean is more favorable. I would never rely on a come-along as the only pull line. I’ve seen those things explode. They don’t crank fast enough when it counts, unless you front-load the line, which puts the tree under pressure — which is highly dangerous to the Sawyer. Ask Frosty. For my crew, the visual indicators that the tree is starting to fall are the widening of the cut behind the saw — and the man on the tag line can both feel it in the line and see the whole enormous tree moving as it comes. Maybe the bucket ‘o rocks gives the safety guy something to watch, but to me it sounds like a procedure invented by a mad Blacksmith with a subconscious deathwish and a surplus of buckets. Great story, though. Every other part of it is spot on, like sending ALL bystanders into the next zip code.EXAAACTLY. Big dumptrucks and huge excavators get thrown around and slammed over by tees, sometimes. Proper tree falling is done by harnessing gravity, with little to no man-made augmentation. The only thing that should be attached to the tree is a tagline that is not wrapped around anything else, getting pulled by one person a sufficient distance away — just to get it started in a safe direction that is on, or very close to it’s natural lean. Once it starts to go, they need to drop that rope and get farther out of the drop zone, fast.Wow - what a story. You did a number of things right, like clearing away tripping hazards and planning escape paths... Trees can store tremendous kinetic energy, especially under load. We used to watch safety videos every year for the OSHA requirements and some of the worst accidents were always people trying to pull the tree in the direction it doesn’t want to fall. If it’s more than a few degrees to one direction, it has to go that way within about a 30° sweep to either side of its lean. That rule gets more strict the bigger the tree gets and/or the more it’s leaning. Little, springy trees can be pulled in the other direction, sometimes, but only so far. Whenever I do tree work these days, if it’s leaning much at all, I go that way within a few degrees. If I can’t, I climb it and take it down in pieces, or I leave it alone. You must’ve taken an unbelievably deadly hit from that thing… Truly amazing you survived it. Thank you for sharing the story. That will very possibly save someone else’s life, who reads it and remembers the danger of a leaning tree. For those who may not know — especially young men who fancy themselves the next Paul Bunyan — rule number one is SAFETY GEAR. Hardhat, eyes, ears, preferably kevlar-lined chainsaw chaps and boots. Rule 2: Never do tree work from a ladder. My personal rule number three, just because I have seen it so many times is never tie a tree to a vehicle — of any kind. I can’t tell you how many bumpers I have seen torn off, or trucks yanked into the air and smashed back down on their noses… ATVs, tractors, etc. — if you care about your vehicle, never tie it to a tree. The list goes on and on, obviously... This is one of the reasons I never mess with high-voltage electricity. I know I am not trained enough about it and I know it could kill the xxxx out of me, so I don’t fuss with it. Thanks for the story, Frosty. I will remember that one! I never realized hardwoods were so rare out west. It really makes me appreciate all our Oak, Maple, Cherry, Hickory, Ash, Beech, Apple, Walnut, etc., here in the east. Minding the woodstove is a pleasing chore. Here’s to warmth and tales of survival!