

SoCal Dave
-
Posts
840 -
Joined
-
Last visited
Content Type
Profiles
Forums
Articles
Gallery
Downloads
Events
Everything posted by SoCal Dave
-
What went wrong? Was it quenching it in water, or working it at the wrong temperature?
-

Slitting and drifting
SoCal Dave replied to brianbrazealblacksmith's topic in Blacksmithing, General Discussion
Brian: I slit and drifted a hole in some 3/4" sucker rod. I upset the middle of the drift about a 1/16", just enough to have a little bulge in the middle. This seemed to work well when the hole shrunk when cooling. Of course, the bar had to slip through the hole very straight and there was no room for adjustment. Also, I had only one long bar through 4 pieces, drifted holes, so I didn't have to make any adjustments. -
Slitting and drifting
SoCal Dave replied to brianbrazealblacksmith's topic in Blacksmithing, General Discussion
Your slit and drift tools were made of what kind of tool steel? Thanks for the posting. -
I 've used a wood cutting chop saw with a metal cutting composite blade for years. I like to use the degree markings on the saw which are much better than a regular metal chop saw. A friend gave me a radial arm saw and I converted it to a metal cutting saw but didn't like it. Generally, I could cut whatever I wanted with the chop saw. The radial arm saw didn't have a very true backing and cuts didn't always come out square and the motor didn't seem powerful enough. As mentioned before, a band saw would be better. I 've used "Metal Devil" blades on my chop saw with some success, but they didn't hold up to heavy use. That was a few years ago and they might have improved and there are other metal cutting blades out there now. I really like the aluminum cutting blade by metal devil and that worked great without any flex in the blade. The cuts were right on the money.
-
A degree in fine, but I would prefer to work with a master blacksmith and a few master blacksmith, if possible. Blacksmithing is not necessarily a degree type of field, unless you want to teach later at a college. The courses taught by blacksmith tend to more intense and progress faster than a college course. There are various schools throughout the United States. Frank Turley in New Mexico is a great teacher and a school I attended. He has a one week and three week course that will very educational. Join an assocation in you state, attend some conferences and see if there is someone you like there. Brian Brazeal is a great teacher and teaches all over the USA. Clearly, if you could do both, attend college, and have a mentor, that would be the best. Good luck in you journey.
-
You will lose a tremendous amount of heat by having the front door fully opened. With the door fully opened, It will be difficult for you to reach the upper temperature limits needed at times for forging. By having a smaller opening in the front door, you retain some of that heat and you must have an opening of some kind. Look at other models and look at the relationship of the door to the smaller opening. You should be able to figure out the right proportions for your forge. Good luck.
-
The forge looks like it has Hypona burners. They go for about $125 for each burner new.
-
Great post Frank. I haven't see your posts lately and it's good to have your advise and knowledge. As usual, you add that experience of 50+ years of blacksmithing to our discussions which is so needed and enjoyed by me. Stay healthy OLD wise one.
-
Check E-bay for anvils and tools. What area of California do you live in? This will help in your search for a better anvil.
-
Very nice work. I was wondering how you were going to support the weight of the gate, and it looks like it is supported on the floor. Good option. Lots of different things going on and it keeps my eye moving around the piece.
-
Thanks RLD. I appreciate the information.
-
I 've been looking at propane forges. I'm interested in the Mankel 2 burner forge. With a blower, it should get up to welding heat. One web site said the 3 burner gets up to 2600 degress. I assume it would be necessary to block off the front portion to reach welding heat and use the side openings like other forges. I like the design which allows for odd shape piece to fit into the forge. Other people have said that the mankel forge was designed for horseshoeing, but does that mean it can't be use for general blacksmithing. Has anyone had experience with the Mankel 2 or 3 burner forges? Does it get up to welding heat with a reasonable time, and with the blower, does this present any other problems or issues? I heard of one person who converted his to an atmospheric forge after a time, but he didn't say why.
-
I don't believe the grill regulators are what you need. I have an adjustable regulator that goes up to 30 lbs psi. You definitely need one that is adjustable. Good luck and good forging.
-
What if you can't make the Tuesday night blueprint session? Can't the ones you go over be transfered to one of the forums for a week so those of us who missed the session can review them latter?
-
I agree with the others about the height issue. When you are moving 10 foot sections of metal around, you have to be very careful when your lights are 8 ft high. I have a 20' X 24' shop and when I first used it, I thought I was in a mansion. Now, after adding shop toys, it's starting to get crowded. I need more room. So, go as big as you can!
-
What if I wanted to build a new forge with a burner on top and a burner on the bottom. They would be directed so they don't directly oppose each other. It seem that it would give an even heat with a rack is in the middle to hold the material. I'm not sure what the rack would be made of, but just thought of a metal rack to support the metal and not block the heat to much. What are some of the issues that I would have to overcome to make it work and would it be any better or worse than existing forges? Food for thought? Be nice.
-
Footer for power hammer
SoCal Dave replied to Adirondacker's topic in Blacksmithing, General Discussion
Frosty: "Sometimes you just have to work with what you have. Without knowing what the base is like under the slab or maybe what the slab itself is like spreading the weight and impact over a larger area through a little cushion certainly can't hurt." Thanks Frosty for the advise. What would be a minimum thickness of wood be for a 50#LG hammer? Are you talking about 1/2" plywood, 3/4" or 2X4's with plywood on top? -
Footer for power hammer
SoCal Dave replied to Adirondacker's topic in Blacksmithing, General Discussion
What about a situation where the slab has already been poured years ago and you have to live with it. For a small hammer, say a 50# or less, would a wood base be a good alternative that has been bolted to the existing slab? Money is always an object to be considered and it would be to expensive to take apart the barn, cut out a section of slab, and re-pour that part. The old slab does have rebar and wire mesh in it and is about a 6" pour. -
Applying wax to finished pieces
SoCal Dave replied to walkerironworks84's topic in Finish and Polish for Knives
If possible, I heat the piece up just a little and apply the bees wax. I brake off a piece of bees wax from a larger block I have and apply it so it melts onto the metal. -
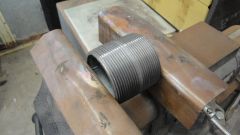
Hardening of pipe threads
SoCal Dave replied to SoCal Dave's topic in Heat Treating, general discussion
I took some pictures of the pipe thread fuller. -
-
-
thanks Ironstein. I appreciate the comments.
-
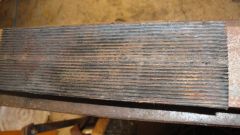
Hardening of pipe threads
SoCal Dave replied to SoCal Dave's topic in Heat Treating, general discussion
Test #1 Report. I took a two inch pipe nipple and cut it. The nipple was all threads, with no unthreaded space. I opened it up and made it flat with the threads running the length of the rectangle. I heated up 1/8 and 1/4 inch rod and used a wooden mallet at first but then changed to a light weight auto repair hammer. The wooden mallet wasn't getting the job done. I hit the stock when it was going with the threads but not perfectly in line and at 45 degree angles. I followed that up with just hammer blows to the stock on the anvil just to impart some texture. The best results came on the 1/4 inch stock during this first test run, and it looks pretty good with definite lines. I would like to get some deeper lines and so I will be more aggressive when I run a 10' section through tomorrow or thursday. I hope to send pictures in the next report, but I have never included pictures with my postings, and I'm not sure how to do it so they are not extremely large and difficult to view. -
Great job. Well worth the effort and the sore wrist.