Trevor84
-
Posts
168 -
Joined
-
Last visited
Content Type
Profiles
Forums
Articles
Gallery
Downloads
Events
Everything posted by Trevor84
-
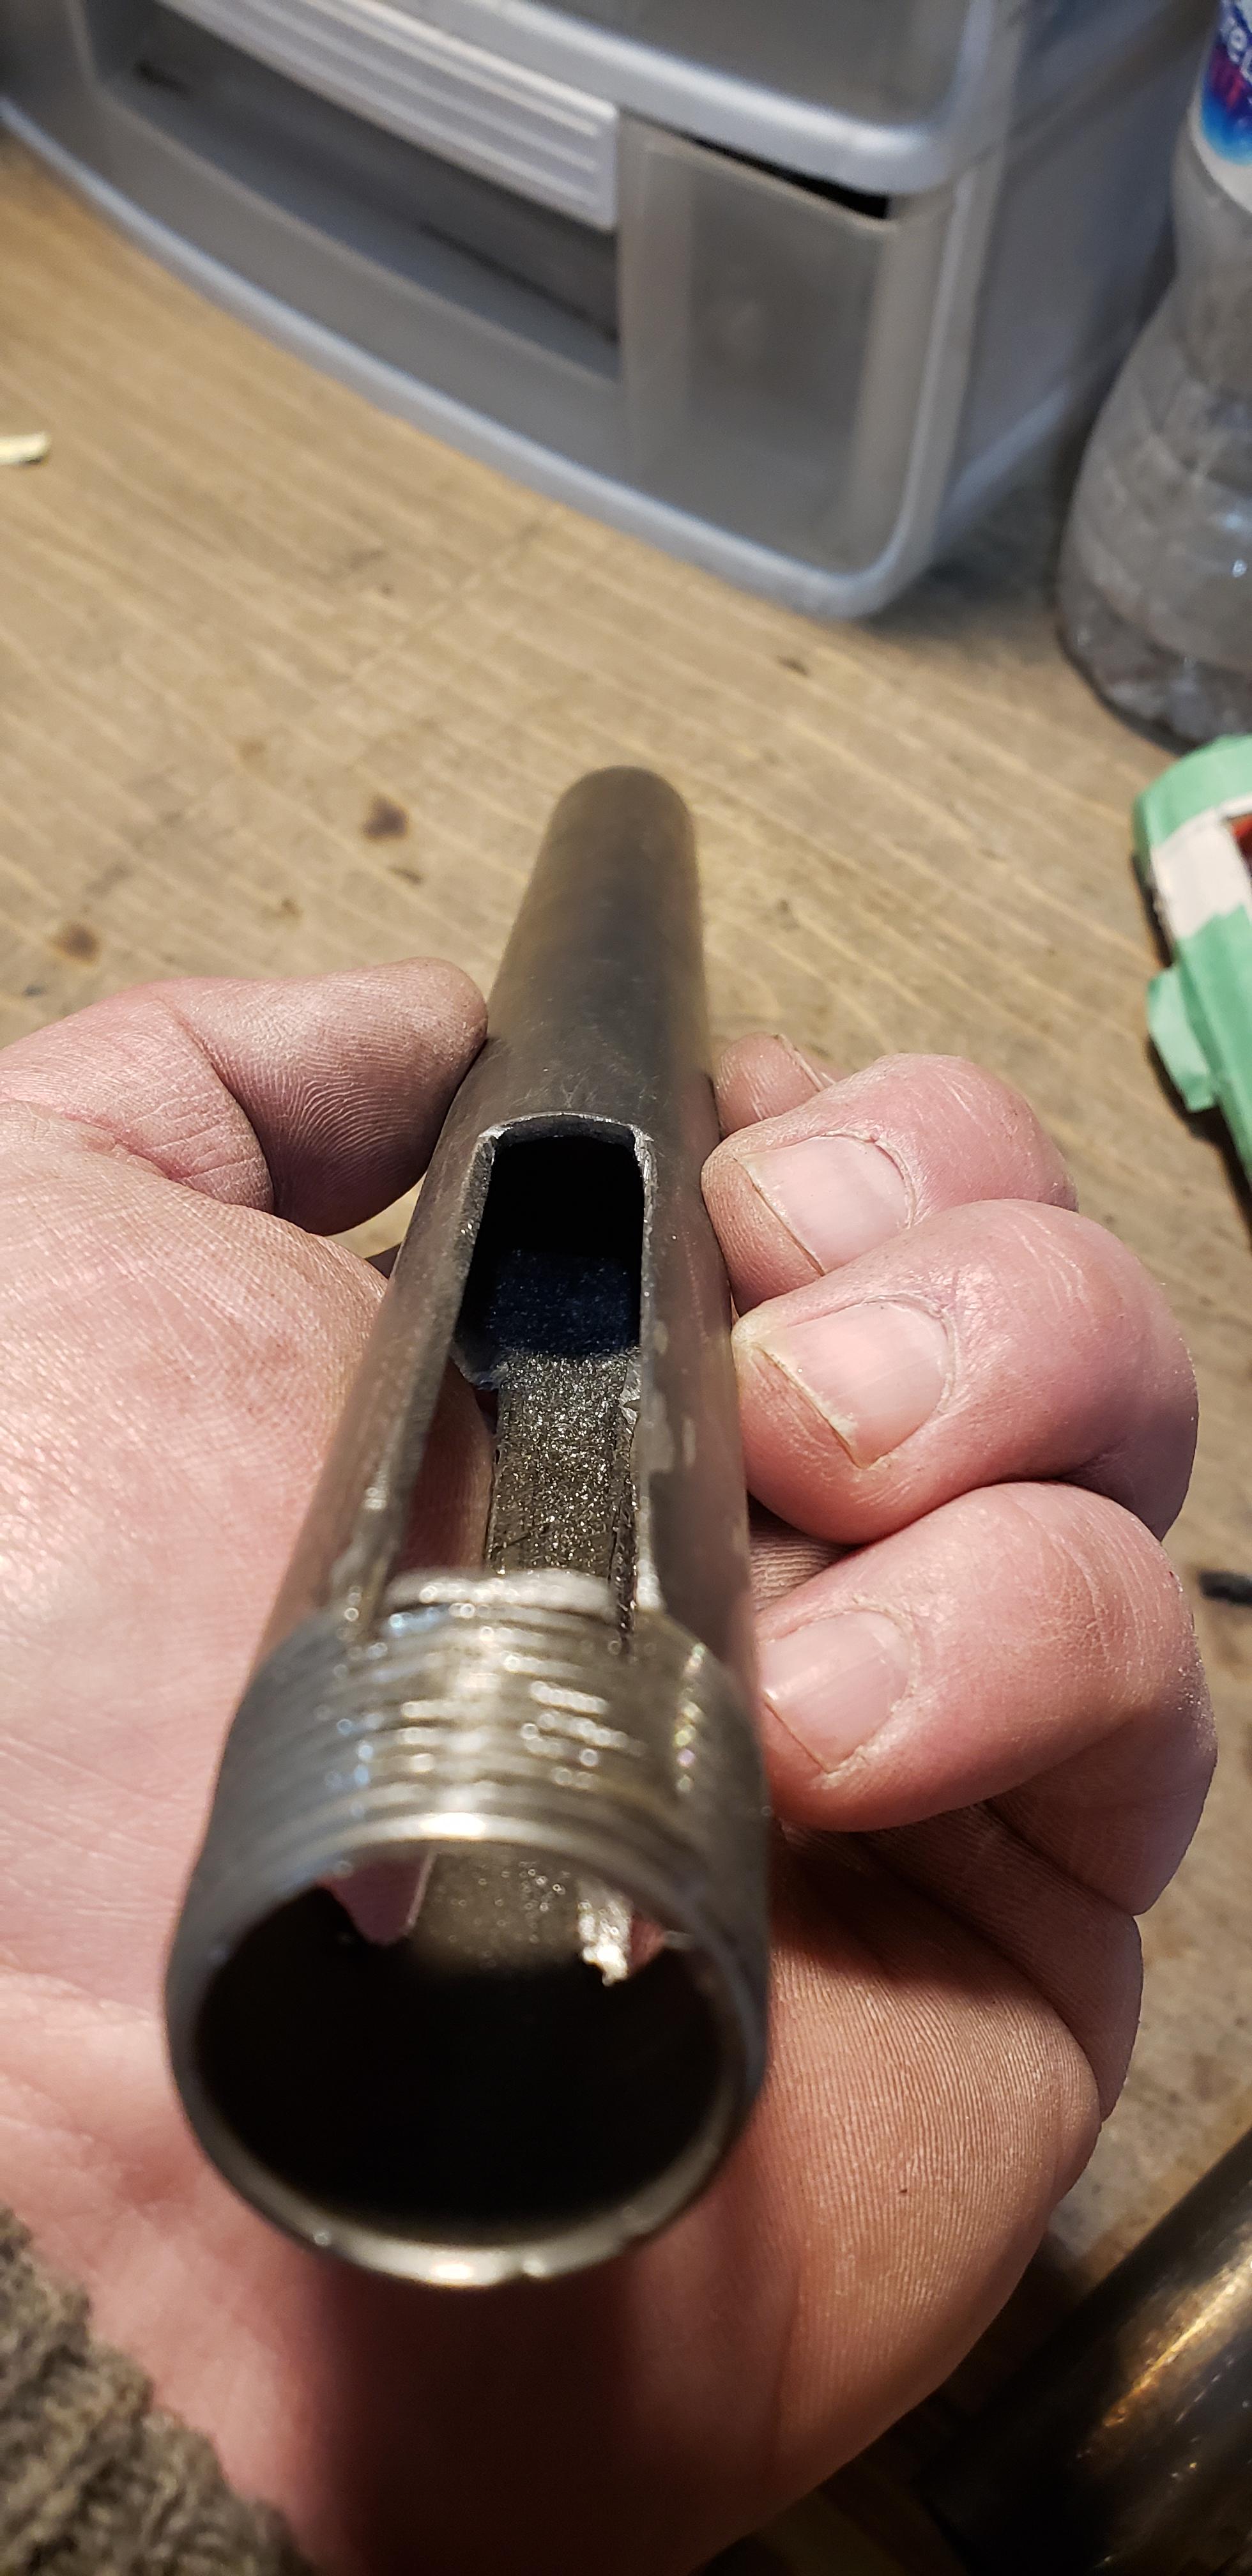
The first time I tried the ball peen idea was back in the beginning before I realized how much steel shrinks as it cool and got the peen too deep and the dang flare locked on. I had to cut it off and put a nik in the side of the peen it doesn't affect anything but it bugs me.
-
The surface area of the intake's opening be it linear or ejector, add up the area of both sides of Frosty's T or Mikey's burner they are similar I believe at least last time I added it up IIRC
-
Mikey, I was just reading back over the discussions regarding printer nozzles and I think I remembered something AFB was talking about incorrectly wen I mentioned speed. AFB, I kinda put this together as a trouble shoot for guy's that have botched up someone's design not to actually build a custom from scratch so I would be sharing it with someone that already has an rough idea. With regards to my math on the nozzle is a typo should read "OD" which is what Mikey's step nozzle works out to with the. When it comes to the overhang I thought that's basically where Ron Reil says to start on his ABANA site. (I know that you know a LOT more than I so please understand that I am not arguing just trying to understand, I can almost guarantee that I will never be giving attitude or what not.) When it comes to my very loose vague math I have based these off of the main stream burners. If you take the area of the intakes on all the burners they are all quite similar are they not? Orifice depth in throat on the Mikey, Sidearm, Reil with the mig tip and even the Frosty mod. I totally understand how much some burners can be and I am definitely not trying to re-invent the wheel or anything, I have been rereading these threads for the last 3 years so I know better than that. Like you say take something like Larry's Z burner it falls out of my intake calculation with what I believe is a 1" wye with a busing to 3/4, this would be smallest intake opening surface area but this is probably because of how it flows or the original EZ burner's orifice depth is outside of my calculation too. Then there's burners like the Oliver, Atlas, Hybrid etc I am over on FB a lot trying to help where/when I can, so I guess my knowledge level is somewhere between here and there if you will Does it make more sense in that context? hack to the flare 3/4"sch40, 1"x1" sch20, 1 1/4"x2" sch80. slit the 1" tap and set screw will expand the spacer to lock the nozzle in place. there is 1 1/2" from the end of the spacer to the end of the nozzle itself this just represents the step nozzle


-
Morning folks, I put this together as an article on a facebook page I am on. I have tried to compile and compact some of the basics that I have gathered creeping all your conversations in these threads. I am leery to ask for a critique buuuuuut I guess I should get an opinion from the people I stolearned it from. ***Build a burner with math*** This isn’t exact but loose parameters to start with when troubleshooting a burner some dude on YouTube “dEsIgnEd”. The measurements used by the previous gen were used based on a lot of trial and error along with studying the more technical sciencey side of what makes a burner work the way “we” need them to. I won’t drag out how’s and why’s here but here’s a basic cheat sheet. If you look at the main atmospheric burner designs (by the original designers) you will find a lot of similarities or "rule of thumbs" to get the most out of your burner. The particular design of the burner and it's environment affects the ratios of these obviously but it is a place to start especially if you're trouble shooting a burner that you wung it on. (3/4" Burner) Mig tip: .030 .033, .035 (+8 for apx actual opening) .038, .041, .043 etc 3d print nozzles 0.8mm, 0.9mm, 1.0mm sold in exact size, .9mm = .9mm. (these create a higher speed jet than the mig tips due to the shape inside) Intake: 1.5-2 x ID of mixing tube Orifice depth from throat: .5 x ID of mixing tube Mixing tube length: 8-9 x ID of mixing tube Nozzle: 1/8" over mixing tube size 1" ID, apx 1 1/4" past end of mixing tube Flare: is a 1:12 and 1 1/14" past mixing tube about the same as the straight nozzle but "flared" (roughly) Make your flare/nozzle adjustable so that you can adjust the overhang by sliding and locking with a set screw while tuning in your forge. **don't get hung up on PSI, it's only relative to YOUR burner**. Or something like that
-
Hey Mikey and all, sorry I'm a lurker and chat with you all that much. Anyway, Mikey I started calling +8 when reading mig tips. I see that I'm close, close enough for a good starting point when planning out a burner. ☺
-
I would however all of them shipping distance only. I am getting to know a couple of them over the phone though.
-
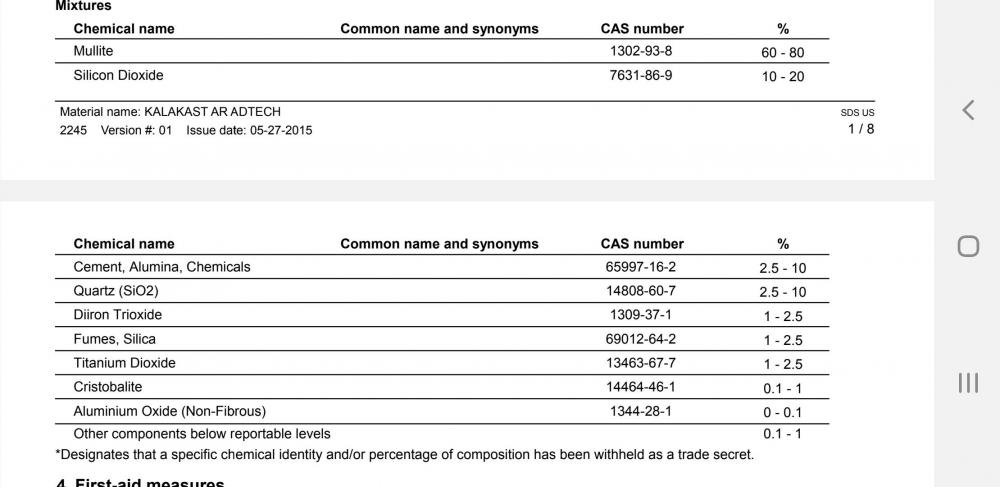
I will definitely update once I try out this Kalakast. Yes there are some crazy refractories out there, HWI, URC, Morgan thermal, allied minerals, vesuvius and that's just the name not the products. Most of these companies make their own stuff like bubbly alumina mizzou etc. The problem is finding a supplier that happens to either stock it like the basic kalakast, unicast, loucast, house brand or get lucky and happen to call when they have a partial pallat of specialty refractory. These guys have it made up in pallets and it only has about a 6mth commercial life so the stuff gets custom ordered, if you're lucky you have a shipper that's willing to sneak a 55# bag out of a 5ton order if you get him at the right time. I'm not able to post a link but if you use some Google foo you should be able to find the "Harbison Walker 2005 refractory handbook" it's not really brand specific and gives a run down of different refractories.
-
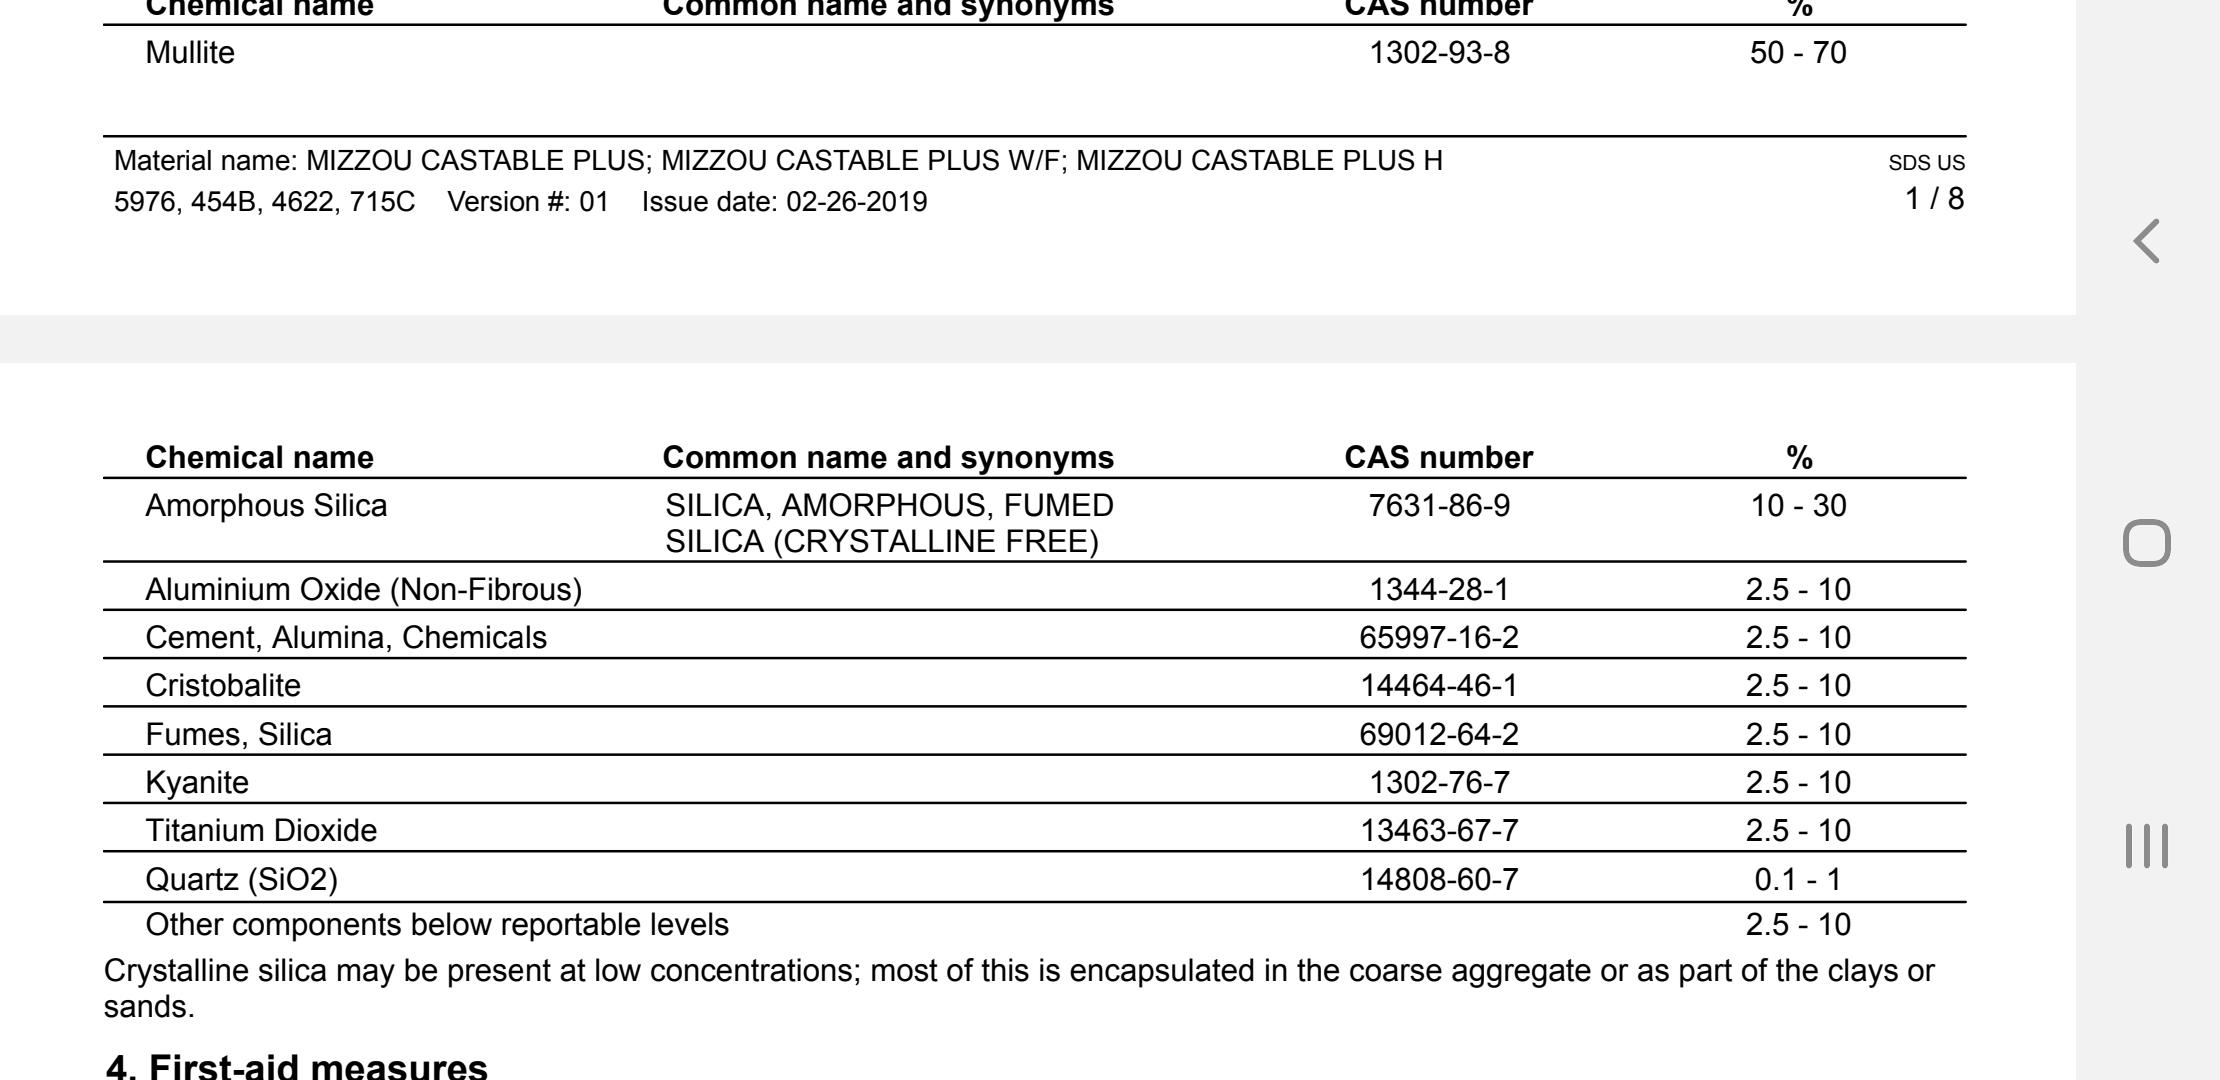
Paul I'm interested in how this works out for you if you buy it. I bought a box of wool from Inproheat and got talked out of the unicast for the same reason, I should have grabbed it though it looks like it'd work. I'm going to try this Kalakast product, I'm told it's basically mizzou but more alkali resistant, maybe tough against flux....... Rep says they use it in the crematorium incinerators a lot. Here's the breakdown of kalakast and mizzou, they're also similar to the unicast. You can get kalakast for around $70 cad a bag from a HWI outlet/warehouse.

-
I guess I could see that flange being a bit sloppy...... Twas just an image that popped in my head. Anyway yes the locking nut seems the best idea. I found a pipe chart so I'm heading to the plumbing store tomorrow to gather a few more bits. Thanks guys for your patience I'll update if I have success
-
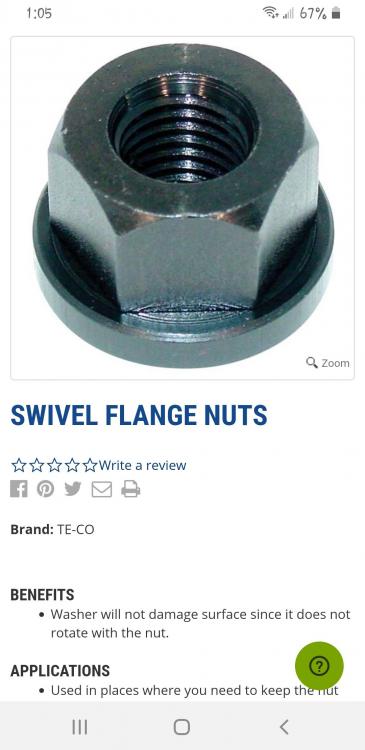
I was thinking of being able to lock the burner in the forge so doesn't rotate. Now say the threaded 1/8" fuel jet accelerator stays stationary, like it can't turn. Now the piece I am envisioning would be like a nut that can turn on a flange that would welded to the outside of the T. This way you can adjust the nut and move the accelerator in and out without removing the burner from the forge. Obviously this is frivolous, it's just something rolling around in my head. Please if that is still confusing just disregard this. I am having a hard time putting it into words. Haha I found it, a swivel flange nut . Weld the flang to the end of whatever style of burner and then just turn the nut in and out for micro adjustments of the jet.
-
Hey Frosty, I'm not sure how I confused things I was talking about two different things...... Yes using a jam nut will lock the jet in position whether it's in a T like the last pic or through a threaded bushing in another design. I then was asking about the step nozzle and which sizes of pipe were used So I was asking about the carb then the exaust. When I was talking further about adjusting, I can't really describe what I was/am thinking about and in the end it's not necesary.
-
Ok thanks that explains it I think. I kept using varying lengths and combos of the 1" black pipe and the 1 1/4" black pipe and kept fixating on needing to use standard pipe nipples and not other combinations. Now I'm going to see if I can get some schd 80 1 1/4" it, in theory it should only take a bit if grinding to get a tight fit.
-
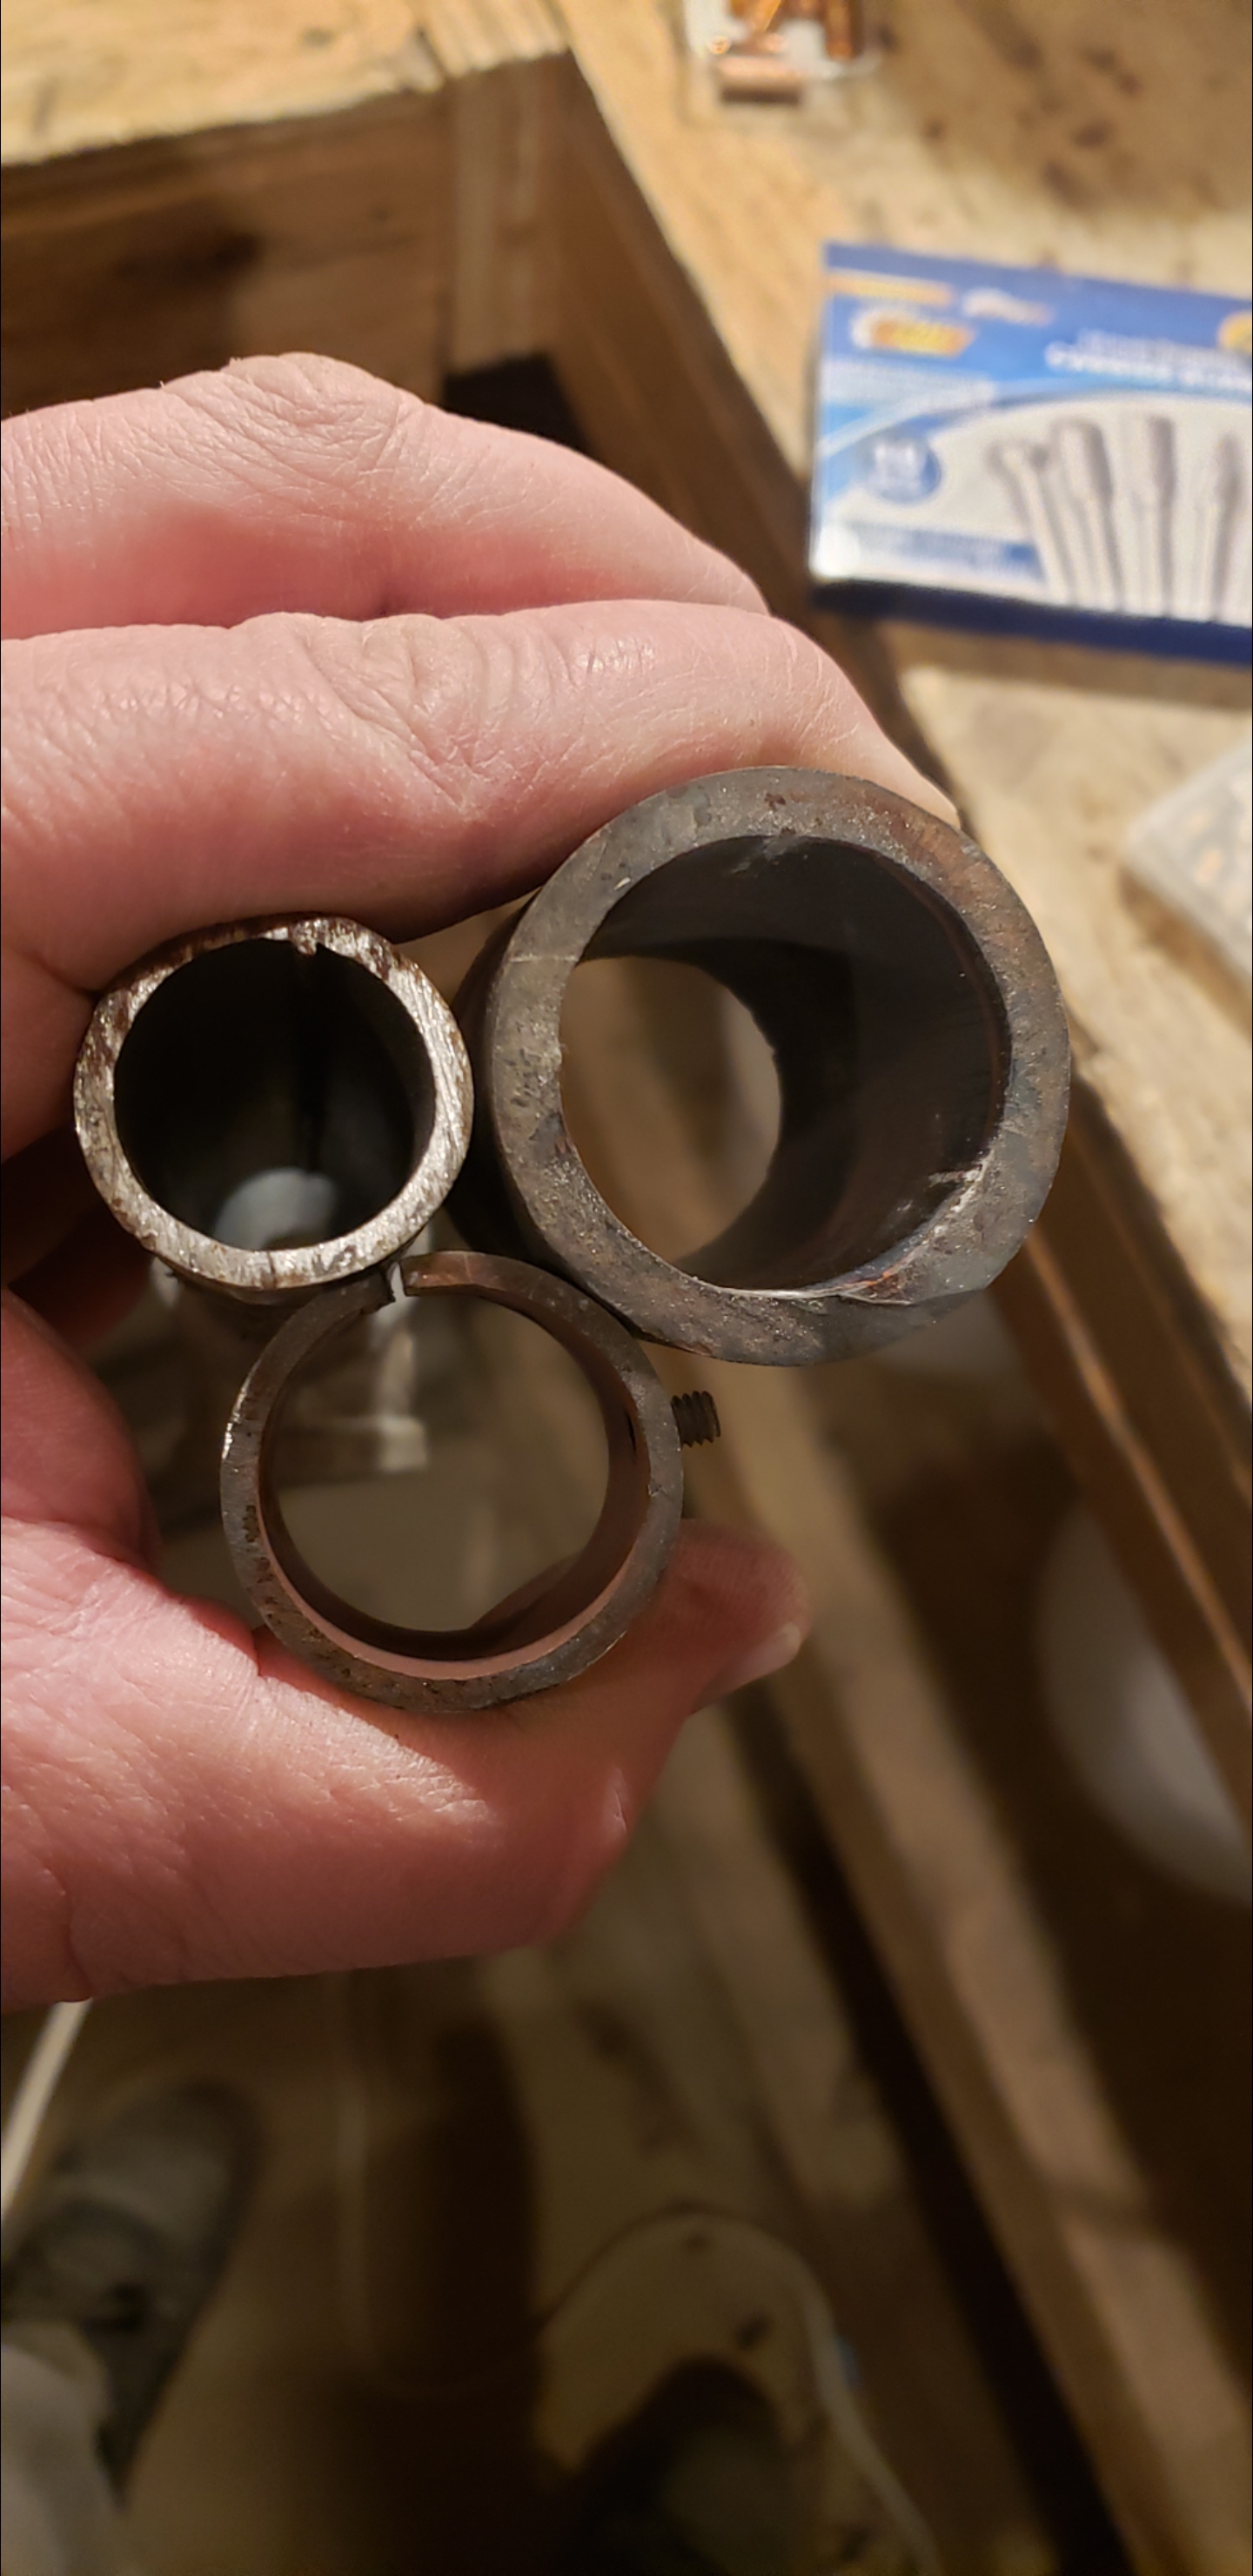
Thanks Mike, I'm going to go back and try a couple more going slower When you make a "step nozzle" for a 3/4" burner do you use sch 40 or sch 80 for the 1 1/4" nozzle portion? I'm finding the 1 1/4" sch 40 nipples are almost 1 1/2" ID so real sloppy over the 1" spacer and I'm getting too much pressure drop.
-
Thanks, in the forge tests will be coming in a couple days This is hard to describe but I'm wondering if there is a type of adjustable nut thingy that could be fixed to the T but have a nut that turns freely so that the burner and the jet can stay stationary but turning the nut would just adjust the jet in and out. I think I've seen something like that before but can't think of where or what it would be called......? Any ideas, does that make sense? I guess kinda like the screw in a crescent wrench but a female version...
-
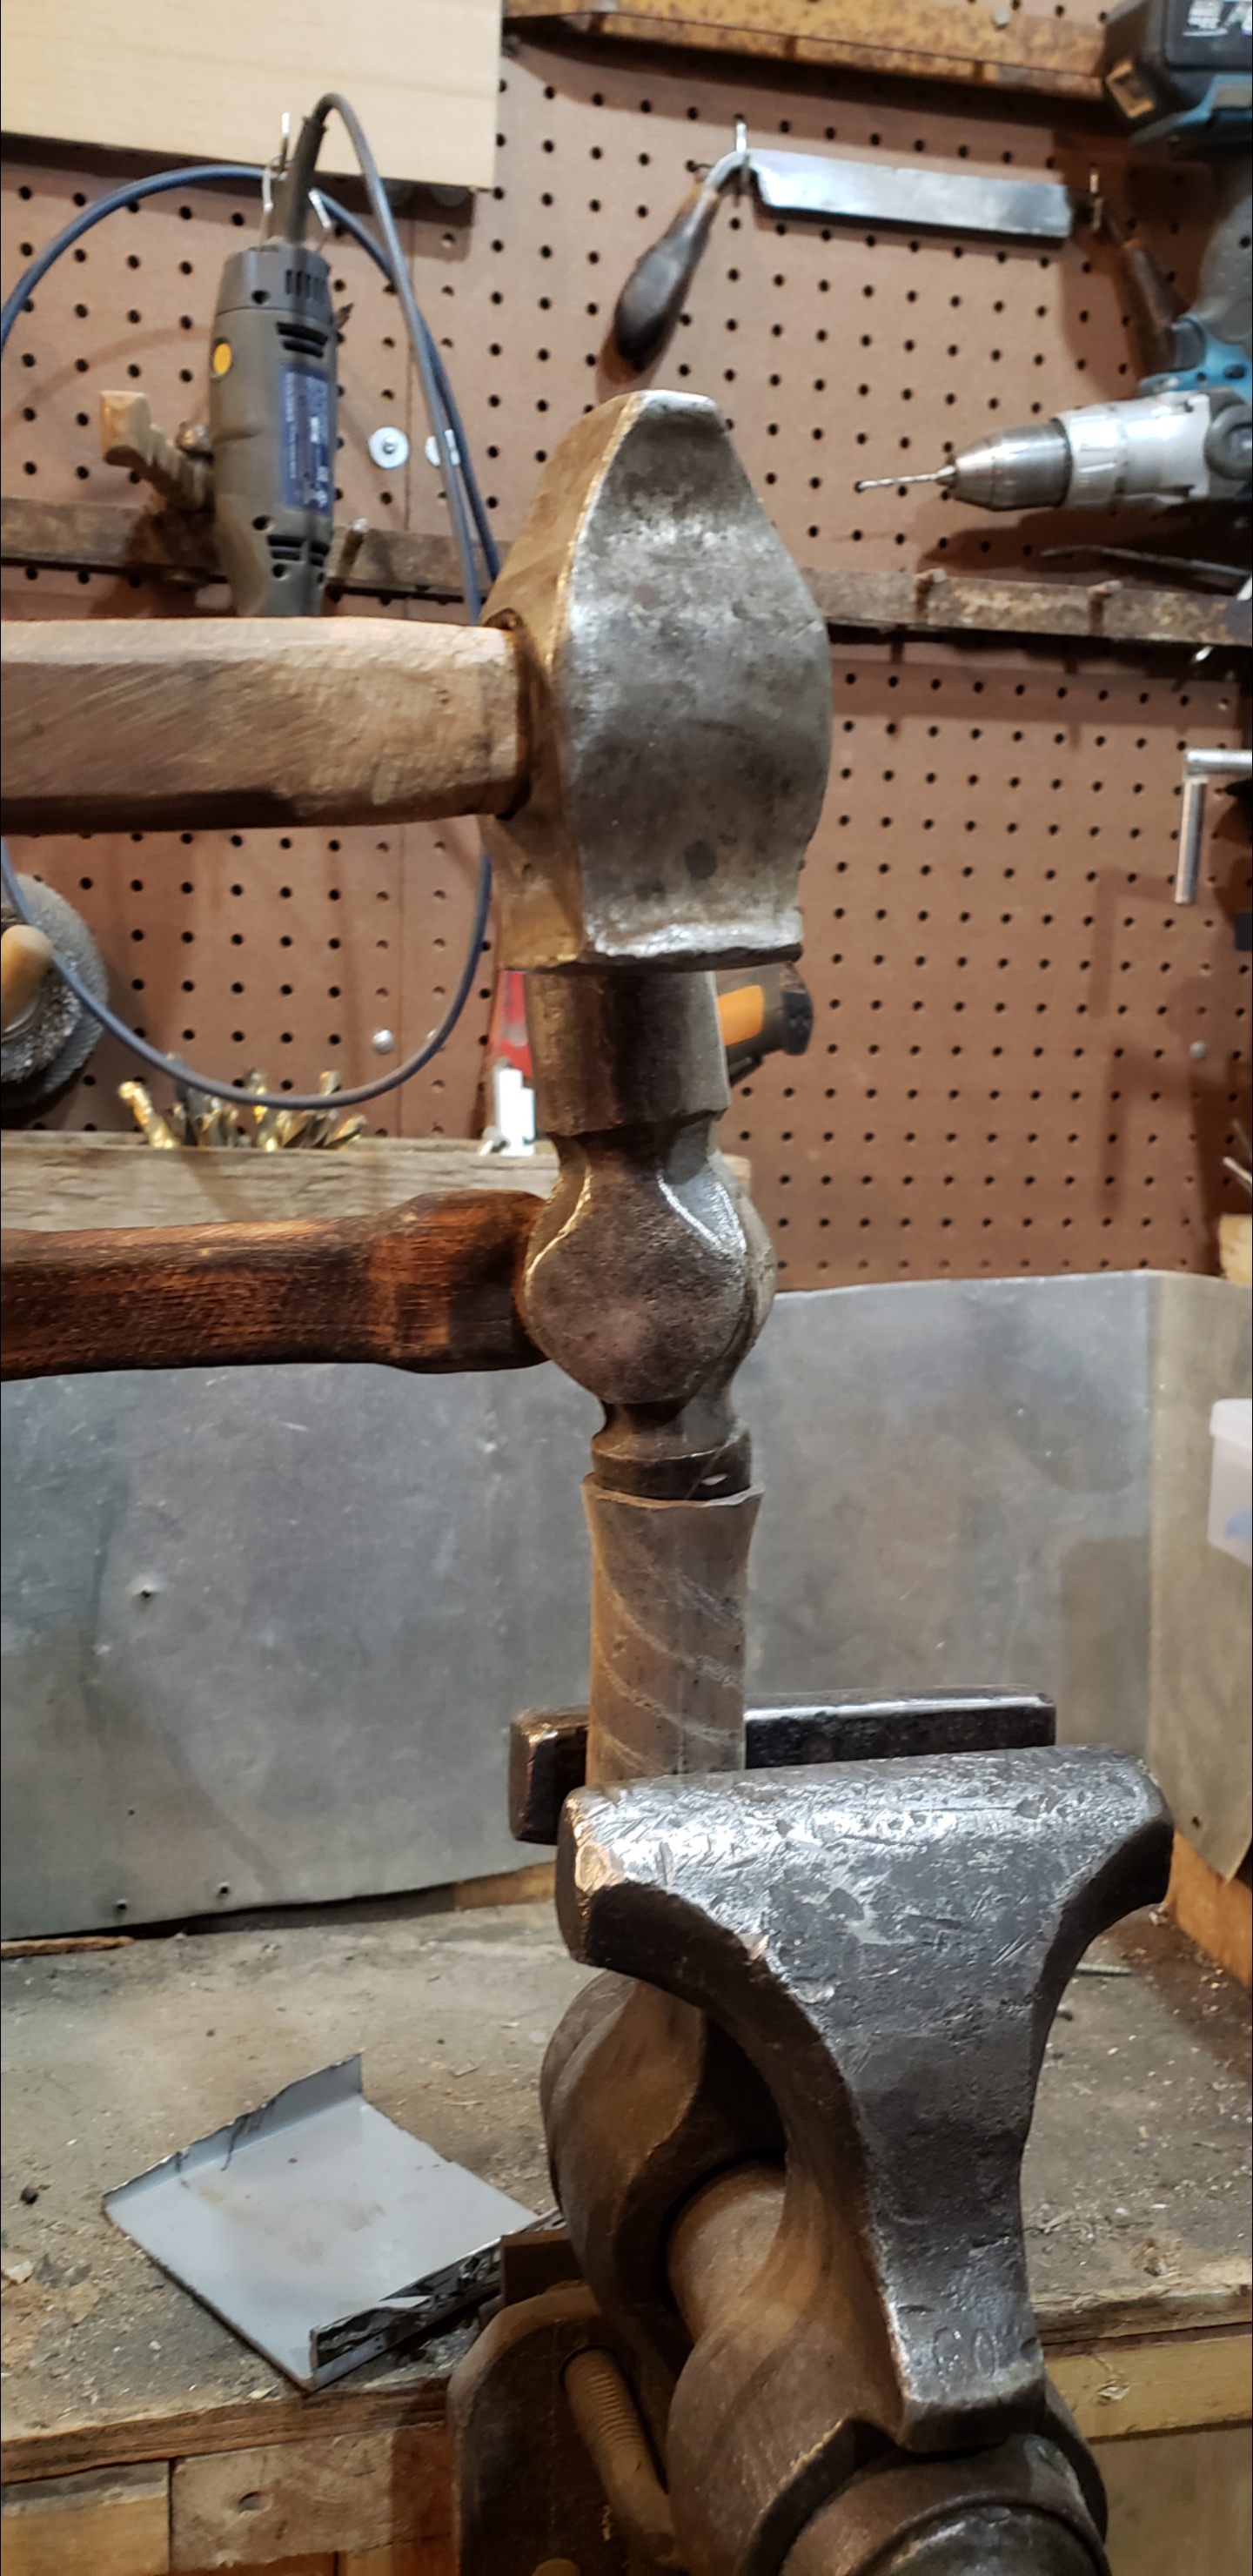
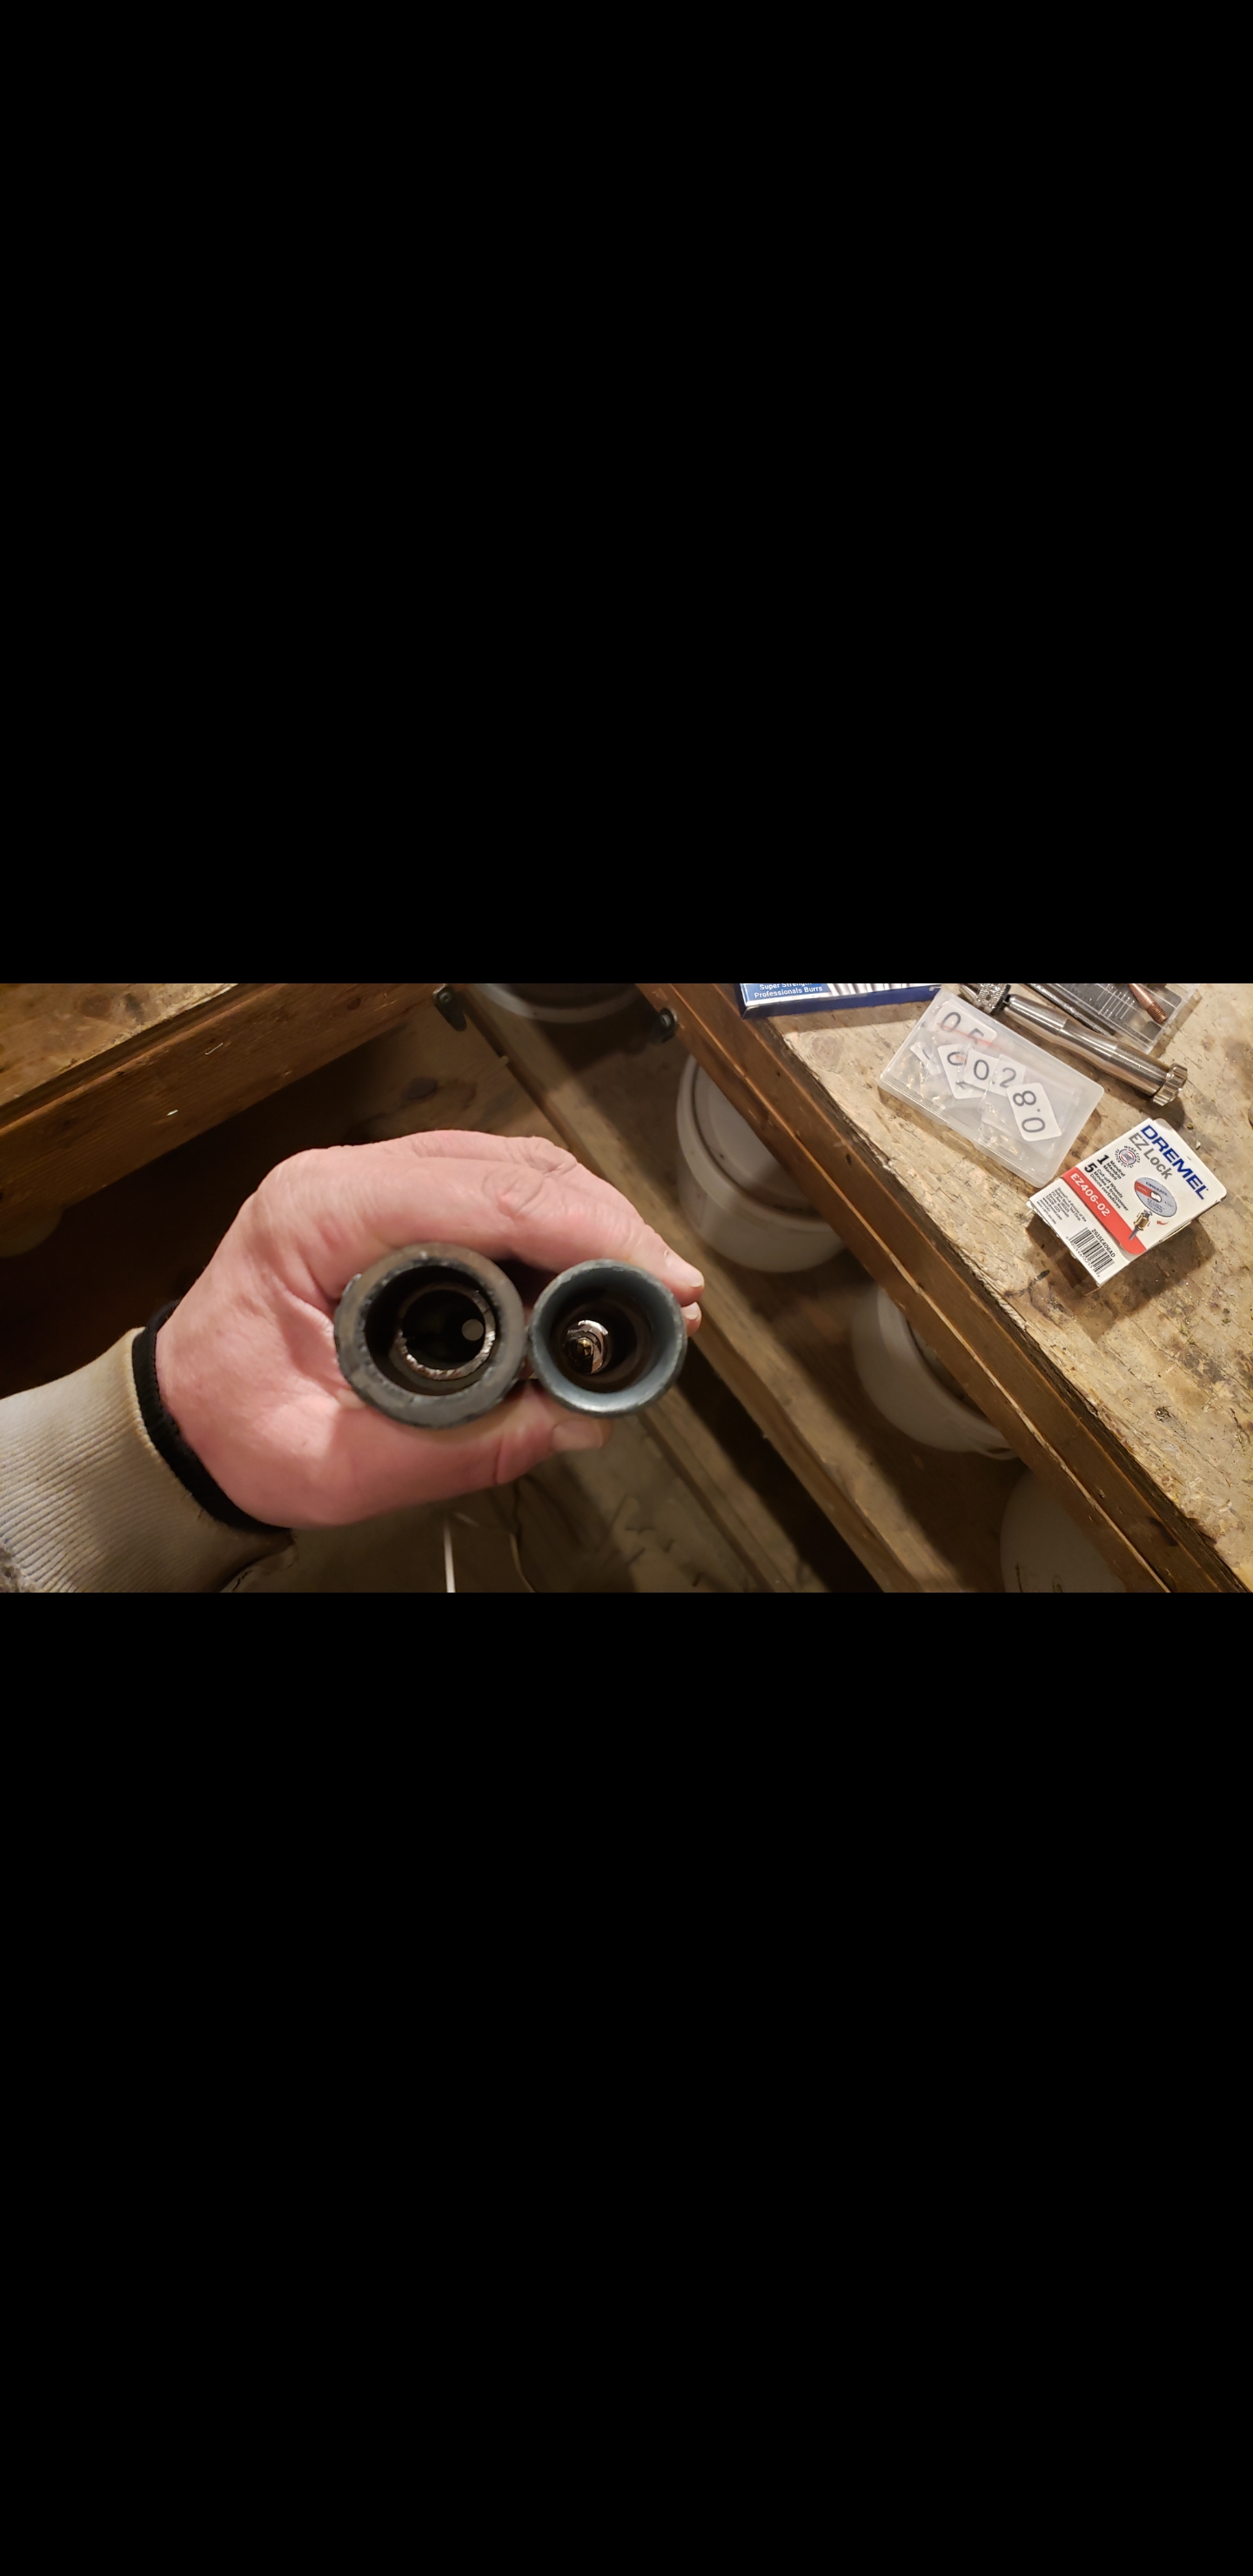
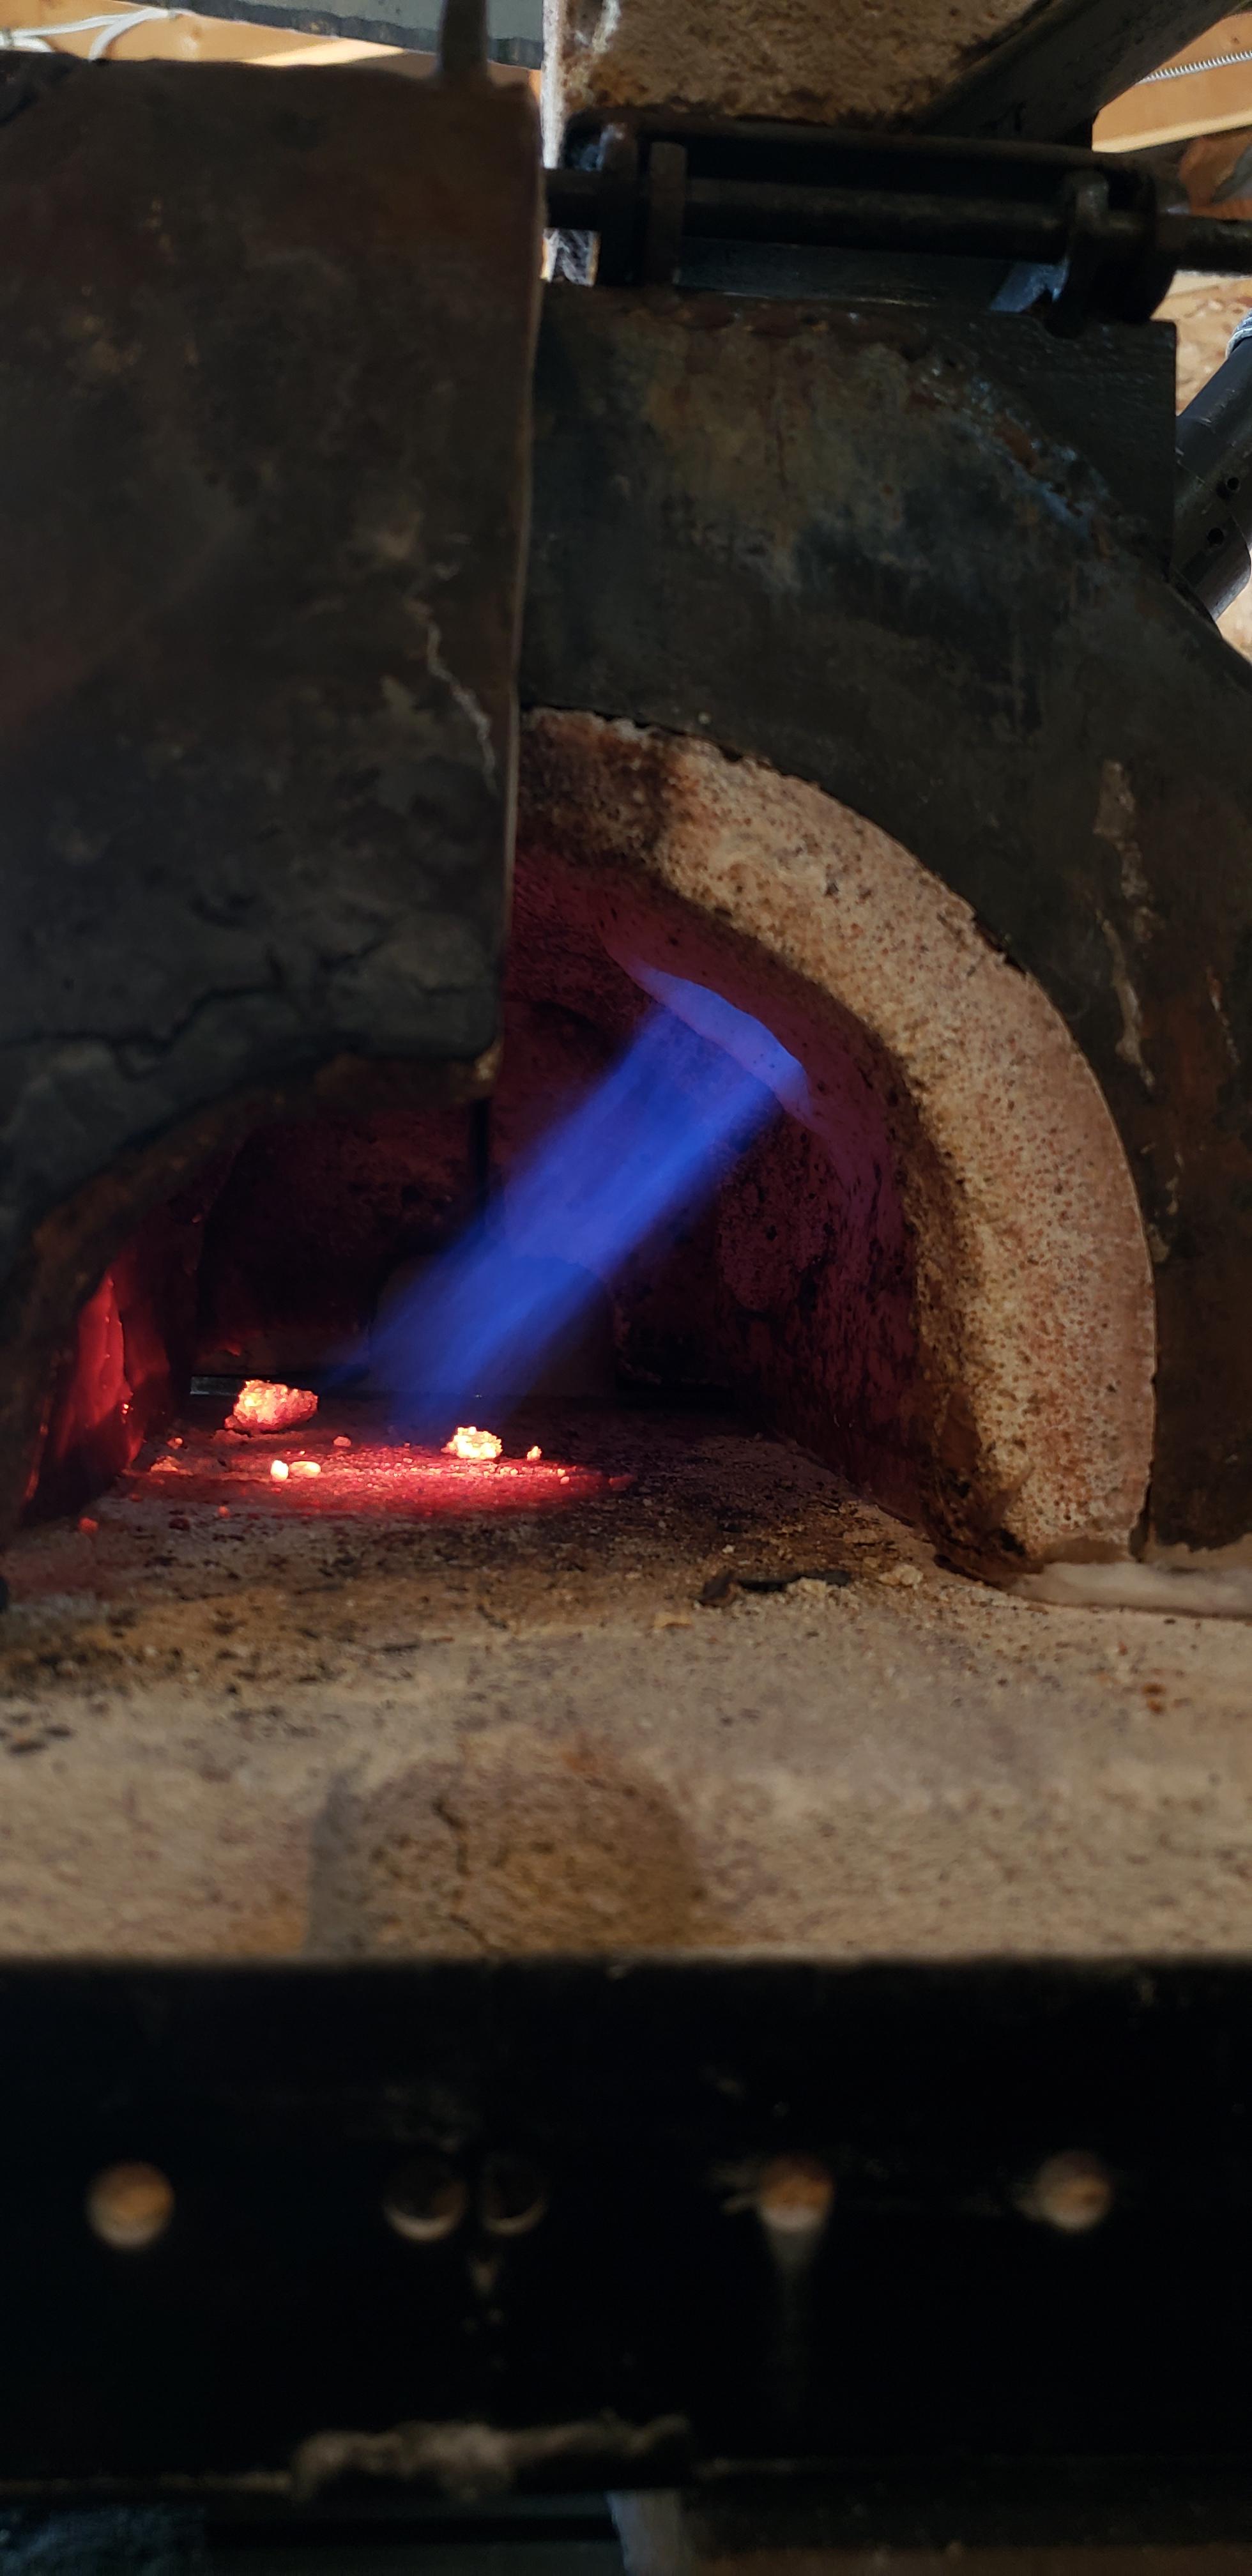
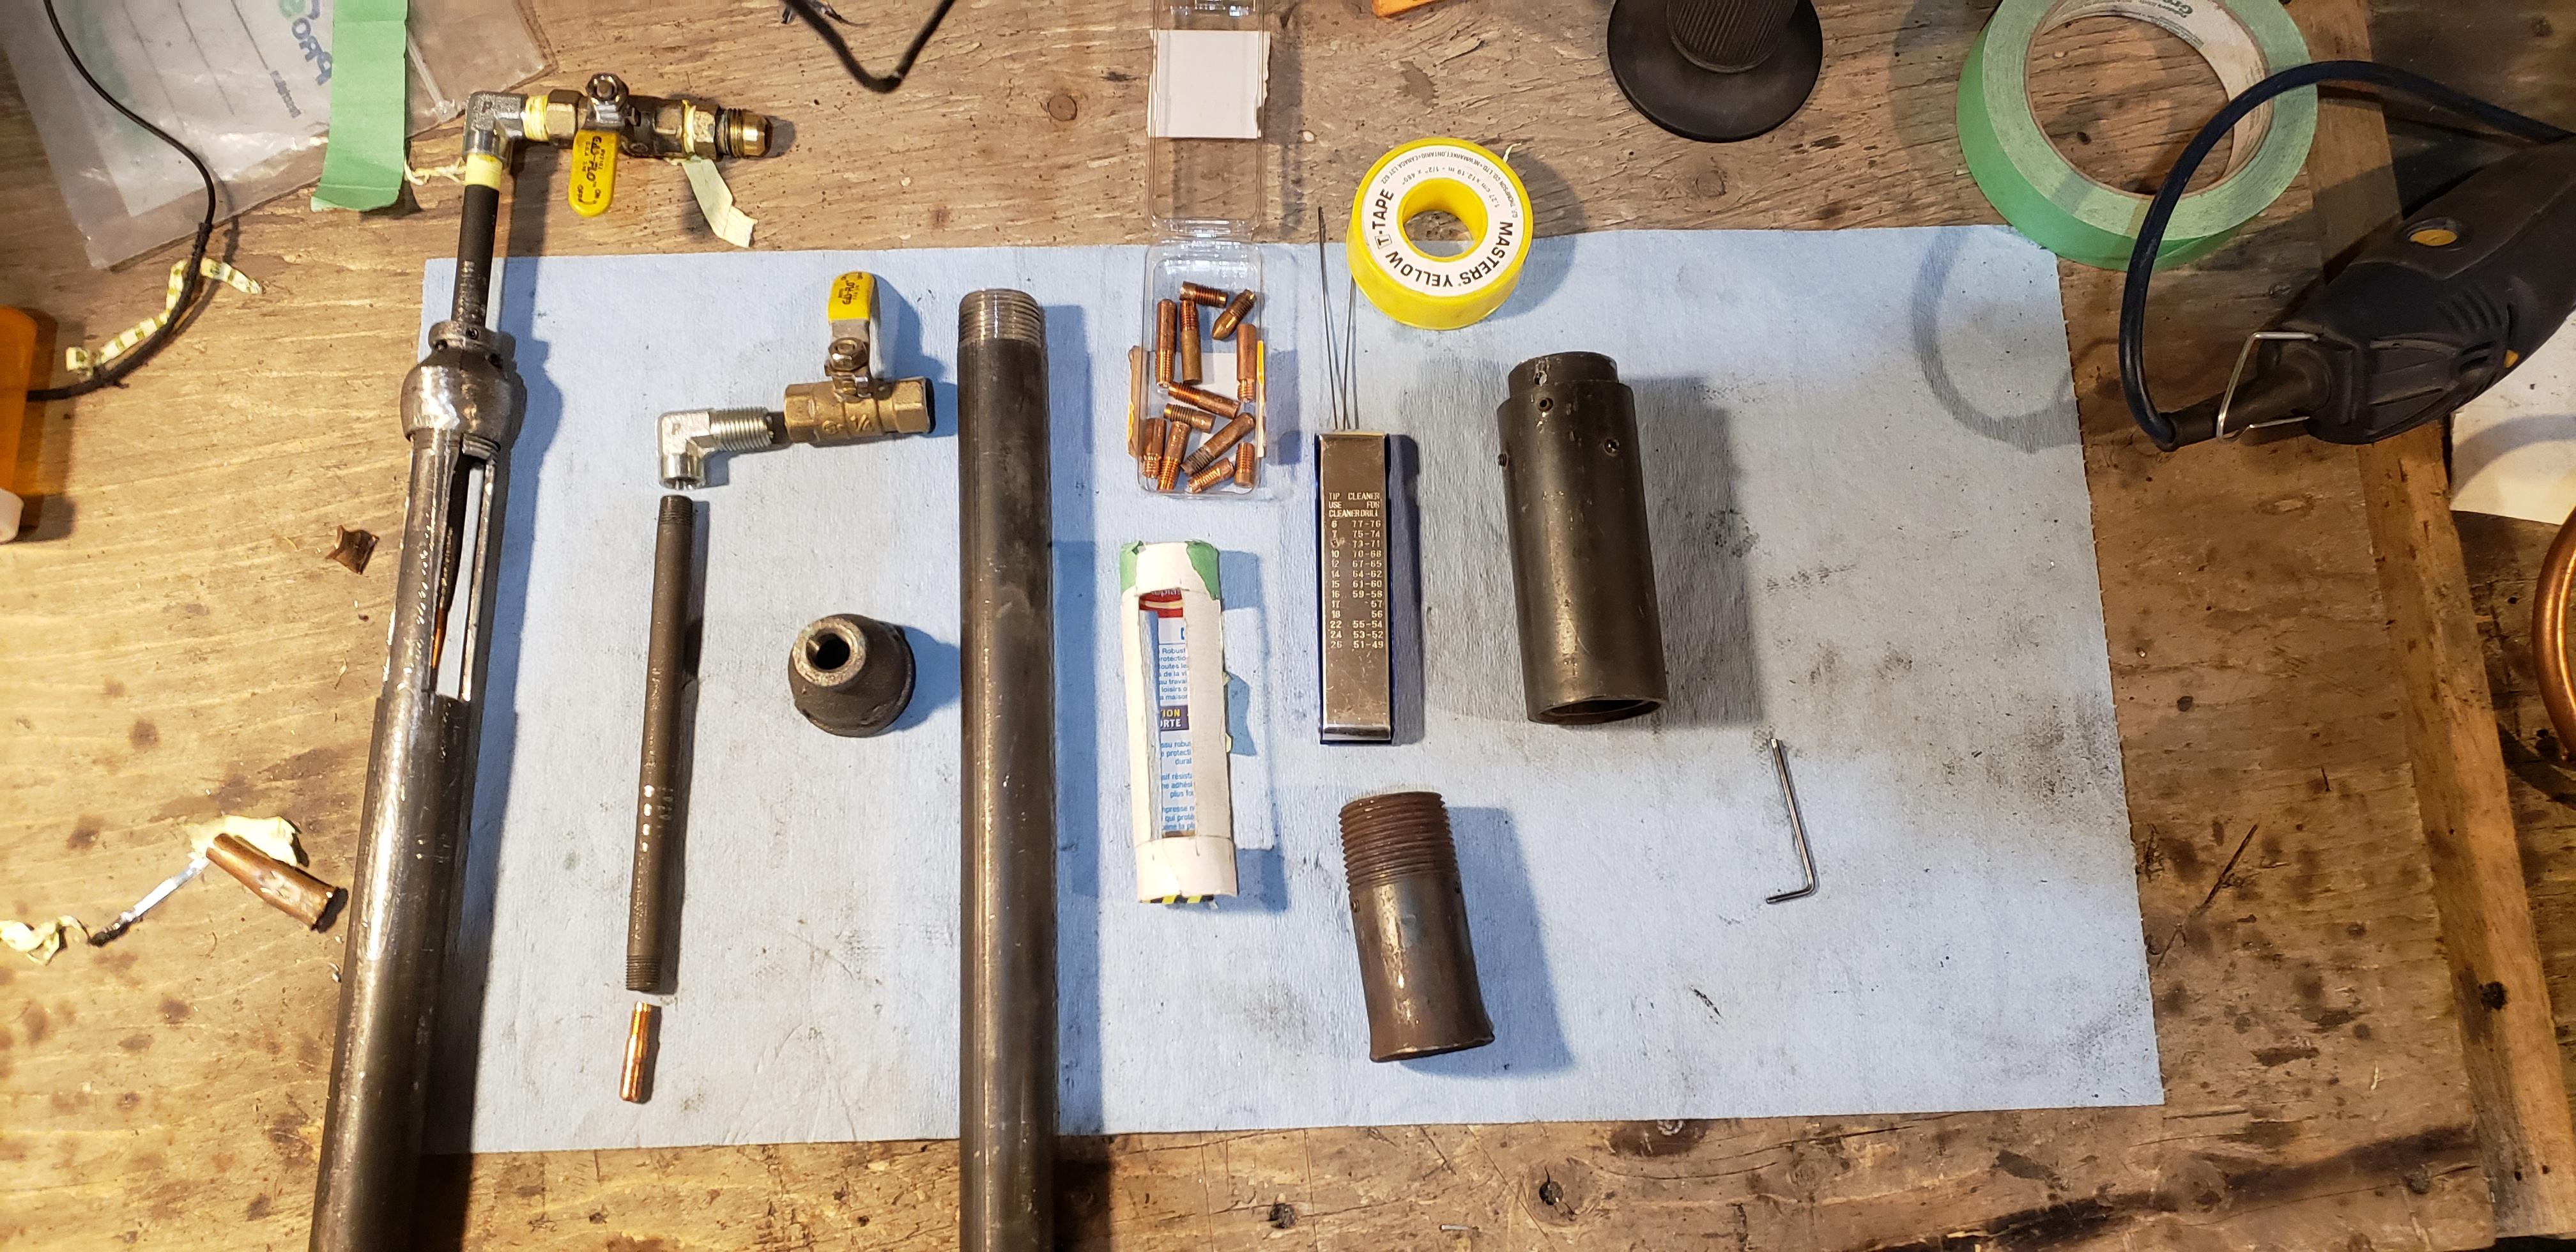
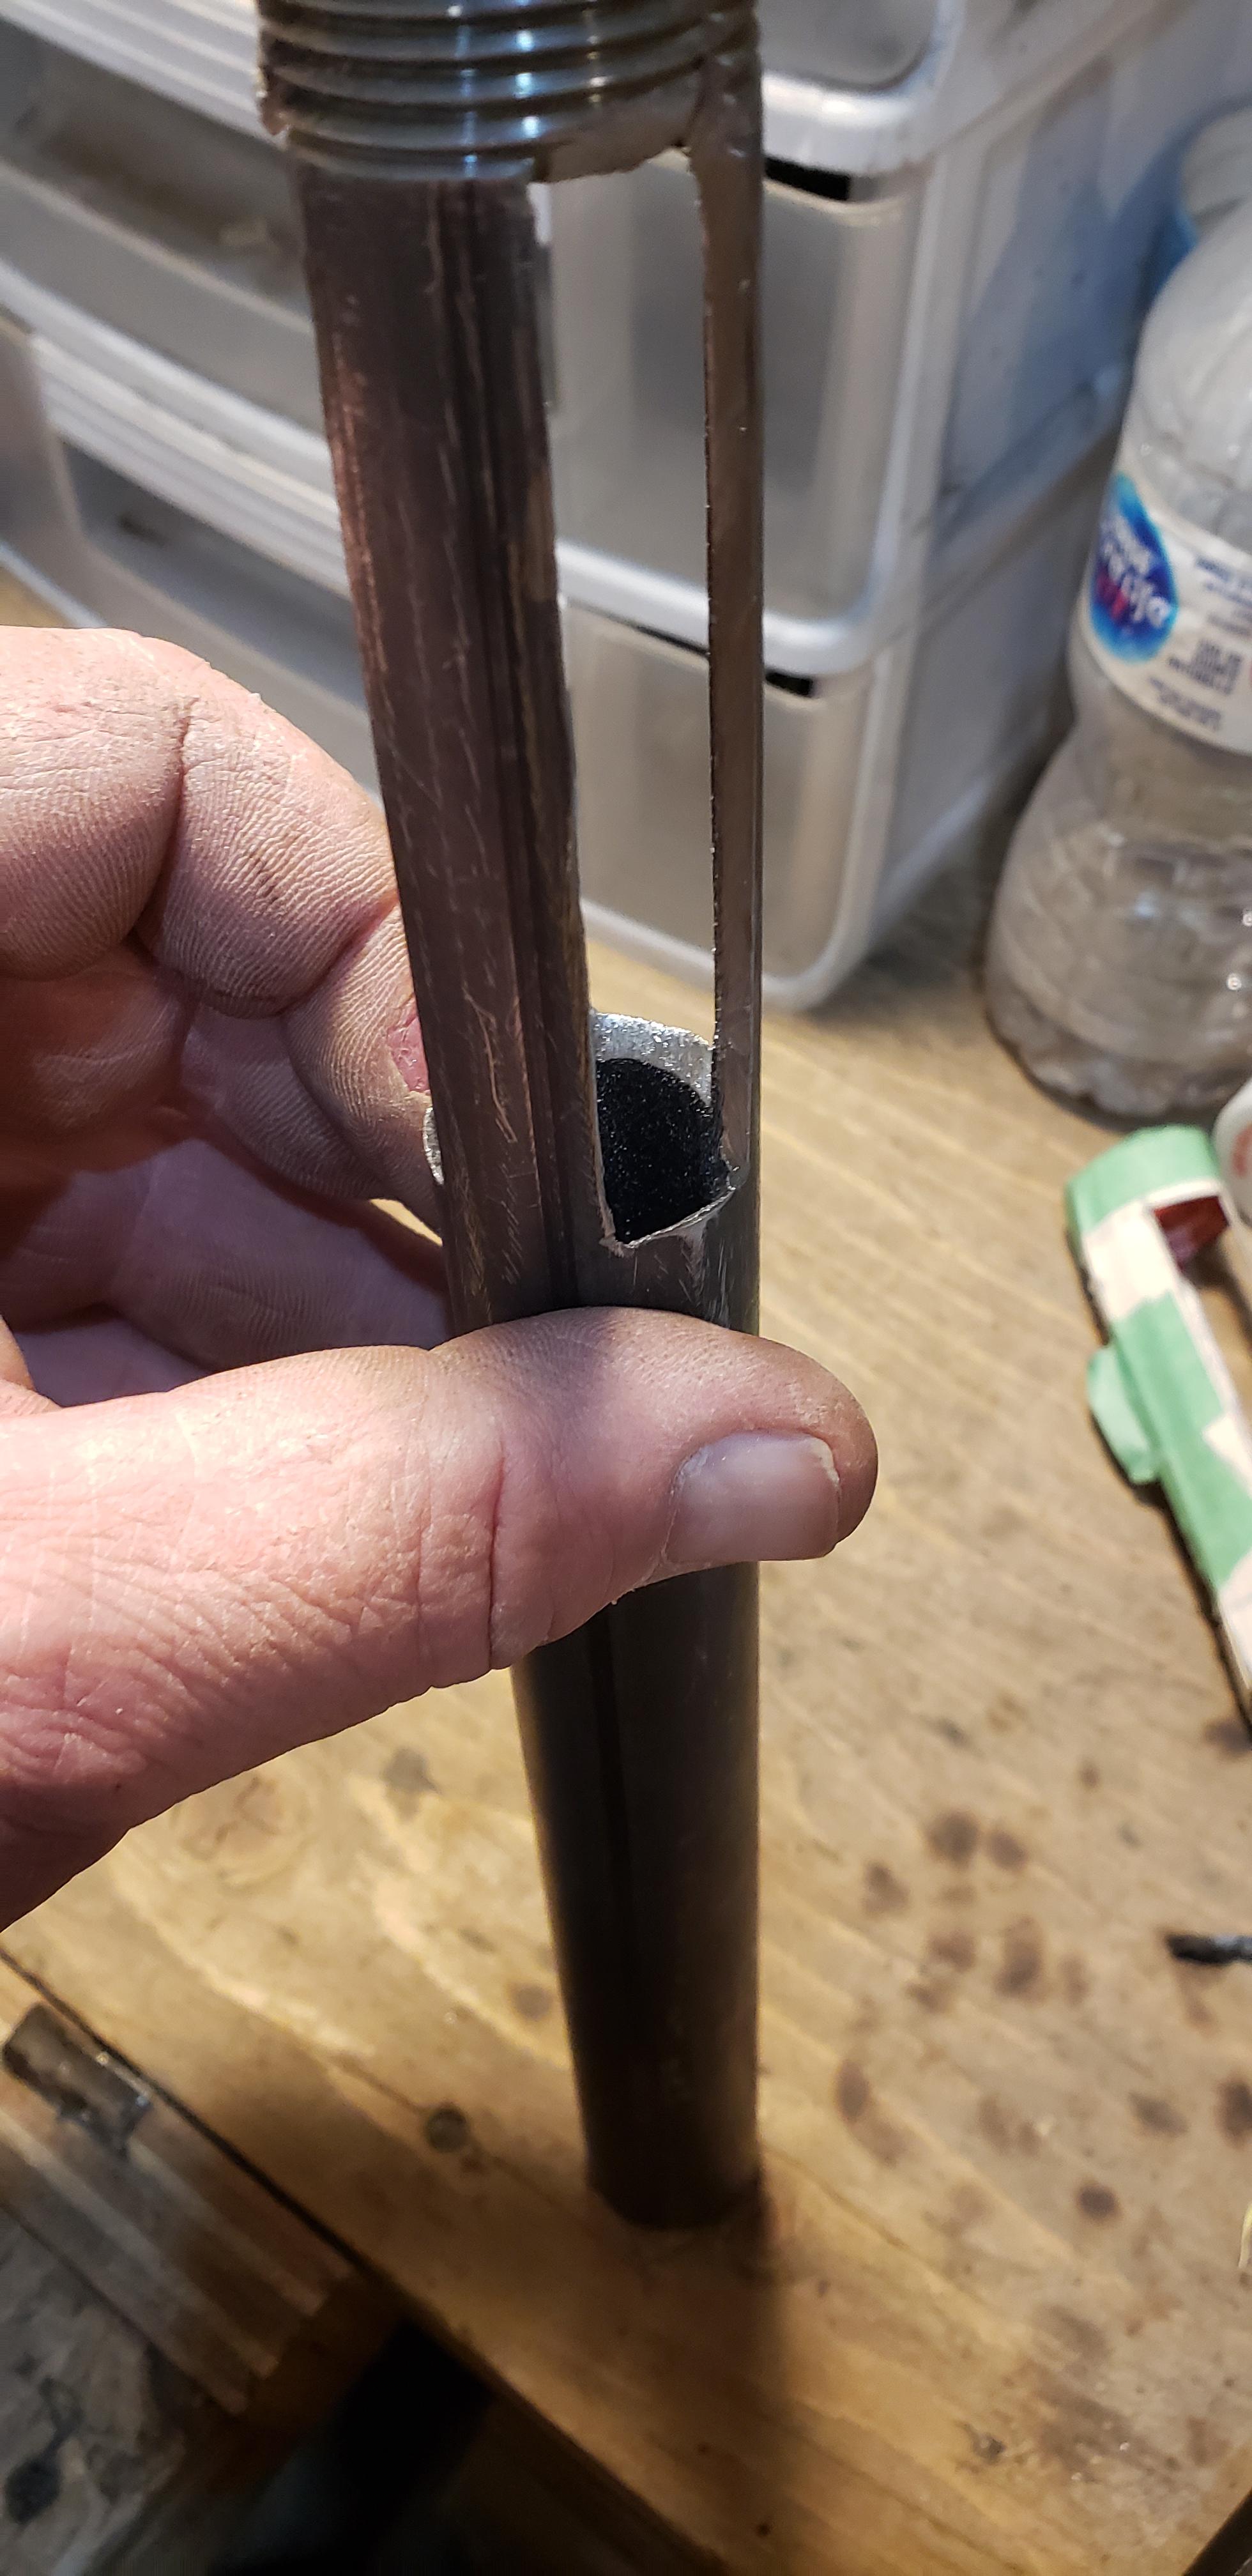
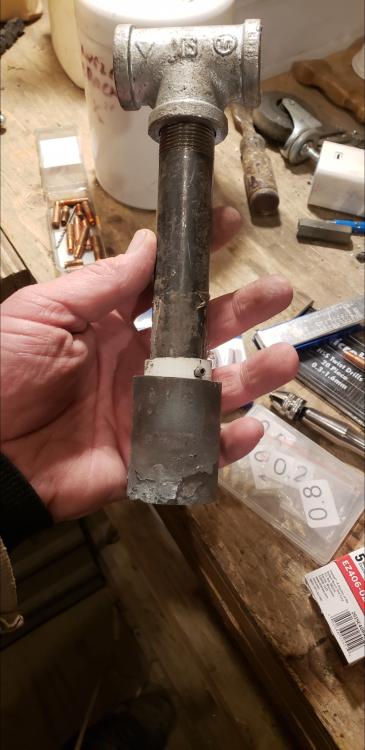
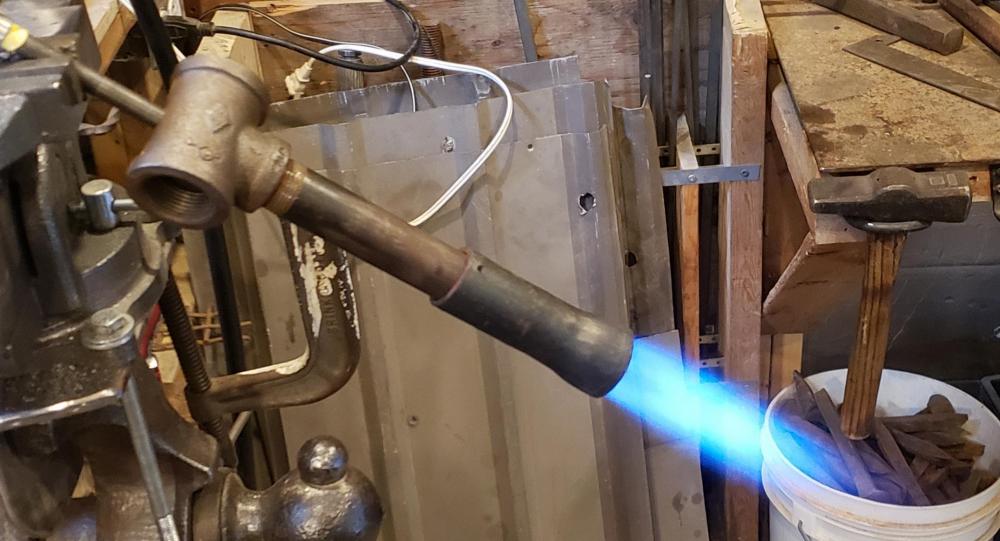
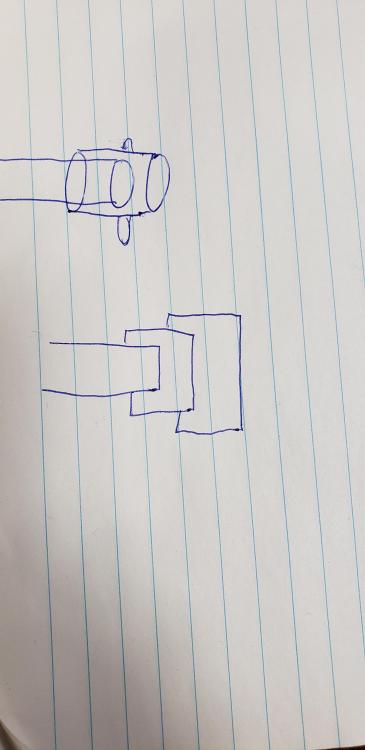
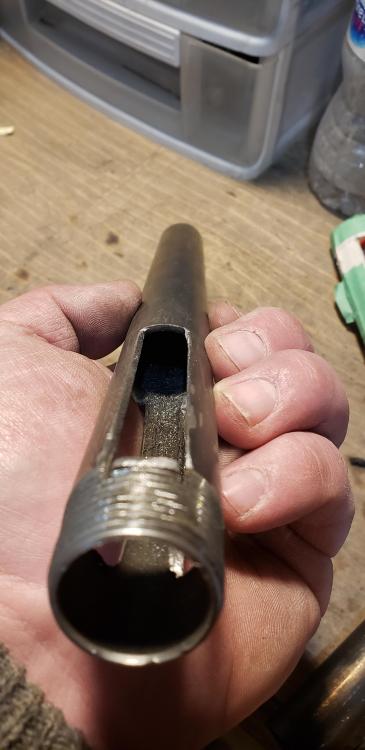
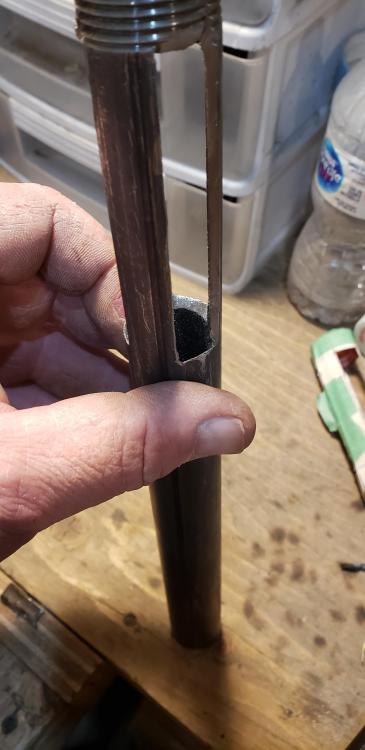
I had a little breakthrough yesterday when I was tinkering. Now this may be documented already but I found that you can cut threads on the outside of the 1/8" sch 80 nipple using a 7/16" 20nf I think it was. Also you can drill and tap the 1/8" fittings with the 7/16 20nf this way you don't need set screws you can screw in and out to tune as long as you got everything straight. And in some designs like a Mikey, Oliver, straight straight tube burner you may be able to stream line a bit with let's say the 3/4" steel, straight sided coupler/thread protector then a 3/4"-1/8" bushing tapped for 7/16" nf..... May be a scooch more streamlined without having to turn/grind anything down....... In this case I tapped the T and I was able to clamp the 1/8" nipple in the vise and just screw the burner up and down. However there's not much meat in the wall of the T so I may tap the T for a bushing then tap it then and also use a jam nut to lock in the orifice depth once I find the sweet spot. This is temporary flare for now, it's a bit larger than the 1:12 so it holds the flame a bit too deep. This burner as is currently: 1/8" nipple 0.030 contact tip 1",3/4",1" T 3/4"x7" mixing tube Flared out to 1 1/2" with a 1 3/4" over hang. This is still in the testing phase, I already know that some of my ratios are random in this build but I was just tinkering and had limited fittings (need to hit up the plumbing store) I'll update in a few days when I get a chance to get back in the shop and take a few progress pics. Thanks for copying the vorticle flow write up forward Mike it makes it nice and easy to find...... You have it explained in a way that's fairly easy to visualize.

-
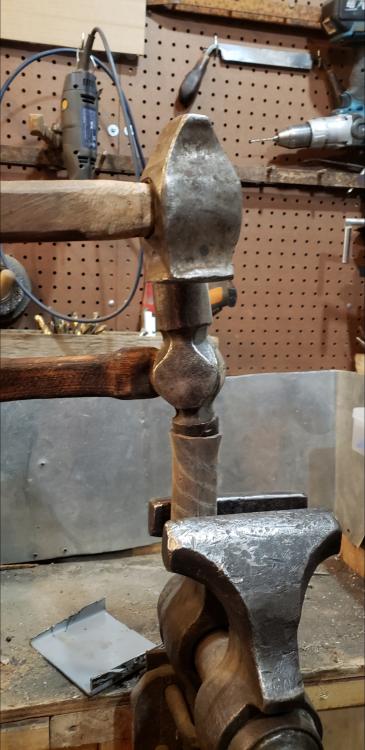
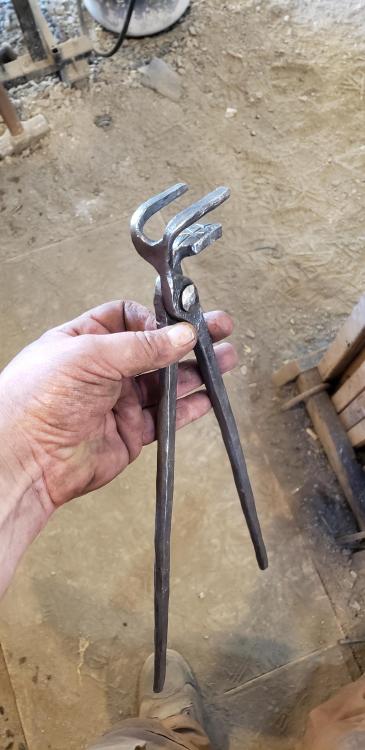
AFB thanks ya they're for holding RR spikes by the head. So far they seem to work fairly well.
-
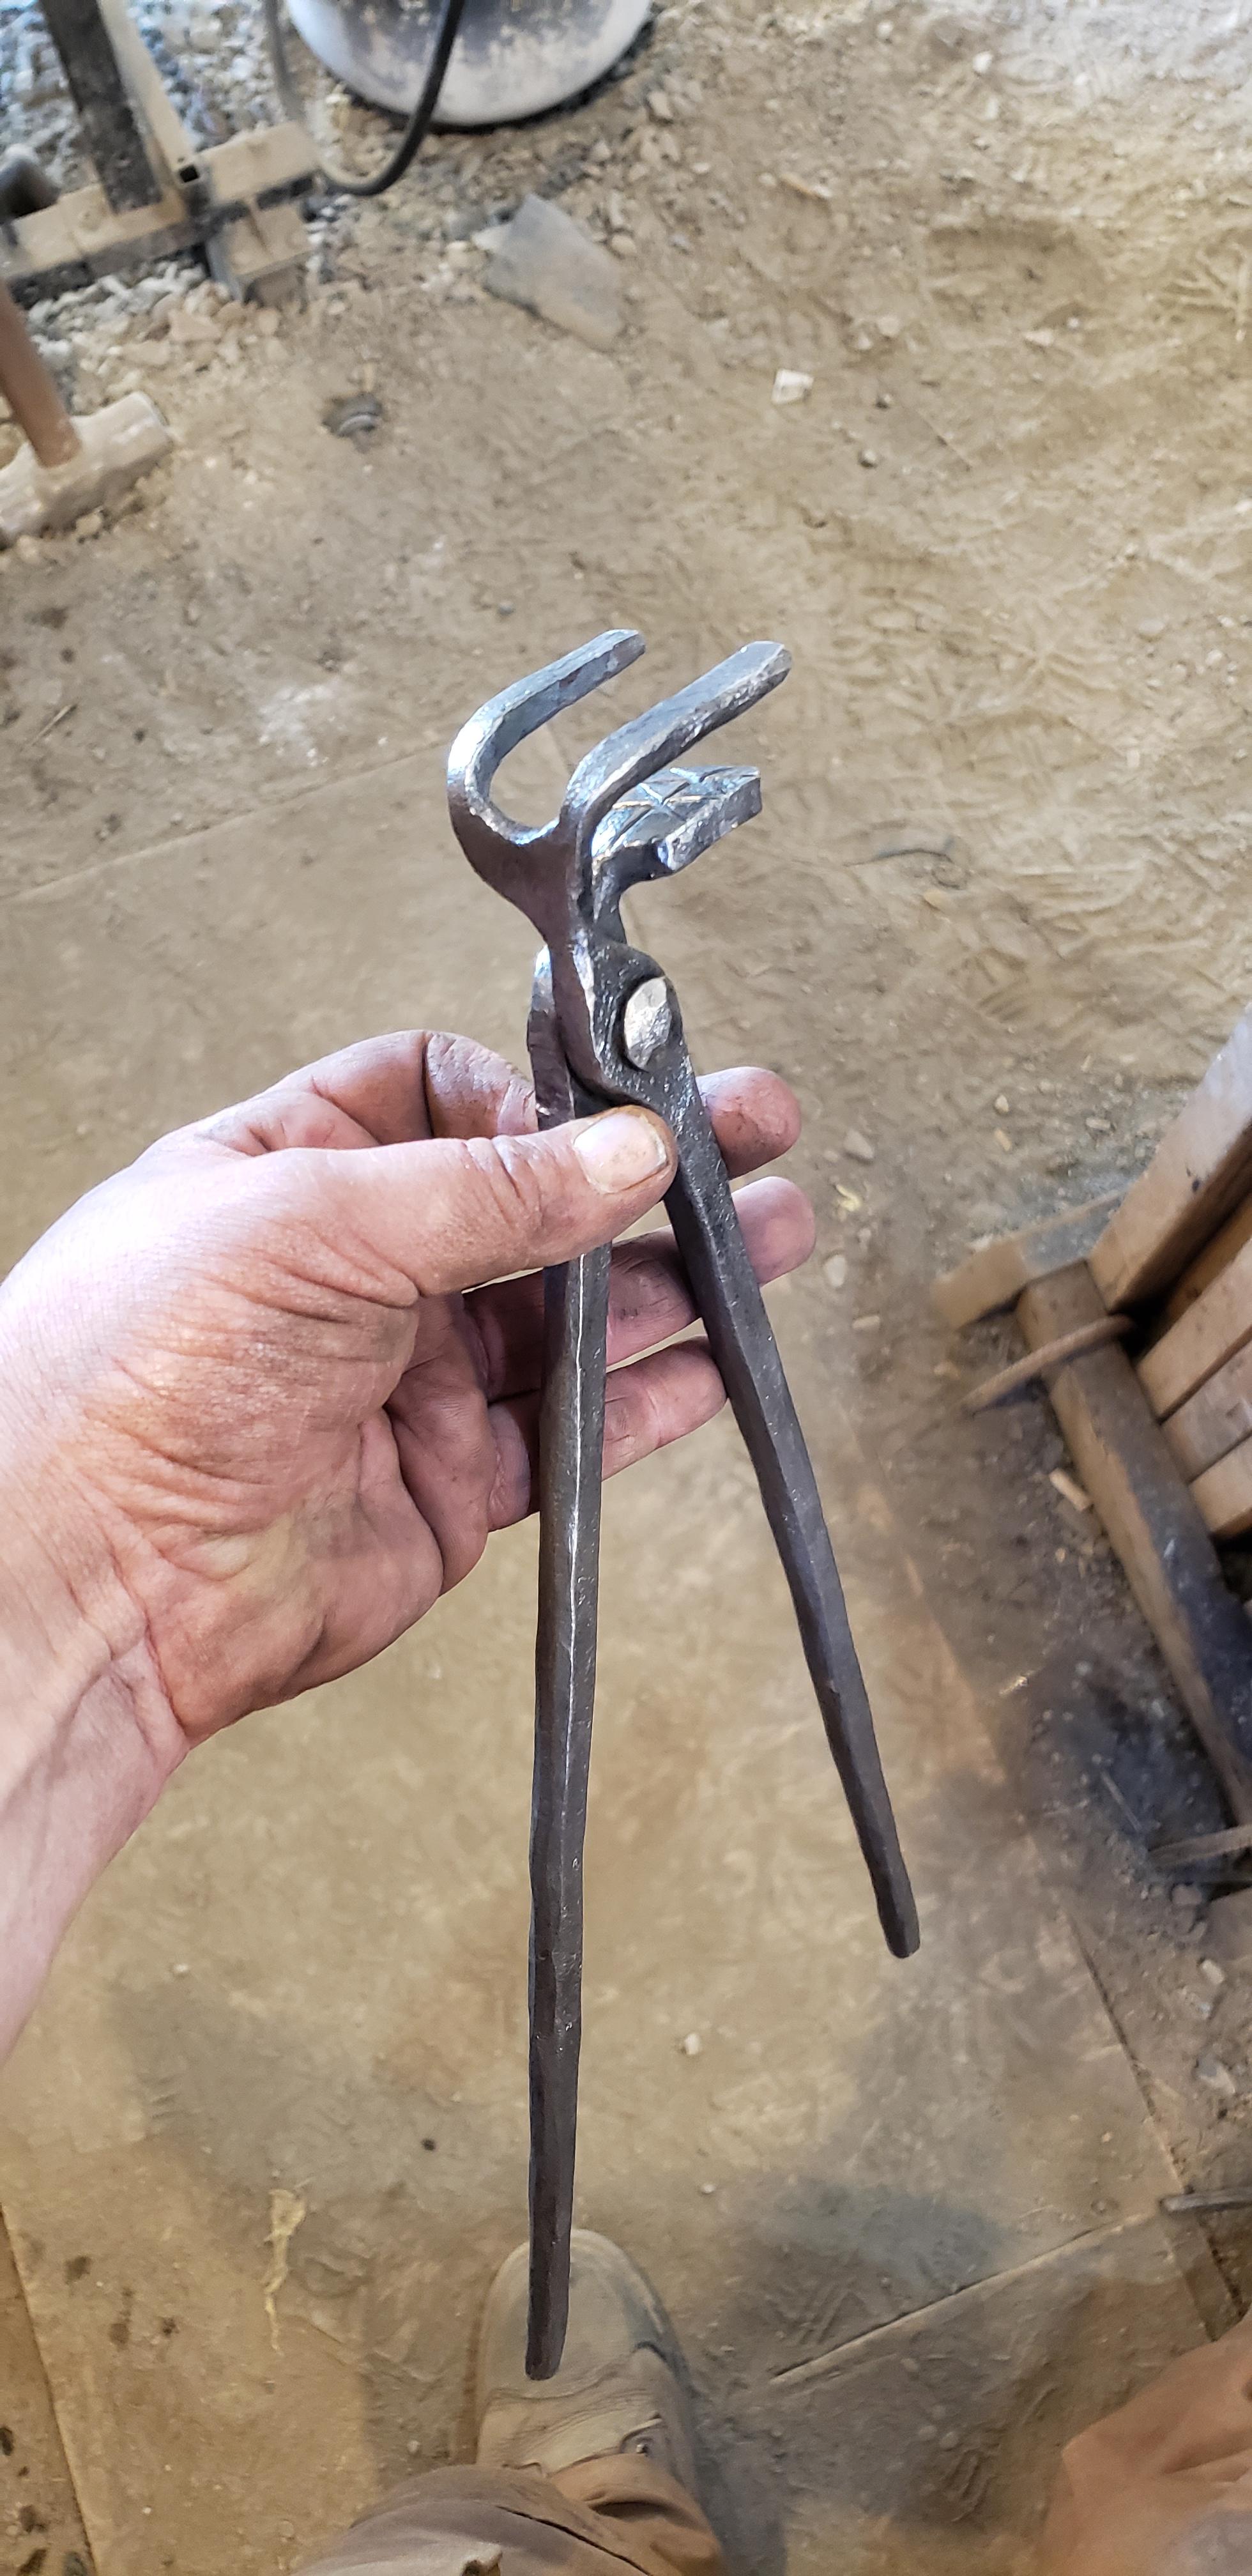
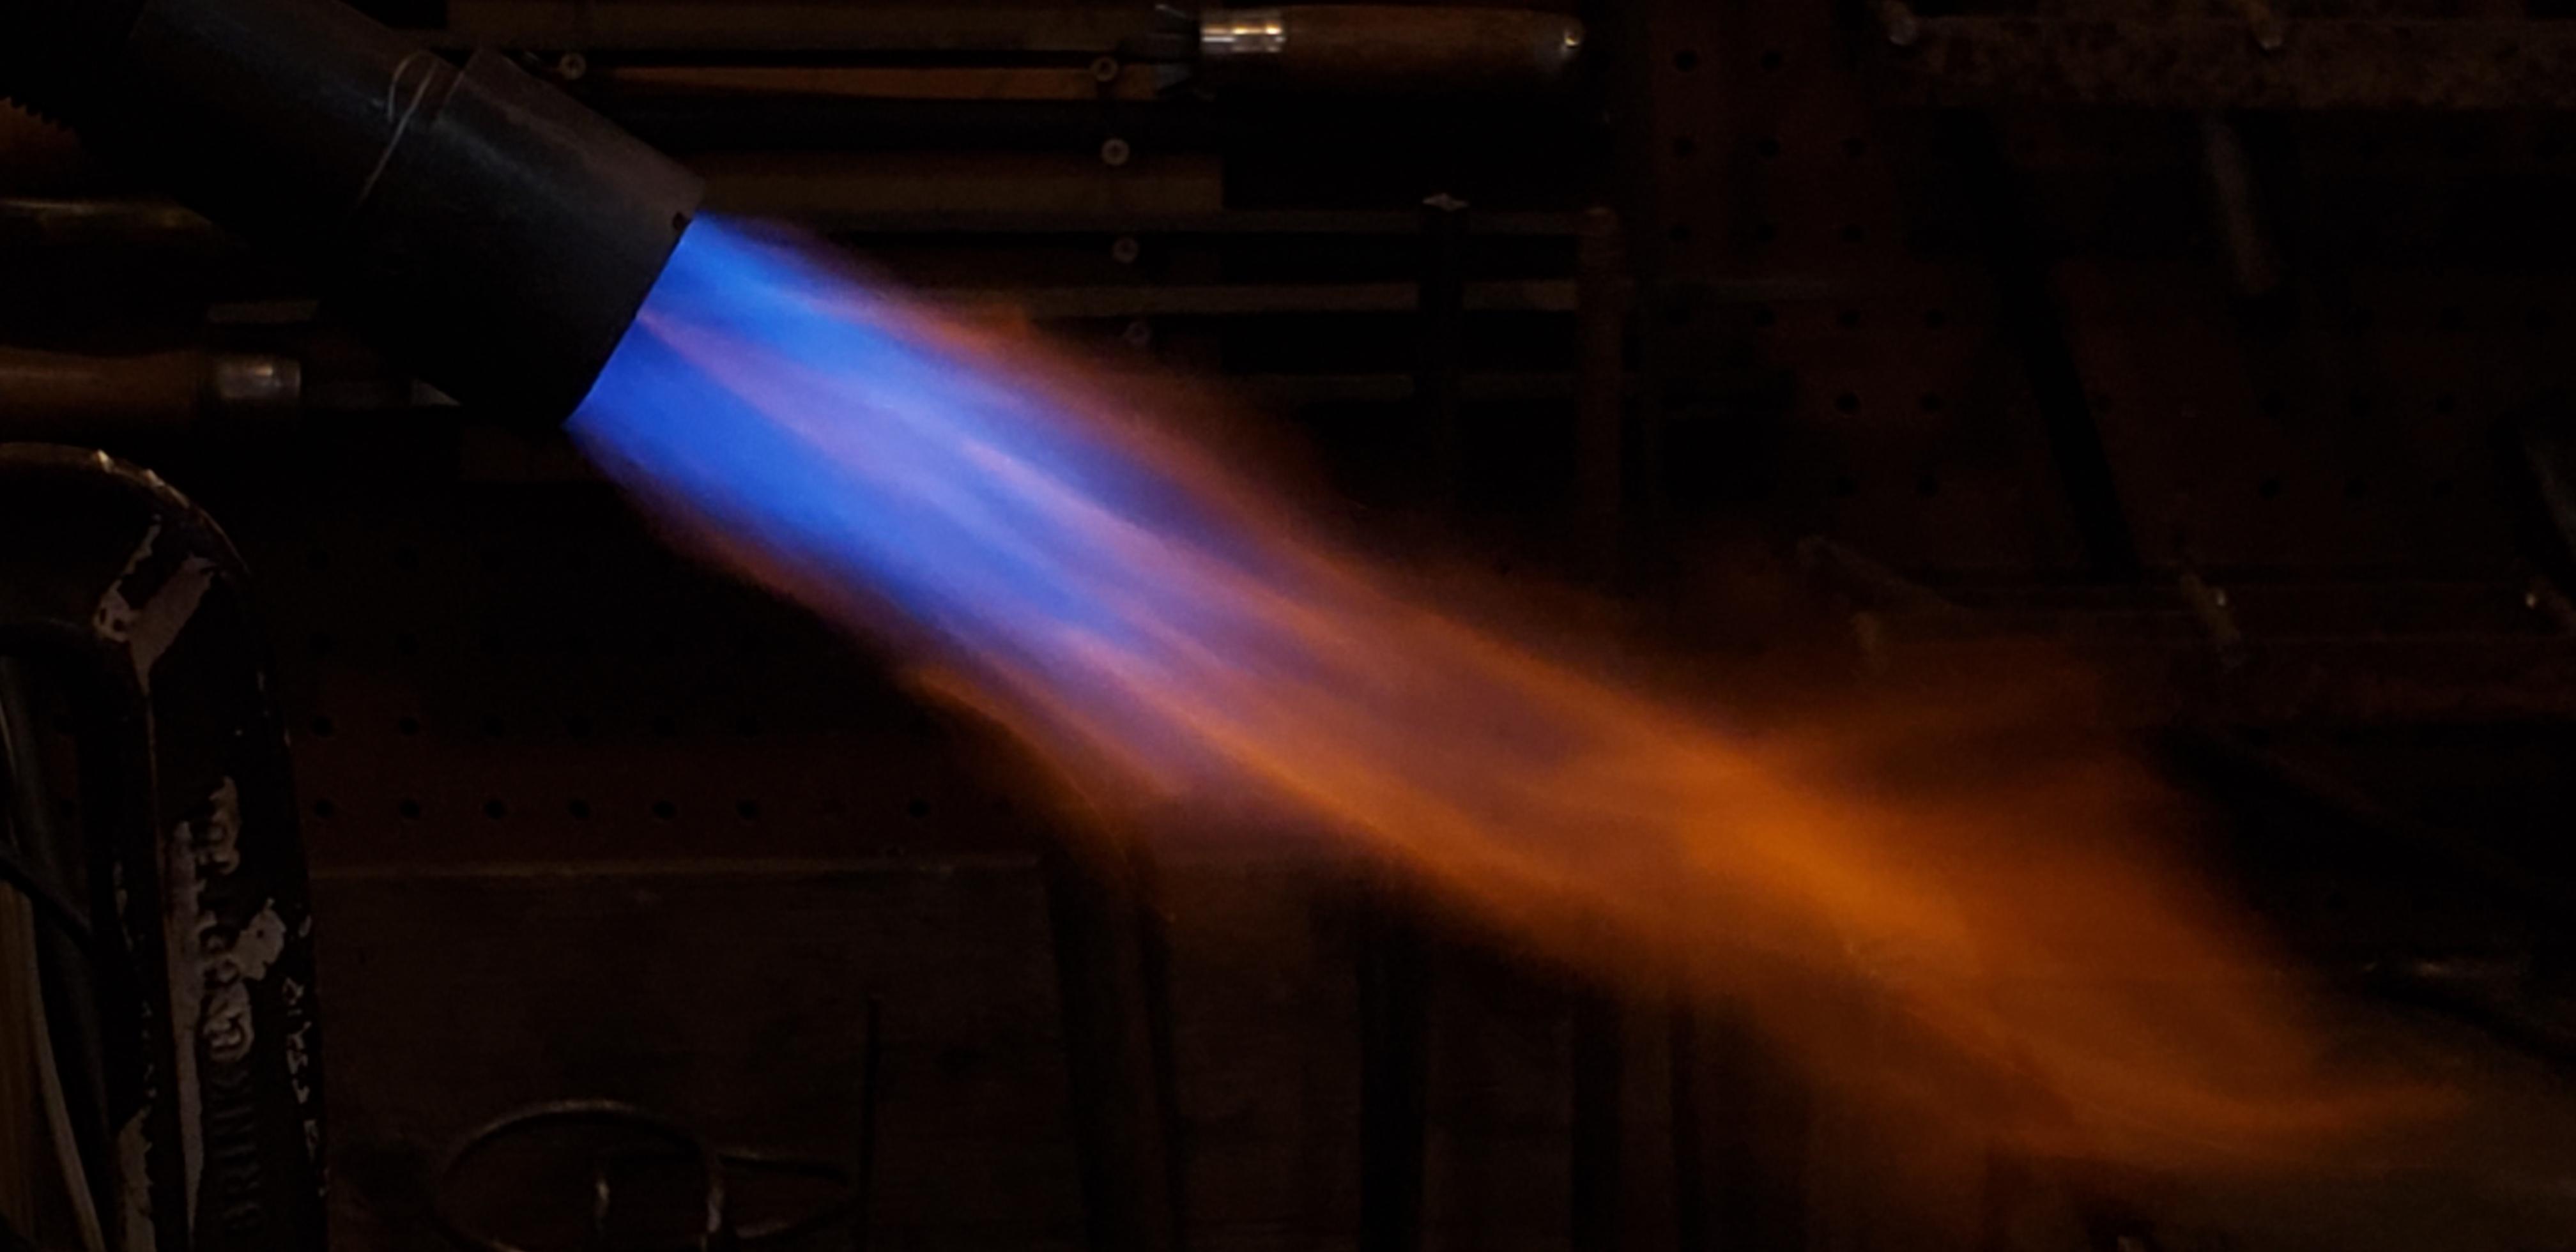
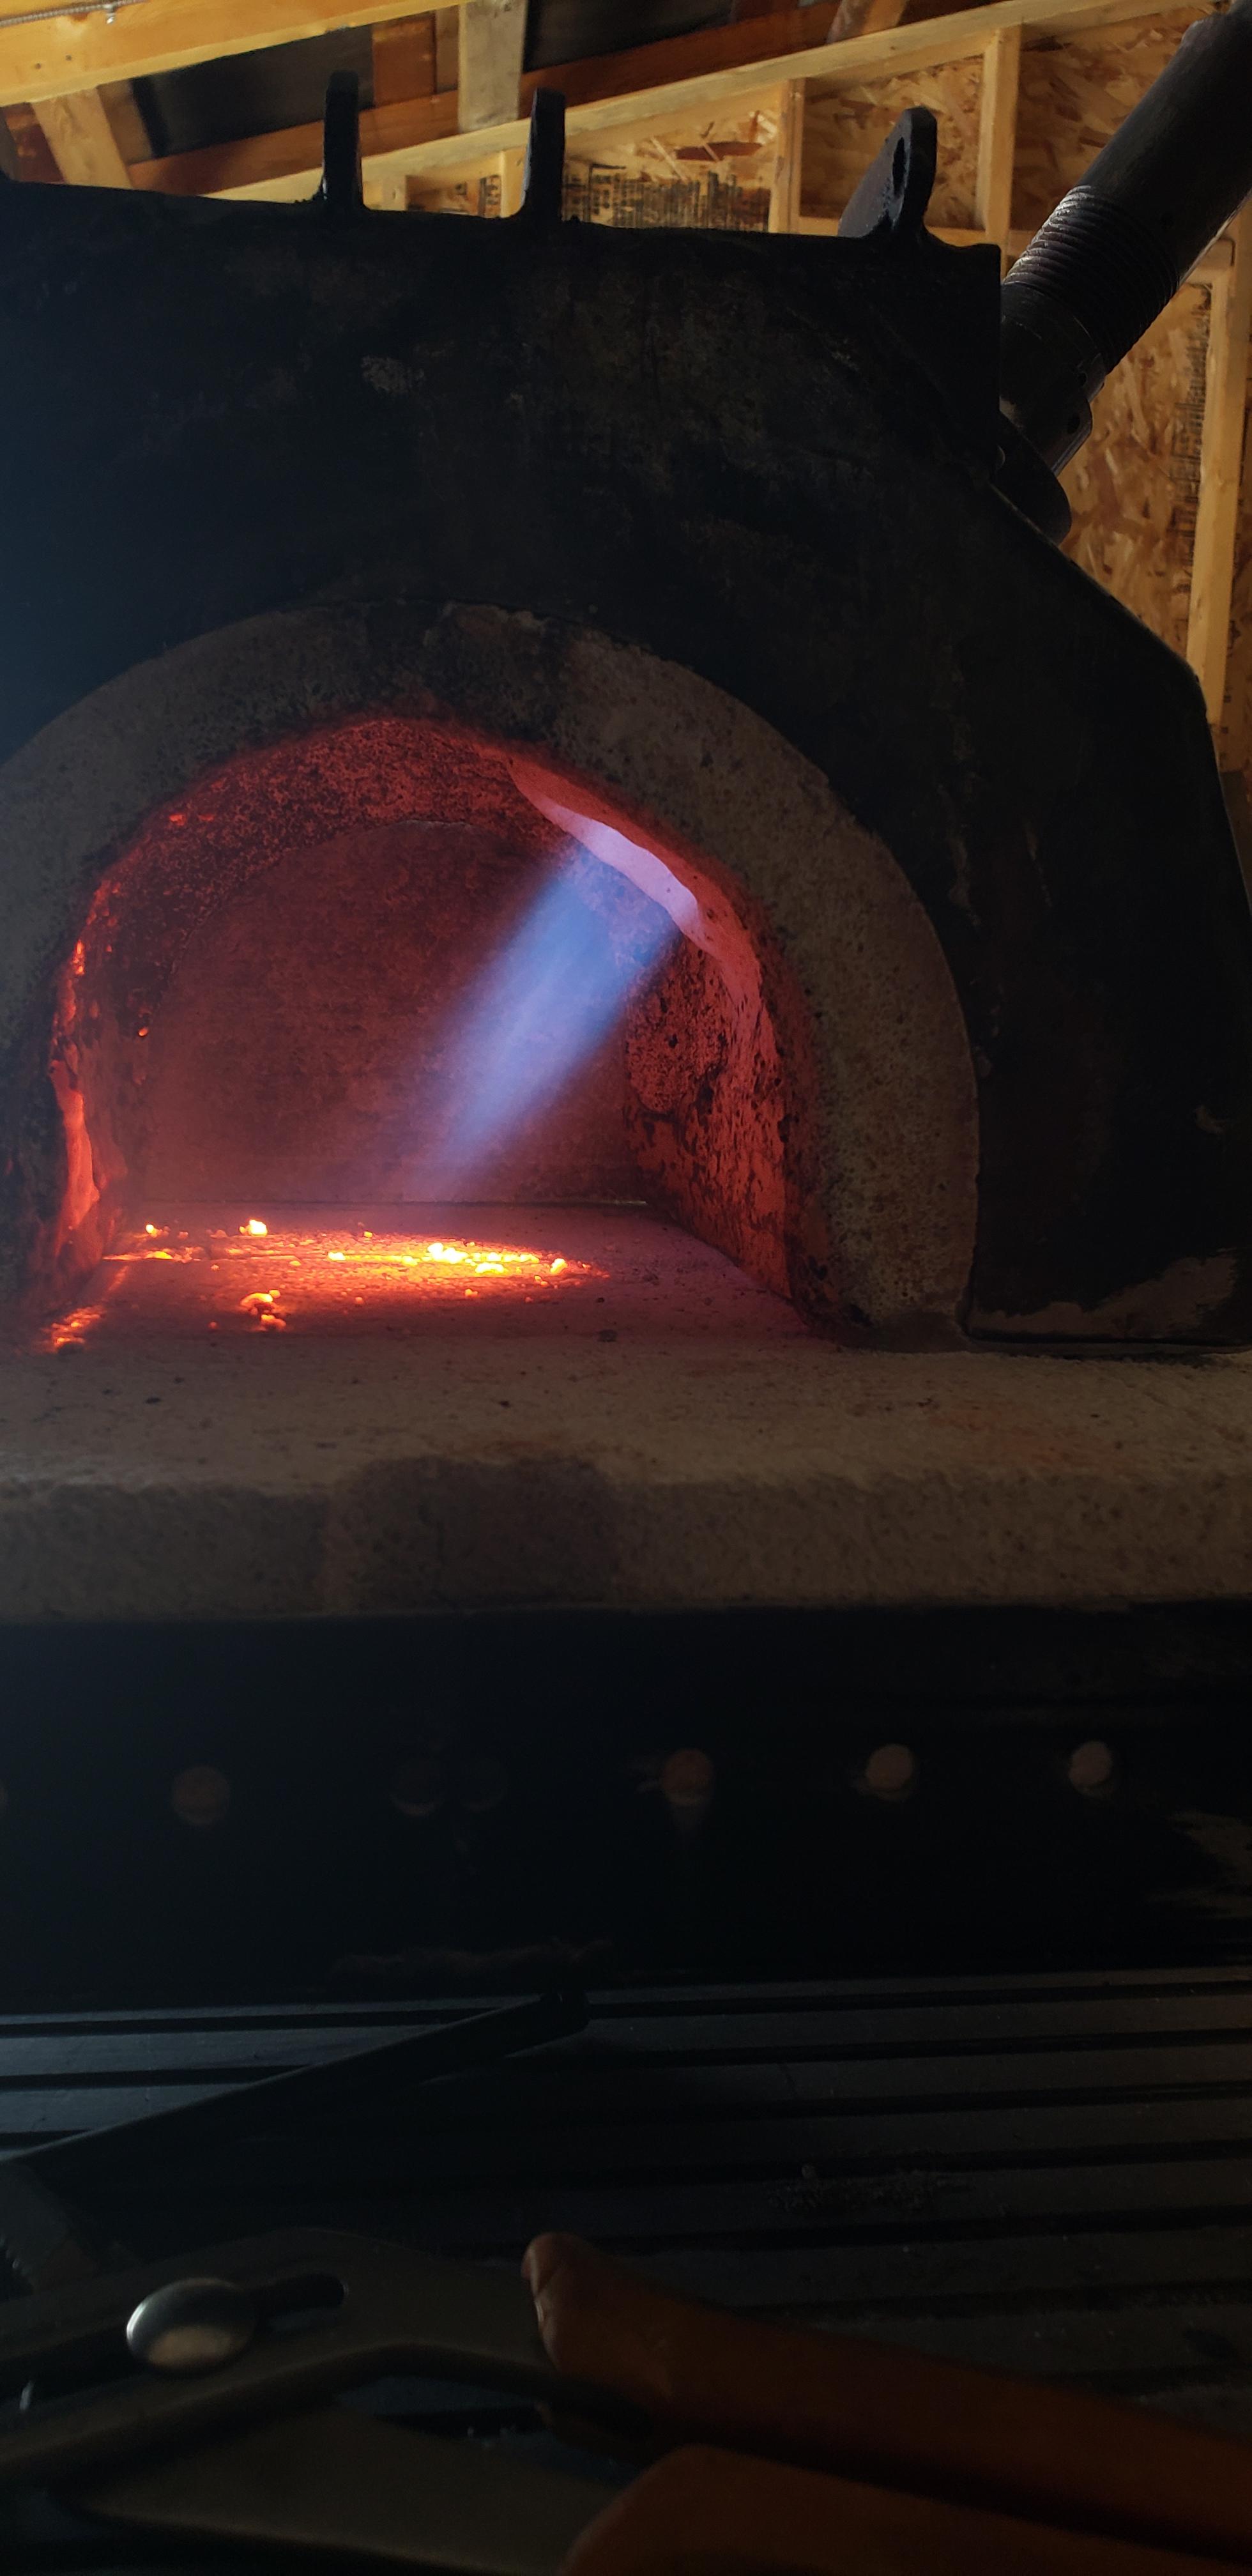
Oh boy I missed a bunch while I was away. 671Jungle, that's a beautiful flame nice stable shape. Hey Mike I already had two burner Tubes made up so I would be able to try different lengths after the air slots. For some reason I can't get a decent flame burning outside the forge, I'm trying to use a step nozzle and have put it together in several configurations but I either run rich with the orange flame or I blow the flame out. I cleaned up the air slots, trimmed the mixing tube to 8" after the air slots, 0.023 contact tip. Inside the forge I can get these flames. I get no dragons breathe once I get the forge up into the yellow range and yellow is easy to hit and hold. Im not sure what you see in these flames but they seem to be working fairly well. To hold a yellow temp with my old burner running a 0.035 tip I would run about 10psi. This burner running a 0.023 I run about 10psi for the se yellow temp. Am I correct in assuming that I am using less fuel but getting more heat because I'm getting a more efficient burn? Here's a couple flame pics and a pair of tongs this new burner helped make.
-
Hey Mickey "very hot" is a good start, I already have a .030 tip turned down so it's a real easy change over. I have not read your book only picked up dimensions here and there in this thread and others so I've kinda pieced those bits together. The mixing tube portion (from the tip of the burner to the beginning of the openings) is 7 1/2" if that's too short I have another tube all ready made up that is about 8 3/8" so I have a little bit of option on length. Could you refresh me on how you determine a "very hot" flame? Is it because of the compact conical shape vs a looser flame that more or less blooms out of the nozzle? After I get these couple things dialed in I'll pick your brain on the "other" minor things Thank you
-
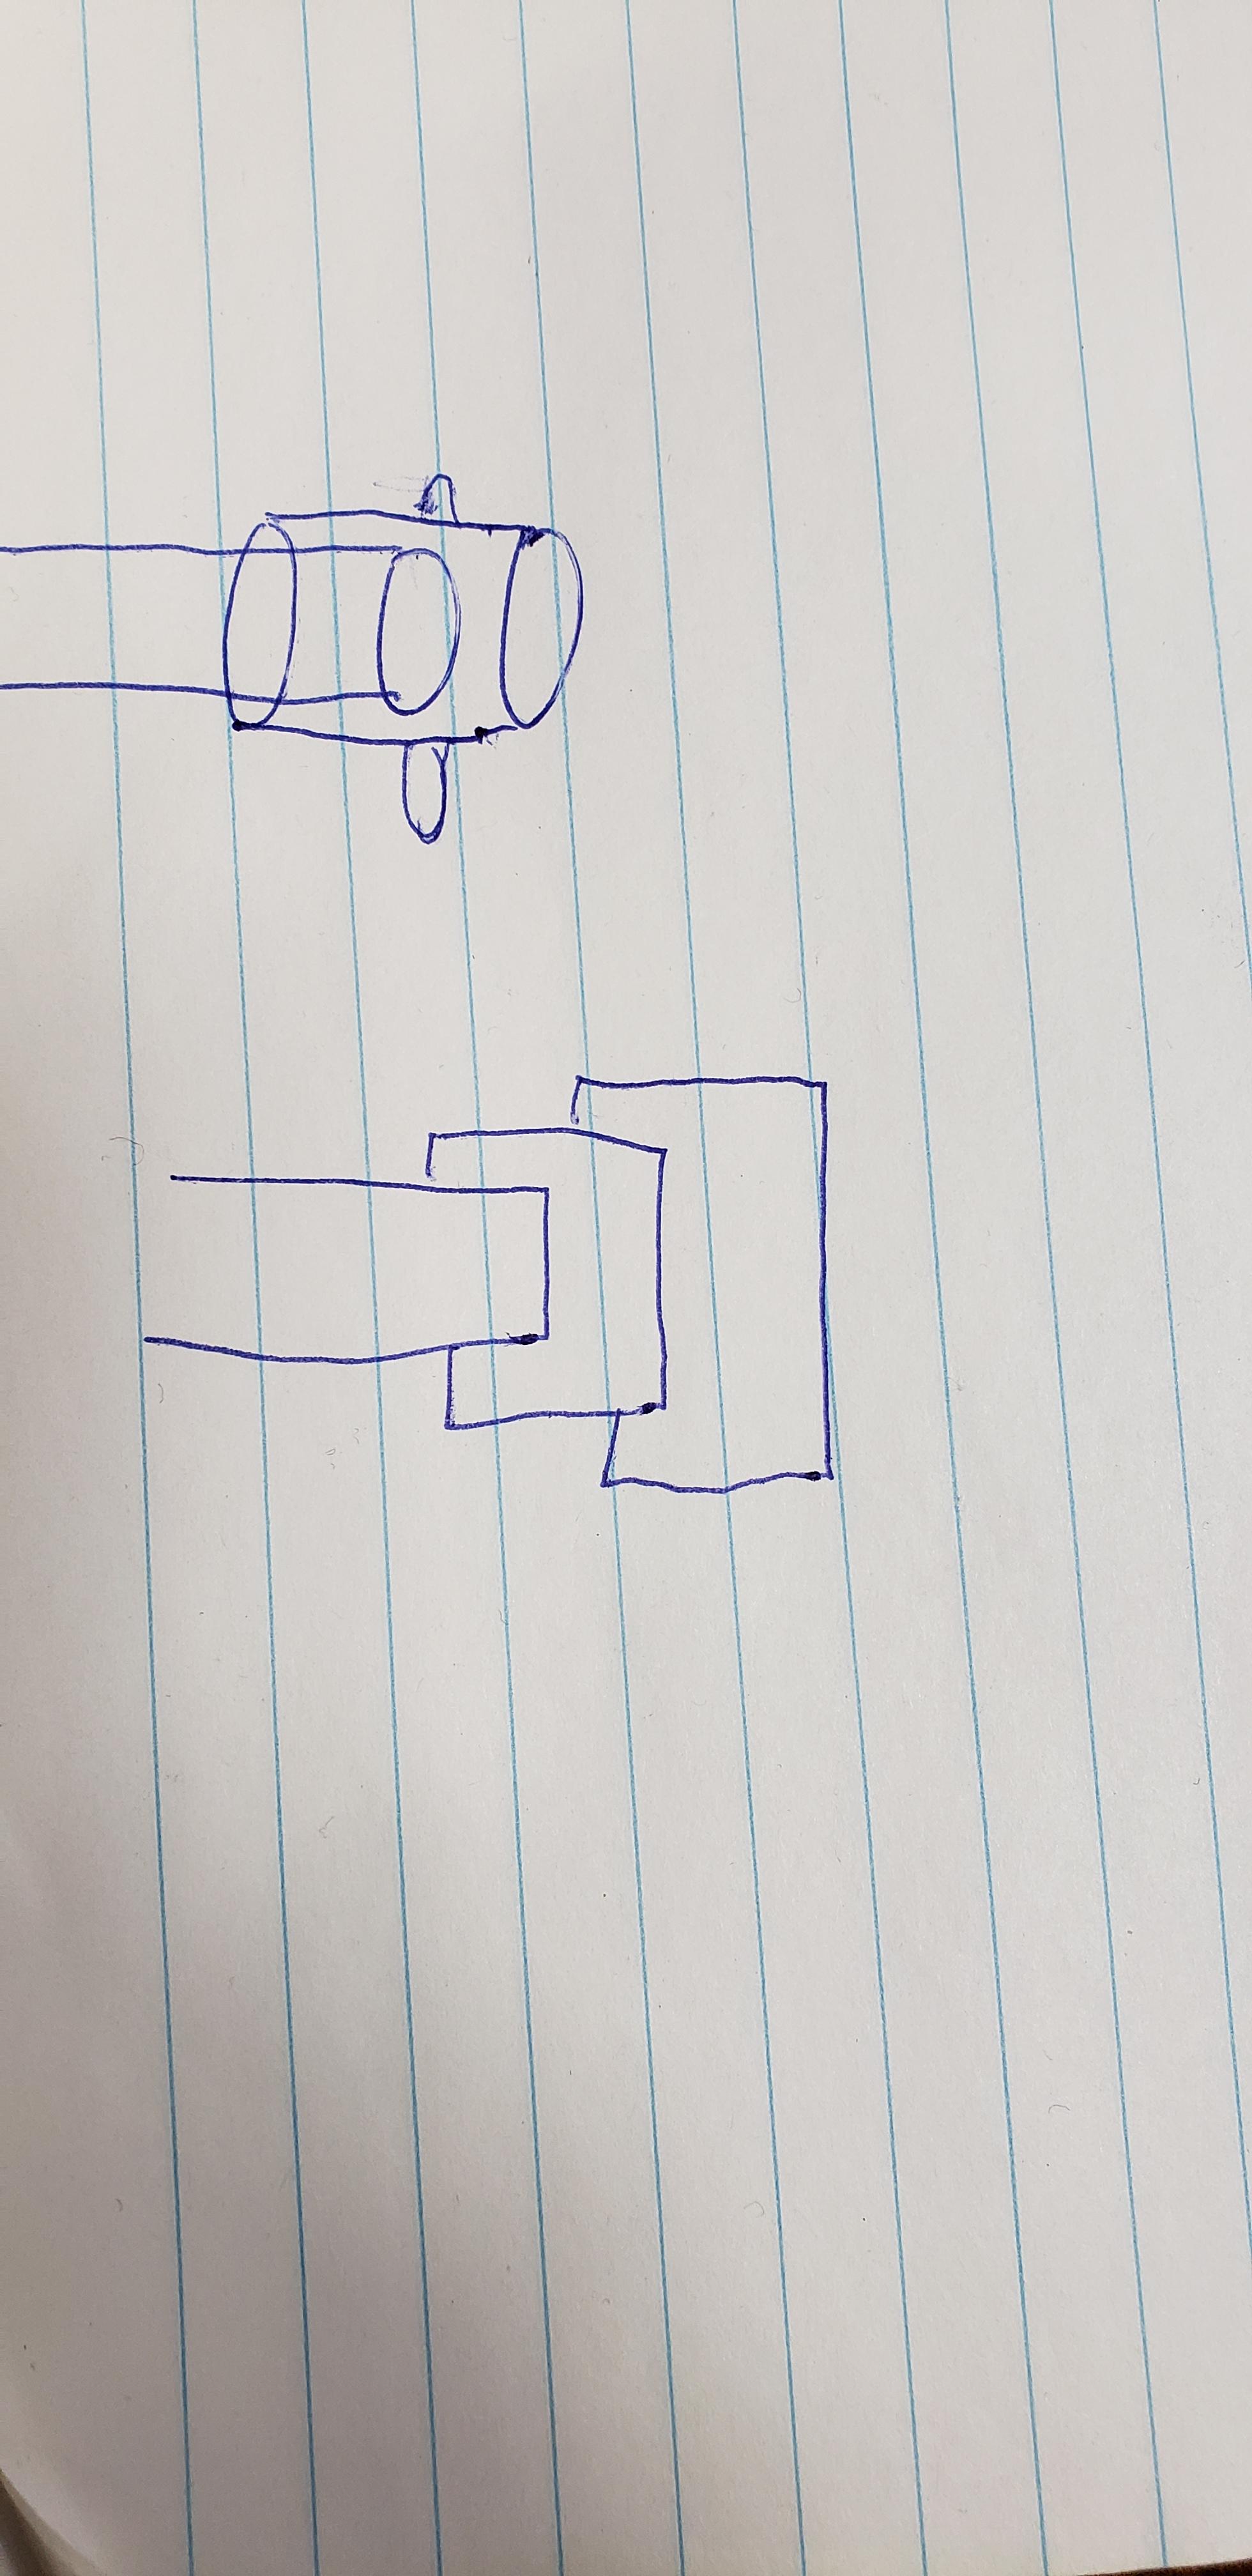
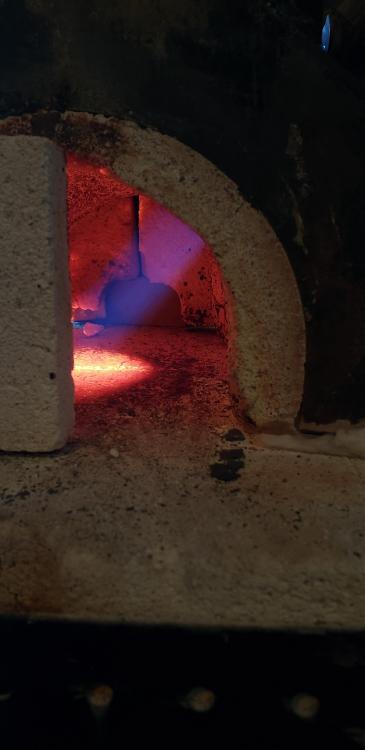
When the burner is in the forge the current pieces I am using as a nozzle only act as spacers, they butt up to the flare in the liner. Outside the forge I just slid these spacers out into a multi step type nozzle just to see how it would act ( I do have other pieces to make a step nozzle as Mickey describes which will be used in future testing ). Your description of the flame makes sense and adds to my ability to visualize what I am looking for. I guess the first thing I do tonight is going to be taking this apart and give it a clean again to make sure I have zero residue left to rule that out then put the proper step nozzle on and exhaust tuning option there before moving to the next step. When it comes to the where the orifice should be, I have not found that measurement so I have just listened to it and it sounds like about 1/2" away from the throat may be the ticket there. With the 035 tip in there using the choke does zip until it's almost fully closed so no adjustment to play with there currently. I do know from reading that the 035 is way bigger than what Mickey calls for so I'm not sure why I started there but it's an easy change if I can't find neutral. Thanks again Frosty I'm sure Mickey will be around eventually, I got at least 9hrs before I can get back to it anyway........... that whole work thing this is how the current step looks like this is a rough idea of how the burner lines up in the forge, it mates up with the cast liner about an inch into the liner unlike how it looks like in the pic but this shows how the cast nozzle kind of looks
-
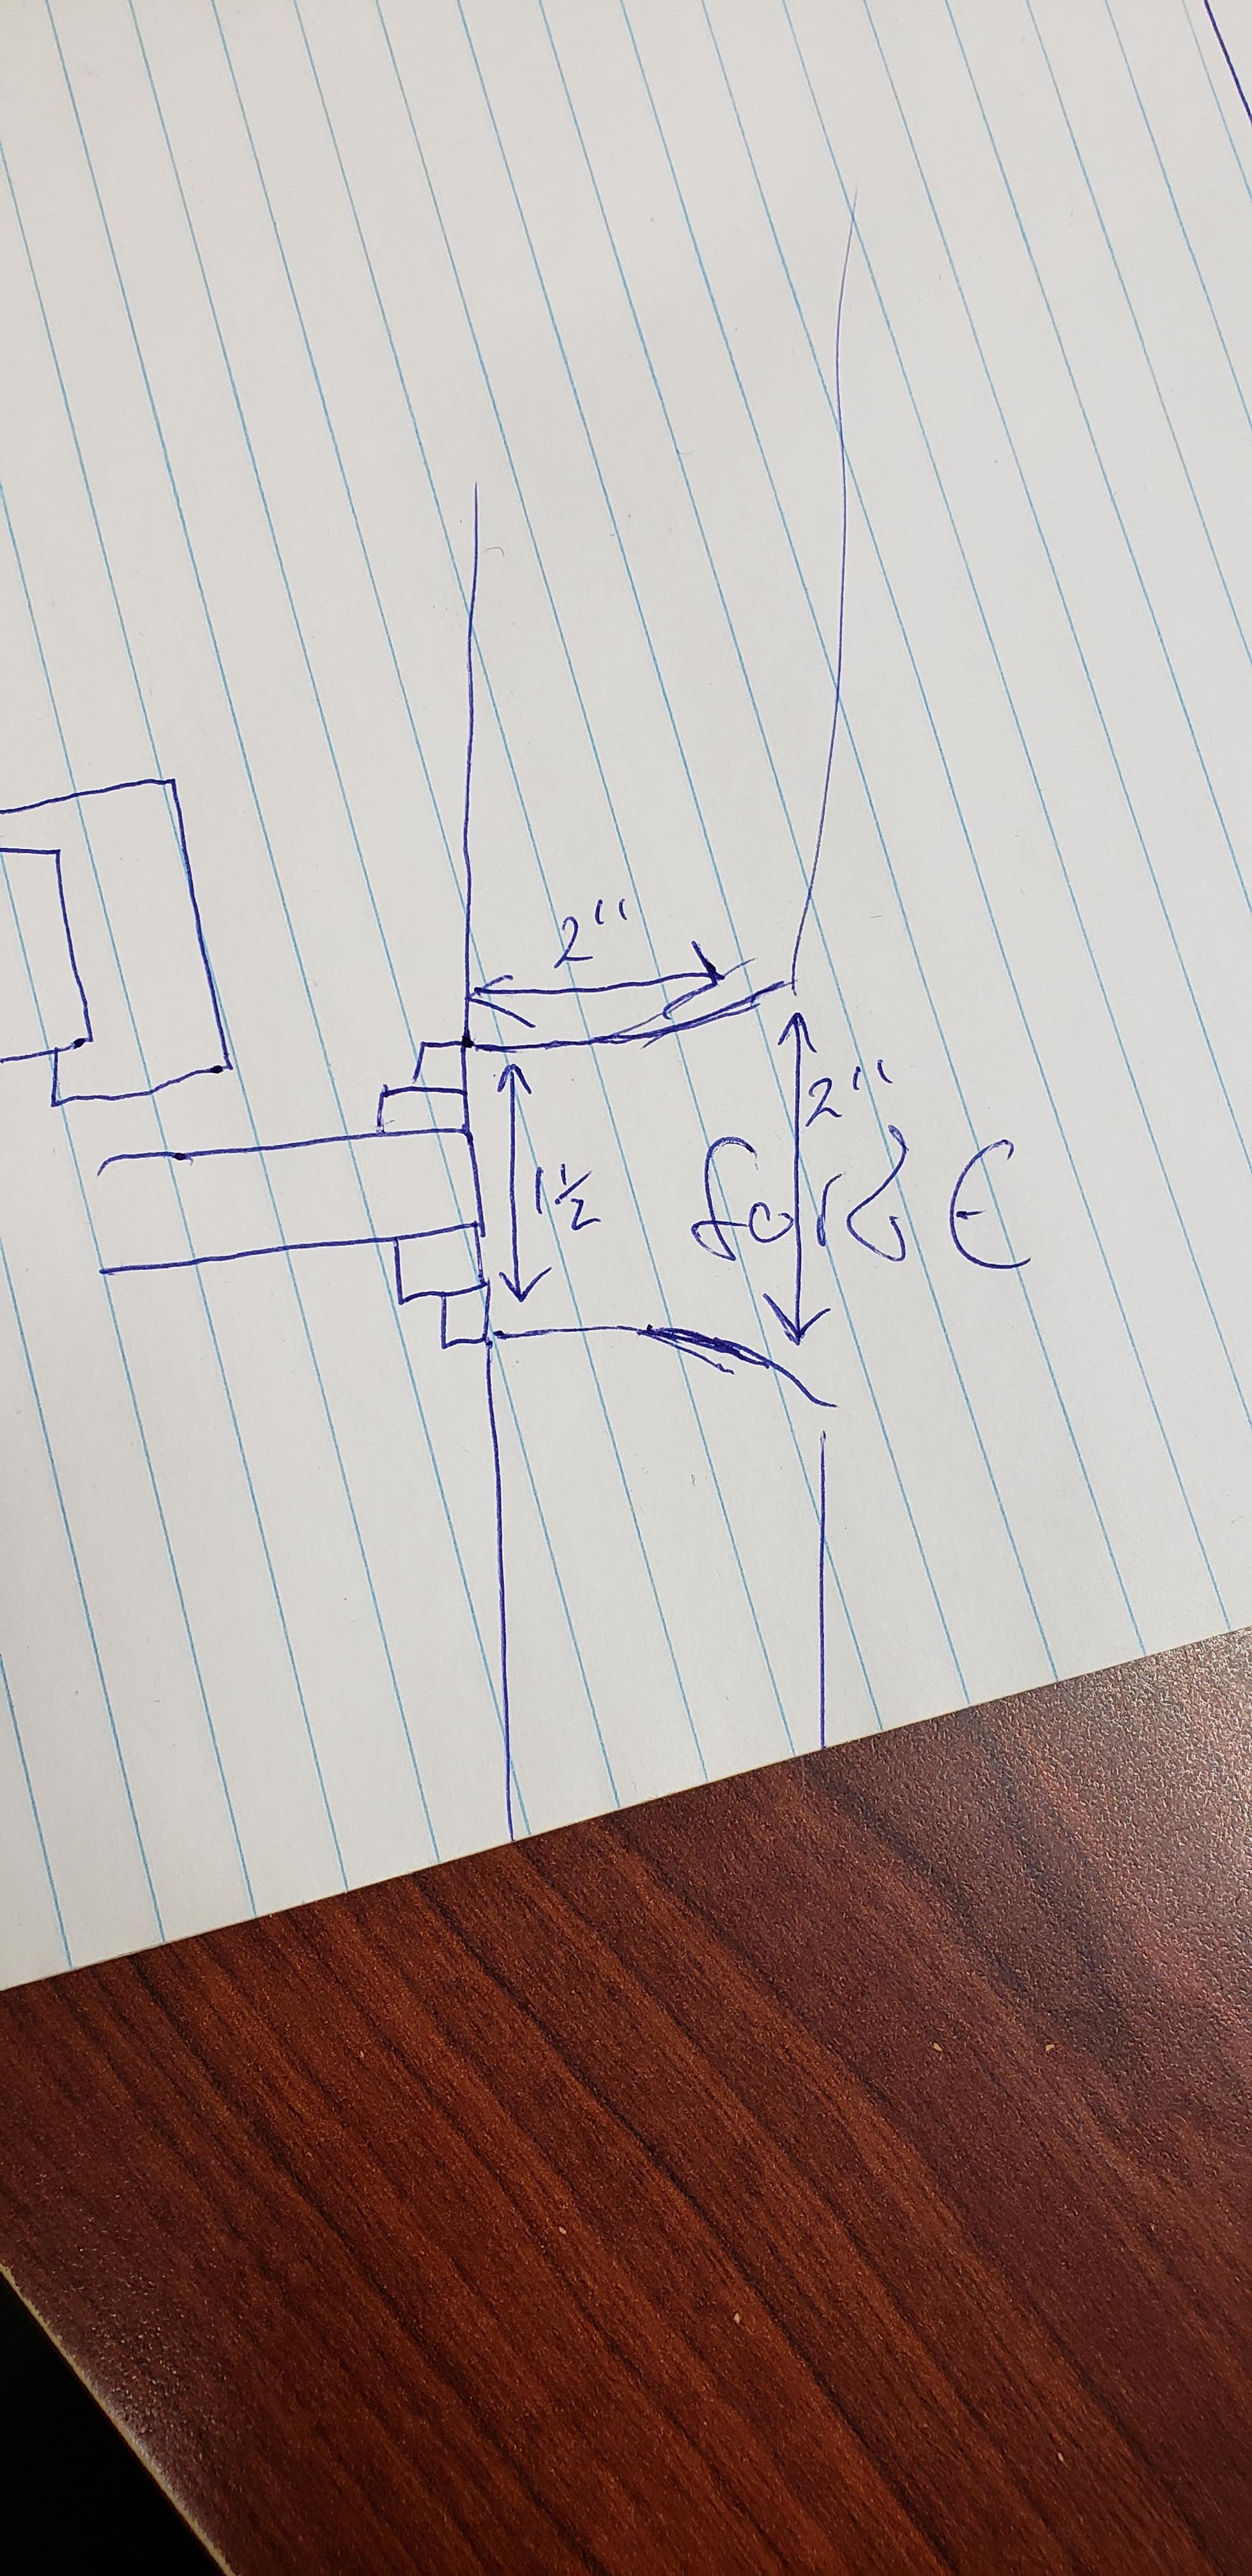
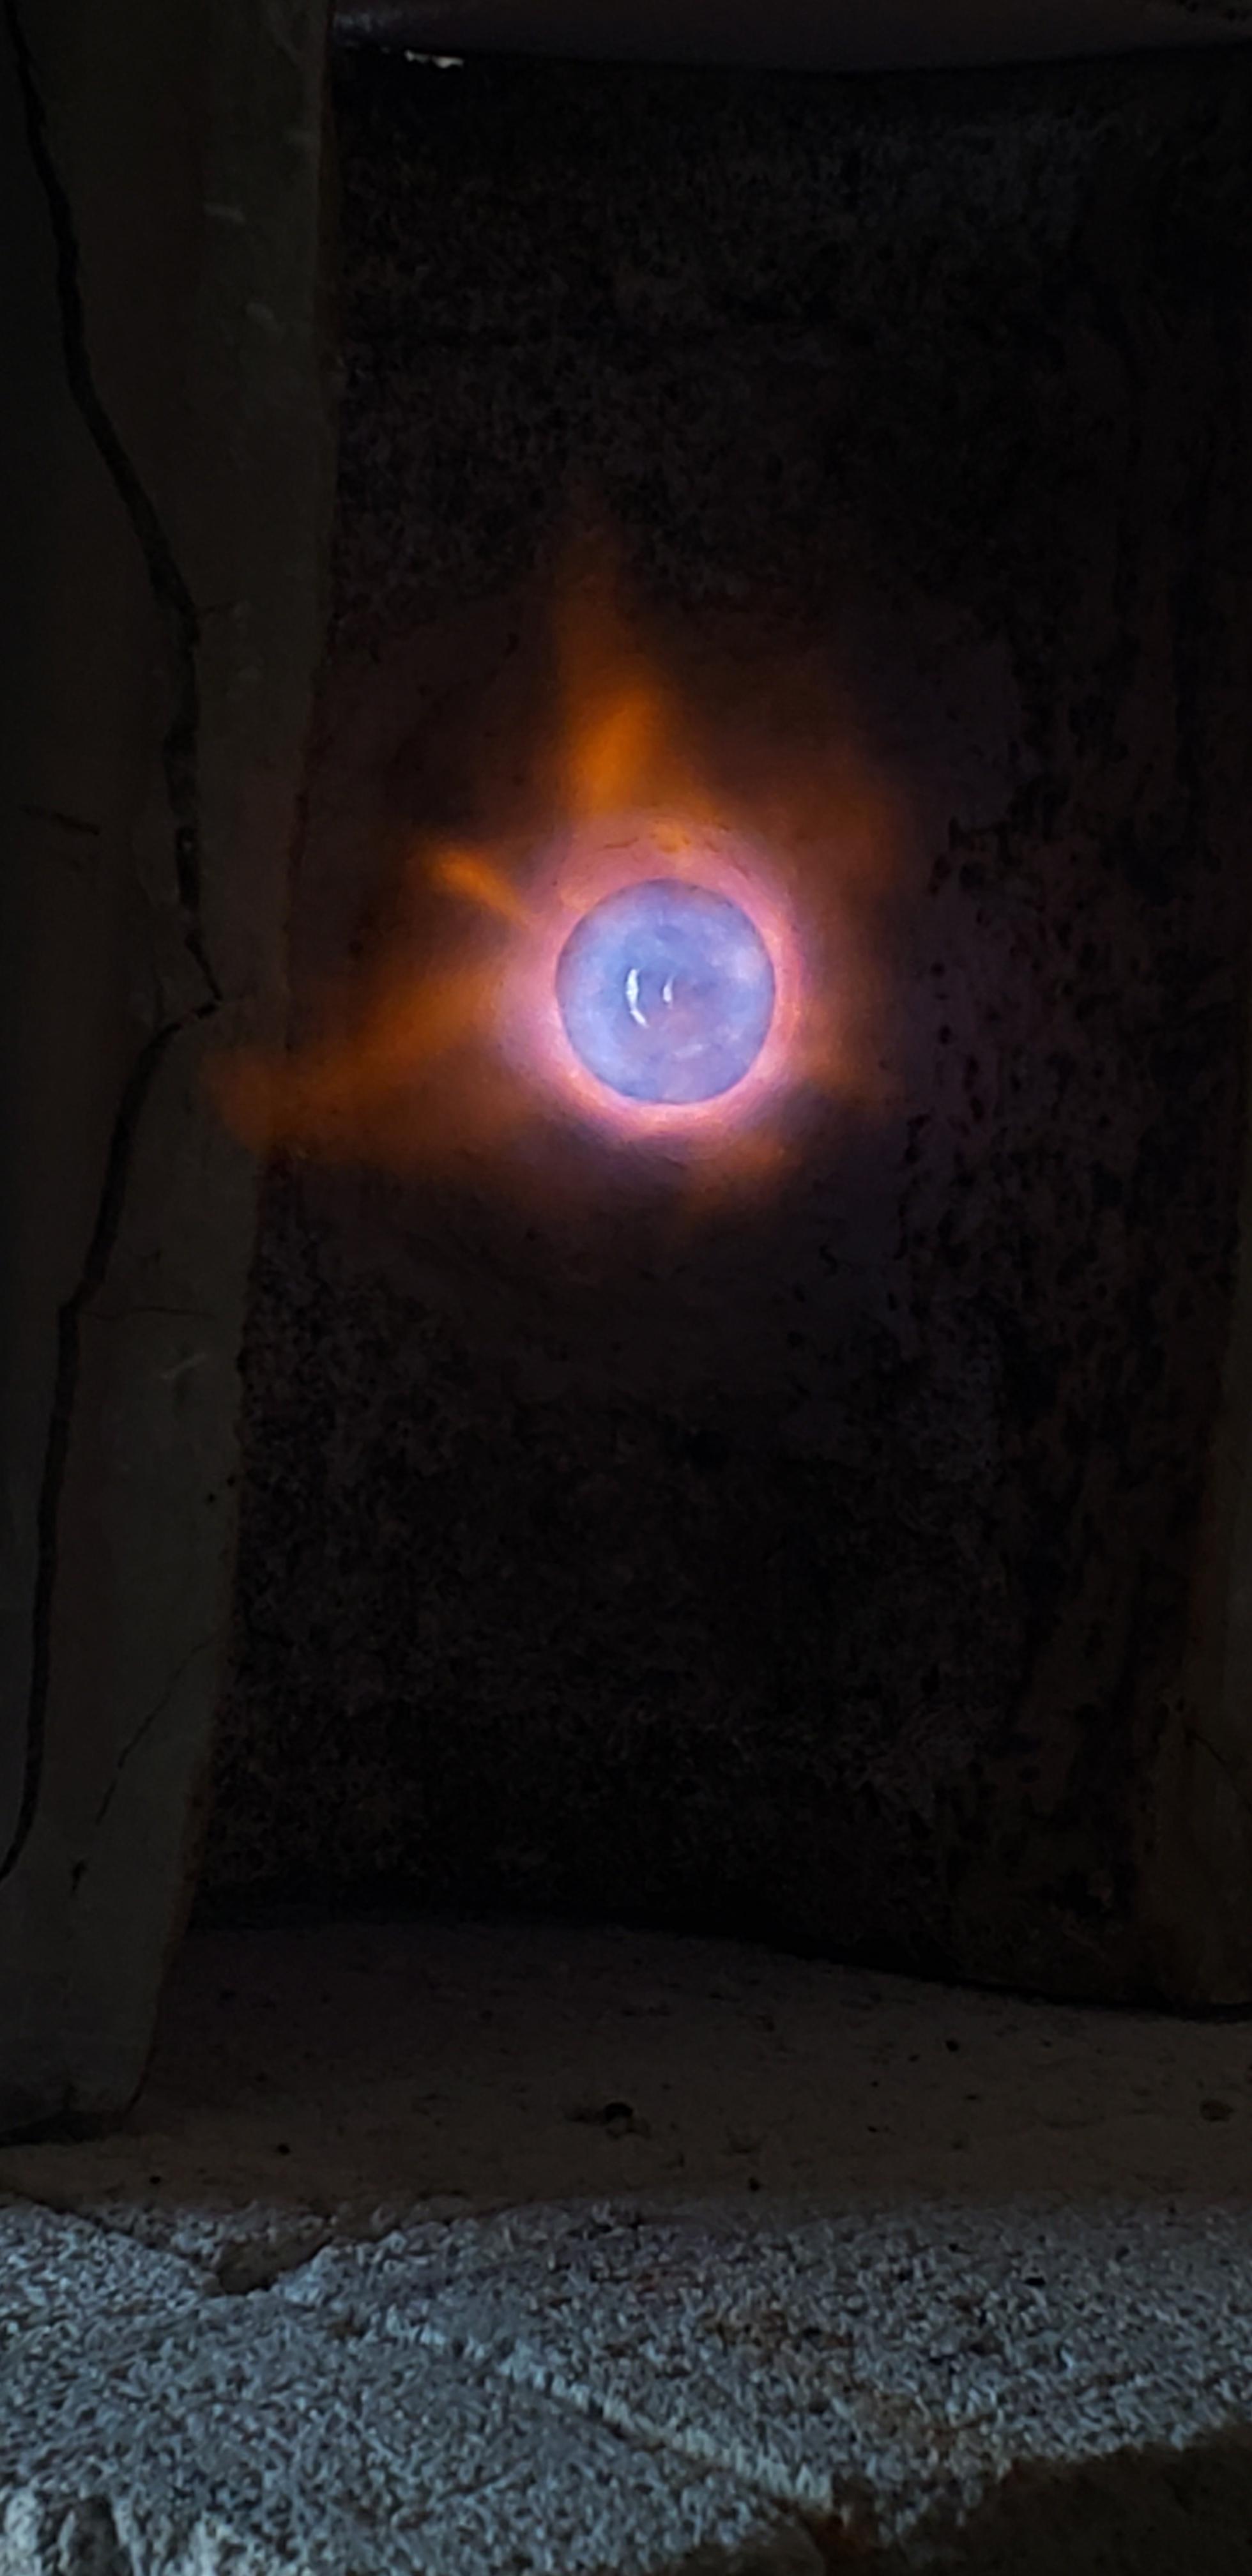
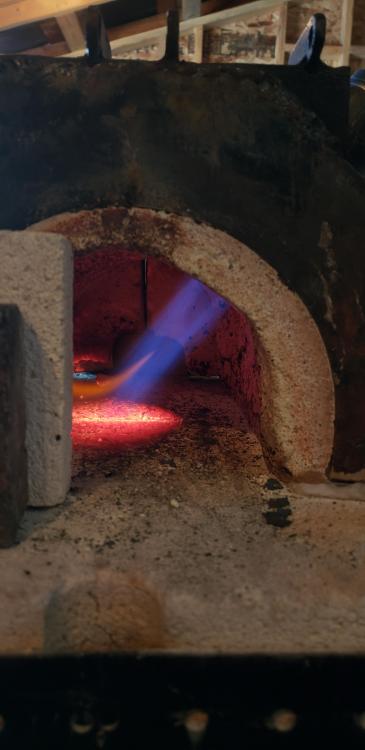
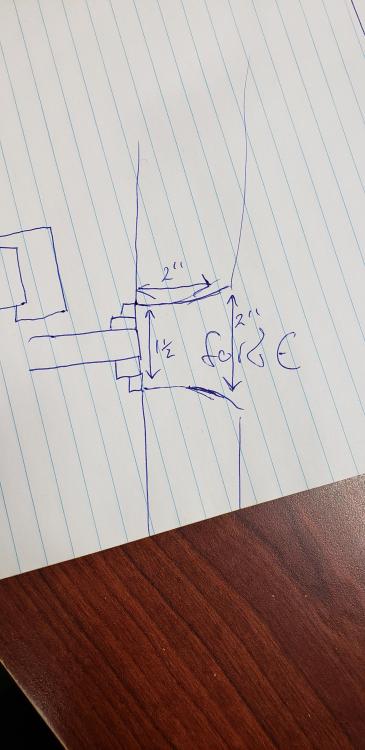
The last 3 pics are all without changing anything with the burner but the amount of orange will constantly change. In the forge the nozzle is cast into my liner however outside the forge I have a step nozzle on there. The nozzle is a 1" nipple with a 1/2" overhang then a 1 1/4" overhanging the 1" by about 7/8". The orifice seems to have the same outcome when I set it between 1/2" from the bottom of the air slots up to about 1 1/2". I have another jet set up with a .030 tip that I will try out tonight but in the meantime if you have any thoughts I am all ears. Frosty thank you. I wasn't quite sure about the color but if you're thinking that looks rich I will definitely try out the .030 jet, I always struggle judging the flame colors. Is the tertiary suggesting rich or the color of the blue?
-


-
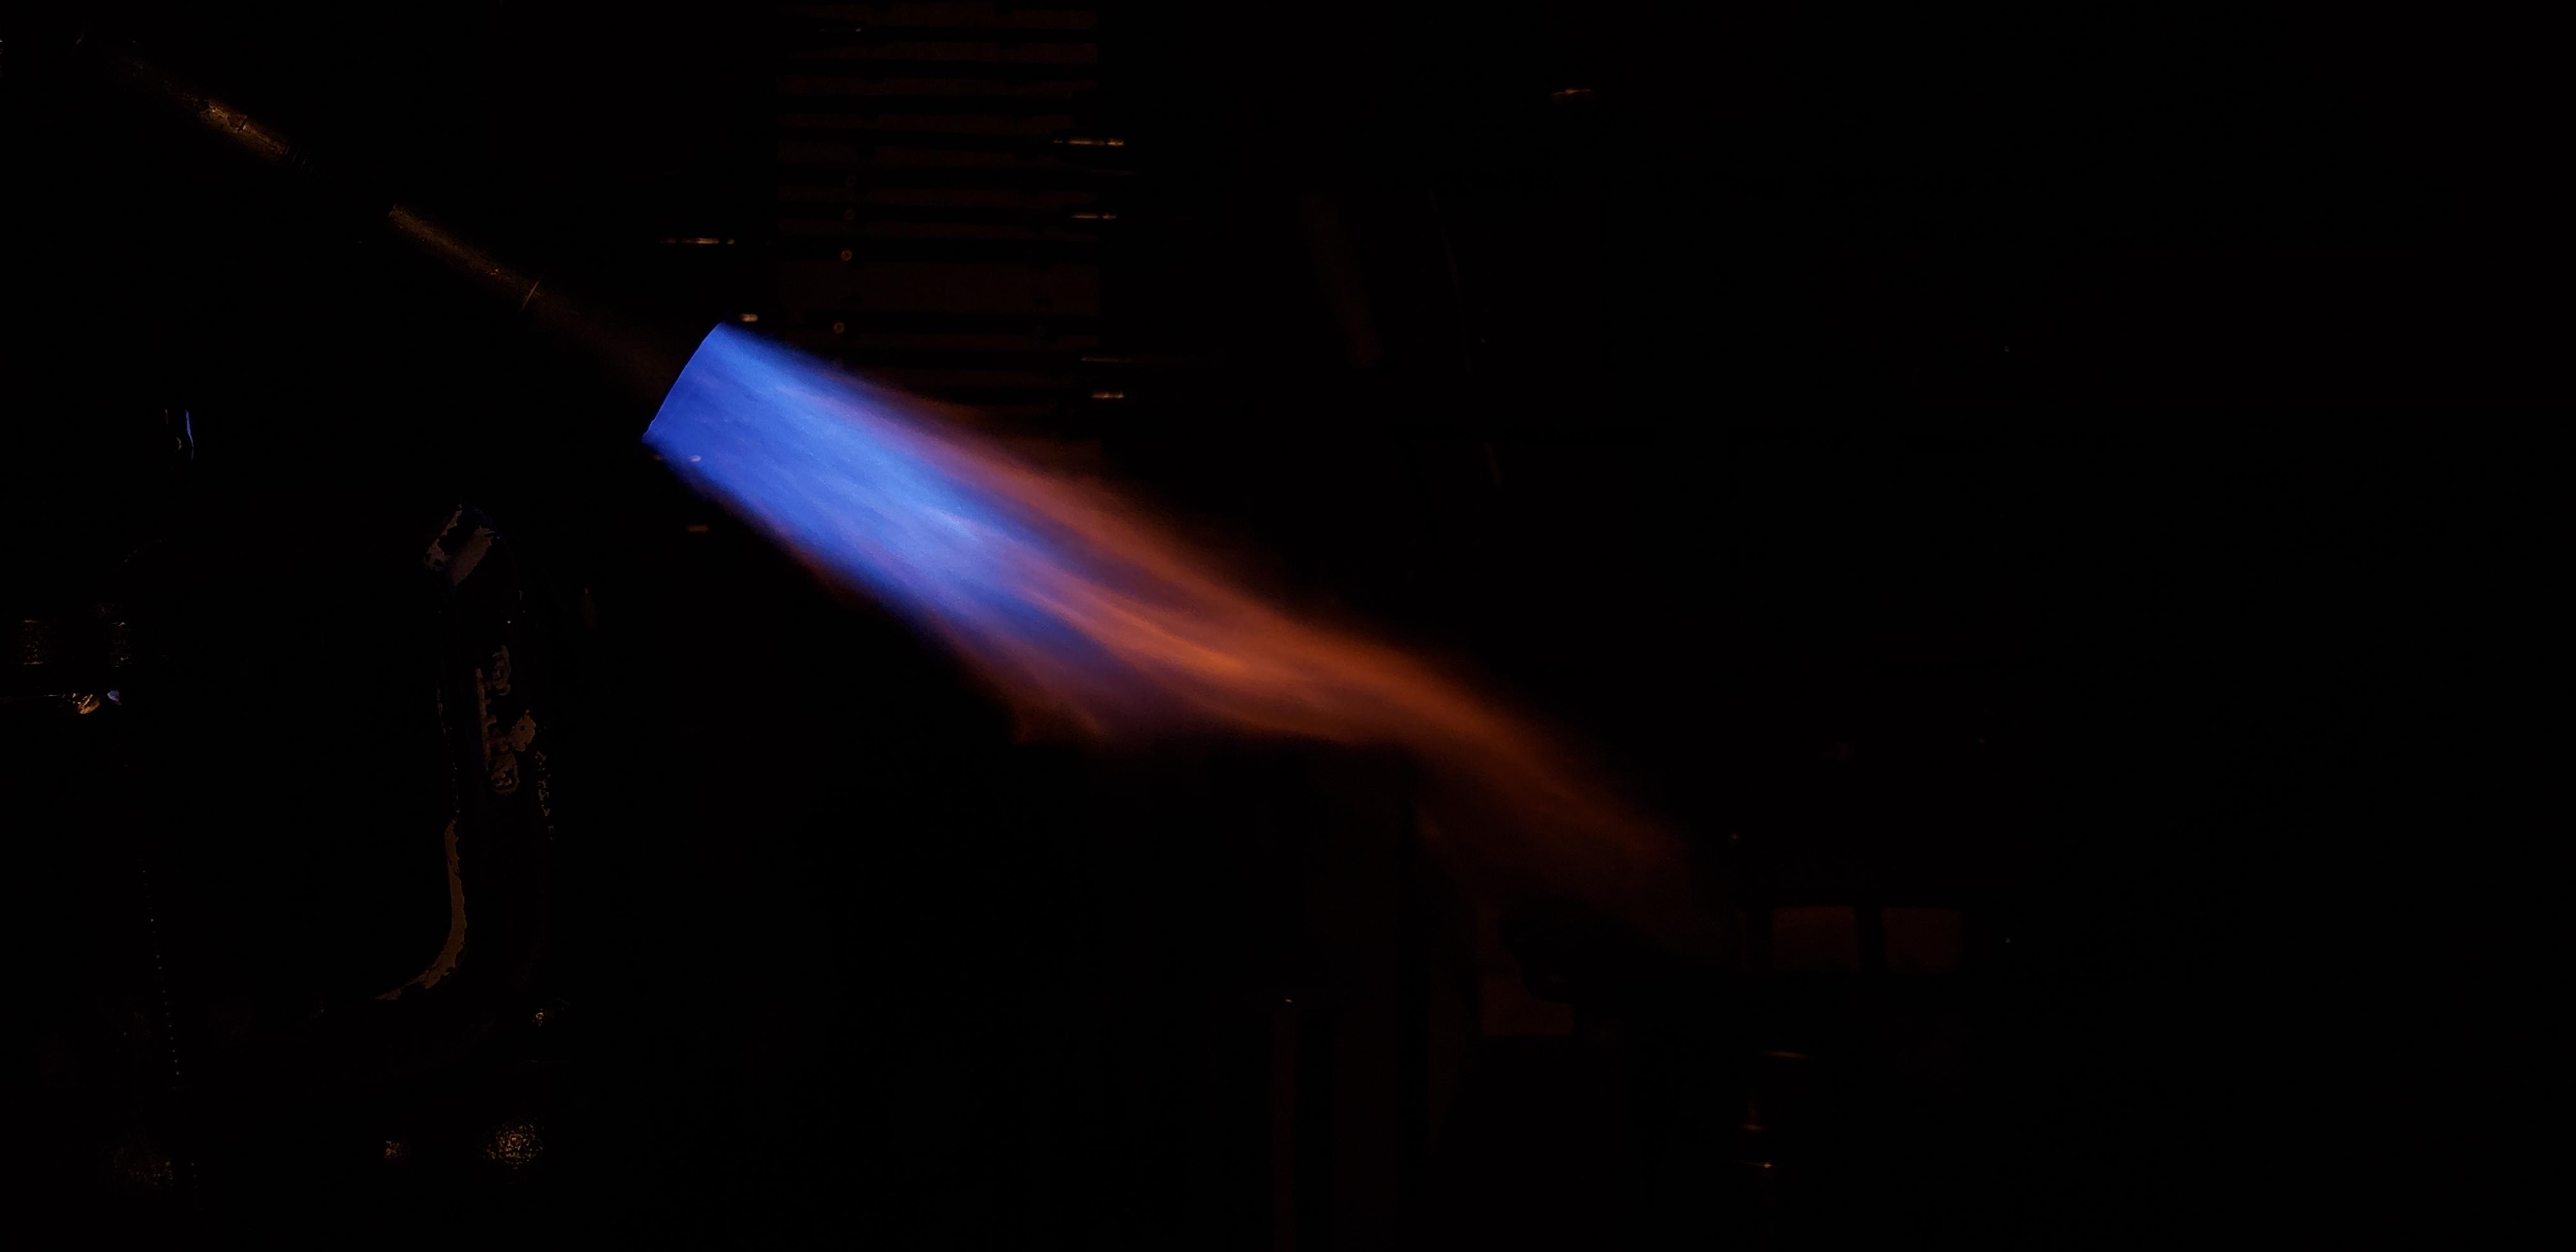
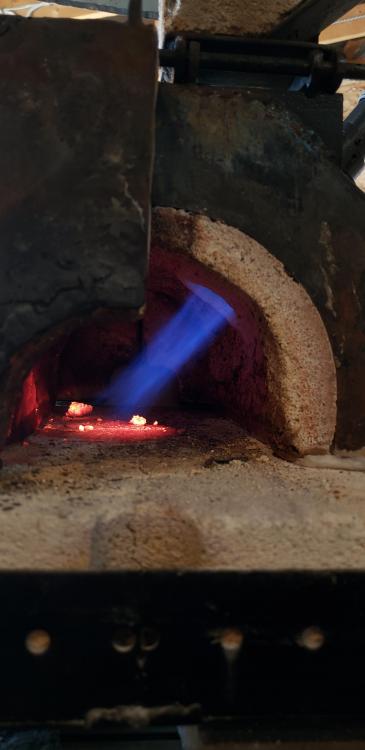
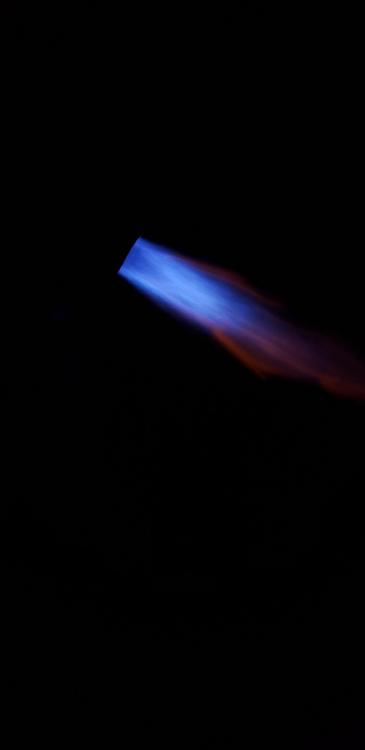
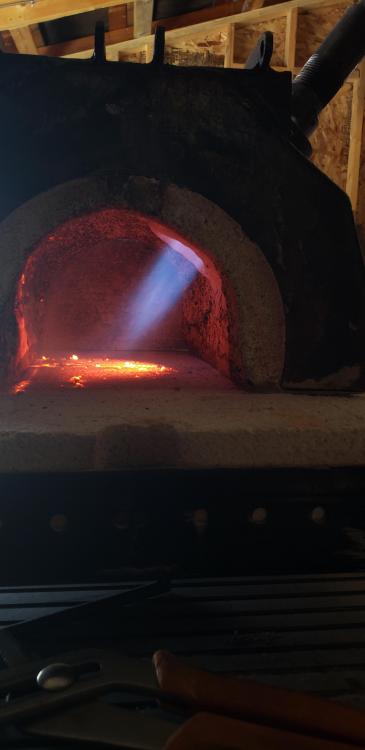
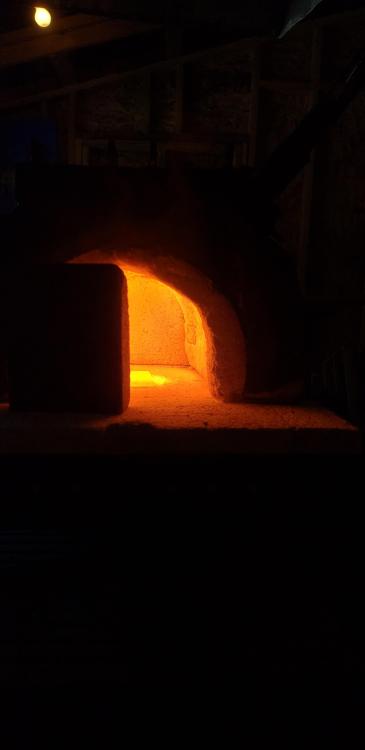
Good morning folks, I'm back with another build I'm in the tuning stage now and looking for thoughts on my progress. 3/4" Mickey burner with a 0.035 contact tip in a schedule 80 1/8" nipple and tapered to a point, mixing tube is 7 1/2" from the bottom of the air slots. The air slot area is divided into 6 and 3" long so that the solids are the the same width as the openings. The vertical the slots have opposing bevel's, like the sides are cut in the same direction. This just happened because of how I was holding the grinder but I assume it helps induce the vortex action, the bottom and tops of the slots have opposing bevels as well. Once I cleaned up these openings with a file I was able to see the vortex develop when looking at the flame straight on, you can kind of watch a ring of flame slowly rotate during ignition. With this set up my flame itself seems pretty good but I am getting what looks like a lot of tertiary flames at times and lots of streaks. I've tried cleaning the mixing tube with a rag pushed back and forth in the tube with a few shots of brake cleaner. I think that some of the orange flame is still from residual oils because without touching anything and just standing watching the flame I can watch it go from almost no tertiary to a growing plume of orange flame that will back off eventually also if I tap the mixing tube I still get streaks. I think I need to try and clean the parts a bit more........... With the same setting as seen in the previous pic but forge warmed up I was able to leave this shined up piece of metal directly under the flame for about 5 min with no scale formation. The flame becomes almost incandescent once the forge is hot with very minimal DB. Here you can see the ring right at the nozzle, in a video you can see that ring slowly rotate but the flame has a nice cone shape from the side.


-
Ya, no flat rate boxes here, some stores are able to ship at better rates than others but I think that's when they have larger contracts with curries or something. I think the shipping was more than the actual product when I talked to Glen last I think. I was going to just add the zircopax to my mortar but the supplier recommended I try the bentonite, it turns out he knew more about this stuff than I did. So between him and you guys I may have everything I need...... Being able to make ones own bricks would be a treat once you get the recipe down that is. If you can make strong re emmisive tiles instead of just strong would be a nice touch.
-
After the following I have done here I actually do follow for the most part. Like I say I'm no chemist but I'm definitely getting the gyst of it, I've been reading through these threads for the last year or so trying to get a decent visual of everything. The floor in my forge is soft Ifb and got beat up pretty bad and then I leveled it out with high alumina mortar but low and behold...... mortar just won't stay solid at high temp when used this way that's why I'm thinking of replacing my bricks with others I have already and then using a kiln shelf when I plan on welding. The main forge body (D forge) has a kast-o-lite lining but it would be nice to have a higher alumina wash on it or better yet the zirconia wash. When I ordered some other stuff from the company I mentioned above I grabbed a bag of "Ultrox" (zircopax) and a bag of bentonite clay. I may just have to try out a thin wash, I already have the kast-o-lite shell so I just need a thin wash so I probably don't have to worry as much about it cracking up. I just happened to see that alumina being offered as a dry product from this site, they have a large selection of products available on small quantities. It's sounding like 3% bentonite 97% zircopax and mix to a latex paint consistency, dab it on and give it a long time to dry...... I would just order some plistex Burt everywhere I quote it it comes to almost $100 after shipping. I could get a half pint of ITC 100 for $50 but as you say and I've read is that it's designed to be able to flake off so a person can clean their kiln shelves easier when doing pottery. That's why I'm curious about the he brew since it's like $30 and it sounds like there are some decent benefits.
-
You're welcome my pleasure, I hope they help someone out