Trevor84
-
Posts
168 -
Joined
-
Last visited
Content Type
Profiles
Forums
Articles
Gallery
Downloads
Events
Everything posted by Trevor84
-
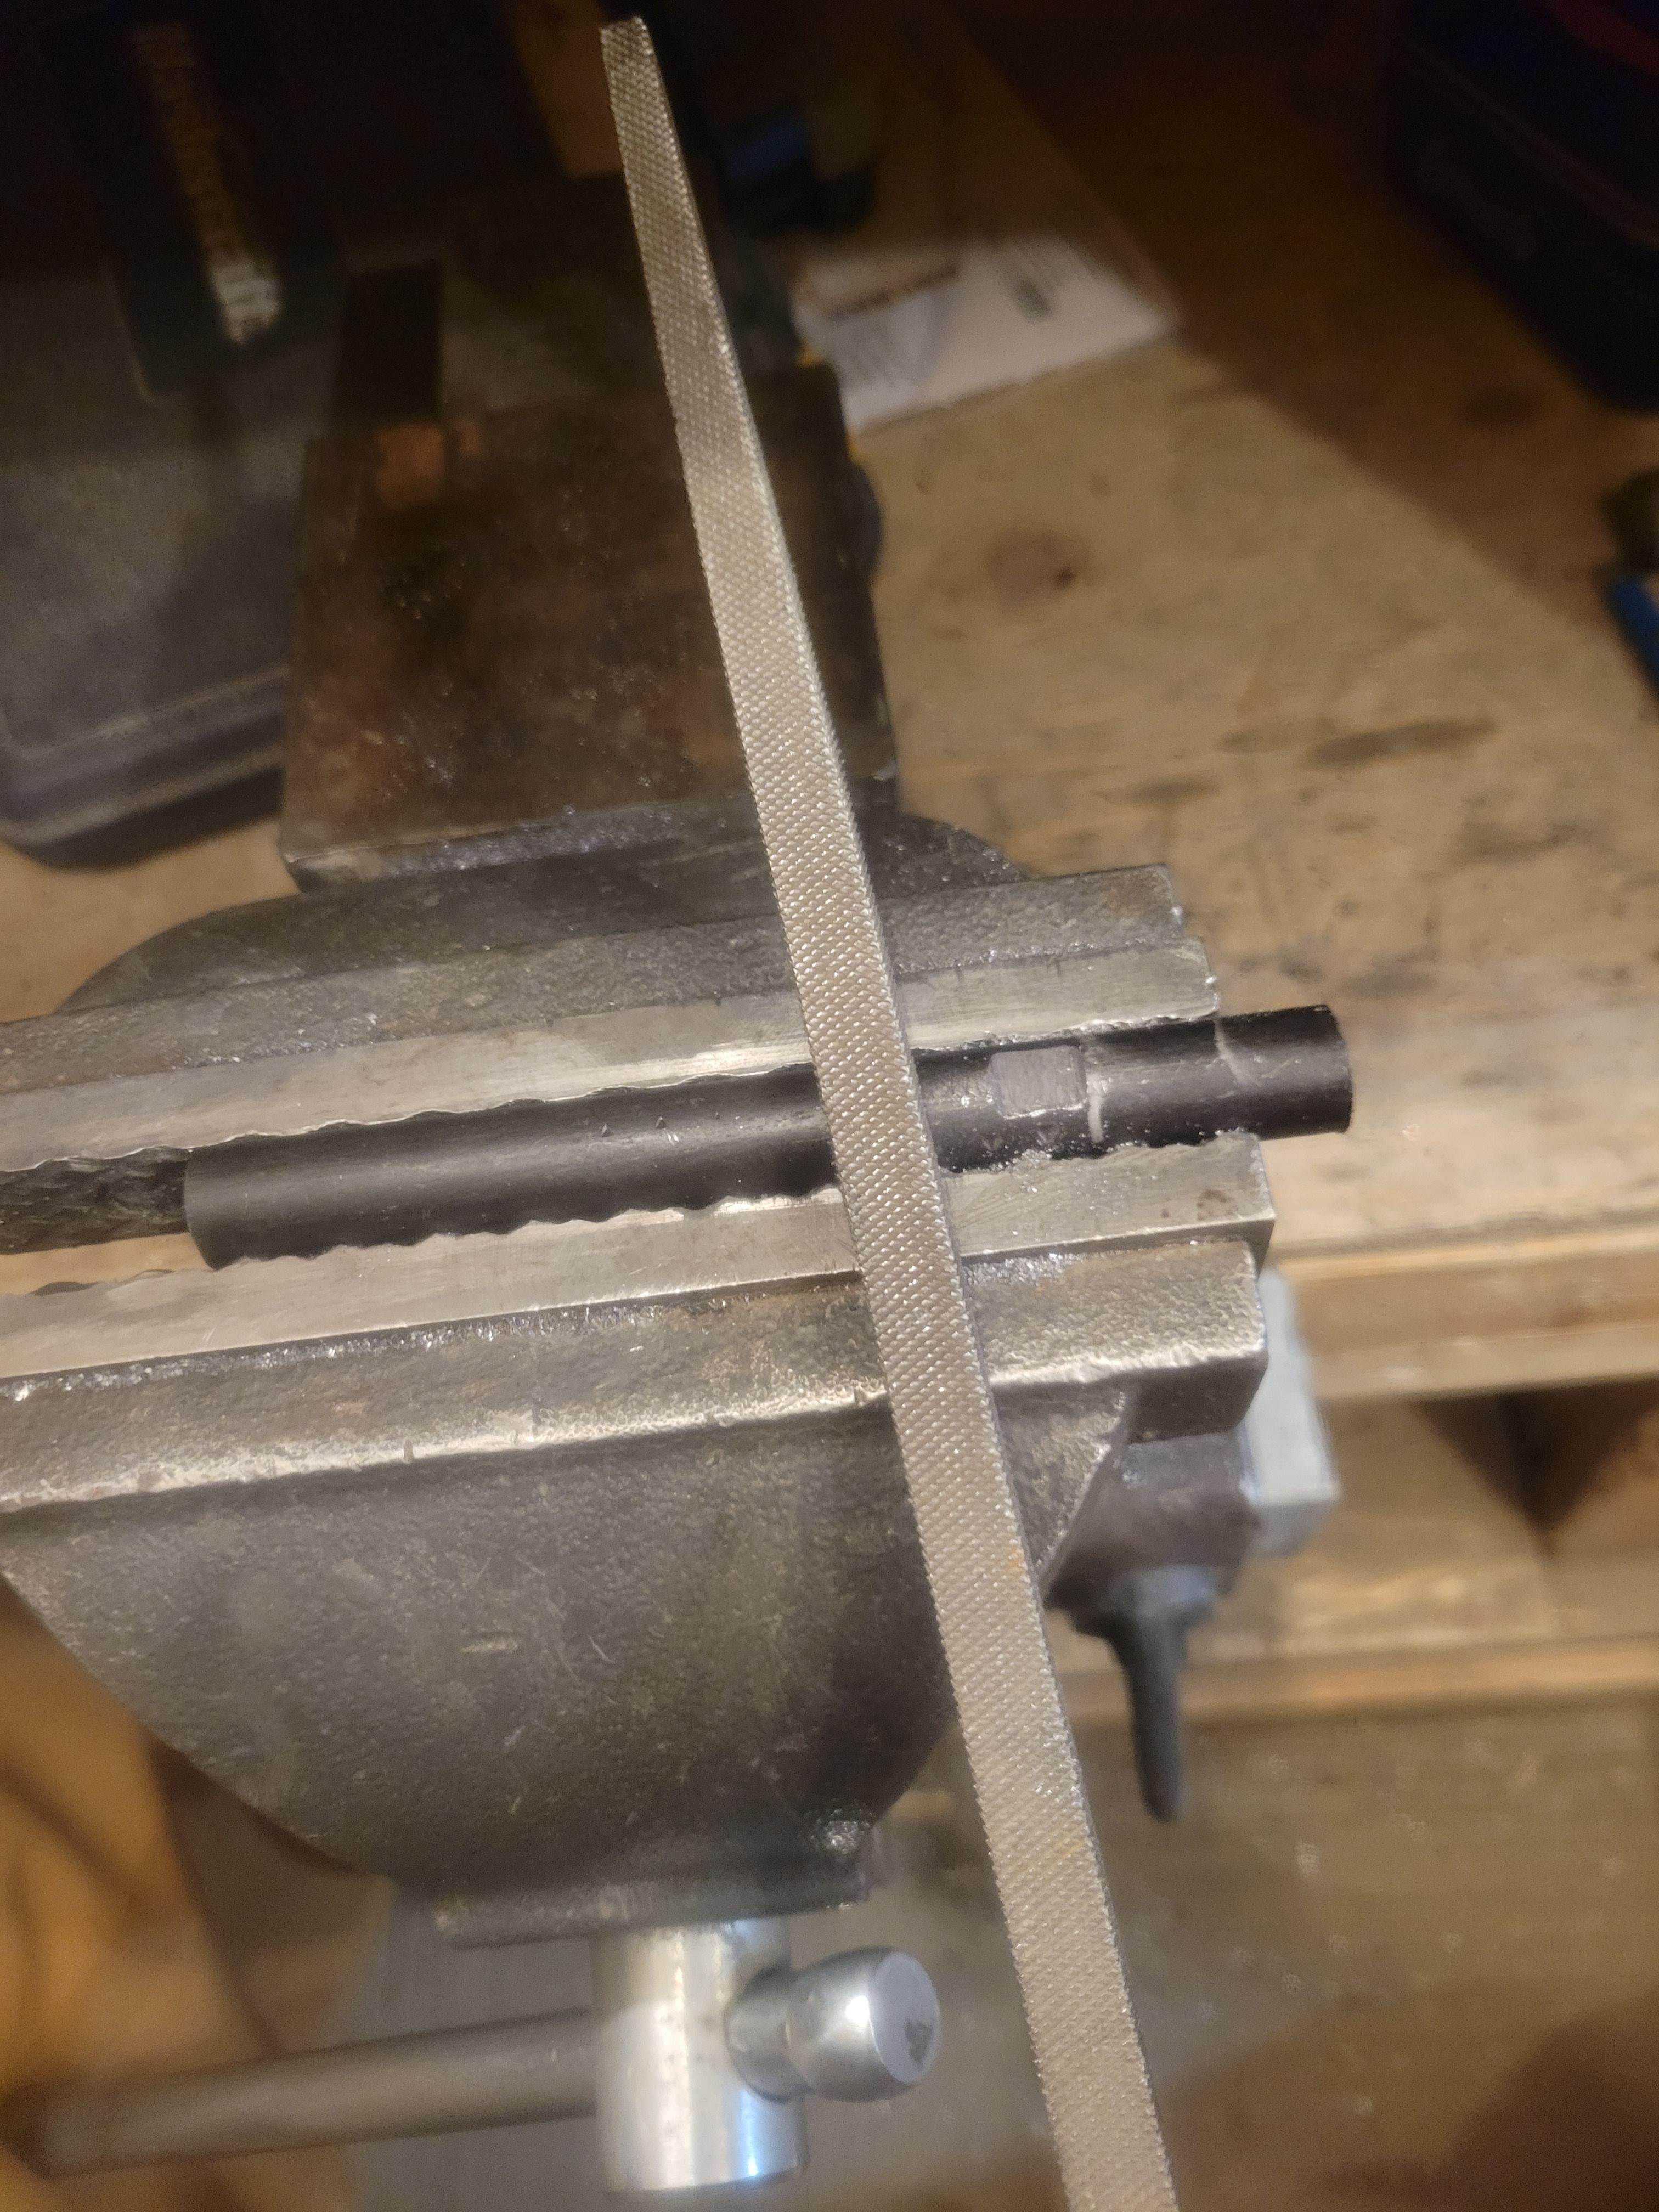
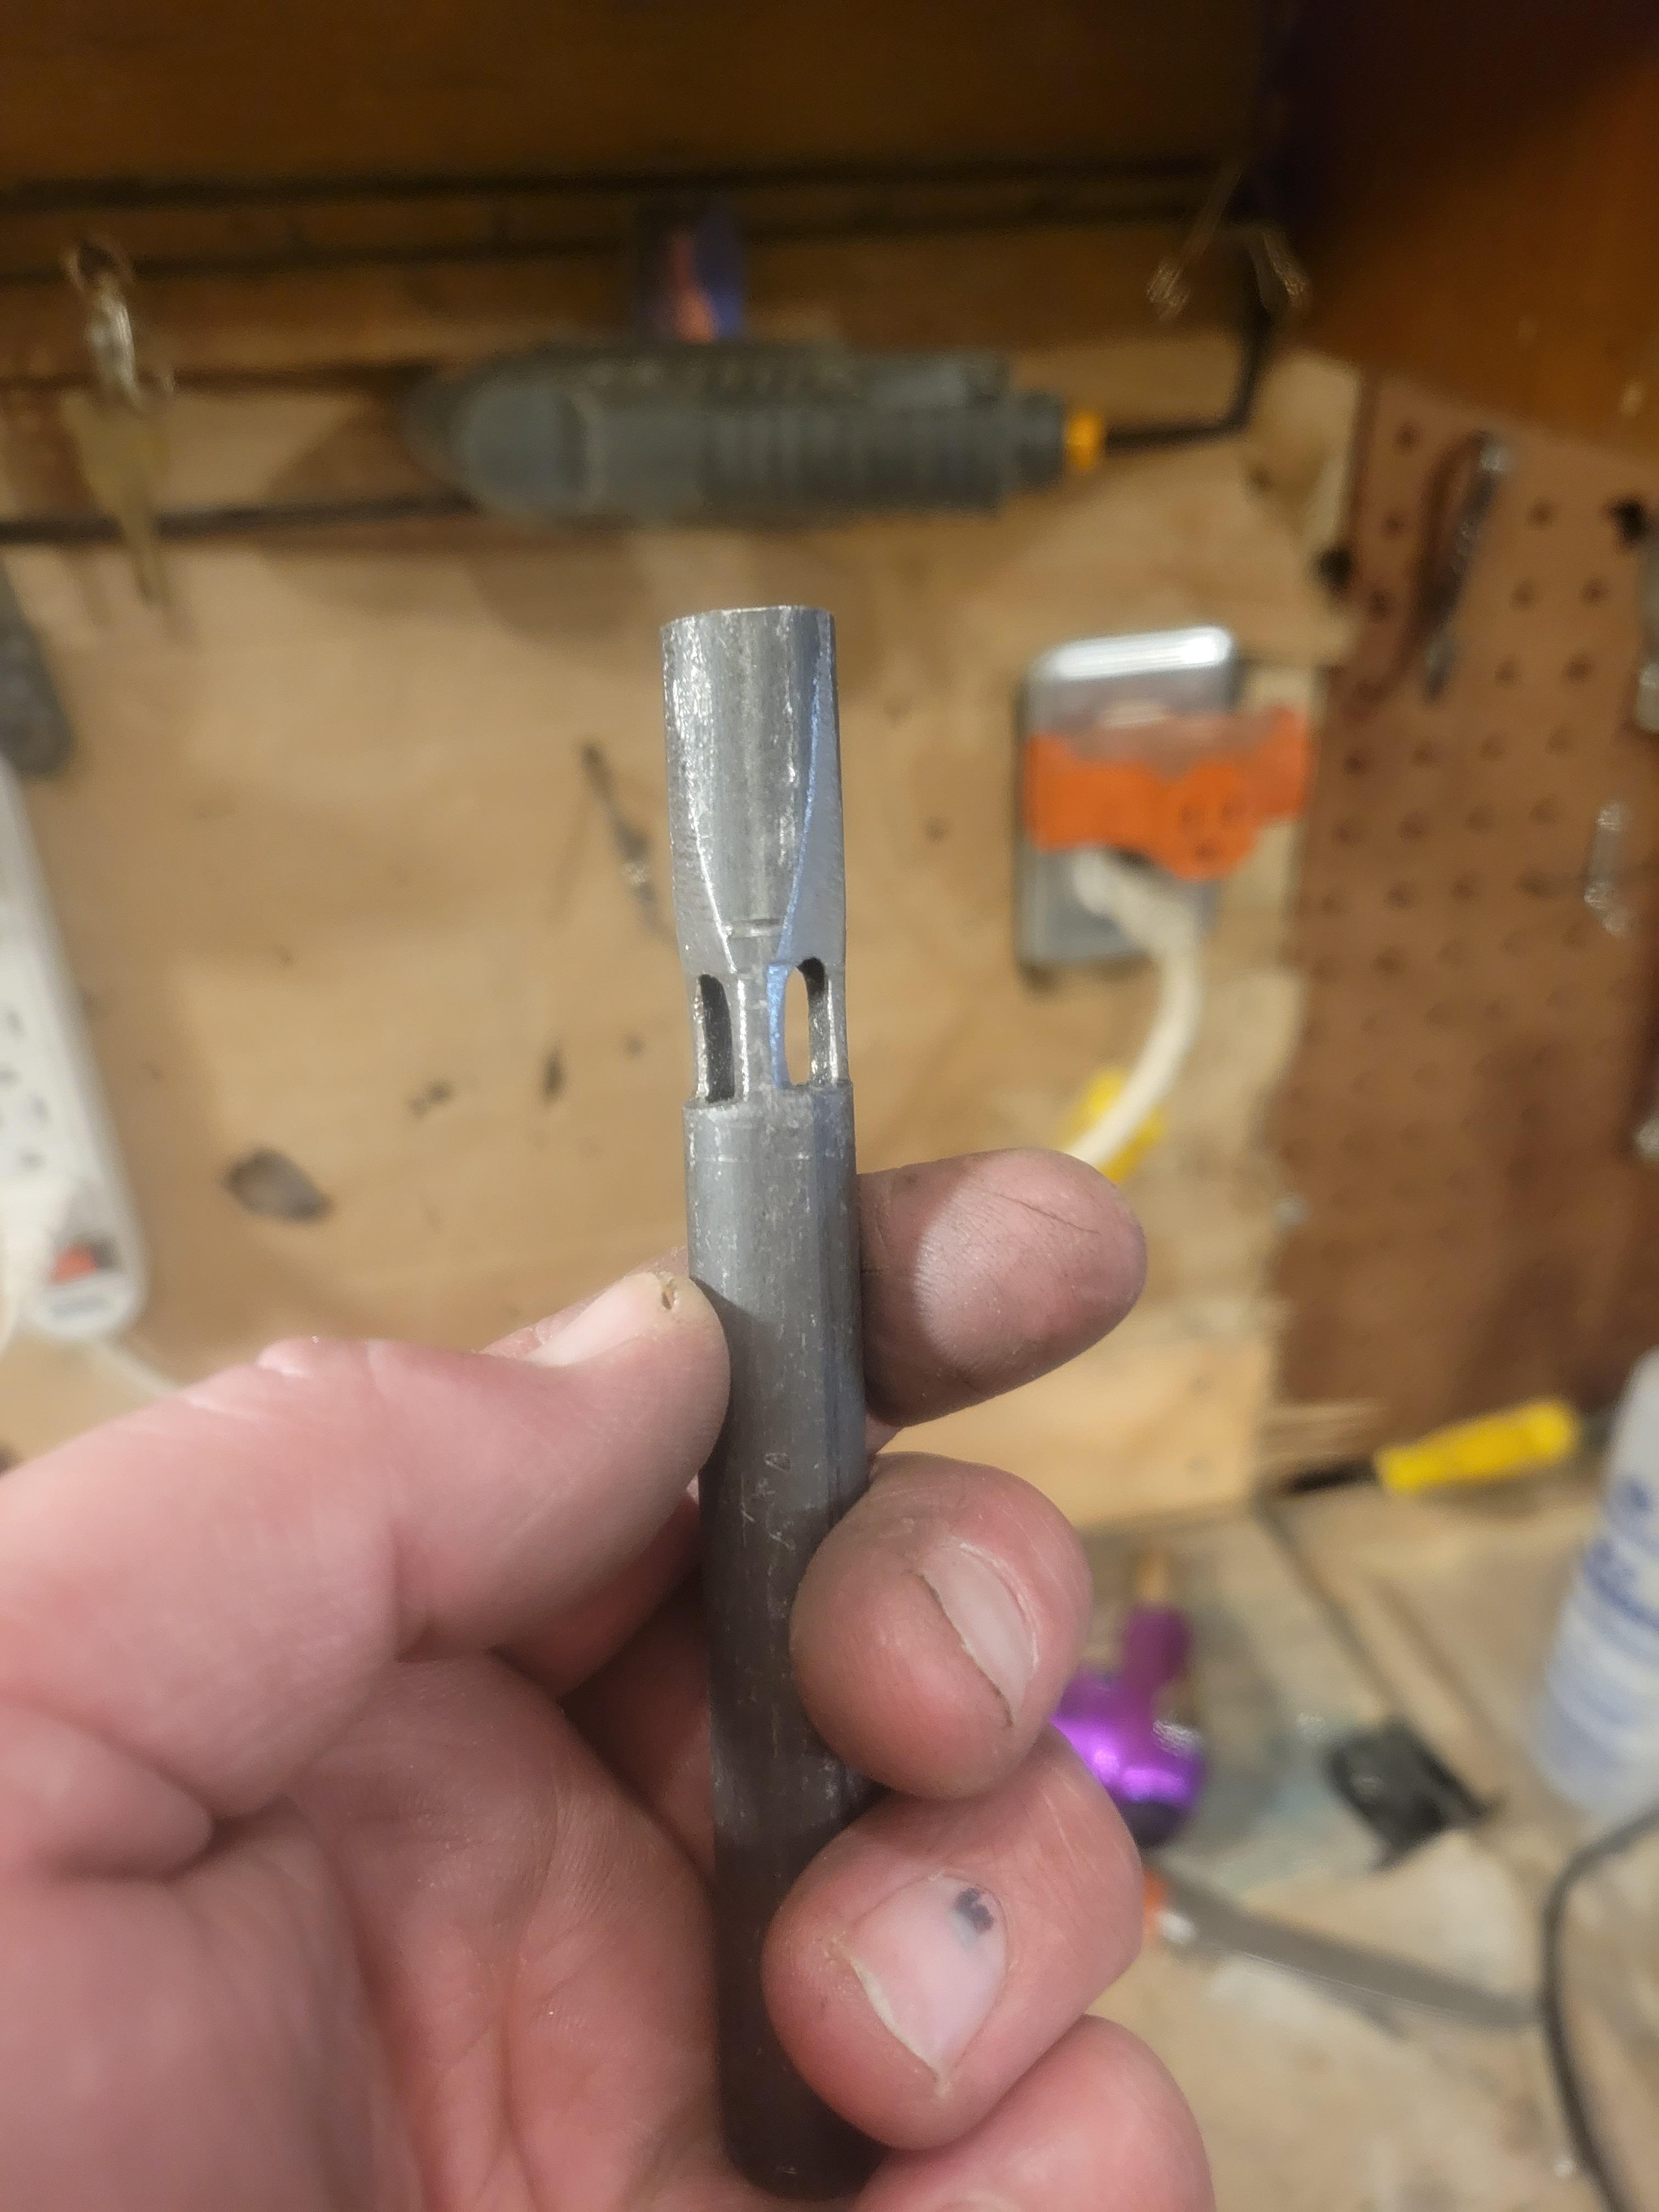
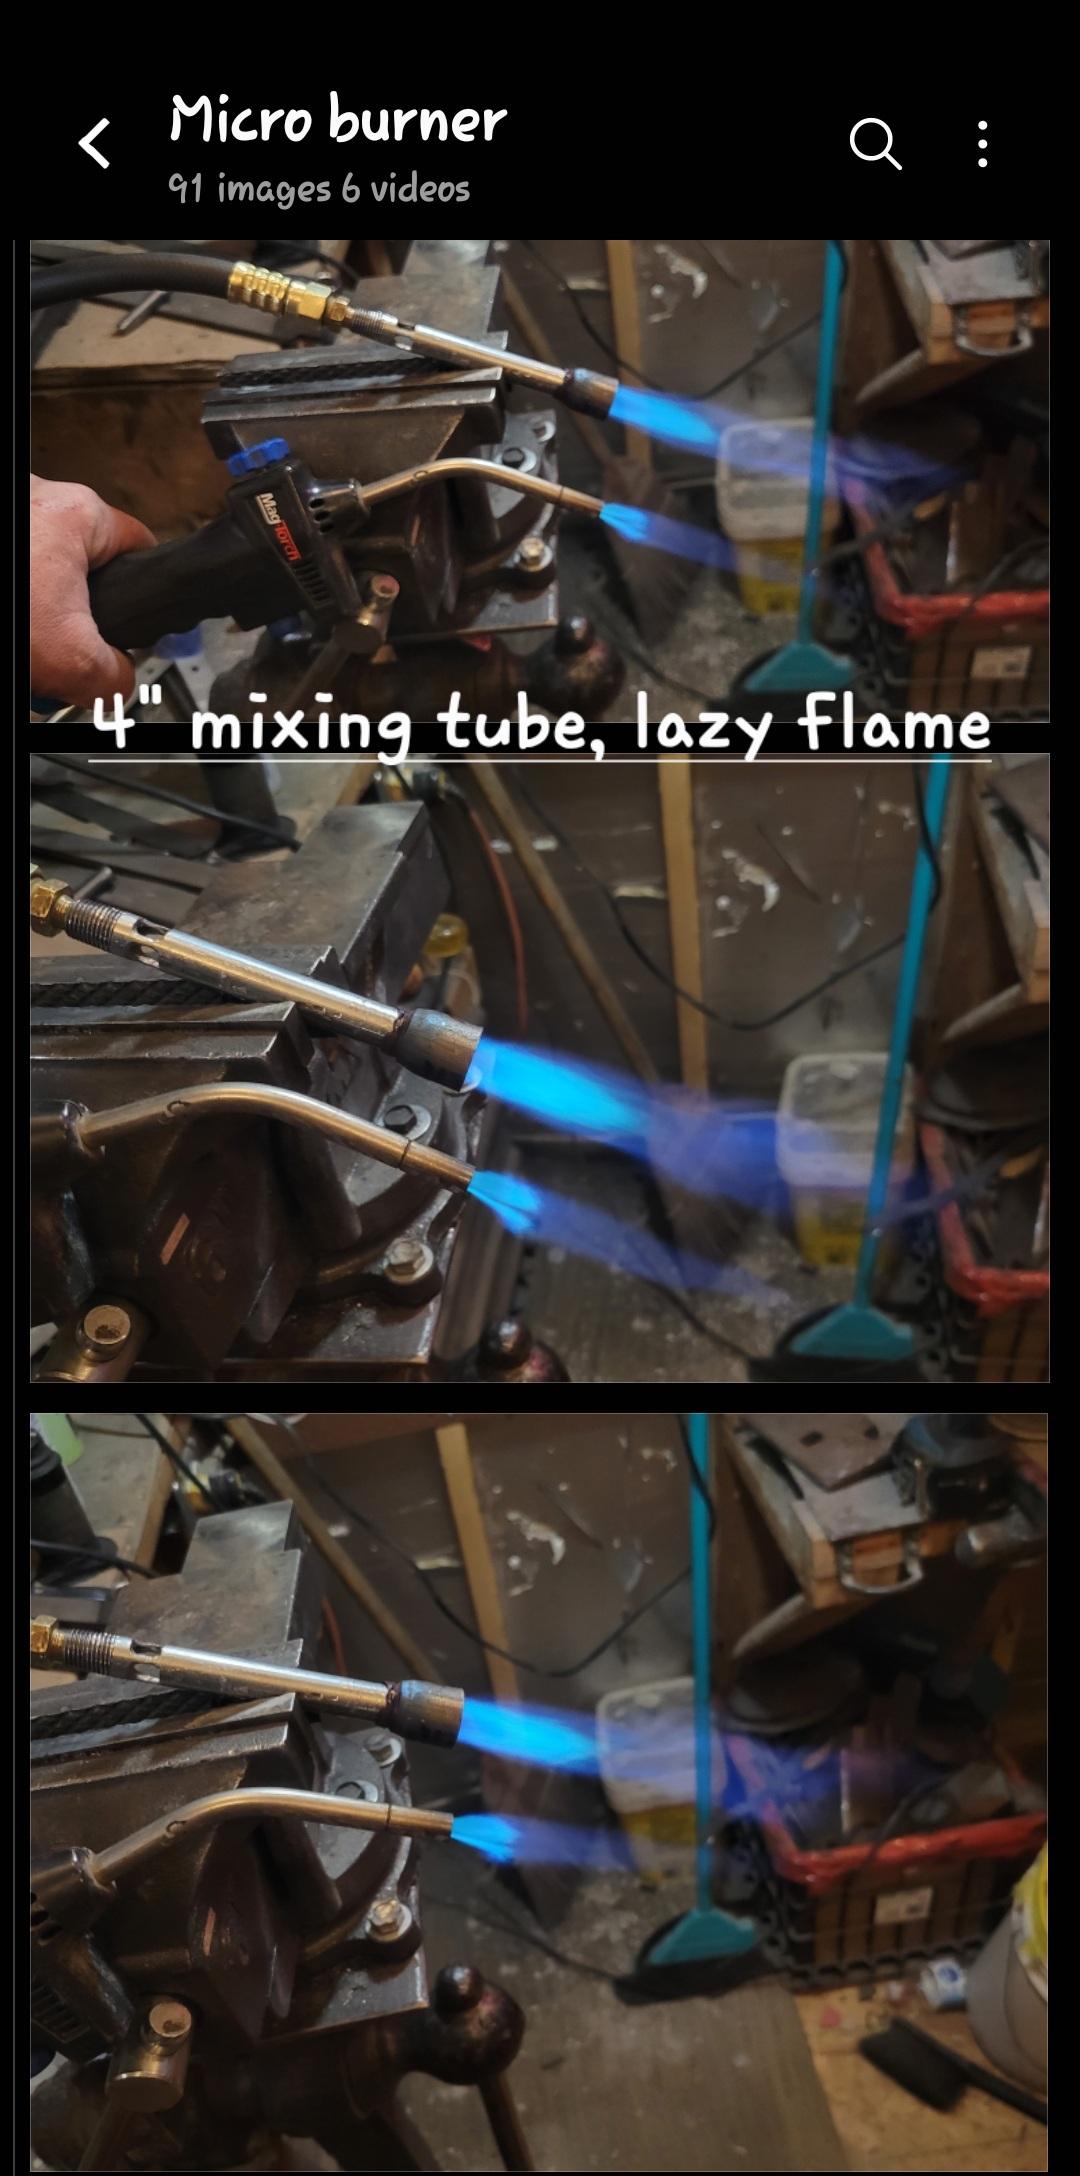
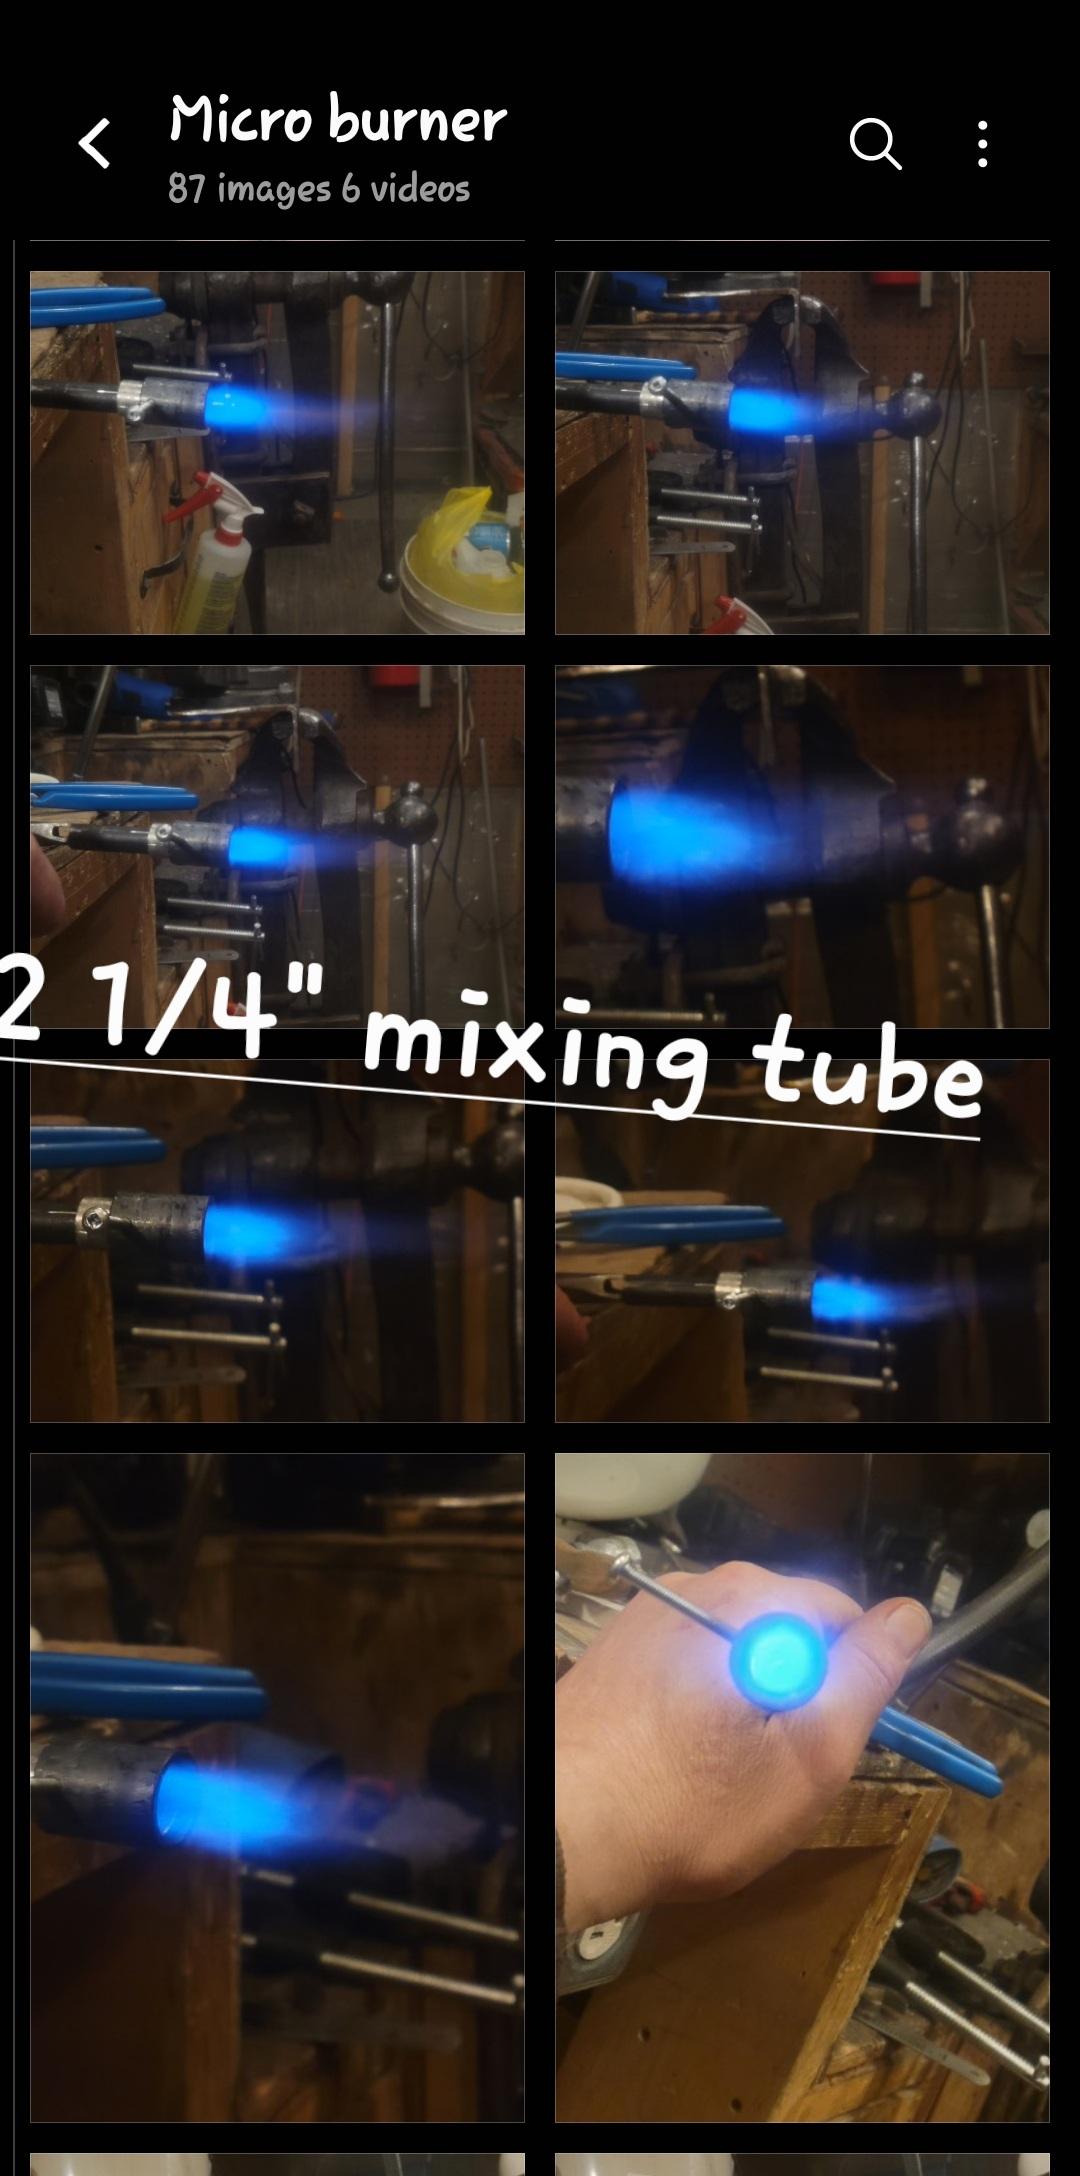
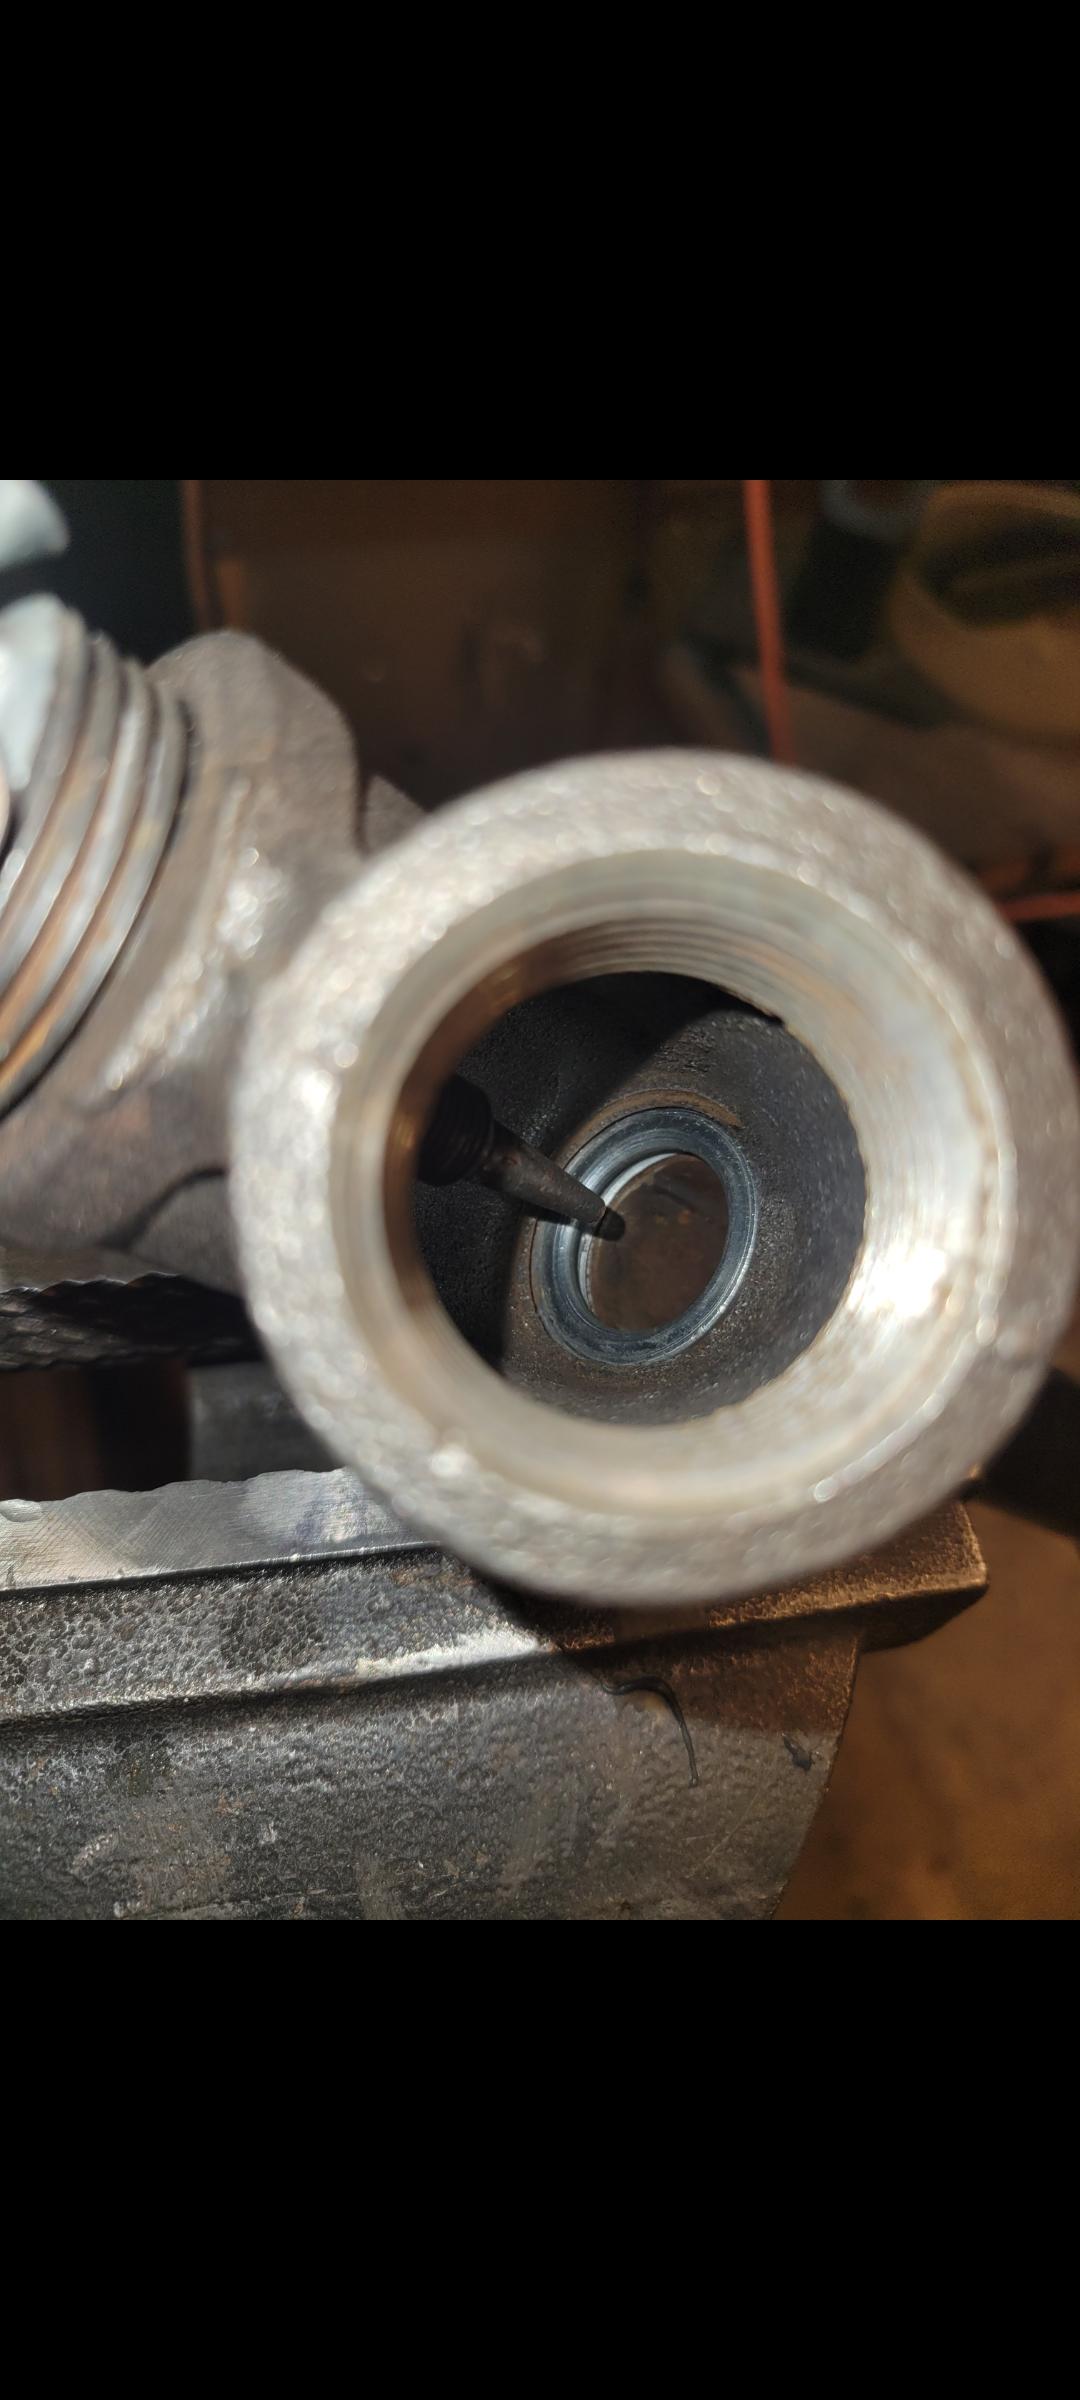
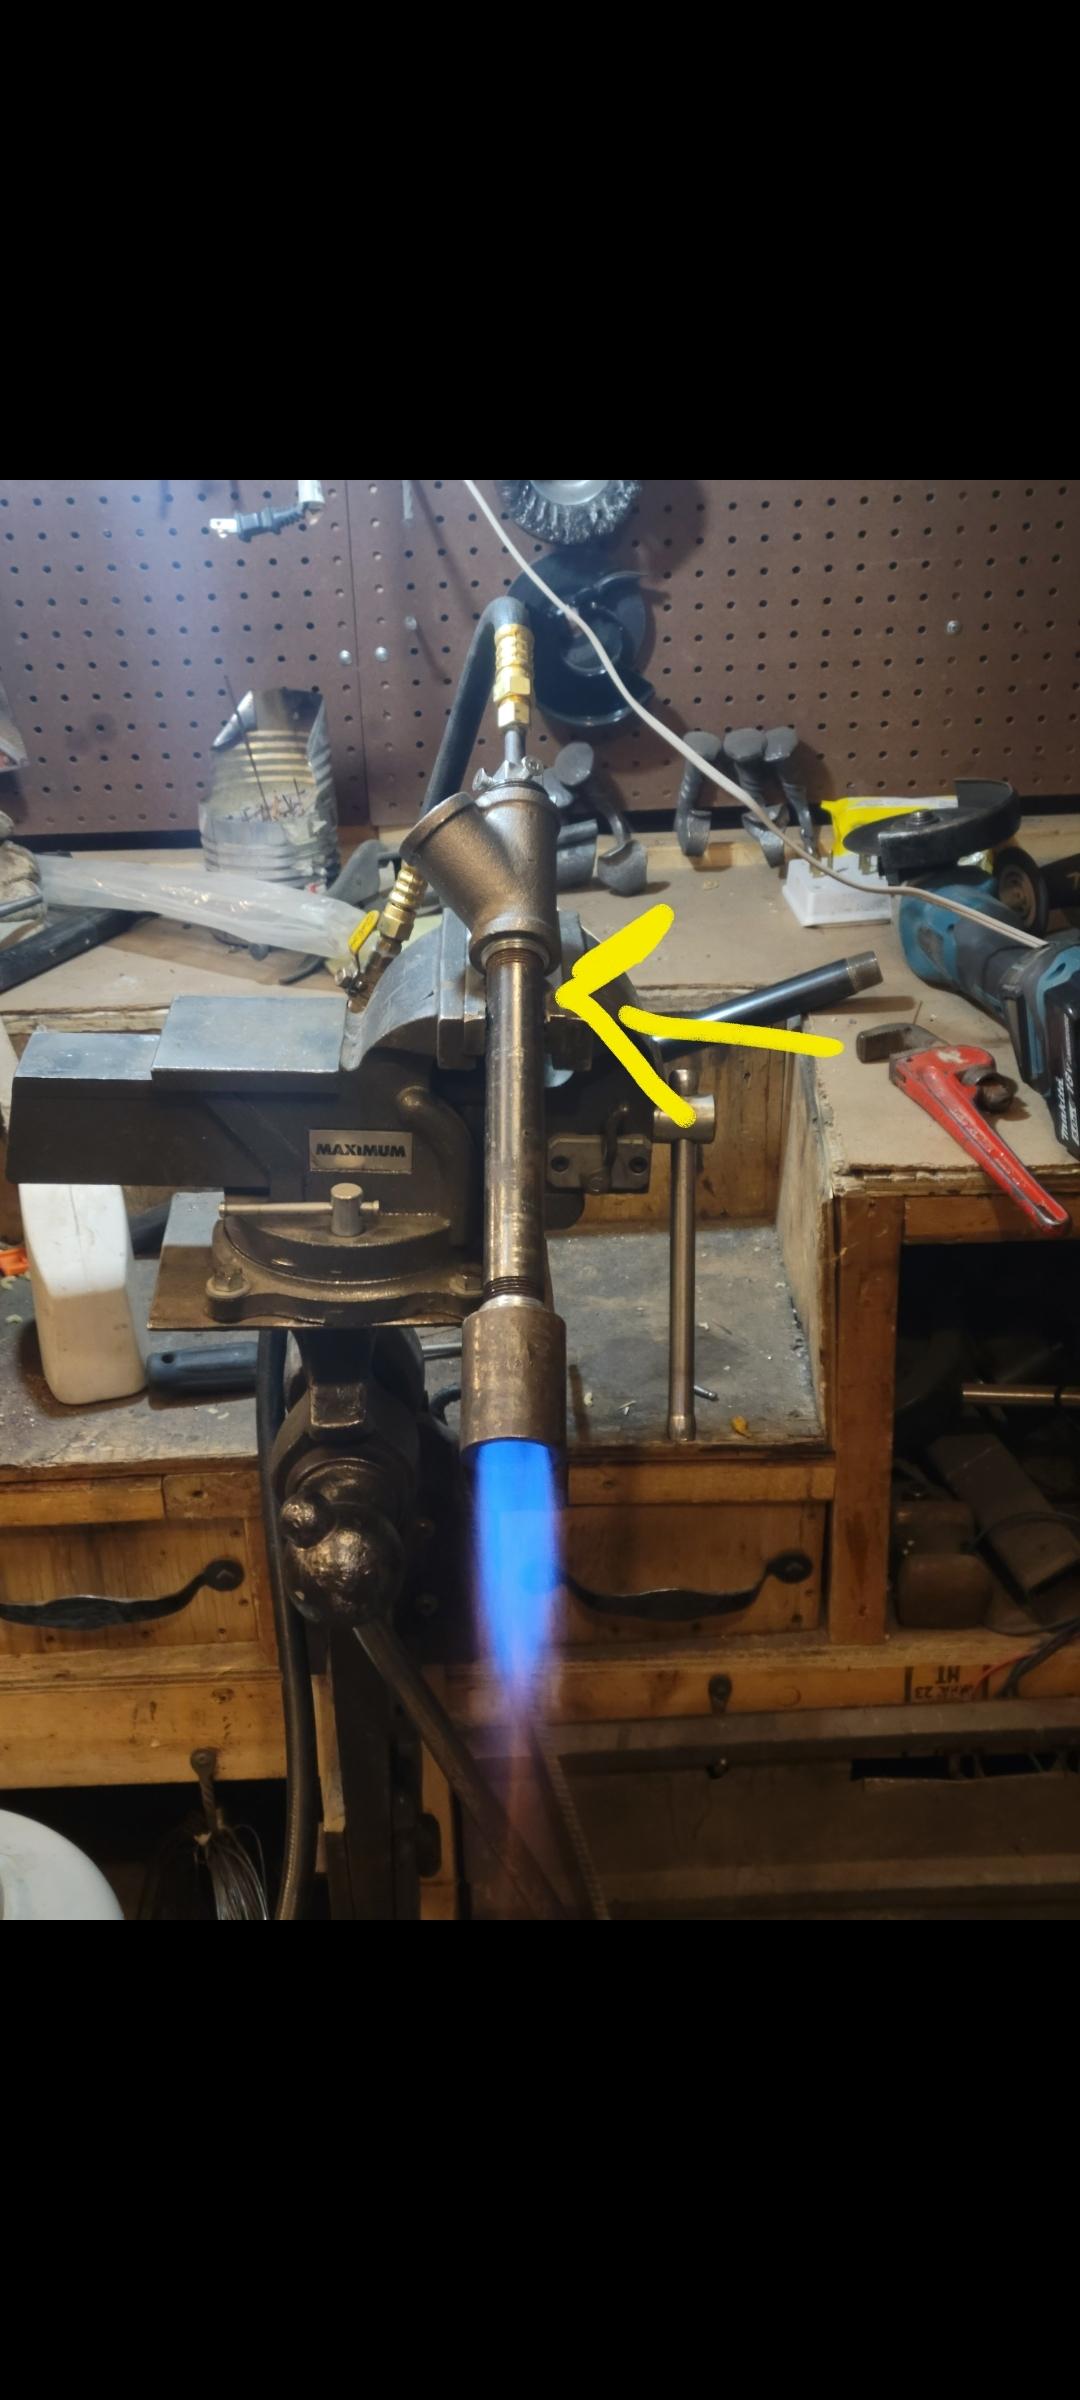
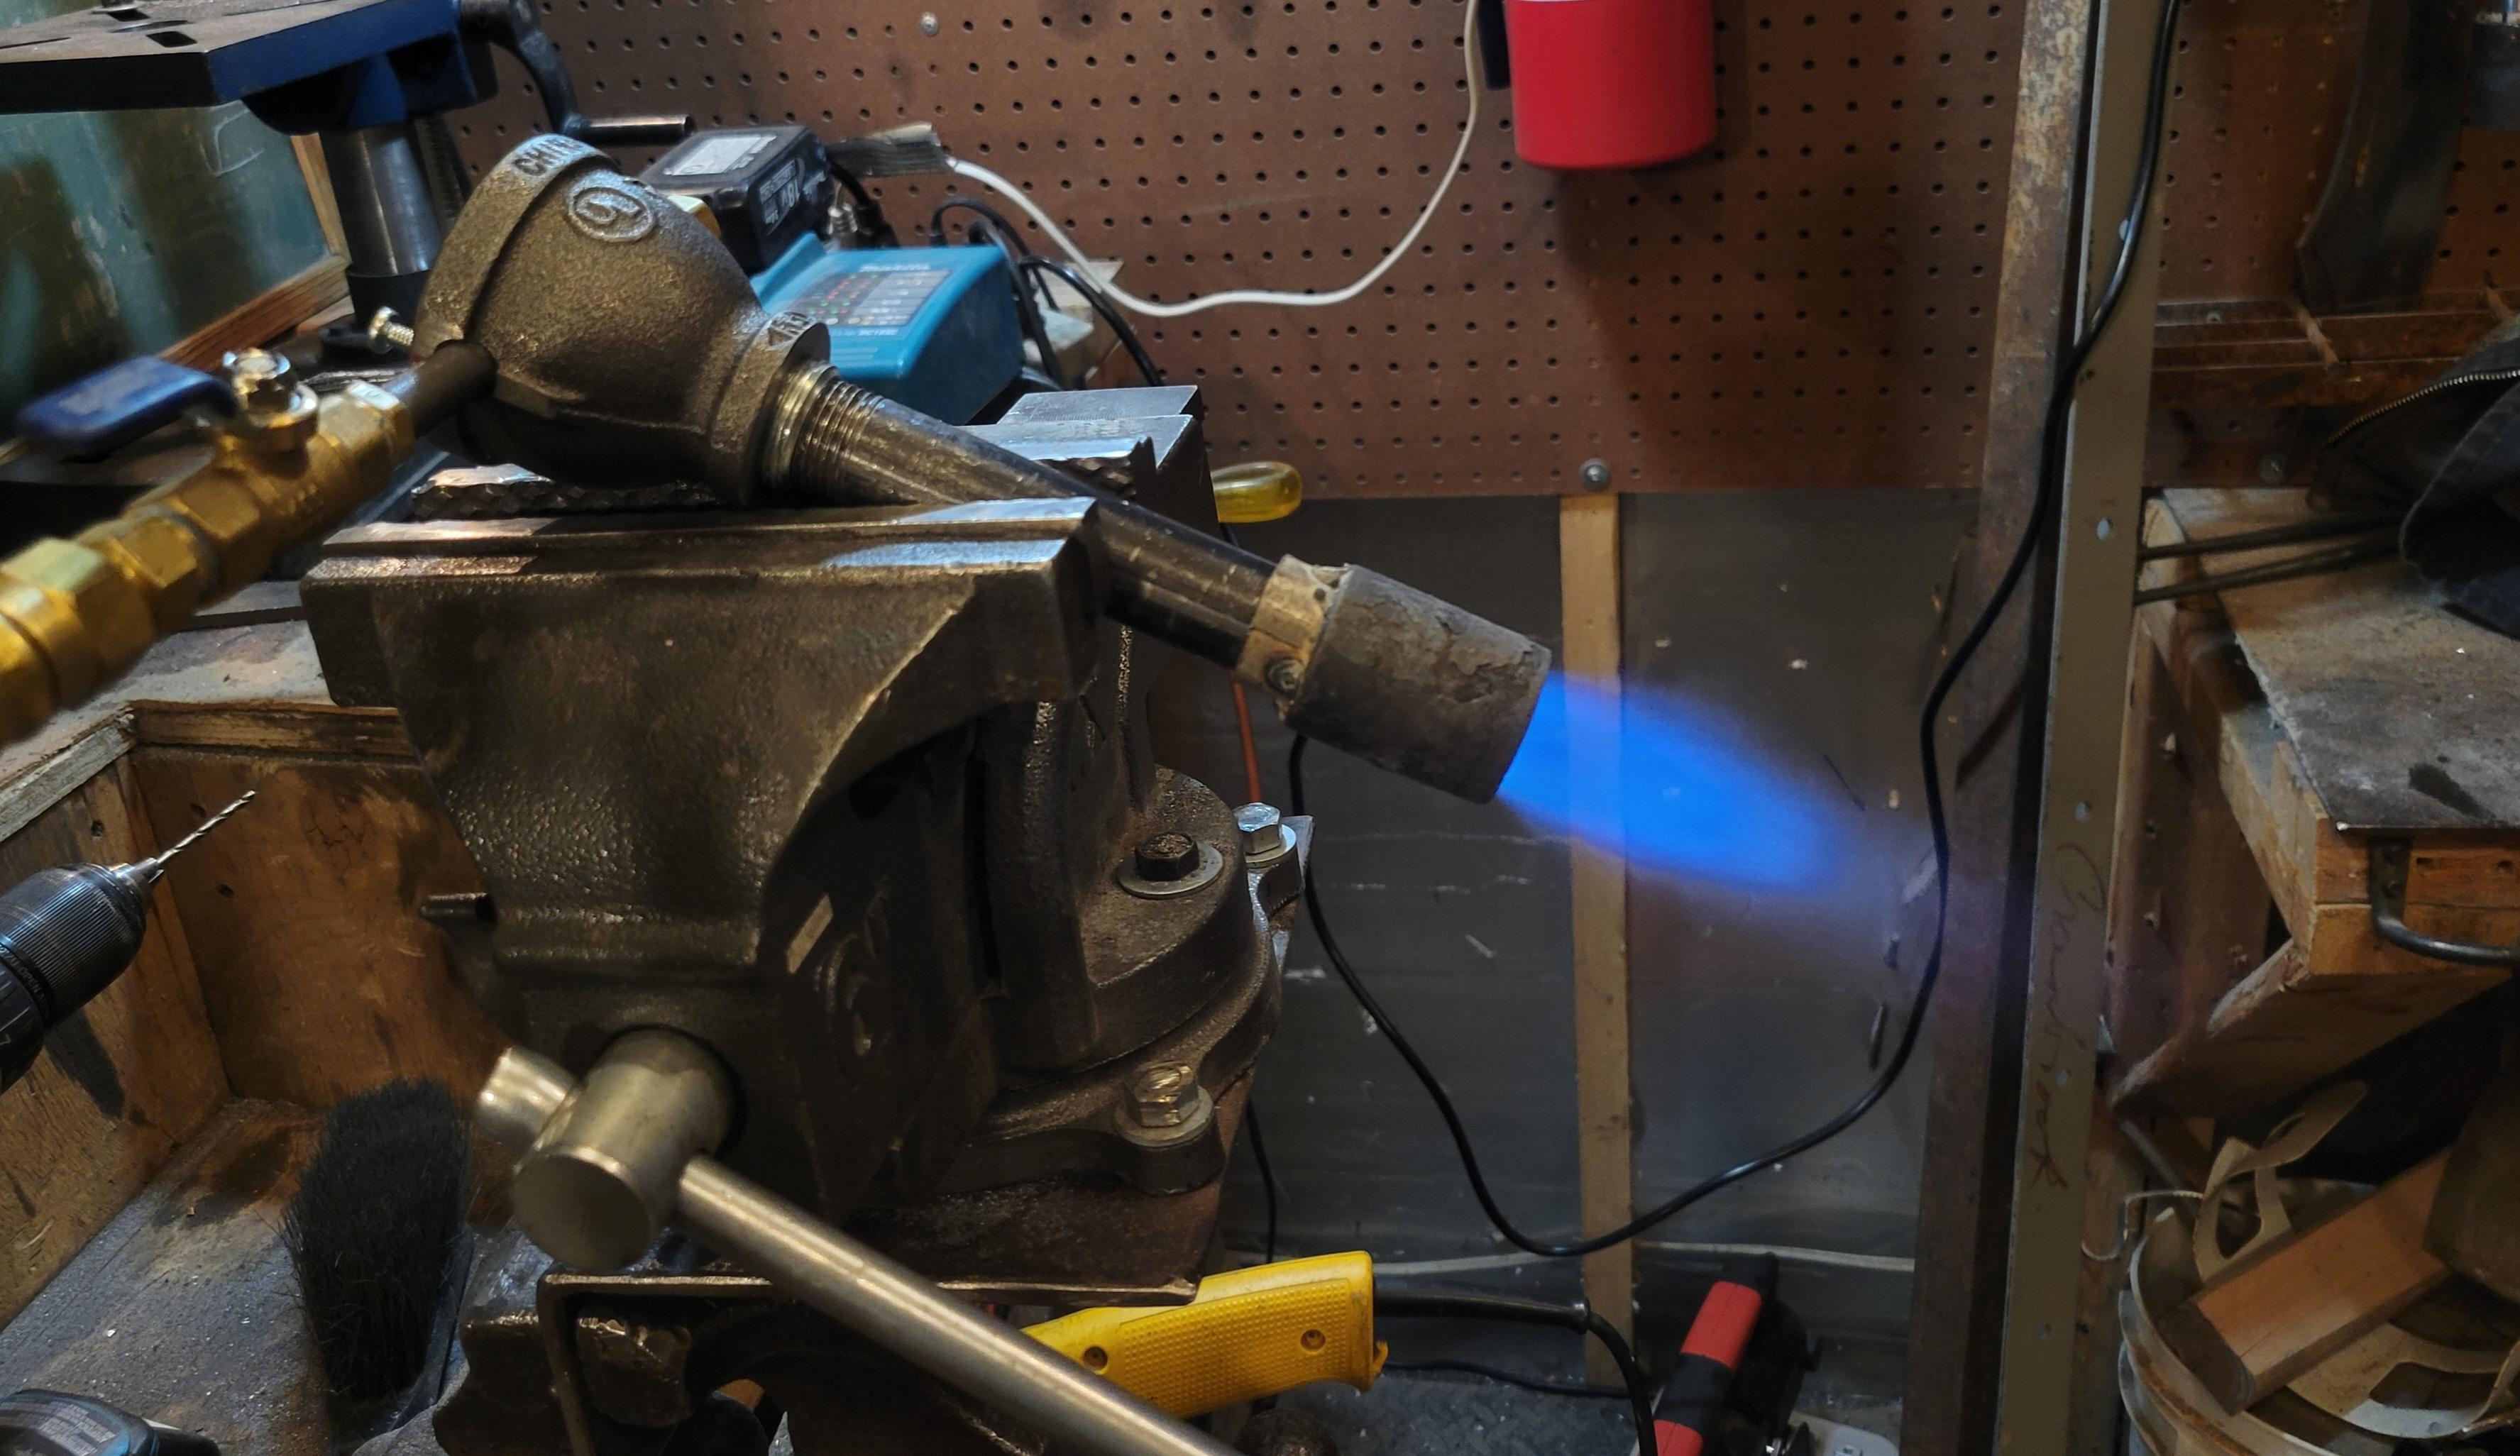
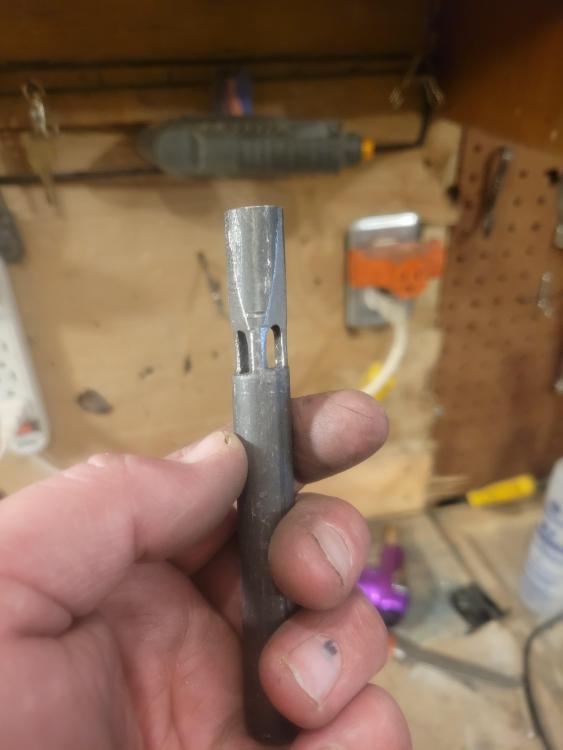
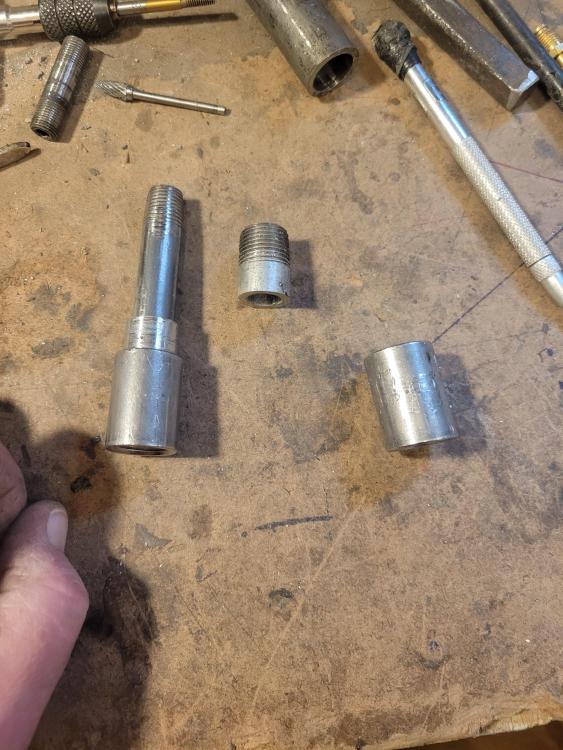
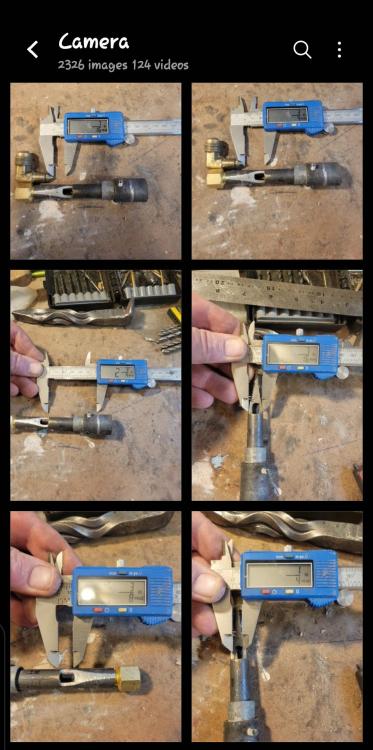
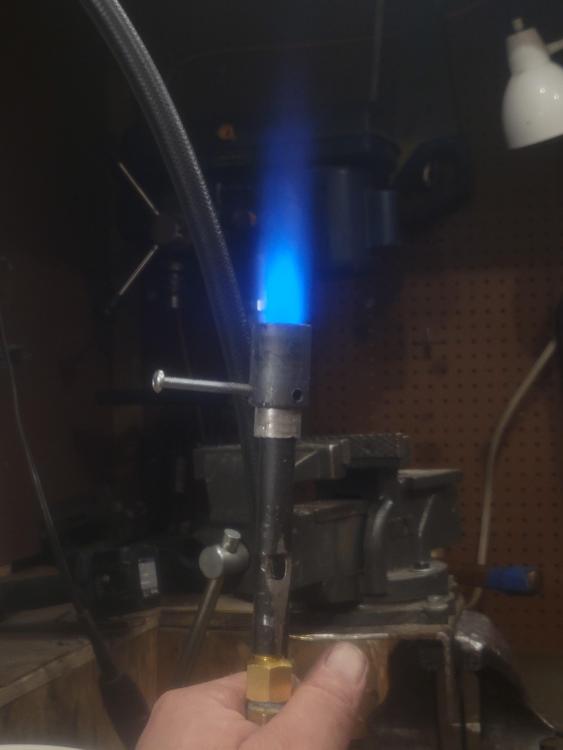
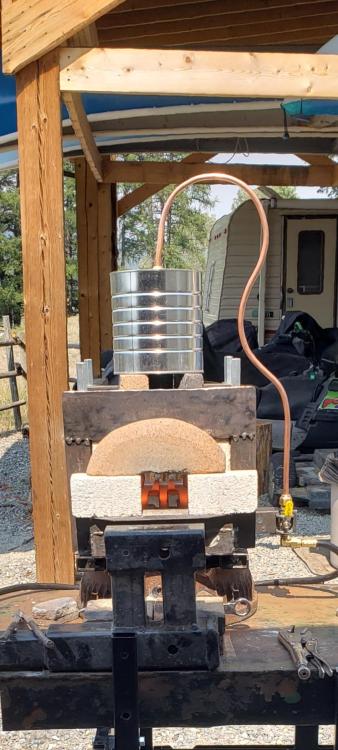
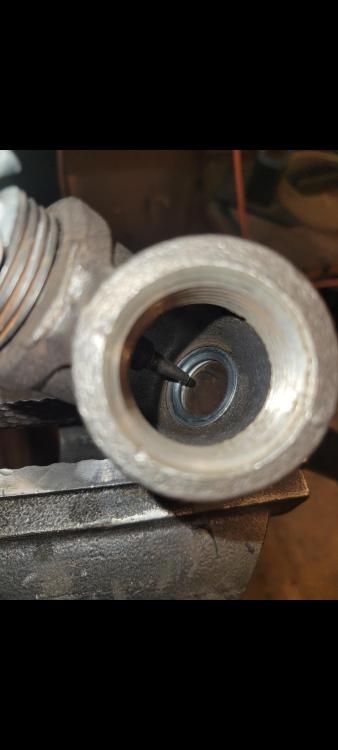
Diaclaimer: Number one I can garuntee you that if I sound argumentative or like I am giving you attitude or dismissing you I am not I promise so please bare with me and trust it's a misunderstanding and that I am only trying to communicate nothing more. I've been dealing with stupid spinal cord damage in the neck. I only bring this up because it affects my hands and I drop the phone and mistype a lot and I struggle tap on the spot to get the curser to fix a typo. I loose focus so I in one paragraph I may use fractions, decimals, even use metric smh. I will use rough approximations instead of specific terms or quoting because I will literally forget what I was thinking. Here we go 6 yrs lurking here and working on bigger burners I figured I'd try my hand at a cute little micro burner for coffee tin or maybe bench work. Now at the risk of sounding like a newb...... I've borrowed concepts from the "Mikey", "Frosty T" and the "Oliver upwind" Hold up wait until the end, I know what you're thinking but this is still in tinker-tune stage...... 1/8"mnpt-3/8"flare .4mm 3d printer nozzle 1/4" X 6" pipe nipple threads removed 3/8" pipe nipple threads on one ende 3/8" merchant coupler Tap the back end 1/8" npt (straight) I tap the 1/8"npt jb quick weld in the 3d jet See the photos that will follow for current dimensions... Use my neato square file and cut 3 equal square notches, I stop just as I see the silhouette of an opening forming (like a thin sheet of foil) you don't even have to measure much just file until each cut out is square and almost touching. I used a carbide bit on a rotary tool (the tip of a smaller file or drill bit can punch the little sections out) I used the little diamond files to square up the edges. The nozzle is a section of 3/8" pipe threads on one end cleaned out with a 17/32" (9/16" would be better) and screwed into a straight thread "merchant coupler" (?), you could use a section of 1/2" pipe nipple cleaned out Outside the forge the nozzle has an over hang of about 1 1/4" apx, the flame does ignite inside the nozzle maybe 1/2" but after awhile the nozzle still hadn't turned red. There is a bit of an air gap between the nozzle sleeve and thee mixing tube, I assume that help cool the nozzle. The flame was quite stable and I was able to wave it around. Inside the forge I think it was still a bit soft and long but I think if I use 8x id 2" instead of 9x id 2 1/4" from the bottom of the air openings (forward end?) that should be making a big difference..... Obviously we know that but dang the difference from 3" - 2 1/4" was a better representation than I've ever seen on the larger burners ;-) The forge is a coffee can forge made with ceramic wool a bit of dense castable and high temp morter to seal the ends. This definitely isn't finished and will still be getting an ITC top coat in tge end. (plistex and mtrikote are too pricey to get here), so definitely not finished! I will update with the forge build later but, I'm open to advice but please note I've only got the pics here to show the burners reaction inside a small space (44-55 cubic inch maybe) Hmmm, here we go the withought further adue the "pocket rocket" https://youtu.be/pxj_f5O85CY


-
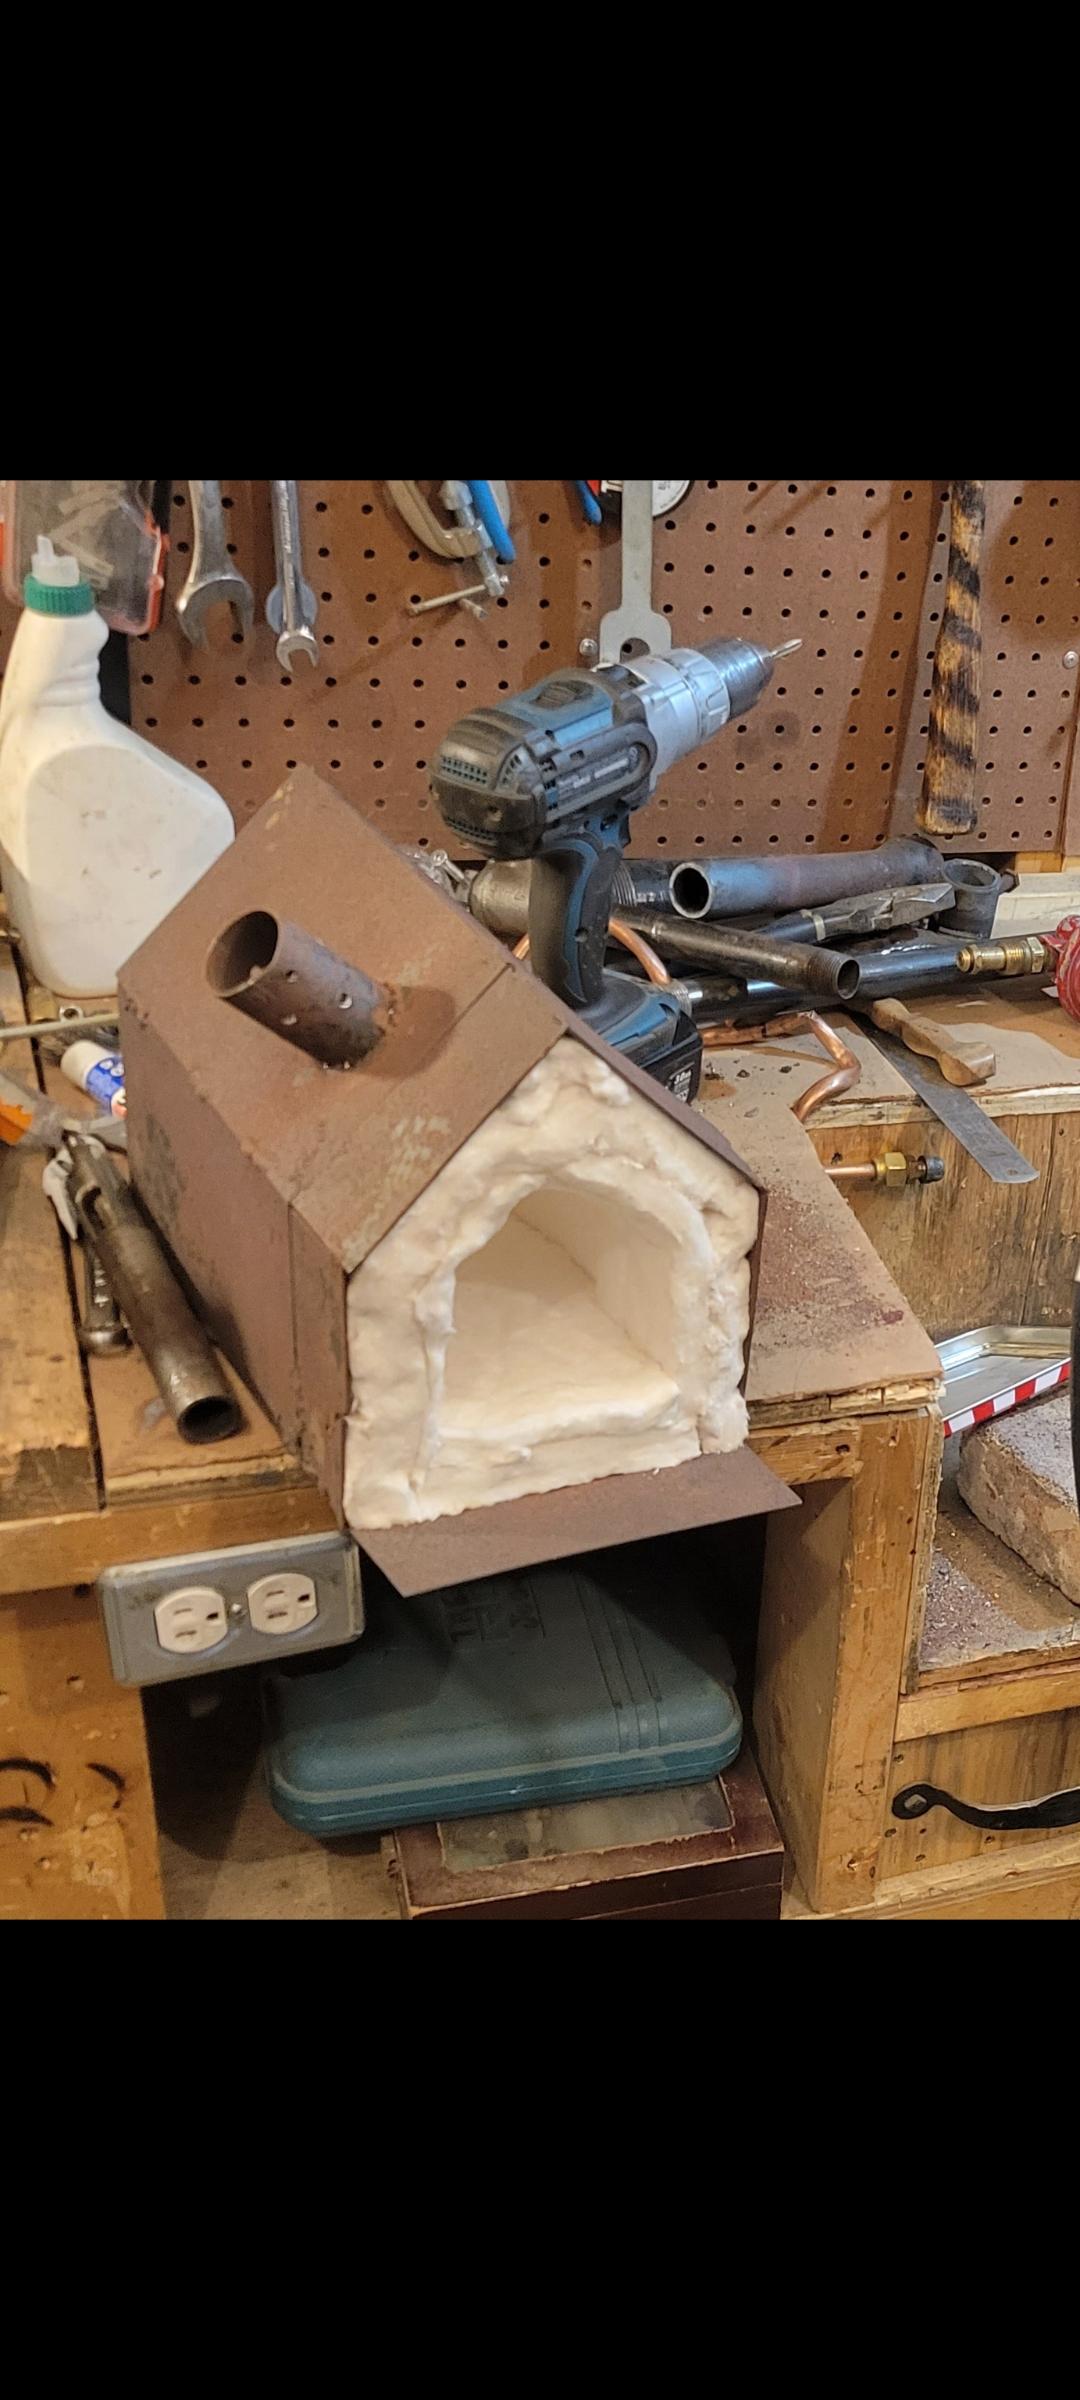
1/2" T burner, hole in the bottom of an all tin coffee tin
-
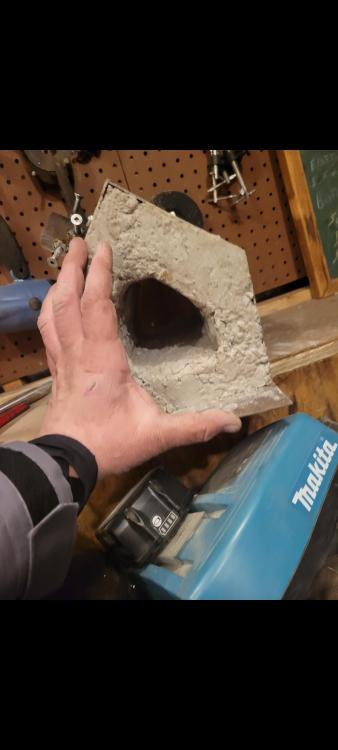
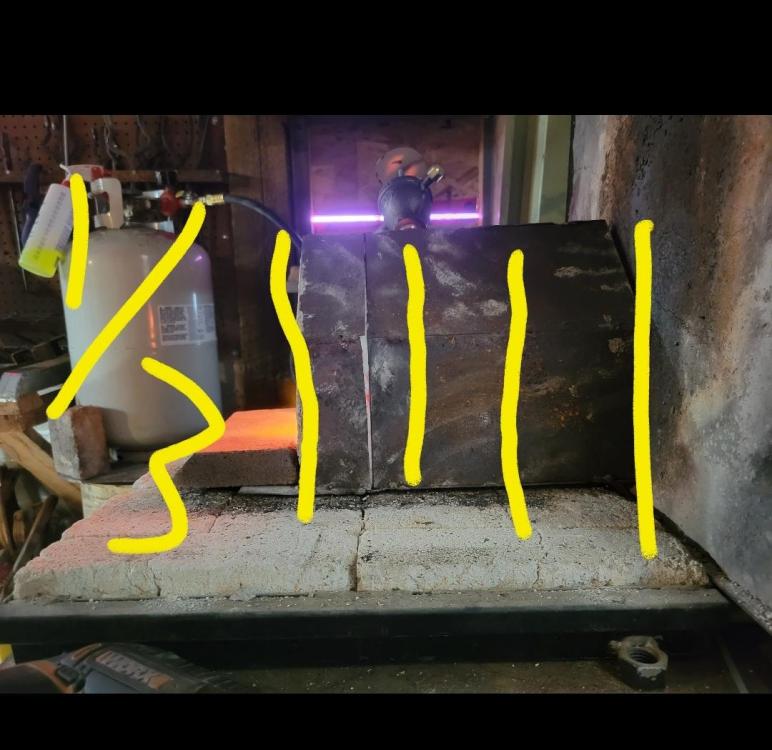
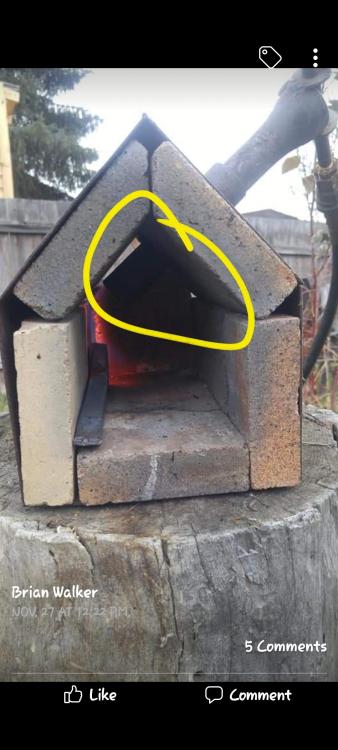
The only thing I didn't agree with is whether or not the burner was inside the forge or liner. It's not arguing or dismissing its explaining. The dang picture was taken from an upward angle, and its obvious the burner is inside a hole/port. I'll read the information shared here but I'm not going to spend three days explain a picture. Maybe it was when I said 1/3rd into the forge..... I meant front to back not 1/3rd into the forge. All these pics are the burner at the same depth. OK the insulation along the back wall is about 1 1/2", peak is 2" maybe 2 1/2", the wall opposing the burner is close to 2" the floor is 2" There's give or take 3/8" castable and then there will be an IR top coat. The burner sits inside the port in the insulating a scooch, it's too small to get a good look or to even feel the depth so I have to judge by how the flame is igniting. I set the depth while watching the balance and yes I try really hard to have the flame light just inside the port in the insulation/refractory. Everything that I've learned here I've used, Mike has talked at length about using the nozzle to superheat the gasses before they enter the forge... I believe that concept is repeated on Chili's website.....I use the port in the insulation for this not my nozzle, my nozzles stay black, maybe a lick of red maybe but that's it and at the end of the day. Yes Mike a Frosty are on repeat, it's too bad, my forge isn't actually 1" thick, the nozzle isn't inside the forge and I don't know what else to say, I don't know but here's a couple more pics, if the forge still needs a LOT of work then that's great it's a heck of a lot close than it was when it was dropped off. I will stop replying to these threads and just read, this is ridiculous. Here's what a burner inside a forge looks like, this is what was brought to me.

-
Seriously I'm not trying to argue, I only corrected the fact the burner wasn't I side the forge. I'm going to stop joining in, I am exhausted with the misunderstandings every time I try to reply.
-
Wow ouch, I got no problem with pride nor I'm I struggling to comprehend the basics of building a forge. I've been here 6 years reading your explanations and instructions and sharing your information I was just explaining that the burner wasn't into the forge interior. I honestly don't know where/how you and Mike came up with that. I feel like there's a constant misunderstanding between us which really sucks because I really respect and appreciate your knowledge. I don't even care about this forge I was just trying to discuss the build not challange your knowledge. You and Mike said up in the liner wich I confirmed then you say only a 1/4" into the liner from outside..... We're going back and forth over less than a half an inch but again all I did was say how it was positioned in its port.
-
Hmm I had a few videos saved on one of my phones but I can't find the ones I was thinking if. Anyway i do try to set the balance up so the flame sits between the lip of nozzle and lip of forge liner interior.. This birdbox will be on forges 101 after I finish up with the ITC 100 and other refinements to the burner port and
-
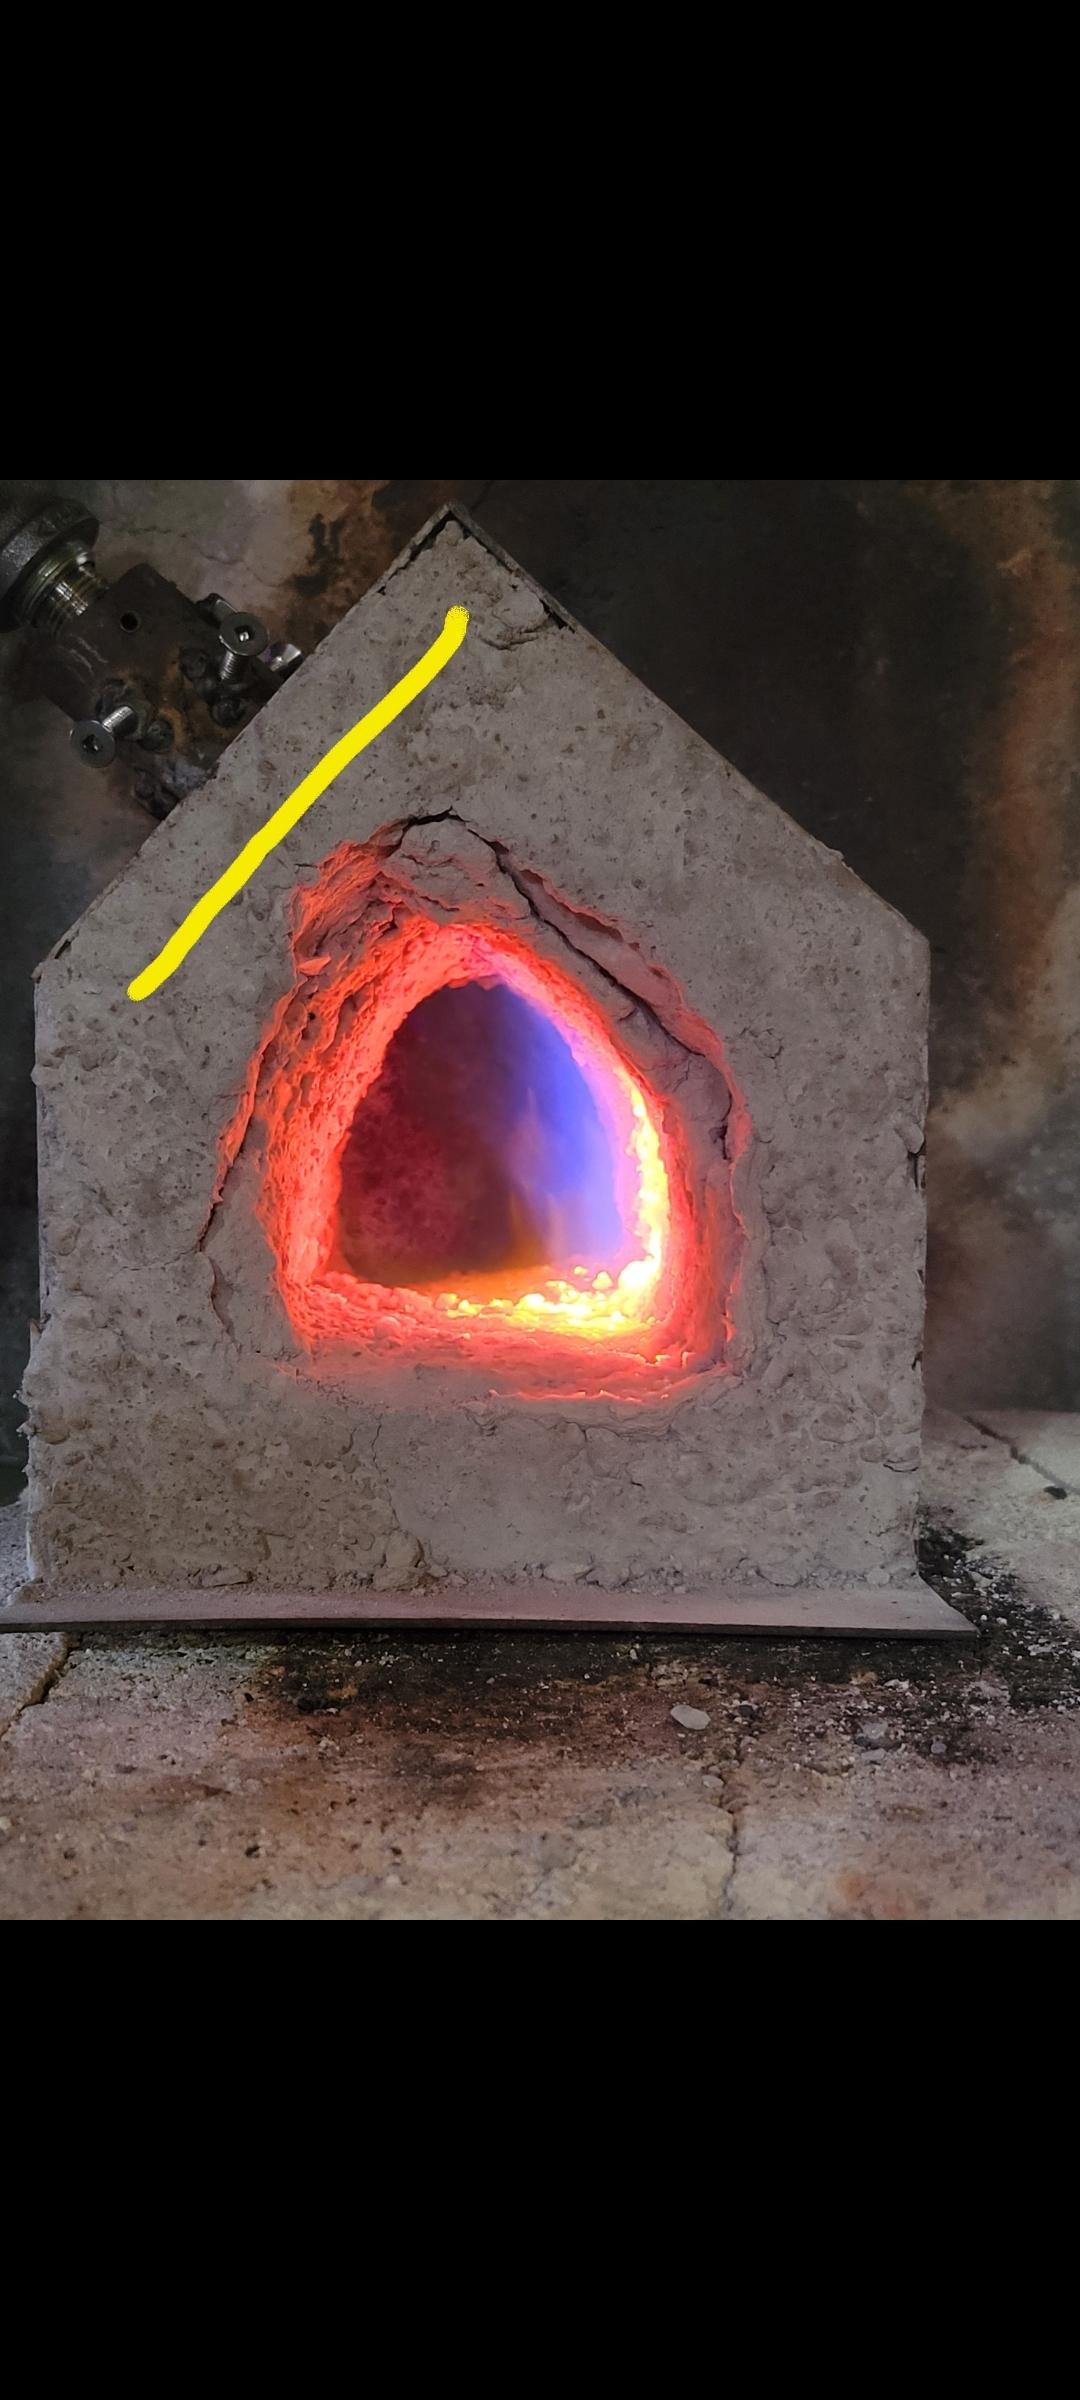
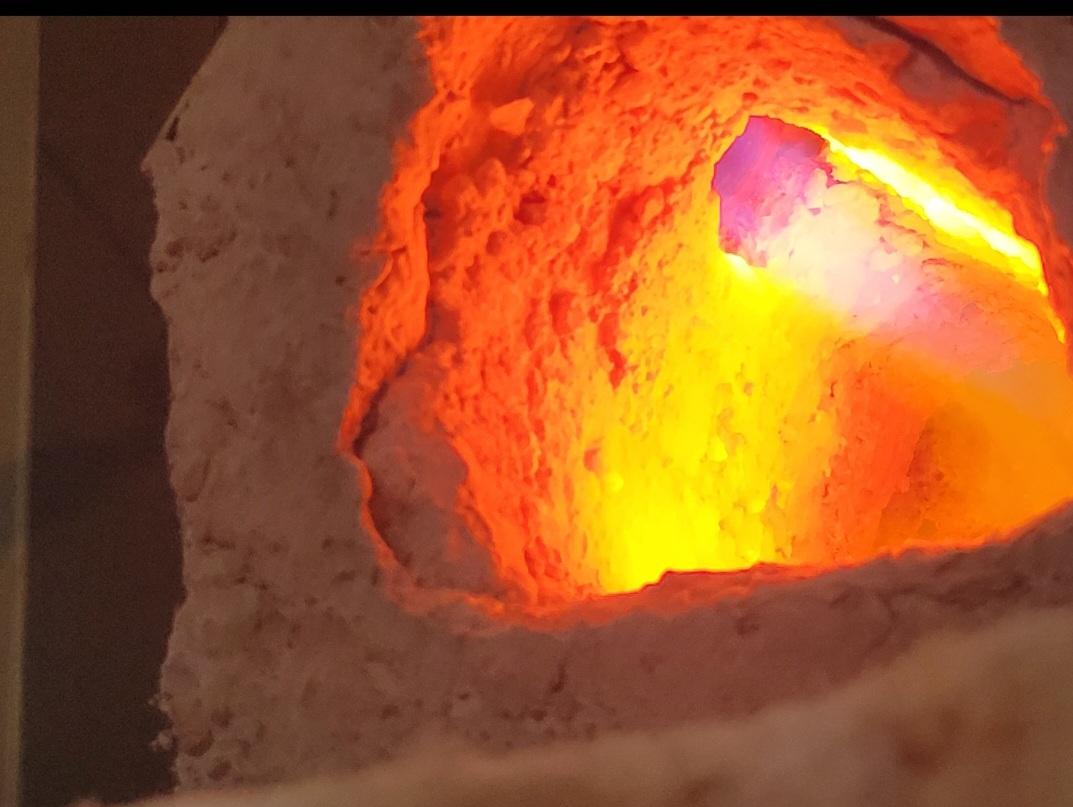
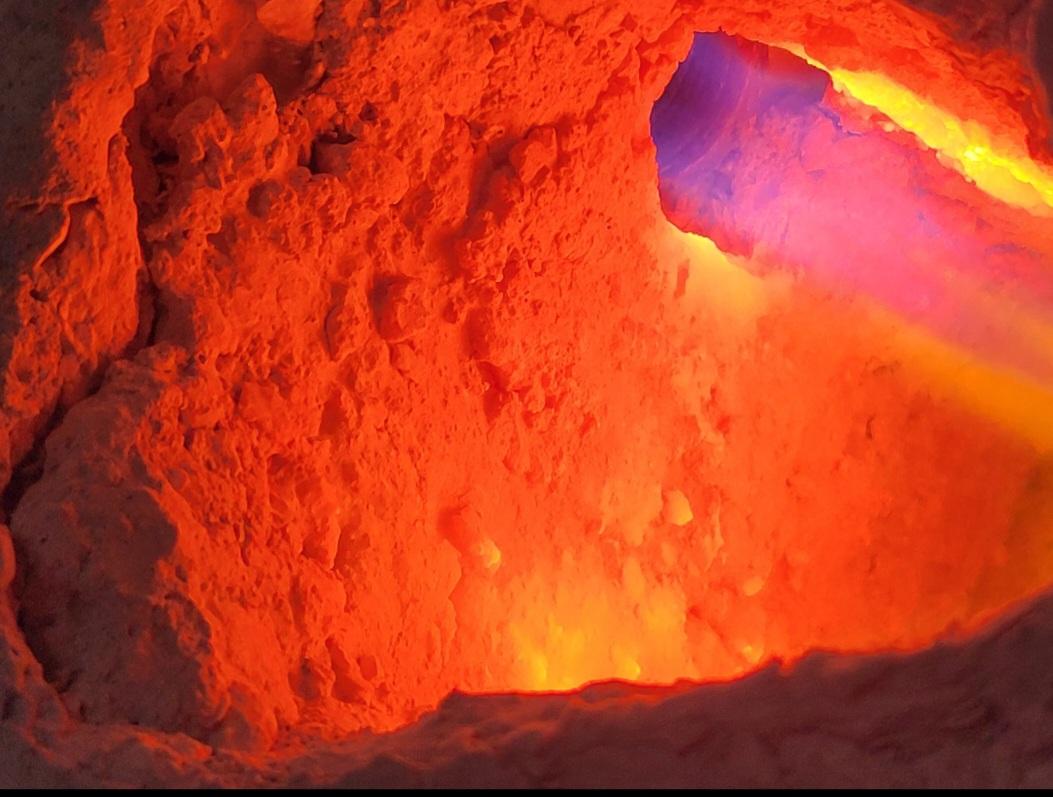
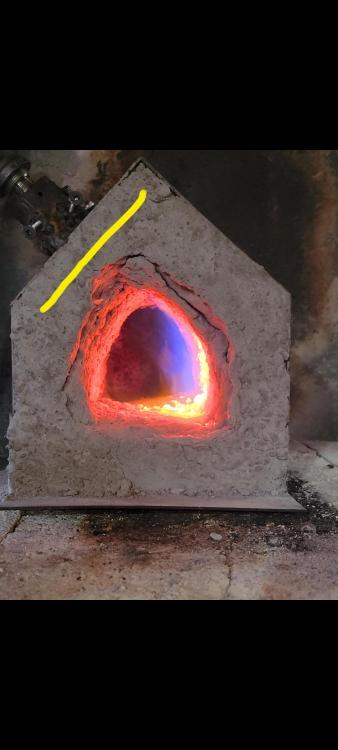
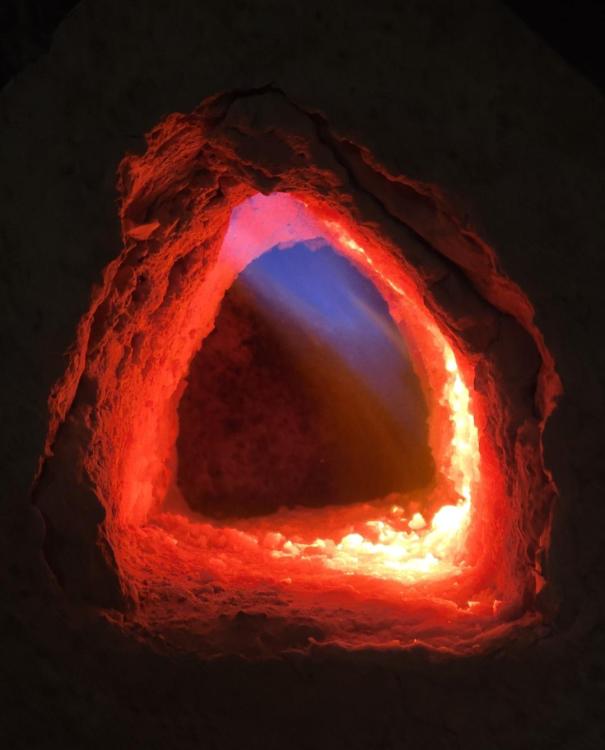
I have the nozzle set to a depth where the lip of the nozzle may get red but no further back..... I pride myself on the flame originating from a black hole..... I try to balance the over hang and increase in diameter with the port in the insulation/refractory ie liner so the flame starts between the lip if the nozzle and lip of the port though the refractory. This forge body was quite small so on the walks the insulation is only 1"-1 1/2" thick so 3/4" UP into the liner is closer to the 1/4" down or 1/4" INTO the liner. I'm not arguing just trying to describe what my eye is seeing vs what the image shows.... I'll see if I can find pics of other hot port shots (that's 'pg' right)
-
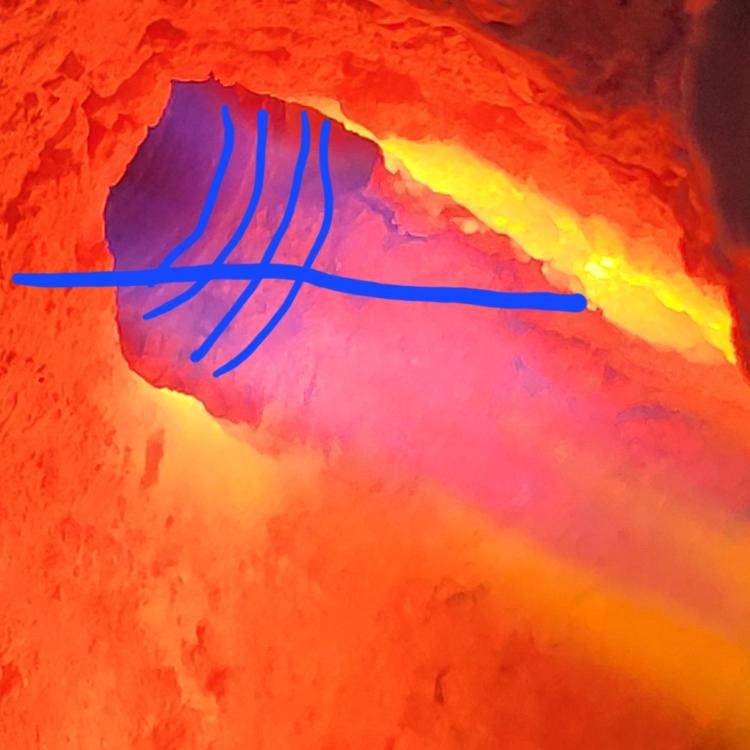
Hmm it's definitely an angle perspective thing. The nozzle overhang is 1/2" past the end of the mixing tube and the nozzle tip is about 1/2-3/4 inch up into the port once at heat the flame sits in the 1/2" between nozzle and forge interior. The blue lines are the wall of the burner port. The refractory broke up as I was refining the ports and reefing the burner about... It is allready patched and waiting for the next step
-


-
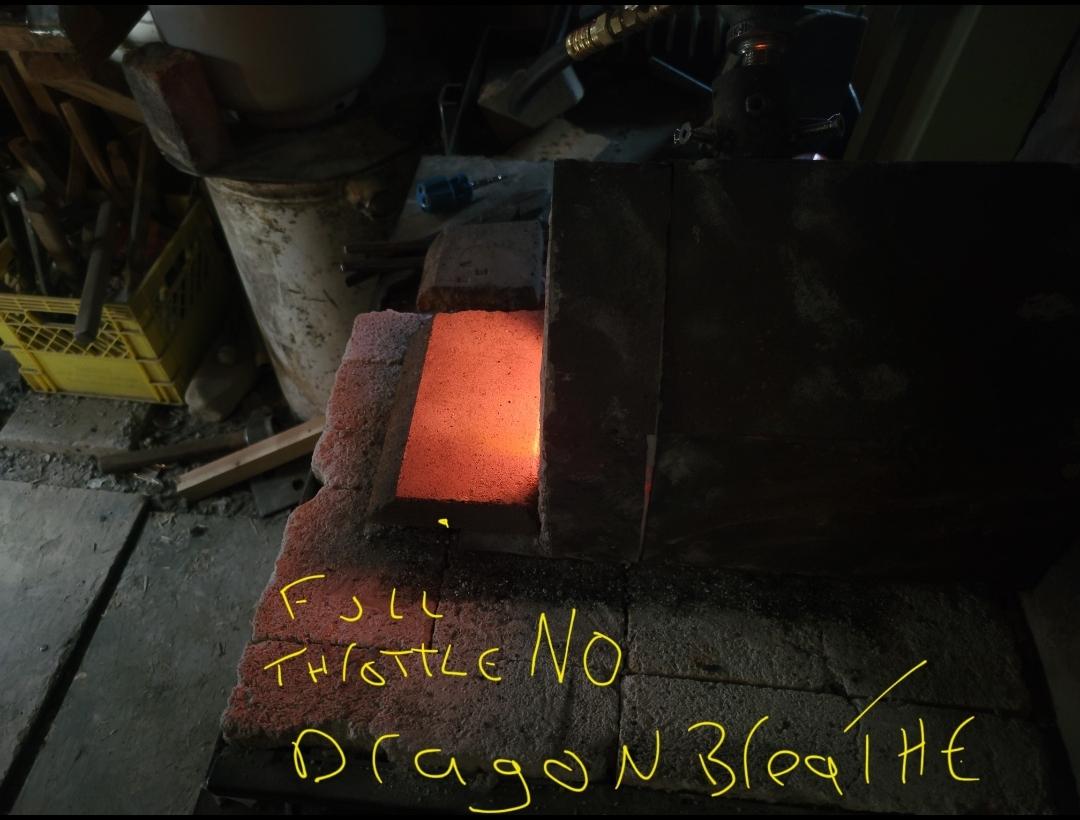
Excellent combustion, woohoo! I think I know what you're saying about a neutral burner wanting fine adjustments, a lean/oxidizing is a lot isier to detune to get neutral. The burners I've built that start out neutral always seemed to ride a fine line with the A/F Now it's the game of getting it to balance out in the forge atmosphere. I added a spinny choke plate thingy for warm up, cool down and mid session tuning, I fiddled with the nozzle over hang and angle the burner enters the forge and depth the nozzle sits. The burner is mounted 1/3 from the entrance but angle backward just enough so the flame can almost corkscrew to the back, the AF is combusted inside the forge with minimal pressure being forced out either end Here the little bird box I'm finishing up for a couple friends. have little touch up's needed to the refractory and I think I may smear some of the ITC 100 I have in there but she's a cooker now! The burner will run stable at the bottom of my regulator all the way to full throttle without belching dragons breath or sputtering. I haven't spent enough time with it to say much more than that.
-
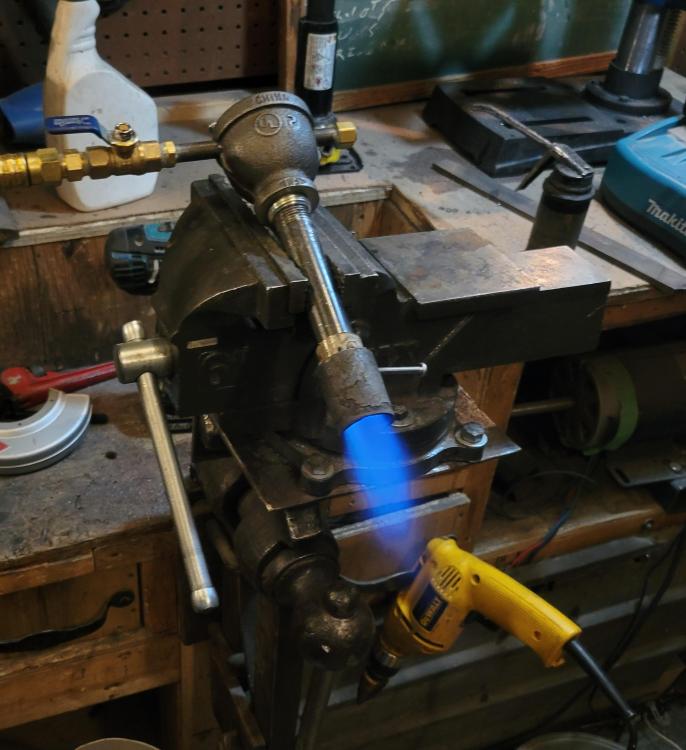
I finally found a place to order these wye fittings, I think my jet is crooked but you can see how the rigid conduit reducer bushing sits inside the throat on this other burner.

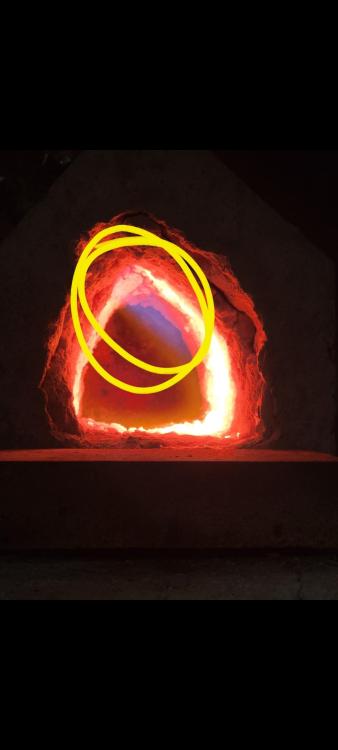
-
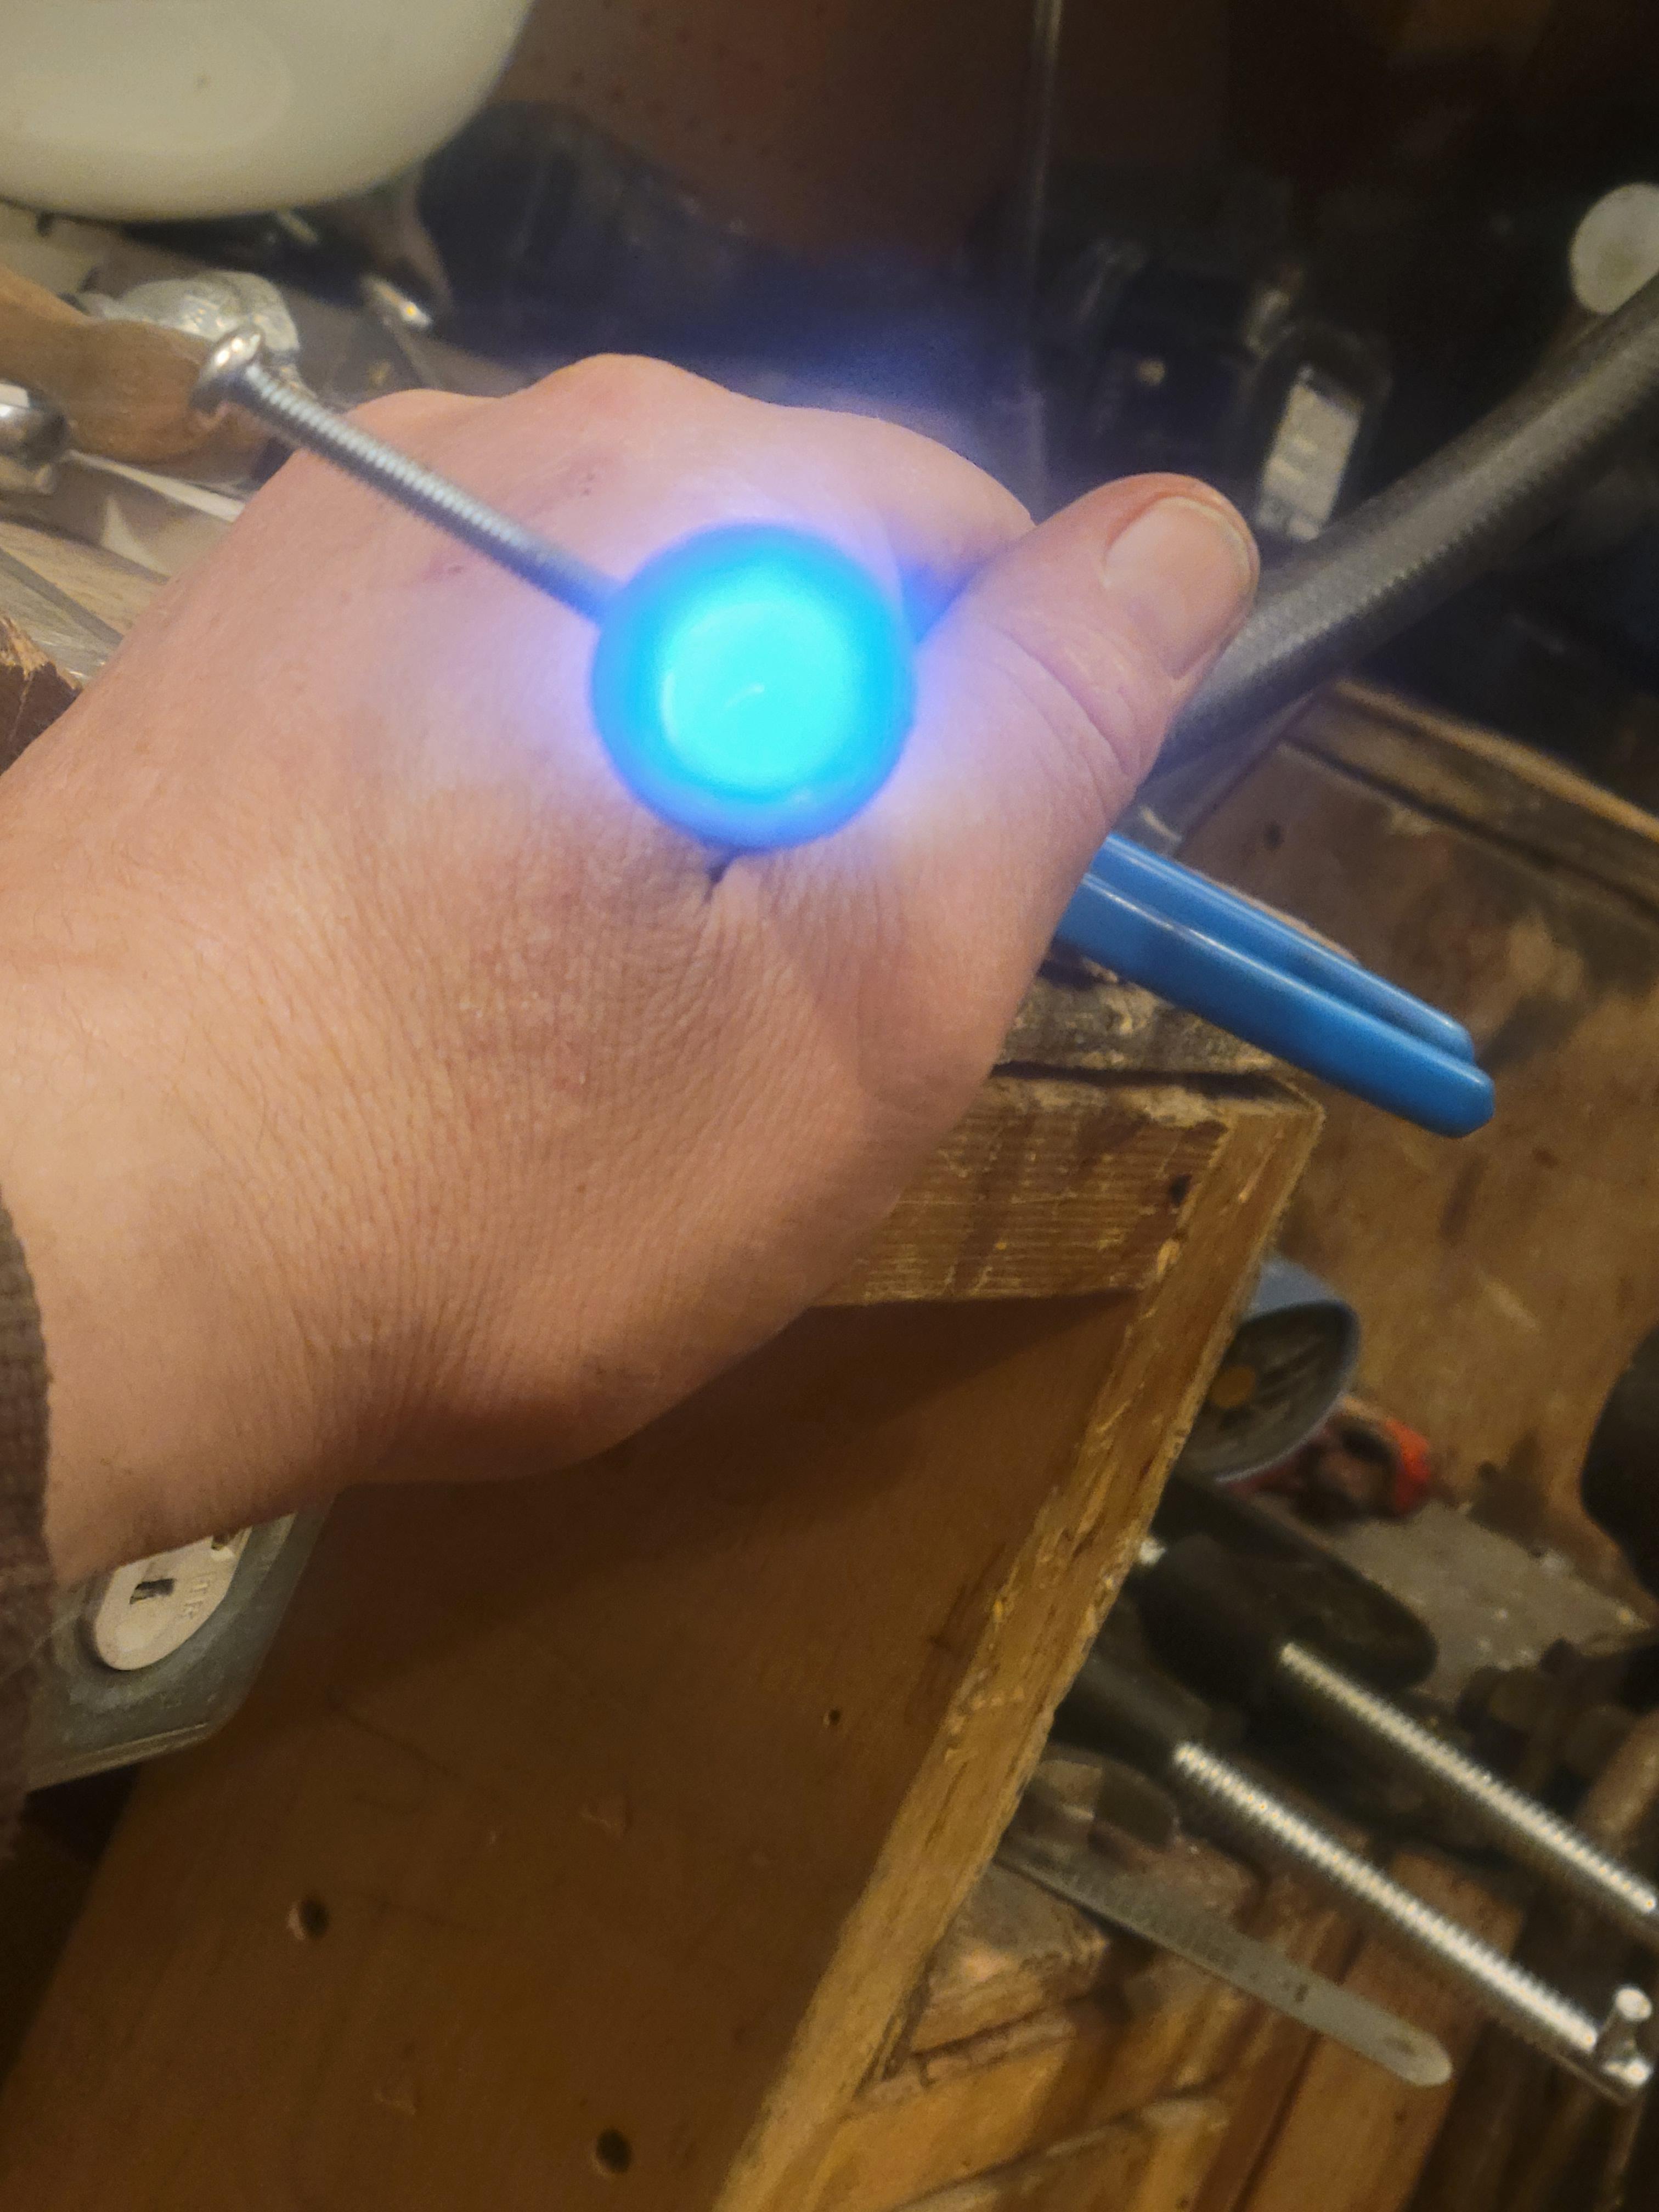
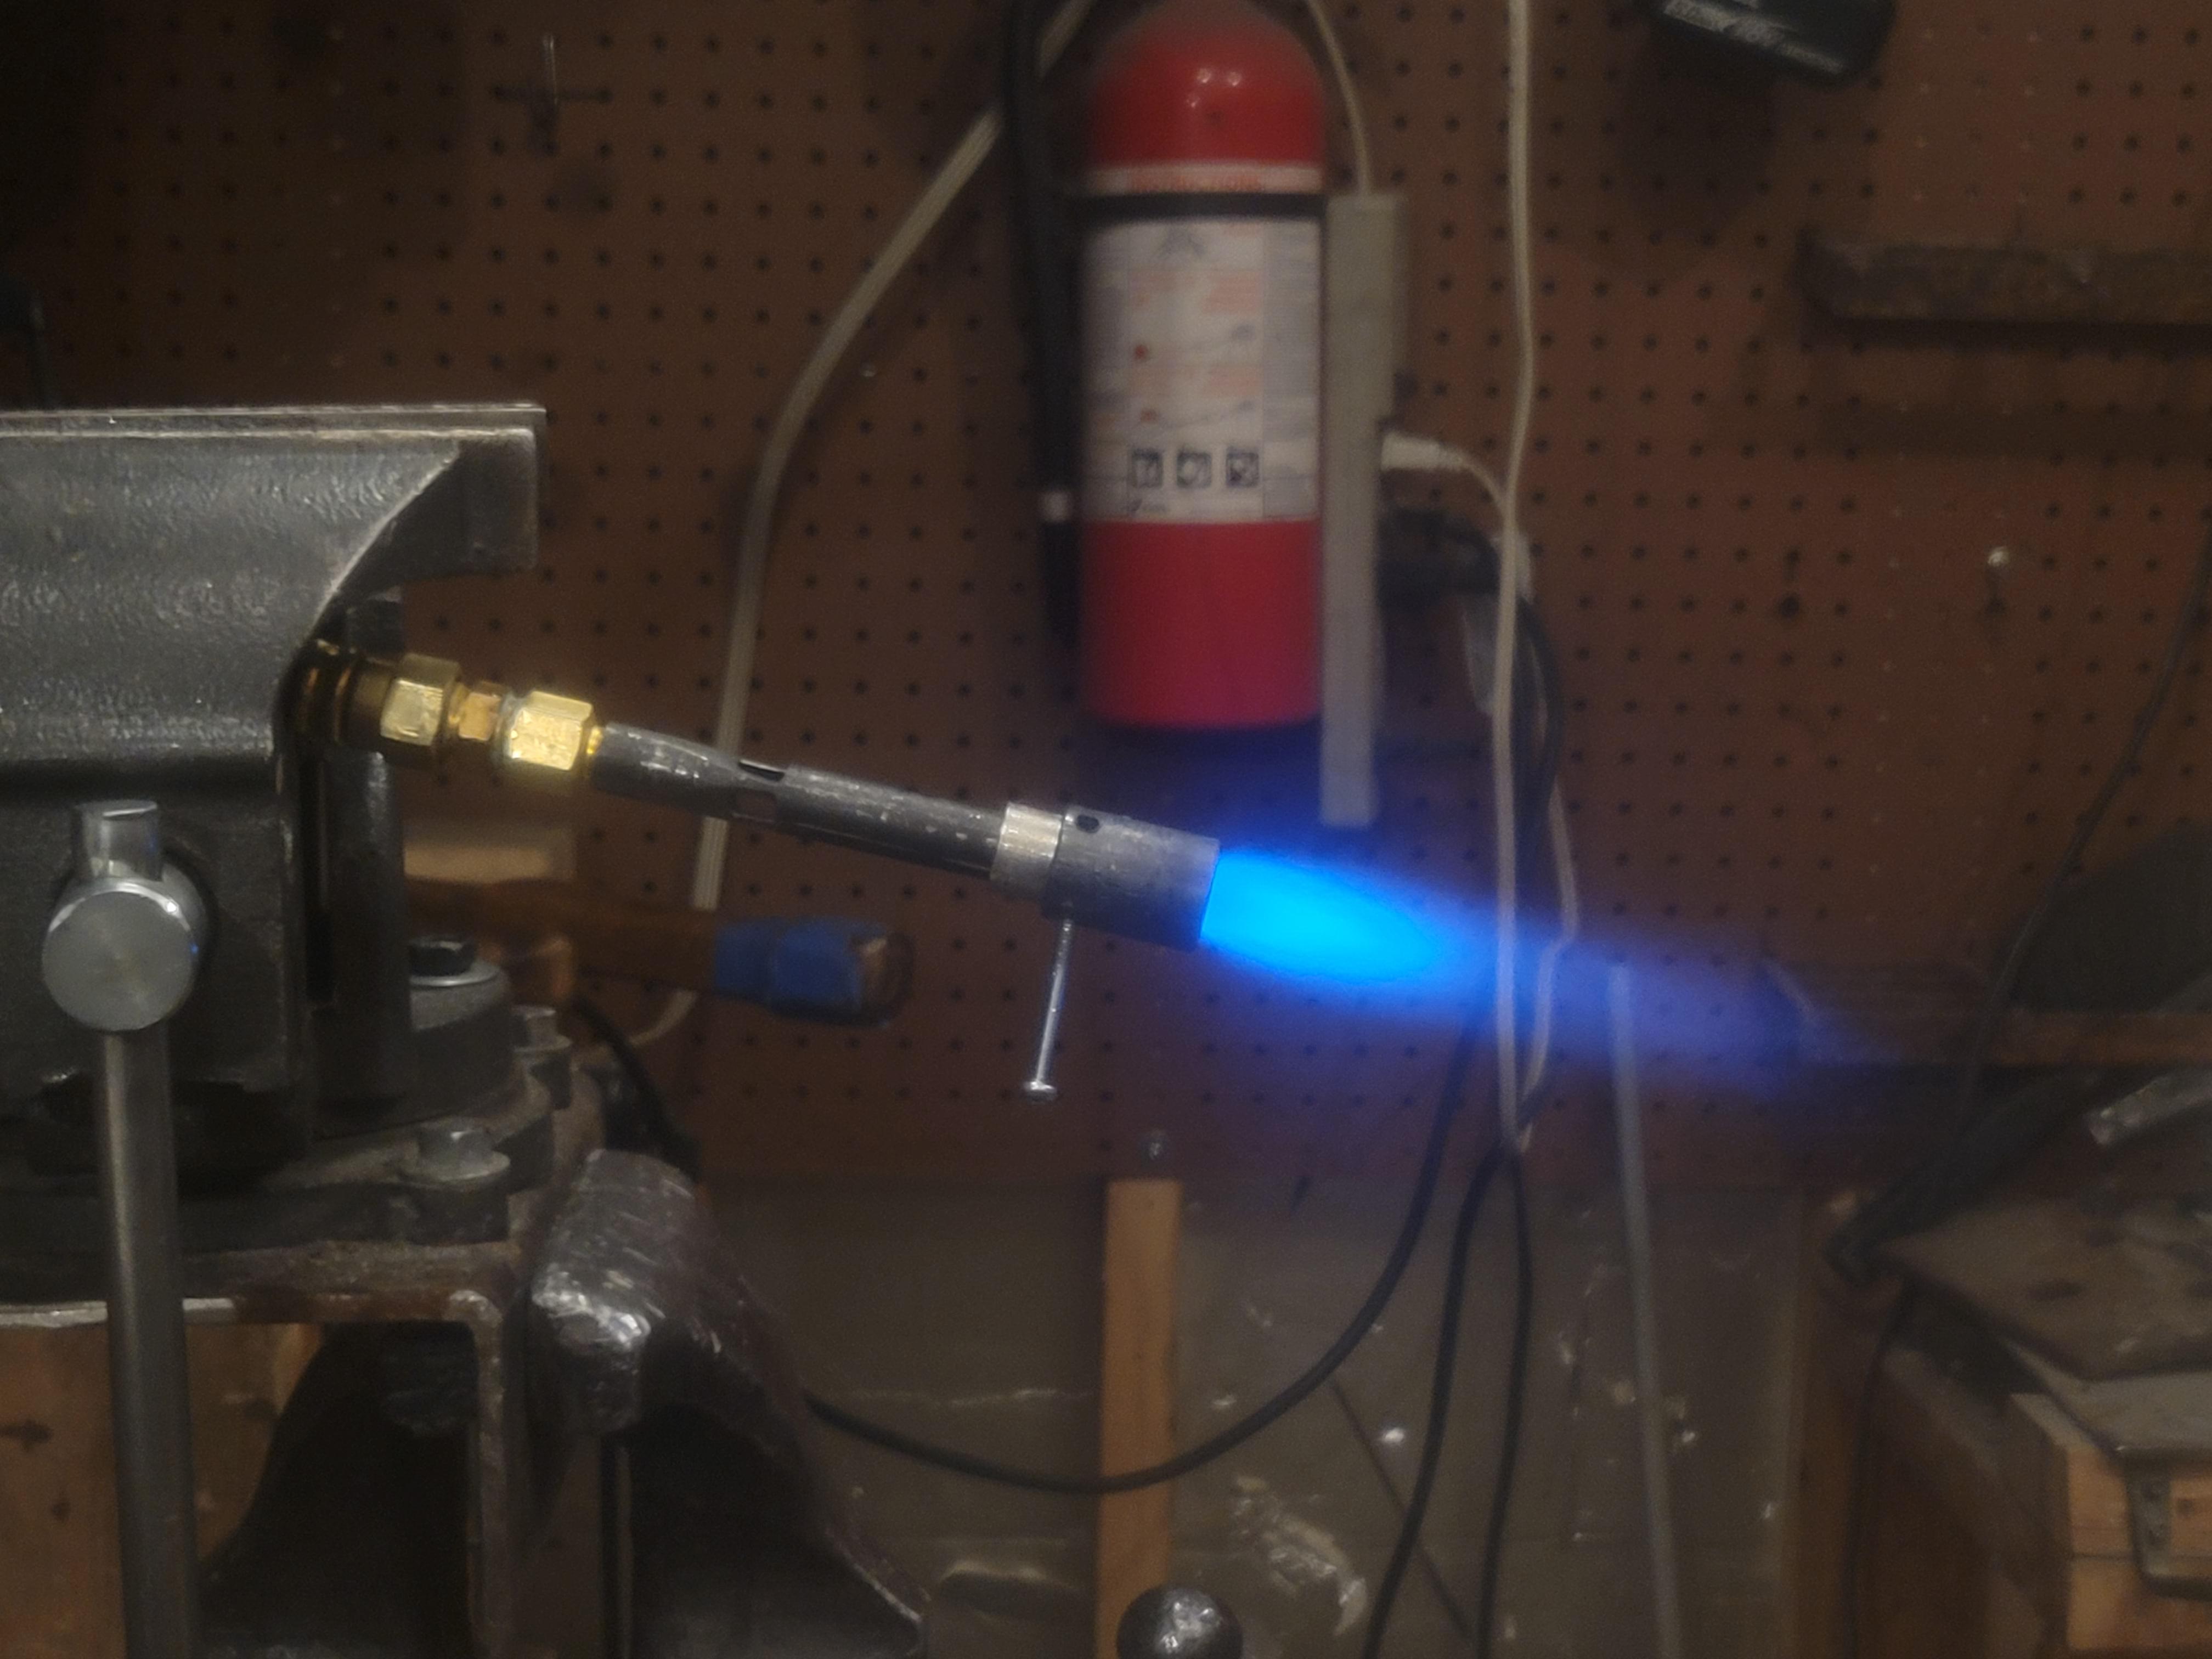
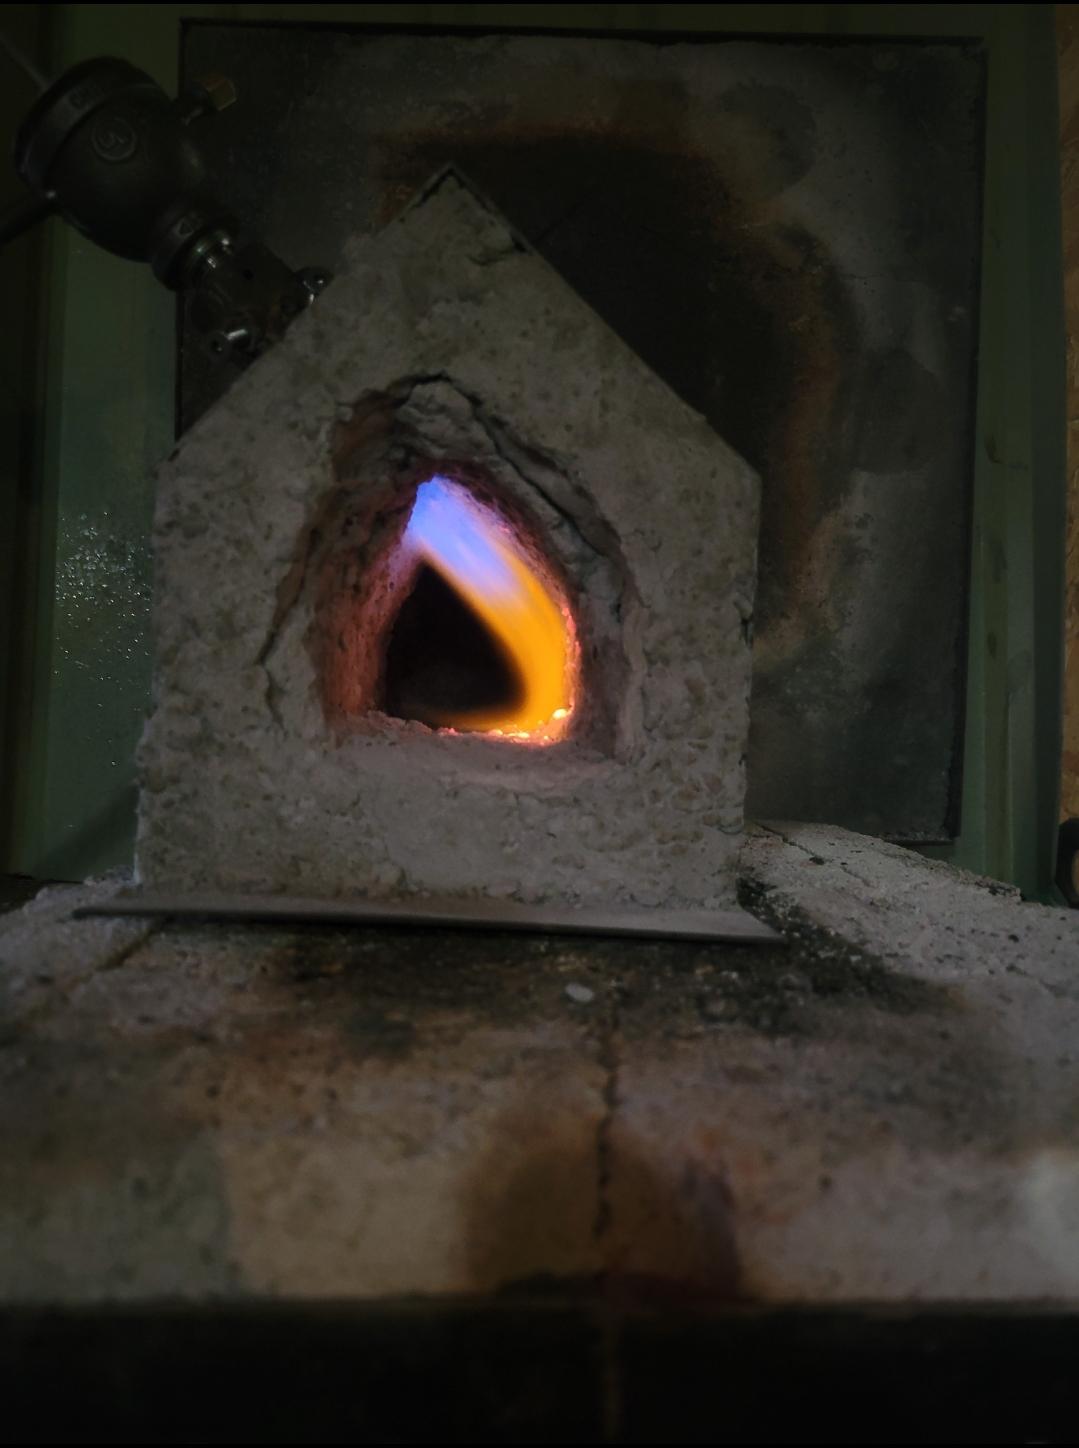
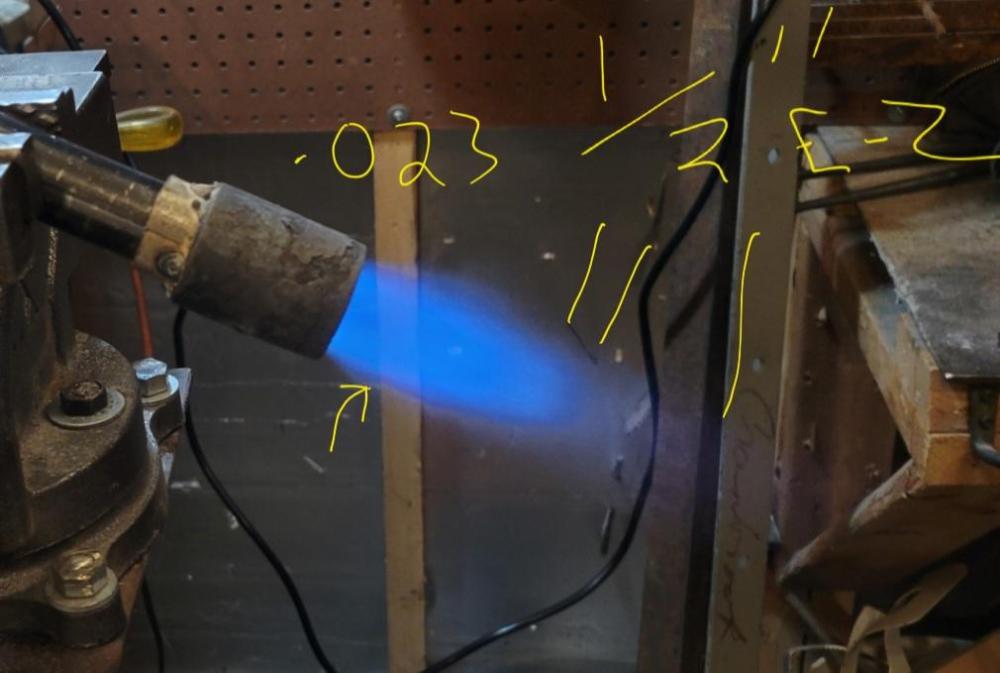
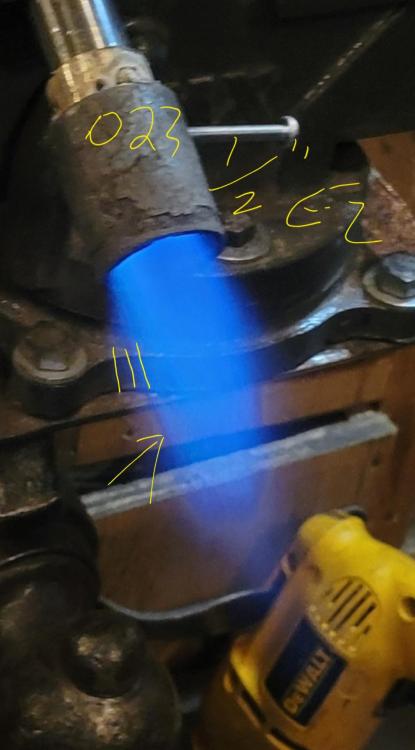
Hey all been awhile, been dealing with stupid neck and back and SC pinches and and and way wah issues so I haven't even kept up to date with these threads so please excuse my just jumping in with a quick question. I'm not ready to do up a stand alone post but this is a slight twist on the ol' RR ez burner. I'm feeling this is a fairly decent flame, if dimmed the exposure so the colors are the same as what my eye sees. I've built several burners and had a thumbs up on the glame/burn/combustion I'm getting however I haven't seen this thin almost neon blue line. It's not just the photo or a filter, it started to appear as I adjusted the mixing tube and over hang of the nozzle. Am I right is this decent combustion, is the thin neonblue line a good sign or irrelevant. 1 1/2" - 3/4" bell reducer 3/4"-1/2" rigid conduit reducer bushing my slight twist 1/8 sch 80 fuel supply to the 0.023 mig contact tip 4"x1/2" mixing tube 1"x3/4" sch 20 spacer in a 3/4" merchant coupler (straight thread not pipe) for the nozzle. The rigid conduit has a smooth rolled lip the creates a slight restriction and sits right at the base of the bell or throat. I would like to hear thoughts on the science, I know laminar isn't always the goal but maybe this will encourage a smother faster vortex? It's like adding the rolled edge from a coffee carafe to the lip of a 2L pop bottle and then doing the child's cyclone experiment with colored water maybe?

-
Not saying you need it but here's a blow by blow I put together last year.
-
Hey J, 165 deg steak on those tongs they were my first projects as well, you can't do nothin if you can't hold that hot metal. 5hrs is just fine! When I forge tongs they are usually from 3/4 to get the meat in the boss buuuuut I haven't got to welding reins so I spend the most time drawing and symetrisizing the reins. Having the reins flex different than one another tends to torque out the nibs/jaws and you fight to keep things inline especially if you get them a bit warm. The knife speaks to me, at first glance it seems odd to have the tang come that far out but on second glance it is quite elegant and I bet that would fit nice when you choke up on it for slicing and dicing (in the kitchen) Maybe it's an Asian pattern..... I like it no matter what
-
Those links are straight to the pdf downloads so if you click on it don't be surprised if it starts downloading
-
It appears that I left out half of the thought. That's exactly what I was trying to say aparantly I stopped halfway through the thought.... It's brought up here often so I wasn't surprised when he tried discourag me. The more a person learns about the stuff that makes up the refractory and how to read the data sheets the easier it is to start seeking out new products. There's this pdf floating around Google from Morgan Thermal Ceramics called the refractory handbook or something. It has the data sheets for all their products and has them categorized by type as well as good descriptions at the beginning of each line of product's explain their properties and applications. I don't know if I am allowed to post the web link to it though. If it needs to be edit out I'll gladly do it. https://www.google.com/url?sa=t&source=web&rct=j&url=https://www.mha-net.org/docs/Harbison%20Walker%202005%20Handbook.pdf&ved=2ahUKEwjRm-qjlpXxAhUQu54KHU6pDZ8QFjACegQIEhAC&usg=AOvVaw080BetQ2ggzPyE1nth4YeM That is a HarbisonWalker pdf I just found, I haven't had a chance to read it but it looks informative. Hopefully these li k's to get me in trouble https://www.google.com/url?sa=t&source=web&rct=j&url=https://www.morganthermalceramics.com/media/7699/morgan-advanced-materials_thermal-ceramics-product-data-book-e-version_2.pdf&ved=2ahUKEwj838Hgl5XxAhWPxZ4KHe0KDKQQFjAAegQIHRAC&usg=AOvVaw16kGQxha_xxZAZj6K6oYHz
-
Well JM that is impressive like is often discussed here the rep I talked to in the past about unicast swore it would not hold up in less than 3" pours. I figured it should work the same as mizzou for a hot face because they're quite similar but I would not have expected a 1.5" brick to hold up to a drop like that, I've split 1.5" clipper dropping it before. 10 min warm up ain't bad, it looked like you have it fairly thick in there. I do have a container of ITC 100HT, it's finally come down in price $70cad at princess auto. I also have a bag of zirconia flour to play around with and compare. Thanks for taking the time for the review ☺ What you describe with the flame dancing on the floor is how a couple of my forge burner combos work, once the interior starts to flow the flame slowly gets closer and closer to the flame port. One forge in particular I don't use a flare or nozzle just the mixing tube into the 2" port, there's enough pressure that when hot the flame is literally at the edge of the port basically leaving a cold black spot inside where the burner port is. Hard to take a pic of that.
-
Hmmm equally important is to read the entirety of something if you want to learn, Doh. Thanks pnut
-
Oh me oh my I do like the idea of these, what a simple way to add independent control with less bits than adding multiple basic needle valves. Tapping the out I get but do you modify the in? The one in this pic is m10*1 in and out do you cut new threads on the in side for 1/4" plumbing or are you using an adapter? Thanks for this tip Mikey

-
Juicemiser, 1 month down the road, do you have any updates? I just ordered a bag of this Uni-Cast 2800 as well and wondering if there's anything you'd do different next time? When it comes to the flame..... It's a "Frosty Tee" I tend to get thrashy tips to the flames like that and the extra orange in the exhaust flames could be from the calcium burning off the refractory (iirc). I do believe there is some tuning to do, the greeny blue flame = fuel rich this is also supported by the excess blue in the exhaust flames. I assume by now you have figured this out in other posts, if not then we need more pics and specs of the burner.... Frosty is obviously the one that knows best on his flames Great thinking with the inflate-A-form I've been thinking of doing something similar but with spray foam if I ship one.
-
Wow that went sideways! It took me awhile to figure out how to source material over in BC. What search terms to use what to look for in products that have a different name etc. Now I know that if you can get ahold if a guy in one of the shipping warehouses they can usually hook you up with something. Just like that unicast. If all I could get was the unicast I'd just go with it. It will armour your wool you just got to make a bit hotter of a burner etc. Tge last random stuff I grabbed was called kalakast adtech at or something..... 60 percent alumina dense castable but has a bit of agragate. Anyway so far so good, it just doesn't heat up like the kast-o-lite. FWIW
-
Since covid refractory suppliers are getting shorted as a lot of the product comes from the US. Search for PSH pottery supply house they sell k2600 HS "high strength" I haven't used them. This company also sells high alumina kiln shelves as well as Bentonite and zircopax I have not attempted a wash yet though. Keep in mind when you look at the k2600 in cad it's like 12 bucks with conversion you aren't too much more expensive than US. span widgpan widgetC
-
No ya I remembered incorrectly I had remembered you had said something about them but got speed stuck in my head instead flow and resistance. So I remembered something that you didn't say. Ya now see I put this together for Facebookers though, you are thinking about it so this is like Frosty's 3/4"x8 not Mikey's 7/8"x9 (I've seen them go back and forth over that) Ratios for different sized burners correct. EZ burner .75x2 = 1.5 so 1 1/2" to 3/4". My 3/4 Mikey has 3 openings 1/2"x1"x3 gives me 1 1/2" total opening. Same goes for the orifice depth, I thought it was Mikey a few years ago that said it was .5 x the id of mix tube or it was 3/8" above the throat which is give or take that .5xid. All the burners I have had success with tend to use this depth.
-
I never thought about it in this way but said that way I get a good visual, like if it was water instead of air it would swirl just like a toilet. I had envisioned it like two waves slamming straight at each other and tumbling down the mixing tube side by side but nature doesn't work like that. Something has to give and once it does it continues towards the path of least resistance in this case that is chasing it's self down the mixing tube.......... At least that's what my brain thinks it's seeing I haven't tried contemplating volume yet, I love math but I am not good at figuring out what I am trying I am trying to calculate. I reference the surface area of the intake's opening/mouth but I am guessing I am saying this wrong. That reference is just based off the measurements taken off the main burners out there. You often see "that guy" with the 12" mixing tube with a 3/4"-1 1/4" reducer for a flare, 2"-1" reducer for the intake then 1"-3/4" bushing ("that's all the had") and then they have the orifice jammed into the throat and wonders why it's not working. If you tell this guy he needs to start over he ends up hooking a blow dryer to it and perpetuates the BS builds. If I throw numbers at him so he can pretend he's making I up as he goes, he basically ends up with something close enough to a real burner that he sticks with the craft and doesn't run around calling some blow dryer mash up a Frosty T.
-
Shall I call you Phil? You are right on the money, it's like you were standing over my shoulder watching me curse.